When you click on links to various merchants on this site and make a purchase, this can result in this site earning a commission. Affiliate programs and affiliations include, but are not limited to, the eBay Partner Network.
In my continuous pursuit of reducing the infamous fuel smell, I'm trying one last ditch effort... Replace the ongoing, used charcoal canister replacement, by breaking down and install a brand new Porsche unit. Before I go any further, please note that I have performed all the obvious (and not so obvious) checks and parts replacement over the years: Restored (replacement) fuel tank, fuel expansion tank found in the C pillar, all new fuel hoses, check valves, etc.. All helped but no silver bullet. I have to also mention that, long drives during hot days will result in substantial vacuum buildup within the fuel tank, hence no possibility of a cracked tank. I did purchase an aftermarket fuel cap and drilled a 3/32" hole to see if that would alleviate the back pressure, however; I have not yet had the opportunity to drive the car for an extended period of time under summer conditions yet.
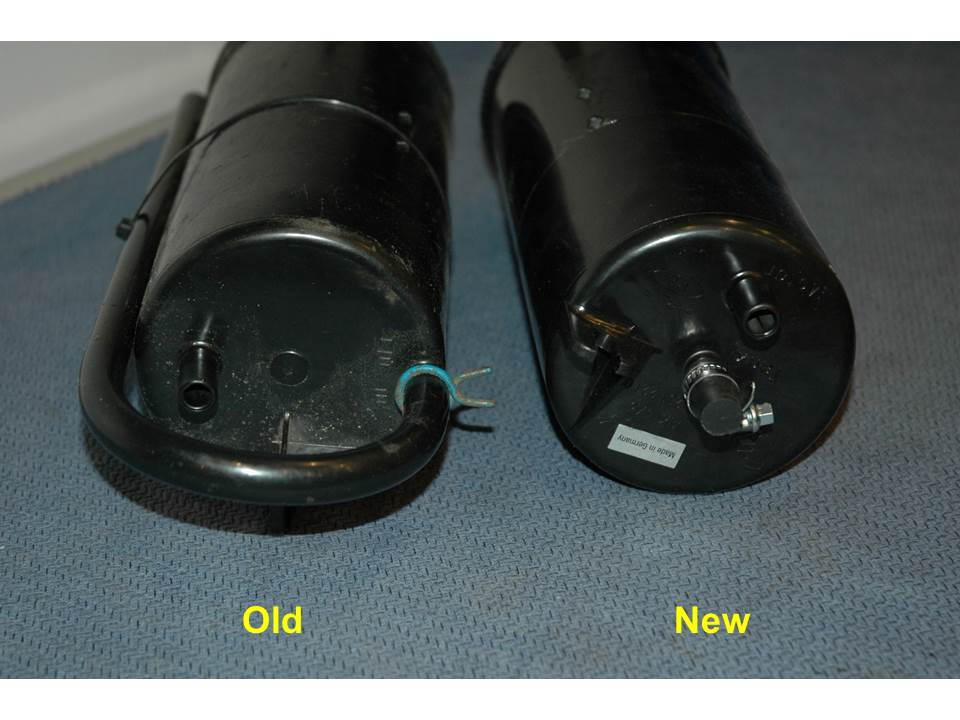
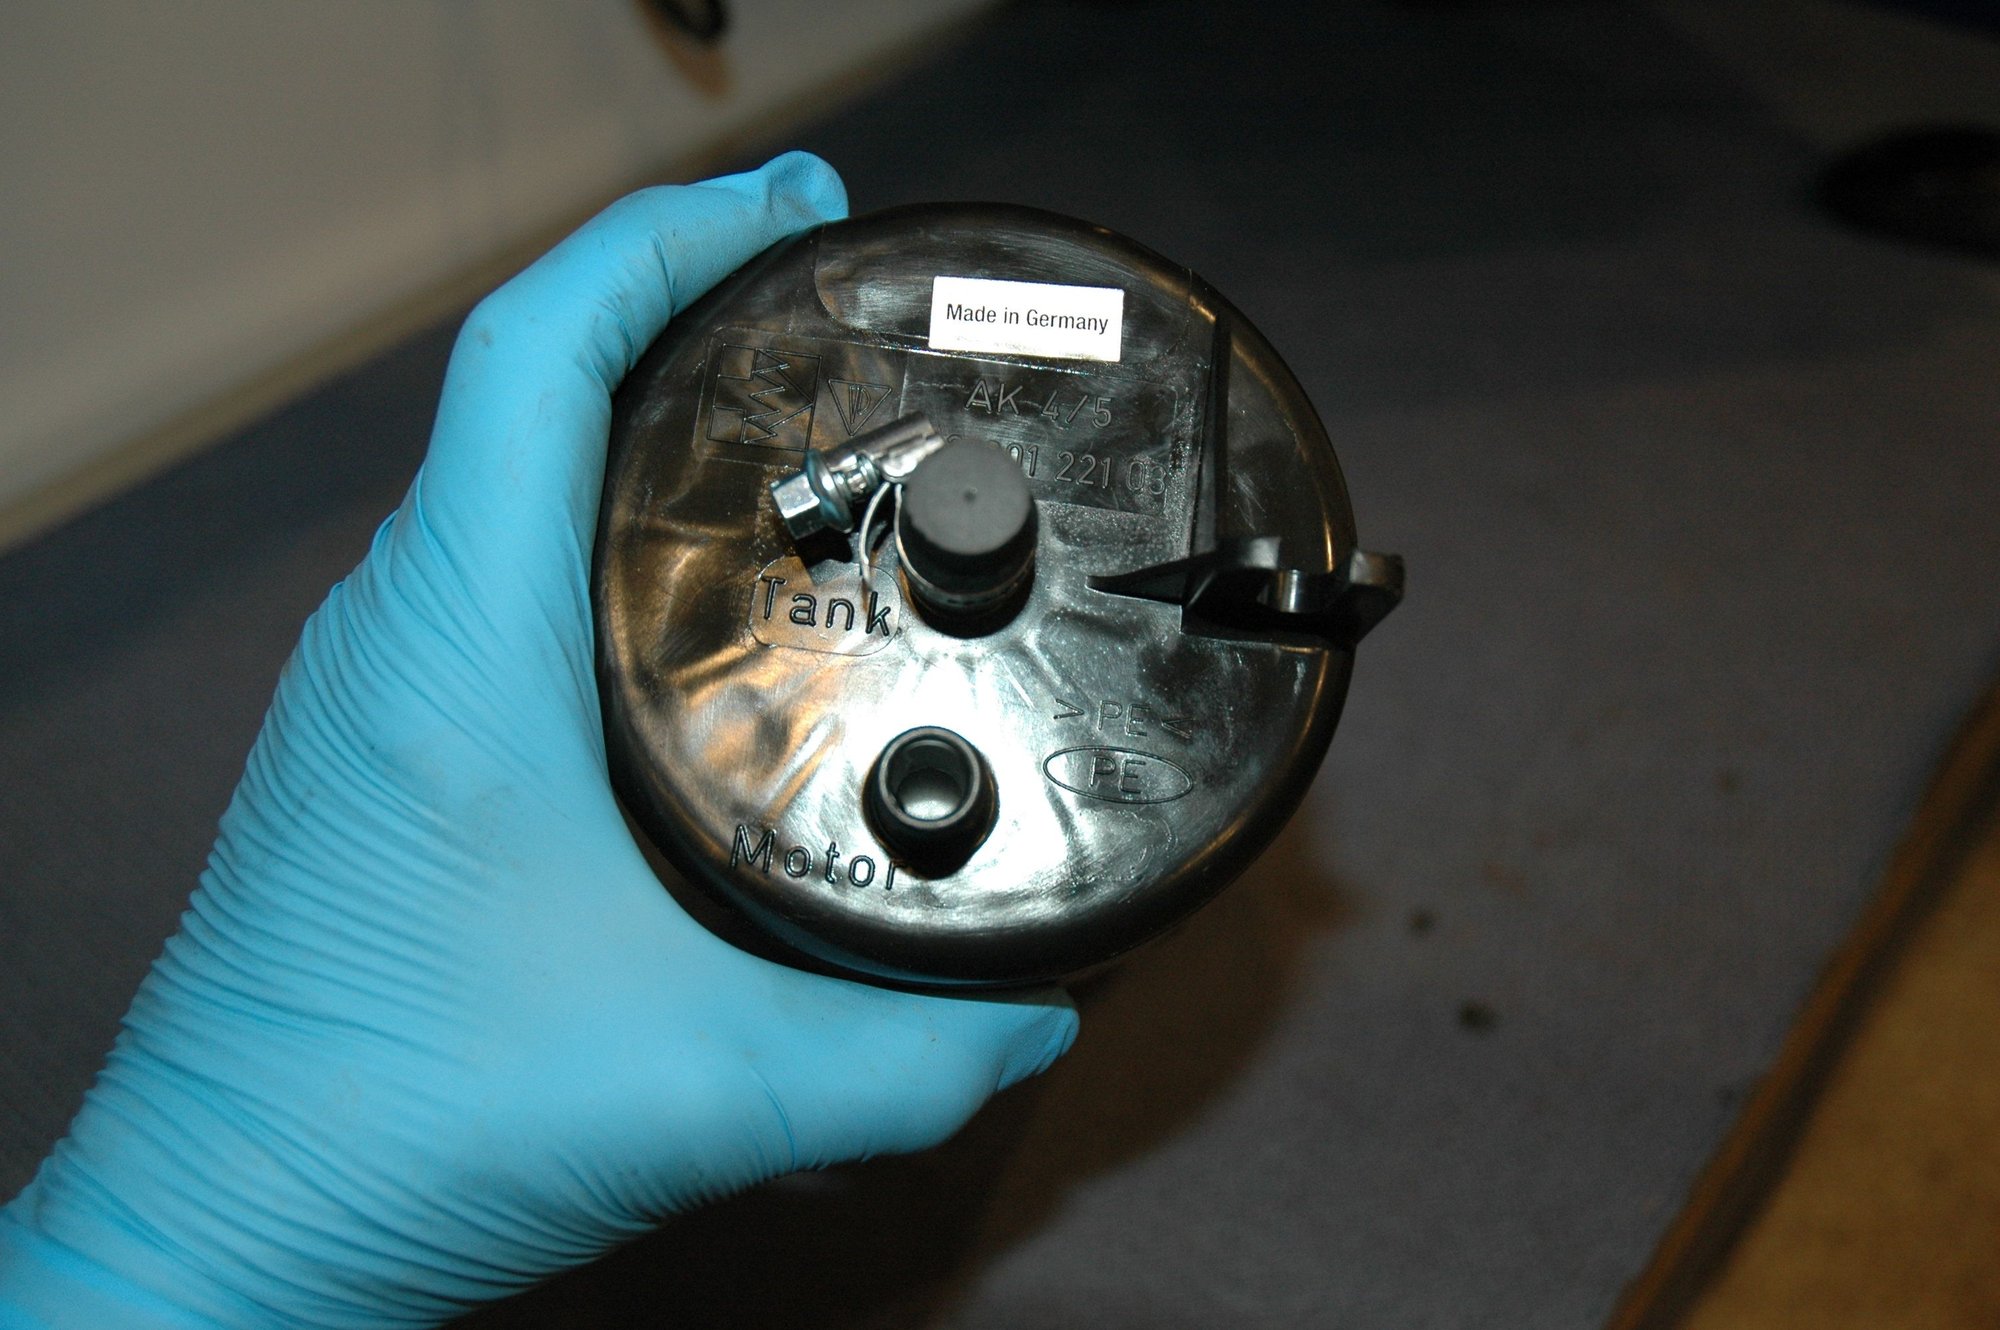
The original unit (Part #: 928-201-014-00) contains two ports (In and Out), while the new replacement canister (Part #: 993-201-221-03) has three ports (Tank, Motor, and an exhaust port found on the bottom). I have reached out to Porsche and they have no information of which top port (Motor or Tank) needs to be capped so I spoke with Steve Manfrie, of 944Online, and after a long discussion, we made the decision to cap off the Tank port prior to installation. I am looking for any verifiable data to confirm or refute our choice and welcome any and all (helpful please) commentary. Thanks!!
Bottom of both units, exhaust ventilation port found on the new unit.
I think a 3/32 hole in the gas cap may make your smell problem worse. It solves the problem of gas tank cracks on early cars, but at the cost of no longer containing the fumes... at all. I believe these cars heat up the fuel tank on long trips with engine waste heat (radiator heat) flowing under the car past the tank. The fuel heats up and the vapor pressure goes up accordingly. In the right hand C-pillar, there is a pressure relief valve (Porsche calls this the bleeder valve) rated at 2 PSI which is supposed to keep the vapors in the tank until the pressure exceeds that. It then vents the fumes into a running engine, or if the engine is stopped, through the canister, which is supposed to absorb them. If the fuel tank is warm enough so that the vapor pressure is higher, the fuel boils off, cooling the remaining fuel in the tank, until it cools enough to get down to 2 PSI above atmospheric pressure. With the drilled cap, fumes will escape directly (not through the canister) until the vapor pressure drops all the way to atmospheric pressure.
Also, with a freely venting cap, you will get fumes anytime the atmospheric pressure drops, or the temperature increases.
BTW, that is not a vacuum building up in your tank, it is the vapors building up to 2 PSI, which results in a large woooosh when you open the gas cap on a nearly empty tank. The tank is never under a vacuum as air can flow "backwards" through the charcoal canister and through the bleeder valve (0 PSI in reverse direction) to the tank.
Thanks for the explanation, much appreciated. However, I still think that negative pressure builds up in my system. I performed a smoke test while opening up the cap and the smoke actually rushed into the filler neck.. I realize this is a strange problem...
Looking at the diagram in PET for the new part, the exhaust port on the bottom flows back to the tank, motor port goes to the intake, and tank (obviously) is input line from the tank. So, if there isn't any way to hook up early car to the intake, the motor port would be the one to cap off.
Looking into this further, I have found a couple of things.
1) The PET for old and new cars seem to have the numbers reversed, with the old car calling for the new part, and the new cars calling for the old part.
2) The bleeder valve that is a part of the early cars is missing on the new cars. This presumably means it is now built into the canister.
Before installing the new canister, I would check the operation of the bleeder valve. It's a pain to get to behind the filler neck cover, but might be worth it. It could be defective, or it could have been drilled by a previous owner to prevent gas tank damage. An even better possibility is if it was installed backwards, which would perfectly fit both symptoms of vapor smell and tank vacuum.
Really appreciate the feedback! I did inspect the valve and it appeared to be in good operating condition. Unfortunately, Porsche only makes this new tank, which backdates to our early cars.
DSMBlue: Could you please post that diagram for me? Thanks!
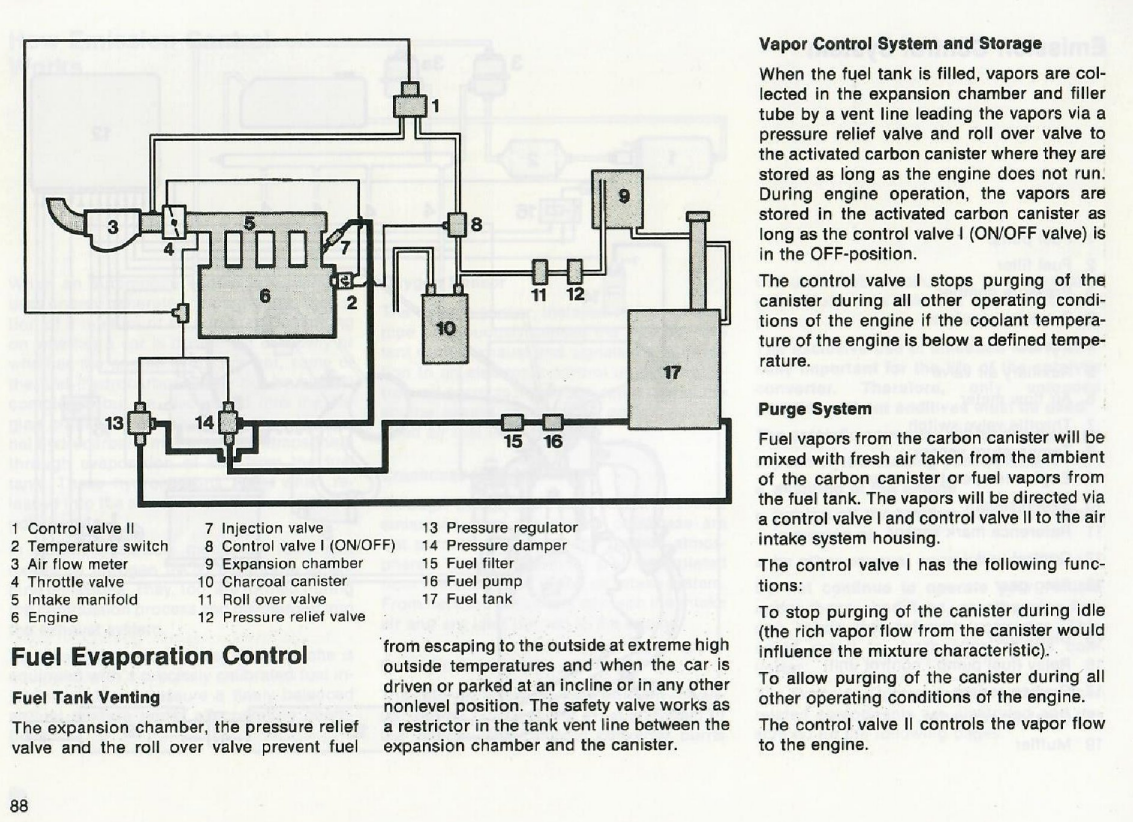
I agree that you should plug off the motor side, as that is where the bleeder valve would be on the new one, and you already have one (#12.) Here is the diagram from the owner's manual:
I'm going to take that back. With the motor one plugged with your thumb, blow through the tank one. Then do the reverse. Whichever way you can blow through to the exhaust port easily is the one you should use and cap off the other.
Am I reading correctly that when control valve I (#8) opens, fumes are sucked into the engine? And in your original setup, this line splits before the canister... but with the new one, the line "splits" inside the canister? I would imagine you should connect both Tank and Motor, simply installing new line so that both from the tank & to the intake are separate lines?
Sorry Dan, I'm not exactly sure what you mean regarding connecting both vent lines to the canister. The early cars had a split in the engine bay; there would be no way to run a 2nd hose to the canister without drilling another hole through the fender. Let me post a couple pictures tomorrow evening of the check valve/hose assembly that's found next to the booster so we can continue this conversation.
Patrick
That would be the motor port, which is why the tank port was capped...
I'm not sure if this will be at all helpful but, have you considered trying a used canister?
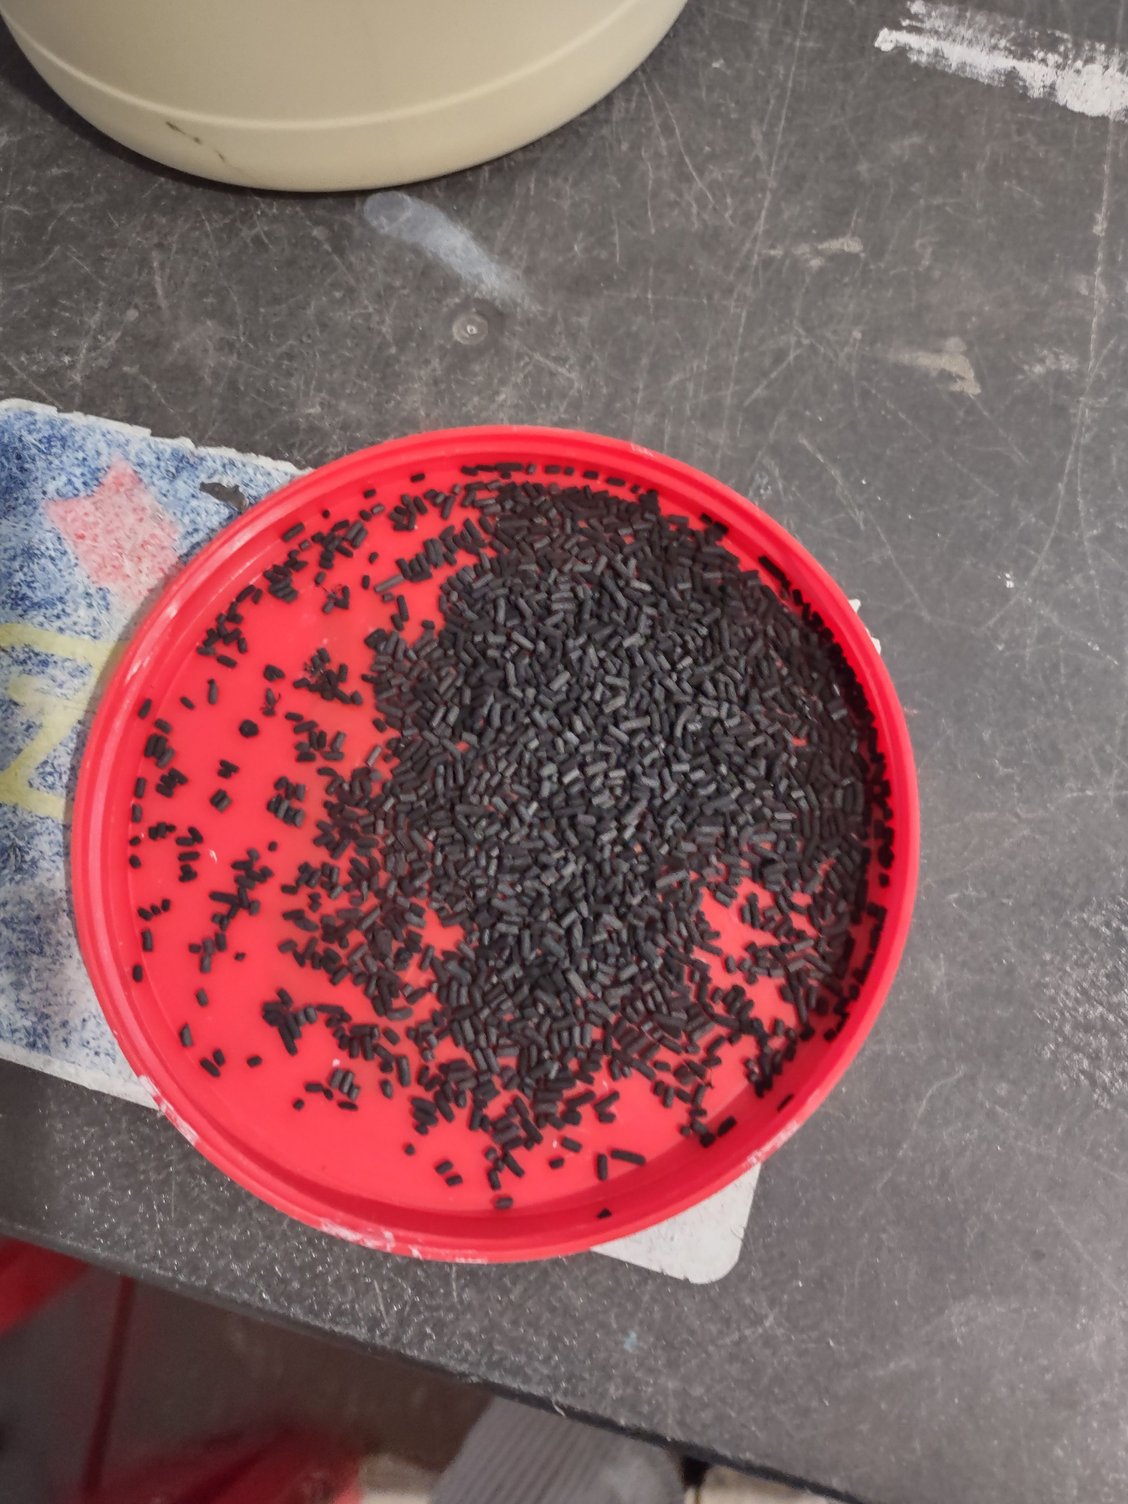
After reading in a vintage racing rule book that it was acceptable to remove such a part I set out to delete it from my '87 924s. Once out and curious about how it functions I cut the container open expecting to find some fuel-soaked carbon goo. Nope. Nothing at all. Only dry miniature pellets that I can only assume are as they were first included.
Really appreciate the feedback! I did inspect the valve and it appeared to be in good operating condition. Unfortunately, Porsche only makes this new tank, which backdates to our early cars.
DSMBlue: Could you please post that diagram for me? Thanks!
Looks like Porsche decided to poop out any excess fumes in the back of the car on the late late models. In Patrick's case, he would just leave the bottom open and use one hose on the freely flowing nipple on top as was originally done in his car.
Am I reading correctly that when control valve I (#8) opens, fumes are sucked into the engine? And in your original setup, this line splits before the canister... but with the new one, the line "splits" inside the canister? I would imagine you should connect both Tank and Motor, simply installing new line so that both from the tank & to the intake are separate lines?
Thermostat #2 makes sure the engine is warm before opening control valve #8. Control valve #1 opens when manifold vacuum is low, indicating not at idle. When both are open, a limited amount of air is pulled through the canister and into the intake manifold to flush the gasoline vapors stored in the charcoal.
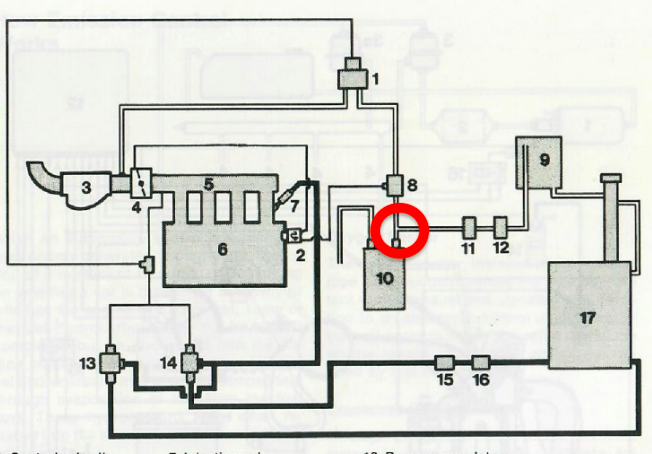
The pressure relief valve #12 is built into the canister itself. It's function is to close off the tank at a safe pressure so no additional vapors need to be captured.
Here's my concept for the late cars. Note the function is exactly the same, just the pressure relief valve has moved.

 06-20-2023, 11:41 PM