When you click on links to various merchants on this site and make a purchase, this can result in this site earning a commission. Affiliate programs and affiliations include, but are not limited to, the eBay Partner Network.
So I'll start this off by saying that I am no expert, but I recently had to remove my fuel rail and reseal my injectors twice because I did things wrong the first time. I didn't find a good write up anywhere on tips and tricks to properly reseal these injectors, so I wanted to make a small guide on how I had the most success. Hopefully someone will find it useful! People recommend just sending your injectors off to Witchhunter because they will clean and reseal them, which I have no issue with, but it just isn't feasible every time you have to pull the rail. And, for the low cost of a $16 reseal kit, you can do it yourself!
TOOLS
To remove the fuel rail, and the injectors, you will need the following tools:
Small blade flat-head screwdriver
10mm socket with extension, recommended U-Joint for socket as well for the back 2 bolts
10,11,12 mm open-end wrench (more on this later)
Small utility knife or razor blade
6mm socket (Again, more on this later)
Injector Reseal Kit - Either available from Rennbay or available from Autozone with the following part number: GP Sorensen Fuel Injector O-Ring 800-9281*
*NOTE: DO NOT GET THE GENERIC BOSCH SET! This is available on FCP Euro and a few other sites, but it will not seal properly. I had a fuel leak all over the intake after I was done. At best, you may experience some rough running since the pintle may be obscured by the taller cap. At worst, the injectors won't seal and leak fuel all over. When in doubt, go with the BLUE caps!
PROCEDURE - Resealing the Injectors
I won't go into the full procedure of how to remove the fuel rail, as Clark's has a great guide here. However, I find that a large box-end wrench can be useful when removing the rail as a way of leverage. Typically, when removing the rail, after disconnecting everything, I stick a 22mm wrench wrapped in a shop rag (as to not damage or mar anything) flat between the Cam Tower and the Fuel Rail near injector 2. With my left hand, I hold the left end of the fuel rail, and with my right hand, I twist the 22mm so that the open end pushes against the rail. Having this leverage often helps pop the rail loose.
Another tip is to leave 3 of the 4 injectors clipped in, and unclip the 2nd or 3rd injector. Once the rail pops off, the gasoline in the rail will pour out of the hole with the unclipped injector. Easy enough to stick a cup underneath that hole as it drains so you don't end up spilling 2-3 oz of raw gasoline that the rail contains.
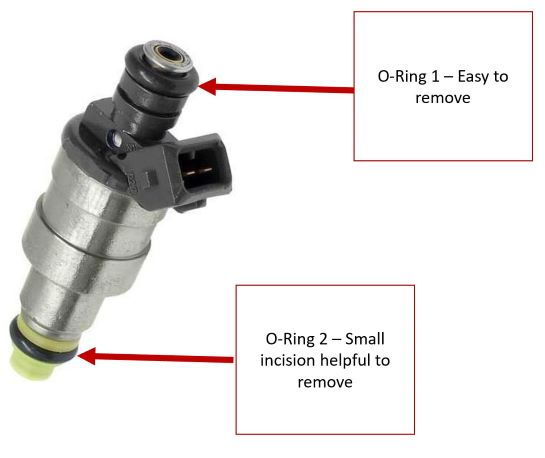
Now, in terms of sealing the injectors, first we have to un-seal them. This is where the wrenches and the razor come in. The top O-Ring is easy to remove, typically just place the flat-blade screwdriver under the O-ring and roll it off its groove. The second O-Ring is a little more difficult. I like removing this before the pintle cap. Take a small razor blade and make a shallow incision in the rubber. It don't make deep, just deep enough to get a bite on it with your screwdriver. Once the incision is made, you should be able to place your screwdriver on the cut and break off the O-ring off by applying pressure sideways, away from the metal. I would recommend mechanics gloves, because you run the risk of the screwdriver letting loose and stabbing you in the finger (ask me how I know).
So now, you only have the Pintle Cap and the collar left on the injector. This is where the wrenches come in. If your caps are old, they may be really brittle and break when you pull them out. If they are newer or they don't break and still have the "brim" of the cap on them, you should be able to use the open end of the wrenches to pry it off. First, take the 12mm wrench and place it in between the collar and the brim. Pry up on the brim with the wrench, resting it on the plastic collar to avoid metal-to-metal contact. In some case, the 12mm may be enough to pop the cap off, but in other cases it will just bend the brim. Keep moving down to the 11mm and then the 10mm, working slow to pry the cap off the injector. The reason to use the box-end wrench as the upward prying requires no additional stress on the metal that might be applied by a set of pliers. Instead, all the stress is just upwards on the plastic. When the cap finally pops off (and trust me, it will) there is no risk of damaging the pintle. After this, the collar will slide right off and you have a completely unsealed injector.
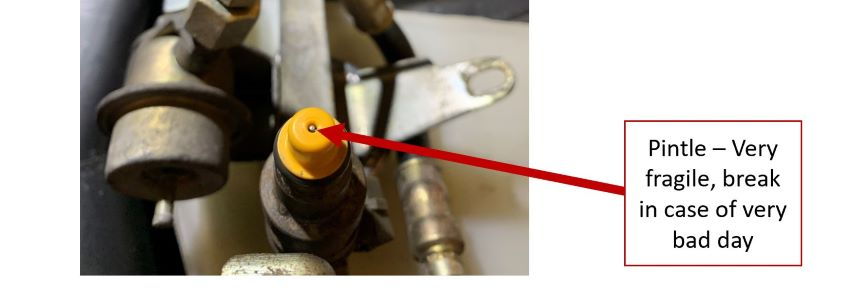
Now for the reseal - This is easily done but you want to very careful not to damage the pintle. Damaging the pintle is a sure-fire away to ruin your day. Install the top O-ring, then install the collar and the second O-Ring. Finally, you've got to put on the pintle cap. They have grooves that they sit in, but they also have a first groove that seems to catch the cap and get stuck. Some people opt for a rubber mallet or a hammer, but this risks damaging the pintle. Even just pushing down pintle can cause your finger to hurt it when it finally seats. However, grab your 6mm socket and place the 6mm end on top of the pintle cap, so the pintle can be seen through the socket. Hold the cap on with your thumb and squeeze down on the socket end like you're at the end of an action move and you have the detonator in your hand. The opening in the socket will prevent the pintle from being damaged, while cap will still get pressed down evenly and seat into the injector. The pintle tip will show slightly above the cap (somewhat shown below, but remember, Blue Caps, these yellow ones did not seat far enough and the injector leaked). Once the O-Rings seem "Squeezed" but not flattened by the caps, you are all set! You have successfully resealed your injectors! Put some ATF on all the O-rings before you put them back on the rail and into the manifold so everything slides into its place.
Hopefully this helps people in the future, and feel free to leave any comments, tips, or tricks that you have!
Thanks,
James

 03-17-2021, 08:54 PM