When you click on links to various merchants on this site and make a purchase, this can result in this site earning a commission. Affiliate programs and affiliations include, but are not limited to, the eBay Partner Network.
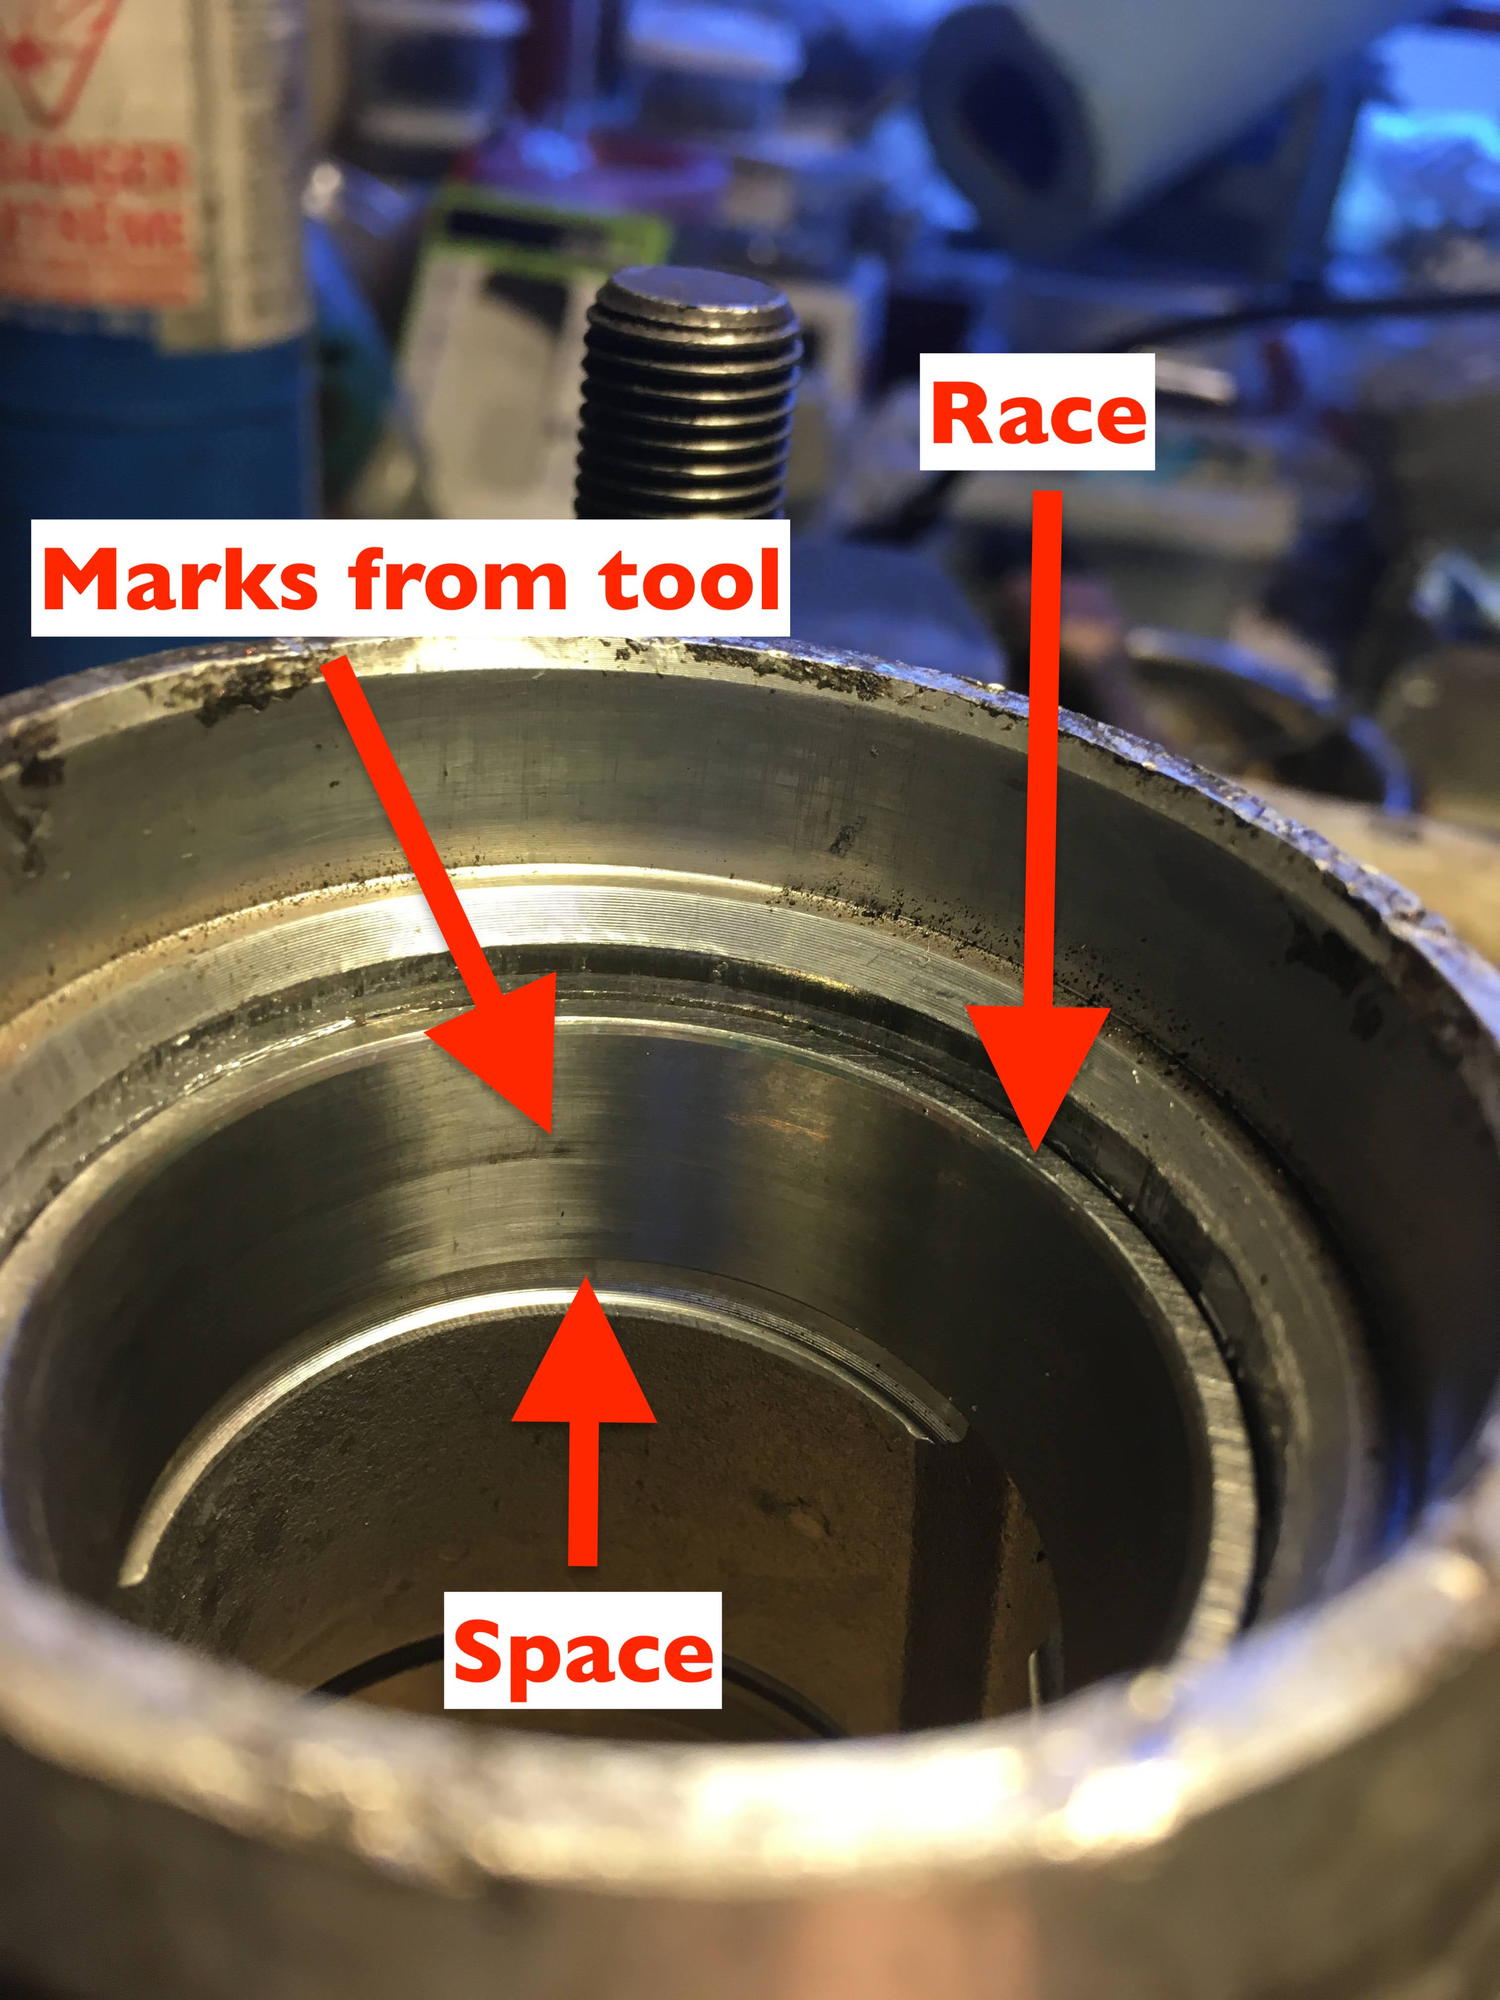
While installing new races into a spare hub--practicing so I don't have to pay someone to do this again--, I bought a bearing/race install kit. I heated the hub to the required 120+ C but this is as far as I could get it down. Is this the proper location? There is a little space still inside.. and, the tool appears to be too thick: it has been hitting the inside of the race. The race is tapered and the tool is straight so I'm not sure how this is supposed to work. It's a standard kit like those in the videos?
I always assumed that the driver is supposed to push against the edge of the race, not the inside. My guess is it's too big and it's getting stuck on the ledge of the casting above the edge of the race.
But either way I'm pretty sure that race needs to go all the way down. Watch Van's youtube video on this.
My install kit is 750 miles from where I sit. From memory, I believe the aluminum insert is tapered and did not leave marks on the ID of bearing race.
My procedure was heating the hub to 120C and placing the race in the freezer for 1 hr. Then I installed the race but my sledge hammer weight was was a lightweight and it took more hits at greater velocity to drive the race in with no gap. For the second race, I skipped the preheating, but chilled the race in the freezer. It took the same about of force to install.
Purchased a heavier sledge hammer, about 25 Kg.
The race cannot have a gap with the hub. It will move underlateral load, changing the preload on the bearings. One option is take ice cubes in a bag and just cool the race. The mass of the hub would limit its temperature drop during cooling of race to increase circumferencial clearance.
Last edited by T&T Racing; 01-07-2021 at 02:34 PM.
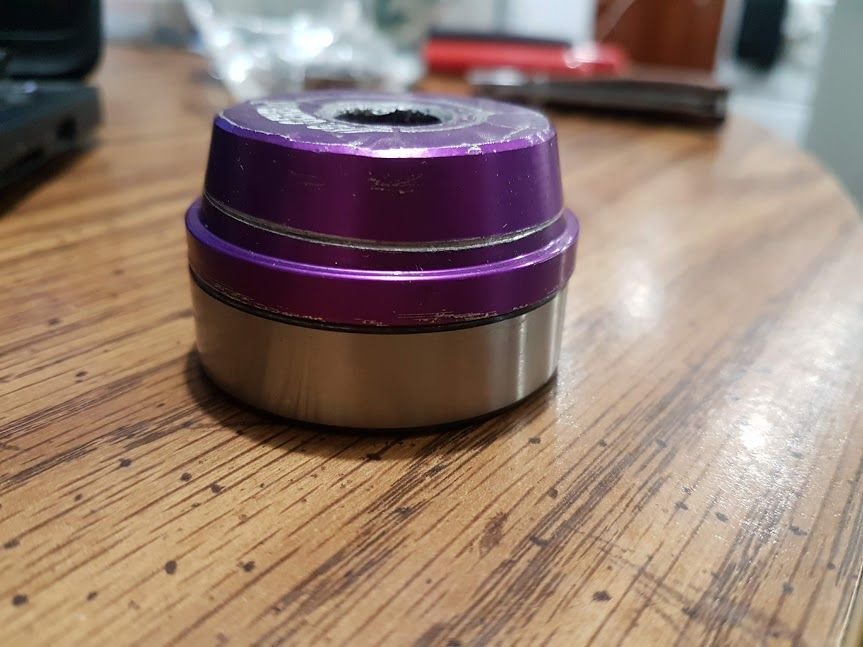
I just grabbed a spare bearing and the driver that I think I used to install mine. It looks like it would be a perfect fit with the wider side against the race:
Having said that, there's a pretty obvious witness mark on mine that proves I must have done it the same way you are doing it:
I don't remember now - maybe I gave up on doing it this way and flipped it around!
Oh I watched Van's video alright.. and as usual, he makes it look so easy His hammering is nowhere near as violent as mine and yet his races slide in pretty easy--plus it appears he doesn't heat the hub on install, only removal!
I test fitted the tools first and didn't notice any interference inside the race (they sat on top fine).. but.. is it possible that I "squished" the race or more likely the aluminum tool top with all that violent hitting? And yes, for sure I need a bigger hammer... or a press.
Something's up: either the races have gotten larger or there are inconsistencies with brands. These were SKF. Maybe I should try Timken the other easily available here?
Unfortunately, Van doesn't show the fit of the race inside.. nor does anyone that I can find. Guess I have to remove a hub from my car first (or take a picture before I started removing races )
EDIT: [IF THEY HAVE TO GO IN FURTHER] I'm going to re-heat the hub with a torch on the outside (around the race area--like I did when removing the old races which ironically came out easy) then use a bigger hammer and a flipped over tool.
Good luck to me
PS: If anyone has a spare hub with races can check if they indeed do rest right to that bottom edge, please let me know and save me from having to remove a hub from my daily driver which sits out in -5deg right now lol
Last edited by Dan Martinic; 01-07-2021 at 04:04 PM.
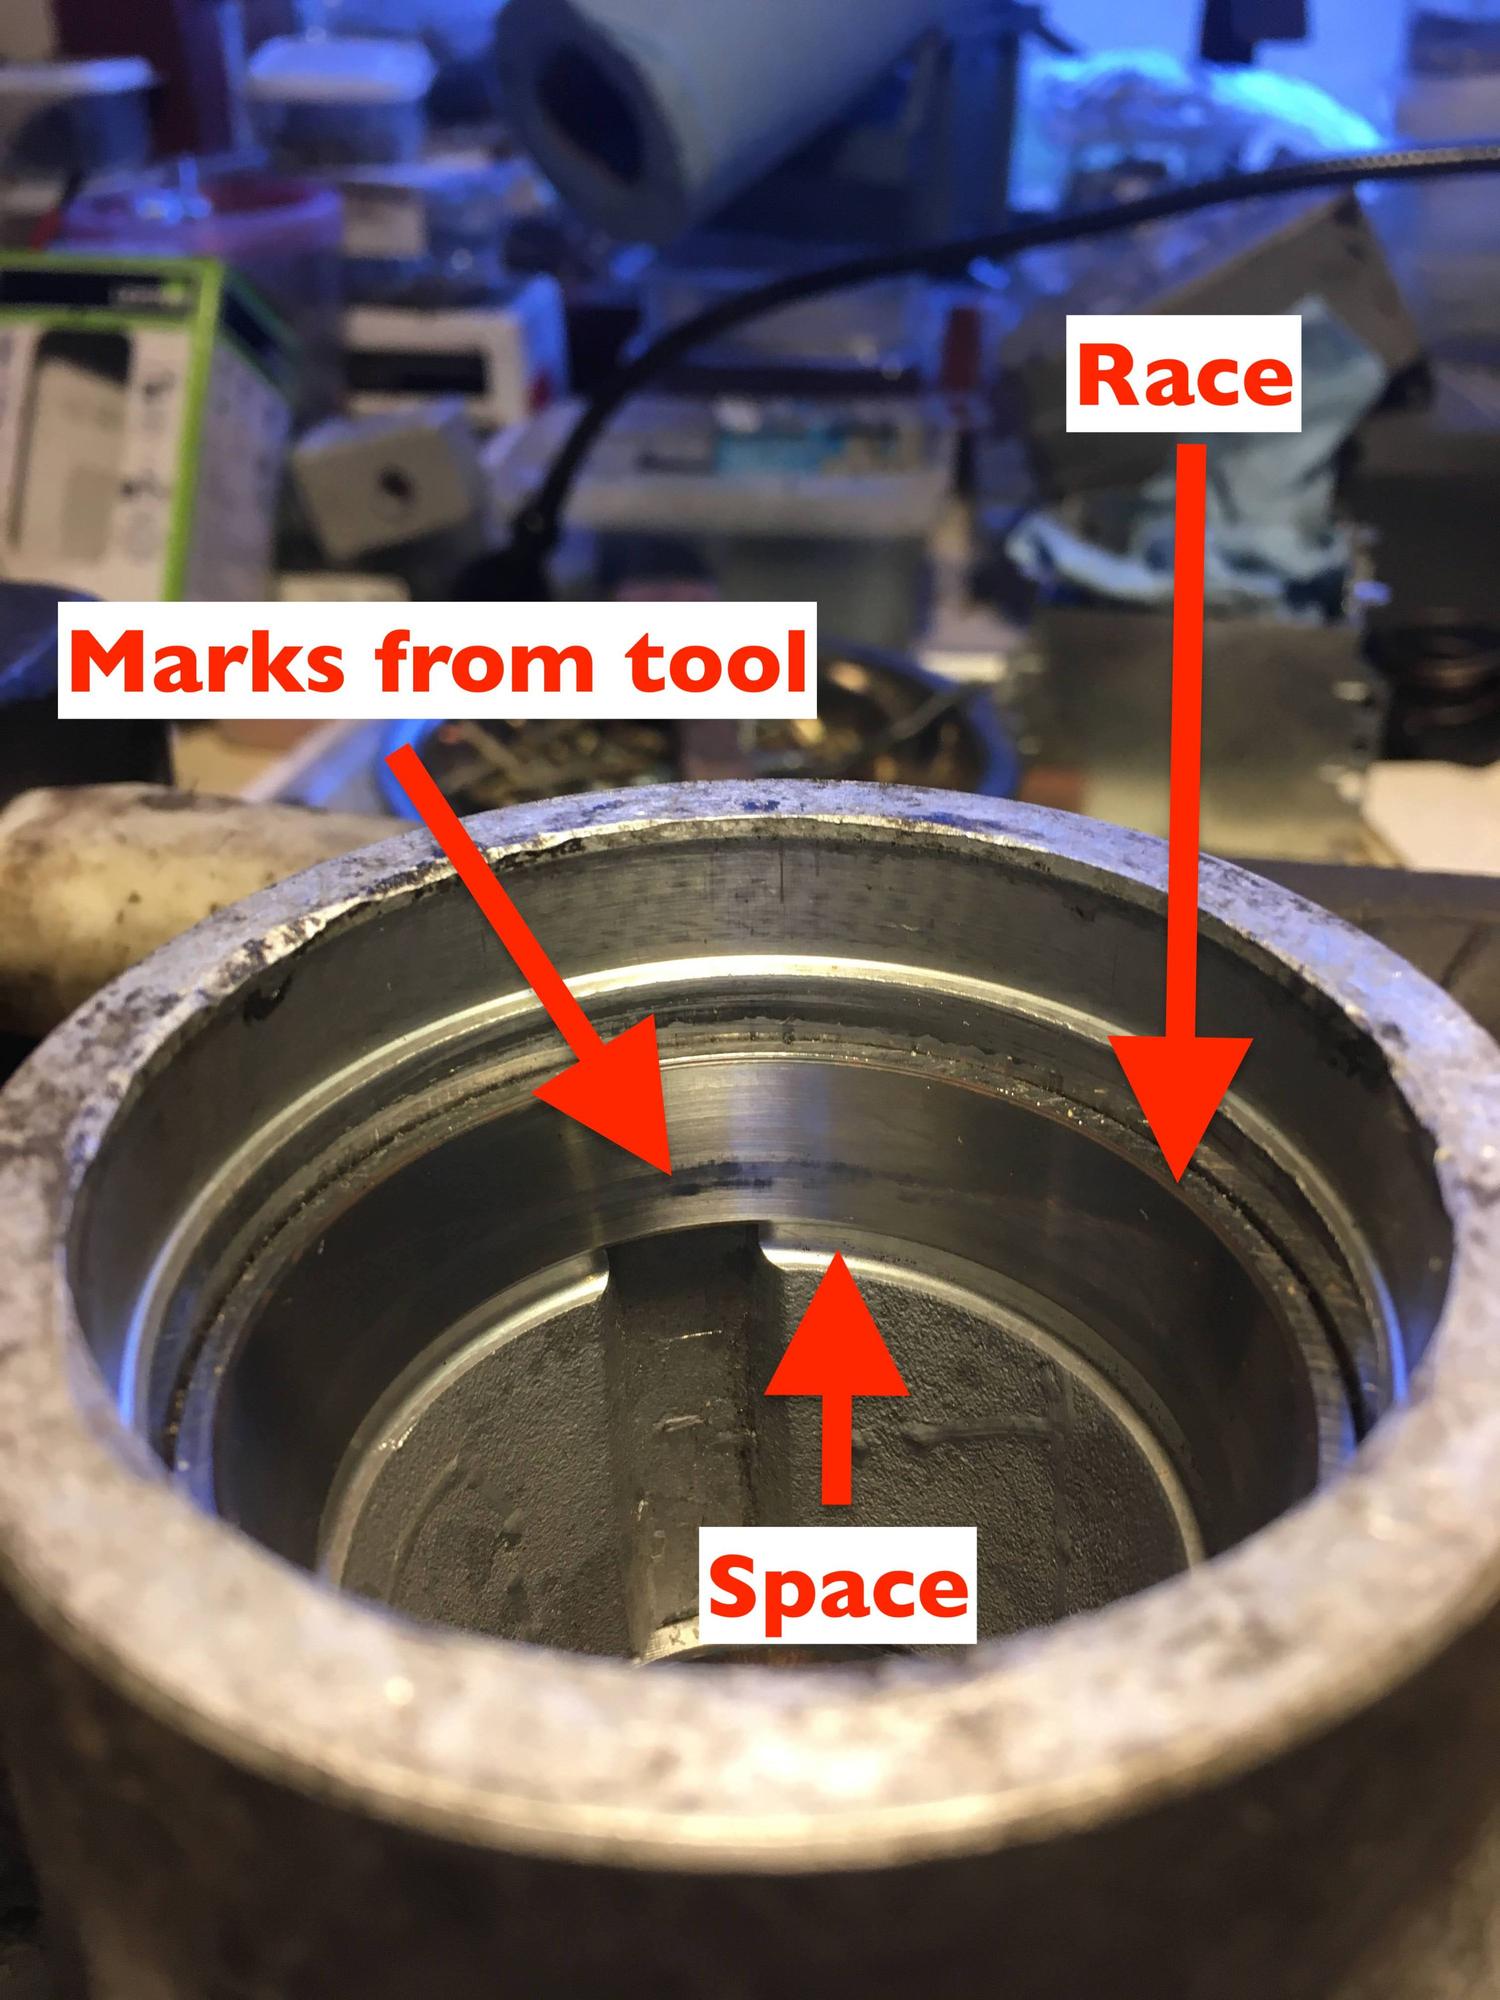
Jurgen provides some good pictures of the inside of the hub with race.. and it looks like there is indeed a space. How much of a space is a good question. When installing his races with his slick press system, he goes till it hits "the stop". Well, hammering away you really don't know if you've hit a "stop". Van hears and feels it.. but his races are smaller LOL!!
Jurgen's hub shot:
Last edited by Dan Martinic; 01-07-2021 at 03:50 PM.
Dan, does your install tool have have a center impact rod that is secured to the tool with a nut? The center rod becomes the impact point for the hammer.
Yes it's a standard race & bearing set with the handle. I'm really liking the way Jurgen does it using a threaded rod and what appears to be similar install tool pieces.. so I think I'll do that too. But.. I'd really like to know how far down the race goes. It appears it stops a little before the end of the bore
Yes it's a standard race & bearing set with the handle. I'm really liking the way Jurgen does it using a threaded rod and what appears to be similar install tool pieces.. so I think I'll do that too. But.. I'd really like to know how far down the race goes. It appears it stops a little before the end of the bore
Do you have a link to what this Jurgen guy is doing? I'm not familiar with him or his procedure. But I learned the hard way to be wary of trying to press bearings or bushings into things using a hardware store threaded rod. Let's just say, I now own an angle grinder
i spend about ten minutes on the bench grinder with the old race until it slides easily in the hub. tappy-tap until the tone changes if i am not around a press.
Guys, I was going to go this route some time ago. Took the hubs and races to a local shop. They dropped the hubs into a bath, heated them up, the old races dropped out, new races installed without the races being frozen. $20 USD. I insisted to pay them more, they said no, it literally took them a few minutes, most of the time was being heated and cleaned in the bath. Best part, my turbo S hubs were clean, undamaged by forcing things, and are perfect. Maybe there is a shop near you who can do the same thing?
Do you have a link to what this Jurgen guy is doing? I'm not familiar with him or his procedure. But I learned the hard way to be wary of trying to press bearings or bushings into things using a hardware store threaded rod. Let's just say, I now own an angle grinder
i spend about ten minutes on the bench grinder with the old race until it slides easily in the hub. tappy-tap until the tone changes if i am not around a press.
What I am missing with this grinder business? You grind the races smaller? How?

 01-07-2021 | 01:51 PM


 His hammering is nowhere near as violent as mine and yet his races slide in pretty easy--plus it appears he doesn't heat the hub on install, only removal!
 )
)


