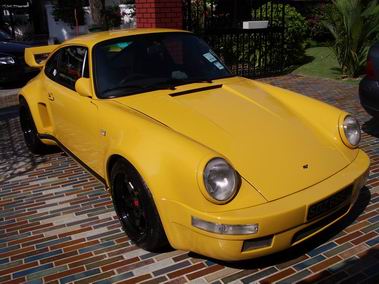
How-to: duck tail on a turbo
 11-24-2003, 05:31 PM
#16
Racer
Thread Starter
Join Date: Apr 2002
Location: 40th Anni. South OC, CA
Posts: 285
Likes: 0
Received 0 Likes
on
0 Posts
Thanks Sameer,
let's see, about those mods..
removed a/c
964 cams
Garret hybrid turbo from Vision
head studs
Late turbo exhaust
valves, special v-springs, guides, head gasket mod, porting by Andial
Andial performed all twin plug modifications
M+W ignition
Sachs light sport clutch/plate/tob
short shift kit
plastic rear and rear quarter windows
One-off (by me) side view mirror
bilstein re-valved coil overs front and rear
935 type ball joint suspension front and rear
modified Mazda oil cooler in front air dam
late? turbo intercooler (same size different matrix)
One off rear panel between tail lights
934 rear flares
RSR front and rear bumpers
RSR magnesium wheels and centerlock hubs
I guess that's it (probably forgetting something)
Cheers, Paul
 11-25-2003, 11:04 AM
#18
Instructor
Join Date: Jun 2001
Location: Bothell, WA
Posts: 167
Likes: 0
Received 0 Likes
on
0 Posts
Where's the wheel tray that goes along with the bicycle fork mount, or do you just let it roll along behind the car?
I guess you could just be using the mount as a trainer, that's some real inspiration, trying to keep up with your car huh?
I guess you could just be using the mount as a trainer, that's some real inspiration, trying to keep up with your car huh?
11-25-2003, 12:59 PM
#19
Racer
Thread Starter
Join Date: Apr 2002
Location: 40th Anni. South OC, CA
Posts: 285
Likes: 0
Received 0 Likes
on
0 Posts
I made the rear panel myself and welded it in after cutting out the stock reflector panel. Feuling is stock CIS and boost is conservativly set at stock due to the 91 octane fuel here in California.
Randy, the bracket on the back is for a trick carbon fiber/aluminum scooter I built. Will send you some pictures as I cant seem to reduce jpeg file size with my computer here at work. To post pictures, I have to send them out to a buddy and he sends them back after he reduces them.
Cheers, Paul
Randy, the bracket on the back is for a trick carbon fiber/aluminum scooter I built. Will send you some pictures as I cant seem to reduce jpeg file size with my computer here at work. To post pictures, I have to send them out to a buddy and he sends them back after he reduces them.
Cheers, Paul
11-27-2003, 12:54 AM
#21
Burning Brakes

Originally posted by p.vanderlinden
I made the rear panel myself and welded it in after cutting out the stock reflector panel. Feuling is stock CIS and boost is conservativly set at stock due to the 91 octane fuel here in California.
I made the rear panel myself and welded it in after cutting out the stock reflector panel. Feuling is stock CIS and boost is conservativly set at stock due to the 91 octane fuel here in California.
11-27-2003, 01:46 PM
#22
Addict
Rennlist Member
Rennlist Member
Join Date: Jan 2003
Location: Rancho Santa Margarita, California
Posts: 378
Likes: 0
Received 0 Likes
on
0 Posts
Paul, what did you do to detail your fan/housing. It looks very sharp. I just bought a new fan and the factory finish just looks awful!

 11-28-2003, 06:05 PM
#24
Racer
Thread Starter
Join Date: Apr 2002
Location: 40th Anni. South OC, CA
Posts: 285
Likes: 0
Received 0 Likes
on
0 Posts
pig4bill,
Actually Andial owed me for a project I had helped them with, so the twin plug/porting/valves/springs/guides were part of the fee. I just wanted a little extra insurance with the motor because of the crappy gas we get in Southern California (oxygenated 91 octane). The car has never been on the track because I really cant afford any engine (or crash) problems.
socalmike,
I used to be in the resto business (and have won Pebble Beach, etc..). I found the best way to make aluminum look fresh is to lightly bead blast the part and then brush it gently with one of those small stainless steel tooth brush type brushes and a 3M scotchbrite pad using WD 40 as a lubricant. The trick is to go real easy and work the dirt/oil out of the pores/nooks and crannys without leaving brush marks. this gives aluminum that "as cast" look. After all that, put the part some place where it's warm and spray more WD40 on it. Let soak for few hours, wipe off and repeat a couple more times. It's a PITA but the results are worth it, the parts always end up with a nice honest look and not overworked/polished/painted. By the way, to make aluminum look like magnesium, have part "hard anodized" to .002 thickness. This has been known to fool the best concourse judges.
Cheers, Paul
11-28-2003, 11:08 PM
#25
Addict
Rennlist Member
Rennlist Member
Join Date: Jan 2003
Location: Rancho Santa Margarita, California
Posts: 378
Likes: 0
Received 0 Likes
on
0 Posts
Thanks Paul, how tough is it to keep it looking good like that. My car is a daily driver, so I had considered going with Powder.
01-05-2005, 01:52 PM
#27
4th Gear

Join Date: Mar 2002
Location: uk
Posts: 4
Likes: 0
Received 0 Likes
on
0 Posts
great car Paul-one of my top five! its that 'animal' look-and them rims.......mental. What sort of power are you getting? Im looking at the same intercooler/ducktail issues with my 73 RSR project but id like to run a bigger intercooler. would I just need to remove a wider opening for wider intercooler? thanks,
Andy, UK
Andy, UK
01-06-2005, 01:45 AM
#29
Addict
Rennlist Member
Rennlist Member
Join Date: Jan 2003
Location: Rancho Santa Margarita, California
Posts: 378
Likes: 0
Received 0 Likes
on
0 Posts
Hey Andy, Paul sold his car and moved on to another project(A Cheetah replica I believe). I see his car and new owner often at local PCA/So Cal runs. Next time I run into him I will try to get an email address for you and perhaps he knows how to reach Paul.