
Installing Longer Rear Wheel Studs
 07-27-2013, 10:26 PM
#1
Addict
Thread Starter
This post has been edited to reflect the wisdom found on the board:
Pictures speak to me much louder than words do so I've made a bit of a pictorial for installing longer than stock lug studs.
I was under the impression that I had to remove the hub to swap studs. Not so....if you are pressing in 66mm. Anything longer and there is no way they will go in without removing the hub.
 Rusnak assured me that wasn't the case.
Steve Weiner. You are also a stud. Get it? Stud. 
Put the rear end up on jacks in neutral without the parking brake.
Remove the wheel.
Remove the brake caliper and the line clip and rest it on the trailing arm. Do not disconnect lines.
Remove the rotor. Don't forget the screws
Remove the adjustment screw and spring on the rearward side of the parking brake shoes.
Back out the backing plate center screw until it is flush with the trailing arm.
Line up your first stud with where the adjustment screw was removed and where the backing plate screw was poking through.
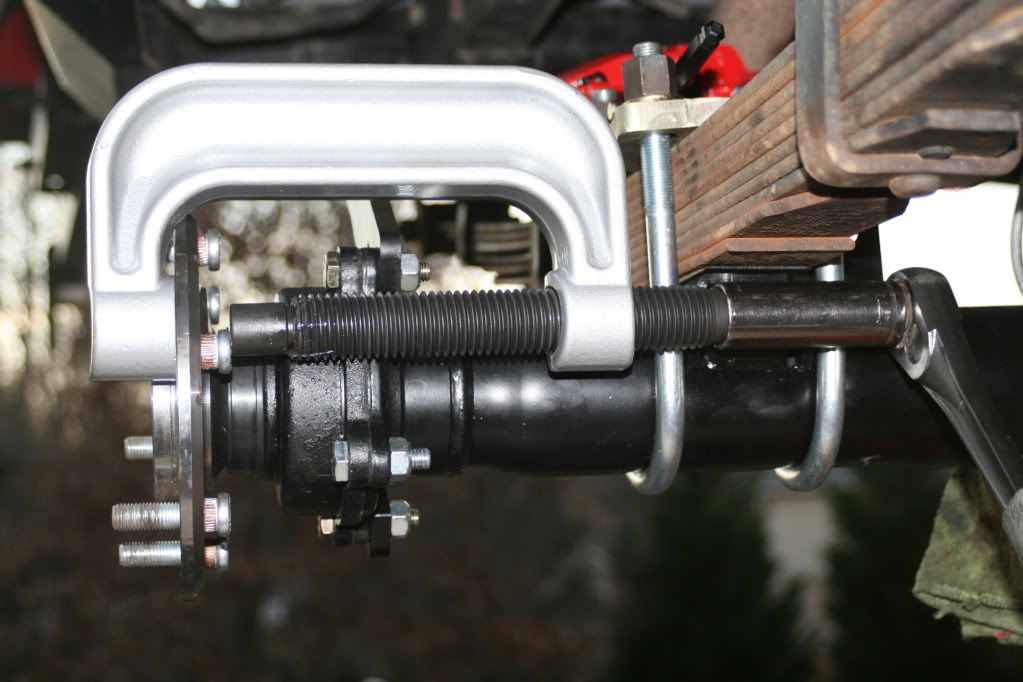
Use the $20.00 Harbor Freight Ball Joint Press pictured bellow or face setting off an international firestorm if you so much as mention a BFH.
Grease up you new stud and slide it in from the back. It will just fit between the backing plate and the hub IF you are good at wiggling.
Find yourself a spacer and a lug nut. I used an old nut from my Honda's half shafts. Any old castle nut that is larger in diameter than the studs will do. You will also find a tool from Lisle listed below that retails for about $42 that can be used to make this part of the job a bit easier.
Install and tighten down a through or open ended lug nut. Crank it down until the stud is cinched down good and tight. I mean really tight like you are applying more torque than you would be when you are putting your wheels on. This will require you to put a junker pry or in my case the dogleg box wrench shown in post 19 that looks like it is just hanging there. It is actually touching the floor and keeping the hub from turning.
Back off the lug nut and you've got it.
Turn your axle and do it again four more times.
Put your brakes back together.
 Take a break.....and get to work on the other side. Very quick work.
Pictures speak to me much louder than words do so I've made a bit of a pictorial for installing longer than stock lug studs.
I was under the impression that I had to remove the hub to swap studs. Not so....if you are pressing in 66mm. Anything longer and there is no way they will go in without removing the hub.
Rusnak assured me that wasn't the case. Steve Weiner. You are also a stud. Get it? Stud. Put the rear end up on jacks in neutral without the parking brake.
Remove the wheel.
Remove the brake caliper and the line clip and rest it on the trailing arm. Do not disconnect lines.
Remove the rotor. Don't forget the screws
Remove the adjustment screw and spring on the rearward side of the parking brake shoes.
Back out the backing plate center screw until it is flush with the trailing arm.
Line up your first stud with where the adjustment screw was removed and where the backing plate screw was poking through.
Use the $20.00 Harbor Freight Ball Joint Press pictured bellow or face setting off an international firestorm if you so much as mention a BFH.
Grease up you new stud and slide it in from the back. It will just fit between the backing plate and the hub IF you are good at wiggling.
Find yourself a spacer and a lug nut. I used an old nut from my Honda's half shafts. Any old castle nut that is larger in diameter than the studs will do. You will also find a tool from Lisle listed below that retails for about $42 that can be used to make this part of the job a bit easier.
Install and tighten down a through or open ended lug nut. Crank it down until the stud is cinched down good and tight. I mean really tight like you are applying more torque than you would be when you are putting your wheels on. This will require you to put a junker pry or in my case the dogleg box wrench shown in post 19 that looks like it is just hanging there. It is actually touching the floor and keeping the hub from turning.
Back off the lug nut and you've got it.
Turn your axle and do it again four more times.
Put your brakes back together.
Take a break.....and get to work on the other side. Very quick work.
Last edited by Amber Gramps; 07-30-2013 at 02:08 AM.
 07-27-2013, 11:33 PM
#2
Team Owner
Doug what is the objective here ?
are you trying to run a spacer without and adapter so you are using original lugs ?
if so I might do this is I have 7s all around and i was thinking of a 12mm spacer out back to give the illusion of eights. if i did that i would want longer studs obviously ...
are you trying to run a spacer without and adapter so you are using original lugs ?
if so I might do this is I have 7s all around and i was thinking of a 12mm spacer out back to give the illusion of eights. if i did that i would want longer studs obviously ...
07-28-2013, 12:05 AM
#3
Racer
Nice work. I've been thinking of going this route as I really like how the longer stud looks with yellow zinc open nuts. My DIY talent is limited to simple replacement of interior or exterior body panels only. I was thinking doing 72mm but the 66mm pictured above looks perfect.
07-28-2013, 12:44 AM
#4
Addict
Thread Starter
Clive, I'm looking at 12mm or 15mm spacers to go with the open black steel nuts I got with the lugs. Just couldn't convince myself to go yellow zinc, though I know where to get them and have wanted them badly. I got the studs and the nuts from site sponsor www.schnellautosports.com just six blocks from my house. Lemon cusses like a sailor, but is turning out to be a great source.
I've given in to the temptations of alterations and have long-term plans to go full retro. Gonna go with a duck tail, center reflector delete, R tail lights, and will someday even mount my bumperette delete rear bumper. Also thinking of going with no rear skirt and doing a triple outlet with the spare muffler I picked up from a fellow lister. I'm a nut, I know.
I've given in to the temptations of alterations and have long-term plans to go full retro. Gonna go with a duck tail, center reflector delete, R tail lights, and will someday even mount my bumperette delete rear bumper. Also thinking of going with no rear skirt and doing a triple outlet with the spare muffler I picked up from a fellow lister. I'm a nut, I know.
07-28-2013, 11:41 AM
#5
Burning Brakes
I need to do this as well, as I am currently running bolt on 12 mm spacers in the rear. But I have a couple pf questions.
66mm is max with this method? What is the length of stock? Obviously I need to gain at least 12mm.
How do you keep the hup from turning when torqueing down the new bolts with out the parking brake? I don't have a LSD?
66mm is max with this method? What is the length of stock? Obviously I need to gain at least 12mm.
How do you keep the hup from turning when torqueing down the new bolts with out the parking brake? I don't have a LSD?
07-28-2013, 12:12 PM
#6
Addict
Thread Starter
I need to do this as well, as I am currently running bolt on 12 mm spacers in the rear. But I have a couple pf questions.
66mm is max with this method? What is the length of stock? Obviously I need to gain at least 12mm.
How do you keep the hup from turning when torqueing down the new bolts with out the parking brake? I don't have a LSD?
66mm is max with this method? What is the length of stock? Obviously I need to gain at least 12mm.
How do you keep the hup from turning when torqueing down the new bolts with out the parking brake? I don't have a LSD?
I'll take a photo later today of the cheater bar in the studs. It makes it obvious why we only do one stud at at time.
 07-28-2013, 08:12 PM
#7
RL Technical Advisor
I'd just like to add that using a BFH doesn't extend the life of the wheel bearings.
While I make a living selling parts and services to people, I take no pleasure in selling things to folks who suffered premature failures due to "human factors"; in other words, self-inflicted damage.
I know people use BFH's for many things that include this task, however I'd strongly recommend doing this the right way and extracting the stub axles to use a press on those studs.
Naturally,..JMHO.
Trending Topics
07-28-2013, 09:43 PM
#8
Team Owner
Steve if you remove those stub axles aren't you in for a wheel bearing anyway? Or can they be removed with the bearing intact?
Sib, those are my questions exactly. If 45 is stock and we need 12 more it stands to reason we need about 57 in order go not risk bottoming the oem nut without the wheel being tight.
Doug do you know if these are available in about a 57?
Sib, those are my questions exactly. If 45 is stock and we need 12 more it stands to reason we need about 57 in order go not risk bottoming the oem nut without the wheel being tight.
Doug do you know if these are available in about a 57?
07-28-2013, 11:45 PM
#9
I haddah Google dat
Rennlist Member
Rennlist Member
Removing the hub will take the bearing inner race with it. The bearings are easy to replace once you've done a few and have all the right tools. However, for a first timer, its the project from Hell.
07-29-2013, 12:29 AM
#10
Rennlist Member
A- I'm not sure that guy is still a sponsor.
B- Be careful, but I guess wheel studs are a safe purchase.
B- Be careful, but I guess wheel studs are a safe purchase.
Clive, I'm looking at 12mm or 15mm spacers to go with the open black steel nuts I got with the lugs. Just couldn't convince myself to go yellow zinc, though I know where to get them and have wanted them badly. I got the studs and the nuts from site sponsor www.schnellautosports.com just six blocks from my house. Lemon cusses like a sailor, but is turning out to be a great source.
I've given in to the temptations of alterations and have long-term plans to go full retro. Gonna go with a duck tail, center reflector delete, R tail lights, and will someday even mount my bumperette delete rear bumper. Also thinking of going with no rear skirt and doing a triple outlet with the spare muffler I picked up from a fellow lister. I'm a nut, I know.
I've given in to the temptations of alterations and have long-term plans to go full retro. Gonna go with a duck tail, center reflector delete, R tail lights, and will someday even mount my bumperette delete rear bumper. Also thinking of going with no rear skirt and doing a triple outlet with the spare muffler I picked up from a fellow lister. I'm a nut, I know.
07-29-2013, 12:47 AM
#11
Addict
Thread Starter
I believe there is a 55mm length sold by most of our sponsors. There are lots of various lengths when you start looking around on ebay. They are 14mm X 1.5 threads.
Steve, you are correct that there is always a better way to do things than the way that I do things...It's a given.....I just don't have $120/hour to pay out in this lifetime. Like when I wanted a wheel alignment and 911Design wanted $500. Ppff Right. I'll stick with my Longacre plates.
Steve can you walk us through getting the stub axle out without destroying the inner bearing race? Everything I found points to what Russell is saying above.
......and sorry I didn't get any more pictures taken, we are awaiting my son's two year mission call so we are spending every minute together as a family that we can.
Ed, I did my homework on Lem, on the internet and in person. I was quite point blank with him.
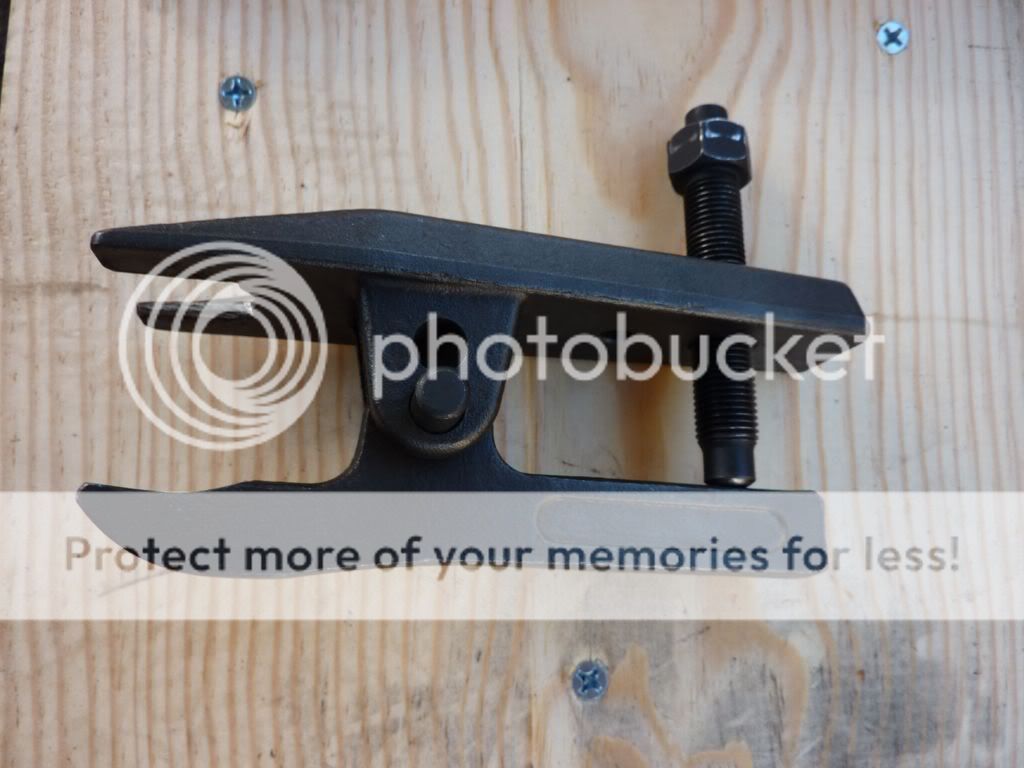
Here is a stud press that works like a ball joint press:
This one is like some of our site sponsors sell:
Steve, you are correct that there is always a better way to do things than the way that I do things...It's a given.....I just don't have $120/hour to pay out in this lifetime. Like when I wanted a wheel alignment and 911Design wanted $500. Ppff
Right. I'll stick with my Longacre plates.Steve can you walk us through getting the stub axle out without destroying the inner bearing race? Everything I found points to what Russell is saying above.
......and sorry I didn't get any more pictures taken, we are awaiting my son's two year mission call so we are spending every minute together as a family that we can.
Ed, I did my homework on Lem, on the internet and in person. I was quite point blank with him.
Here is a stud press that works like a ball joint press:
This one is like some of our site sponsors sell:
07-29-2013, 01:25 AM
#12
Addict
Thread Starter
It just dawned on me that I own an OEM brand/Pep Boys ball joint presses that is exactly like the one in their loaner tool program. Only problem is that I left it in St Lucia last month when I took new ball joints for my old truck.  Even left one of my grandfather's Craftsman ratchets.
http://www.pepboys.com/parts/tools/

Seems to me that is the outer armature will fit between the flange and the backing plate this loaner tool will do the job of pressing out the old stun sans the BFH. What do you think?
Even left one of my grandfather's Craftsman ratchets. http://www.pepboys.com/parts/tools/
Seems to me that is the outer armature will fit between the flange and the backing plate this loaner tool will do the job of pressing out the old stun sans the BFH. What do you think?
07-29-2013, 02:58 AM
#13
Addict
Thread Starter
I should have taken this as a sign.
I have a Snap-On L872 3/4" ratchet with a 36" breaker bar on it. (Pawn shop find) Not thinking of the torque numbers I put my 3/4 x 1/2 impact grade reducer on it, then a 5" x 1/2" S-K extension (so far everything came with the ratchet so I figured I was good), then my 36mm Craftsman socket, placed it on the axle, bounced my 250# gut on the end of it and snapped that extension off before I knew what hit me.
Turns out my wheel flairs aren't that big after all and I didn't need the extension.
07-29-2013, 09:04 AM
#14
Pro
Join Date: Jun 2006
Posts: 633
Likes: 0
Received 0 Likes
on
0 Posts
Use these simple and cheap hand tools to avoid bashing the rear hub with a hammer.
1. To remove existing studs....
Harbor Freight ball joint removal tool (need to file a small amount at fork end to pass over head of stud for clearance - easy modification)
2. To install 66mm new studs....
Lisle Wheel Stud Thrust Bearing No. 22800 to pull new 66mm studs back into hub.
Use grease liberally on friction points of tools, and take your time.
You don't need to use a hammer to bash out wheel studs. Dumb idea.
Last edited by sig_a; 05-29-2014 at 06:43 PM.
07-29-2013, 01:12 PM
#15
I haddah Google dat
Rennlist Member
Rennlist Member
Well now, hold on there Sig.
First of all, Steve W. has already said (with more tact) that he disagreed with the BFH. You're sort of late to the party with that sanctimonious wisdom.
Second, Doug was seriously about to pull his hub so that he can press the old studs out when I cautioned him about getting the diameters of the press right on all four procedures to remove and install the hub and bearing. His plan was to press the studs out the right way, on a floor press. I told him that he's opening a can of worms and walking into what could be a lot more work. It's common to ruin one good bearing the first time a person replaces a rear bearing.
Third, if the balljoint El Cheapo Harbor Freight tool manages to not warp the hub, then it's only because the studs are not pressed that tightly into the hub in the first place, which is what most people find to their surprise when they tap the old studs out for the first time with a BFH. Honestly, those studs are not stuck in there like Excalibur or something.
Fourth, the right way to press the studs out is what we all know to be the correct way: Remove the hub, press the studs out with a hydraulic press, and press new ones in same way. Support the entire face of the hub the entire time, not just a precious half inch or so using a balljoint removal tool. This will mean removing the axles, pulling the hub, removing the bearing inner race that is stuck to the hub, then pressing the hub back into a fresh bearing. As I said, it's about an hour job at most per wheel. But if you've never replaced a rear wheel bearing before, then it can take an entire weekend. IMO, if the axle nut was torqued prior to hitting the studs with a BFH, then the hub will warp before the bearing becomes damaged. Since it only takes about a half dozen raps with a smallish hammer to get them out, I do not believe this to be a risk.