

New to Porsche.Just bought a 77 911 Coupe.
 08-03-2012, 09:36 PM
#31
Verrry nice 911. Welcome to RL.

 08-04-2012, 09:11 PM
#33
Intermediate
Thread Starter

Join Date: Jun 2012
Posts: 46
Likes: 0
Received 0 Likes
on
0 Posts
Got about an hour more of wiping down the engine and bay today. It's not glamorous, and the most important parts are missing (fan etc). However, I removed some of the black paint in the compartment and the lighter color undercoat is much brighter and cleaning looking.
Heavily considering an engine drop in the very near future to perform the maintenance and finish cleaning everything up.


No worries getting much wet. Most potential water problems will be non-issues. New distributor cap/ rotor, valve covers coming off new plugs and wires, etc...
Heavily considering an engine drop in the very near future to perform the maintenance and finish cleaning everything up.
No worries getting much wet. Most potential water problems will be non-issues. New distributor cap/ rotor, valve covers coming off new plugs and wires, etc...
08-04-2012, 11:40 PM
#34
Rennlist Member
Is the light color the same as the exterior? Porsche painted the bodies completely in a given color. If the carpets and drapes don't match, it's been repainted somewhere along the line.
08-05-2012, 01:21 AM
#35
Intermediate
Thread Starter
Join Date: Jun 2012
Posts: 46
Likes: 0
Received 0 Likes
on
0 Posts
I say all of this, and I'm also color deficient. Diagnosed. I know the car has been painted before. There's plenty of evidence all over of a poor job. The paint code on the car does match the color, though. No worries about a hidden color underneath.
What I'm really curious about is why there was black paint on top of the original paint. Did Porsche spray some sort of rust protectant on after the base?
08-05-2012, 01:56 AM
#36
Racer
Join Date: Apr 2012
Location: Phoenix
Posts: 391
Likes: 0
Received 0 Likes
on
0 Posts
A PO more than likely applied the black paint, my car was originally a metallic burgundy, I forget the porsche color code, but the PO ob-v spent some money on this paint job, because it takes a while before you can find the original color anywhere on the car!
08-11-2012, 12:12 AM
#37
Pro

Join Date: Jun 2001
Location: Peoples Republic of Long Beach, N.Y.
Posts: 556
Likes: 0
Received 1 Like
on
1 Post
great deal and a great little project without getting slammed for big bucks
check out your suspension bushings on torsion bars for sagging front and rear
new bushings are cheap and a DIY home wheel allignment and corner balance is very doable with the attitude you've shown so far. Total cost for all should be around $100 DIY. Total cost in a good Porsche repair shop could be $1,000 or more
if you shake the steering wheel quickly while remaining in your lane at around 60-80 mph the car should track like a go-cart
all the best
08-16-2012, 01:48 AM
#38
Intermediate
Thread Starter
Join Date: Jun 2012
Posts: 46
Likes: 0
Received 0 Likes
on
0 Posts
great deal and a great little project without getting slammed for big bucks
check out your suspension bushings on torsion bars for sagging front and rear
new bushings are cheap and a DIY home wheel allignment and corner balance is very doable with the attitude you've shown so far. Total cost for all should be around $100 DIY. Total cost in a good Porsche repair shop could be $1,000 or more
if you shake the steering wheel quickly while remaining in your lane at around 60-80 mph the car should track like a go-cart
all the best
check out your suspension bushings on torsion bars for sagging front and rear
new bushings are cheap and a DIY home wheel allignment and corner balance is very doable with the attitude you've shown so far. Total cost for all should be around $100 DIY. Total cost in a good Porsche repair shop could be $1,000 or more
if you shake the steering wheel quickly while remaining in your lane at around 60-80 mph the car should track like a go-cart
all the best
My immediate goals are to A) source a wallet-friendly new fan, and B) drop the engine to perform some maintenance, check for leaks, and clean the CRAP out of it.
08-16-2012, 04:27 AM
#39
Poseur
Rennlist Member
Rennlist Member
Ice Green Metallic. A very nice color for 1977. Originally, they came with a magnesium cased 2.7 liter engine that put out about 157 HP. Very crappy. One of the worst years for a 911. However, someone took the time to install a 3.0 liter engine in it (as evidenced by the red fiberglass engine shroud--2.7s have the green).
The VIN puzzles me a bit. I had a 77 coupe (US model) and that year for the USA market you could get only two different models--a Turbo Carrera (obviously not yours!) and the 911S. I took delivery of mine in early March 1977 in Zuffenhausen with a VIN of 9117201923. The '3' in the fifth place throws me off--I don't have my guide with me. Usually that place told you if it was a coupe or a targa. At any rate, yours was produced in very early 1977--probably early February.
The flares are definitely not stock for the 1977 cars, only arriving as standard in the 1978 and later cars.
For the issues that you are dealing with inside the turbo tail rubber trim (as well as the large bumperettes) you should disassemble all that stuff and try to get out as much of the rust you can and then seal it up with a good epoxy like JB weld. (I used a resin type product years ago). The problem with those rubber parts is that they are molded around a core of untreated steel. The bolts, for example, that hold on the bumperettes will be unplated and there will be voids in the molding. Unless you seal up the voids you will have a continuing problem with the rust issues. If you break down and buy new reproduction parts (like the bumperettes and the turbo tail rubber lip) you need to apply the same treatment to them as the aftermarket producers did as bad a job as the OEM suppliers did for Porsche AG.
Contact me any time for tips on things. These are terrific cars and are quite easy to work on yourself with a few simple tools like metric sockets and allen head drivers.
P.S. Spring for the oil fed chain tensioners. (I don't think yours has them from your photos). They will greatly improve your reliability and avoid costly issues in that area.
08-16-2012, 02:02 PM
#40
Intermediate
Thread Starter
Join Date: Jun 2012
Posts: 46
Likes: 0
Received 0 Likes
on
0 Posts
Here's what I can tell you about your car.
Ice Green Metallic. A very nice color for 1977. Originally, they came with a magnesium cased 2.7 liter engine that put out about 157 HP. Very crappy. One of the worst years for a 911. However, someone took the time to install a 3.0 liter engine in it (as evidenced by the red fiberglass engine shroud--2.7s have the green).
The VIN puzzles me a bit. I had a 77 coupe (US model) and that year for the USA market you could get only two different models--a Turbo Carrera (obviously not yours!) and the 911S. I took delivery of mine in early March 1977 in Zuffenhausen with a VIN of 9117201923. The '3' in the fifth place throws me off--I don't have my guide with me. Usually that place told you if it was a coupe or a targa. At any rate, yours was produced in very early 1977--probably early February.
The flares are definitely not stock for the 1977 cars, only arriving as standard in the 1978 and later cars.
For the issues that you are dealing with inside the turbo tail rubber trim (as well as the large bumperettes) you should disassemble all that stuff and try to get out as much of the rust you can and then seal it up with a good epoxy like JB weld. (I used a resin type product years ago). The problem with those rubber parts is that they are molded around a core of untreated steel. The bolts, for example, that hold on the bumperettes will be unplated and there will be voids in the molding. Unless you seal up the voids you will have a continuing problem with the rust issues. If you break down and buy new reproduction parts (like the bumperettes and the turbo tail rubber lip) you need to apply the same treatment to them as the aftermarket producers did as bad a job as the OEM suppliers did for Porsche AG.
Contact me any time for tips on things. These are terrific cars and are quite easy to work on yourself with a few simple tools like metric sockets and allen head drivers.
P.S. Spring for the oil fed chain tensioners. (I don't think yours has them from your photos). They will greatly improve your reliability and avoid costly issues in that area.
Hey Dan, thanks for the lesson. I've heard that the rear fenders may not be stock, and I'm still really curious who would have put them on. When the car eventually goes in for paint, I'll definitely be looking for a weld seam. That panel would have been one piece from the factory, assuming stock fenders, correct? At any rate, I could always use the magnet trick to check for body filler around that area.
I don't know if it was mentioned in this thread or over on Pelican, but apparently the VIN translates into a Japanese market vehicle. Kind of neat. Not sure how true that may be.
09-15-2012, 02:17 AM
#42
Intermediate
Thread Starter
Join Date: Jun 2012
Posts: 46
Likes: 0
Received 0 Likes
on
0 Posts
Just to update the thread:
I've refinished the fan and housing. I had a small chip in one of the blades about the size of my pinky nail. I took it to a very reputable Porsche shop in the area and the actually suggested filing/grinding the blades' tips evenly all the way around. I made up a simple cardboard template and did just that.
Here's the result:
Before:

After:
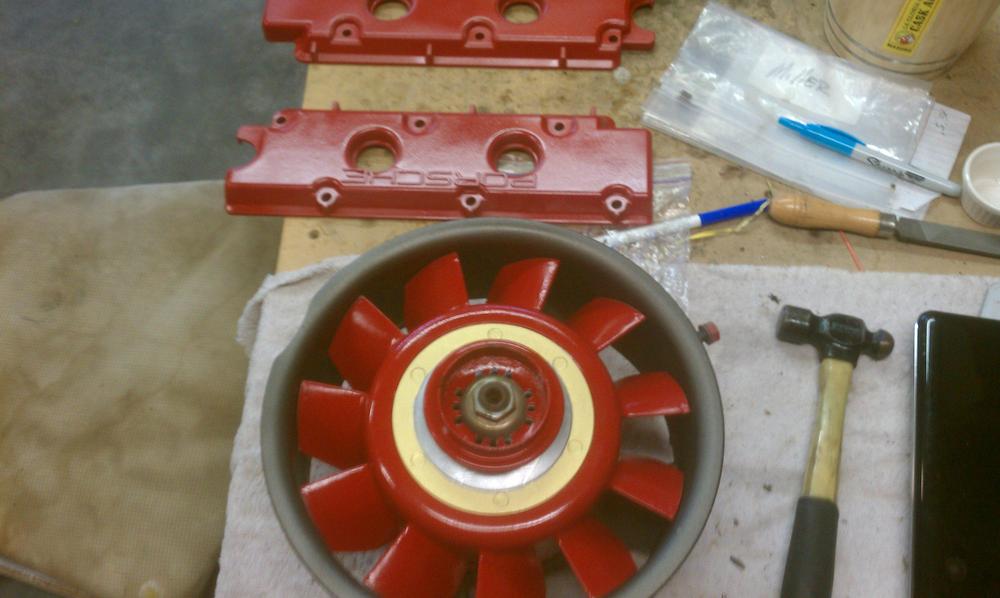
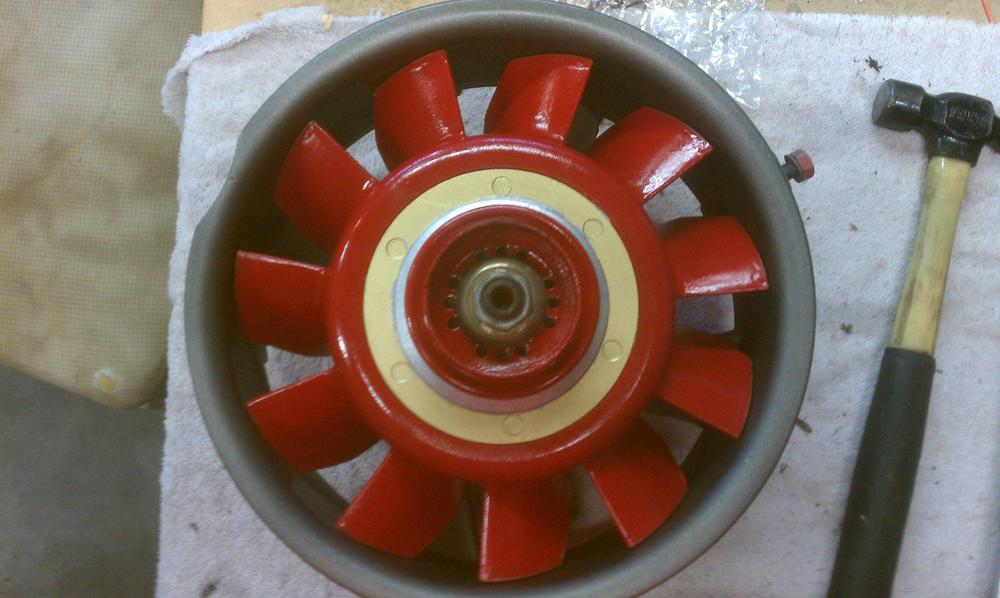
You can see my newly refinished upper valve covers in the first picture. These pictures were before any sanding or buffing. I'm not too keen on the way the valve covers came out with the engine paint, so when I drop the engine this Winter they will be going for powder coat with the lowers. Depending how the fan holds up, that may or may not be powder coated as well. We'll also have to see how the balance is with my newly reshaped fan tips.
I pulled the plugs and wires, and replaced the plugs tonight. Tomorrow I'm going back to my parents' to finish buttoning up the engine and hopefully finish my heater backdate and the car will be in driving condition again.
My problem though: in my haste and ignorance, I didn't take note of how the wires were situated on the distributor cap. I've found the firing order on the forums, but need to figure out how the new wires are arranged.
Any help with the above would be greatly appreciated.
I've refinished the fan and housing. I had a small chip in one of the blades about the size of my pinky nail. I took it to a very reputable Porsche shop in the area and the actually suggested filing/grinding the blades' tips evenly all the way around. I made up a simple cardboard template and did just that.
Here's the result:
Before:
After:
You can see my newly refinished upper valve covers in the first picture. These pictures were before any sanding or buffing. I'm not too keen on the way the valve covers came out with the engine paint, so when I drop the engine this Winter they will be going for powder coat with the lowers. Depending how the fan holds up, that may or may not be powder coated as well. We'll also have to see how the balance is with my newly reshaped fan tips.
I pulled the plugs and wires, and replaced the plugs tonight. Tomorrow I'm going back to my parents' to finish buttoning up the engine and hopefully finish my heater backdate and the car will be in driving condition again.
My problem though: in my haste and ignorance, I didn't take note of how the wires were situated on the distributor cap. I've found the firing order on the forums, but need to figure out how the new wires are arranged.
Any help with the above would be greatly appreciated.
