
Replacing "Rear Bumper Rubber" (now with PICS)
 05-29-2007, 11:07 AM
#1
Intermediate
Thread Starter

Join Date: Apr 2007
Location: Reston, VA
Posts: 41
Likes: 0
Received 0 Likes
on
0 Posts
How is the "Rear Bumper Rubber" attached? (the strip that runs between the rear bellows and the rear bumper guards)
It appears that my bumper shock bolts are rusted to hell, and they're actually pushing the rubber away.
I'll try to clean up the nuts/bolts on the bumper shock, but I guess it's cheap to replace the entire shock if necessary. Is there any other way to skin this cat? Can I drill out the existing bolts and replace them with some grade 8 stuff?
thx in advance
Last edited by NoVaGator; 05-30-2007 at 08:32 PM.
 05-29-2007, 11:42 AM
#2
Drifting
G'day,
I believe that the strip that runs between the rear bellows and the rear bumper guards is held on by a philips head screw near the bellows end. It is recessed in the rubber strip a bit. It should be clearly visible. Once that screw is out the strip should just slip out of it's slot in the bumper guard.
This was true for my 1974 targa.
Good luck.
05-29-2007, 12:48 PM
#3
Intermediate
Thread Starter
Join Date: Apr 2007
Location: Reston, VA
Posts: 41
Likes: 0
Received 0 Likes
on
0 Posts
ok, with a little more poking around I found it...sort of....
there's a little cover plug, but I couldn't find anything under the plug until I looked at the non-rusted side.
I'll post some pics later....
So now I have one end free, but the end by the bellows is still attached. I can feel the end of a screw or bolt on the inside of the bumper, but I can't see how to get it off
05-29-2007, 01:39 PM
#5

I pulled the front bumper guard off my '85. Screw on each end and clips in the center. As I recall the clips slide in the guard required to align with holes.
Actually I pulled the complete bumper off the shocks to paint it.
Hope this may help.
Actually I pulled the complete bumper off the shocks to paint it.
Hope this may help.
05-29-2007, 02:17 PM
#6
Intermediate
Thread Starter
Join Date: Apr 2007
Location: Reston, VA
Posts: 41
Likes: 0
Received 0 Likes
on
0 Posts
Originally Posted by sjanes
there are nuts on the inside of the bumper for the bolts at the bellows end.
thanks for the help...
I'll post some pics of the carnage later
05-30-2007, 08:33 PM
#7
Intermediate
Thread Starter
Join Date: Apr 2007
Location: Reston, VA
Posts: 41
Likes: 0
Received 0 Likes
on
0 Posts
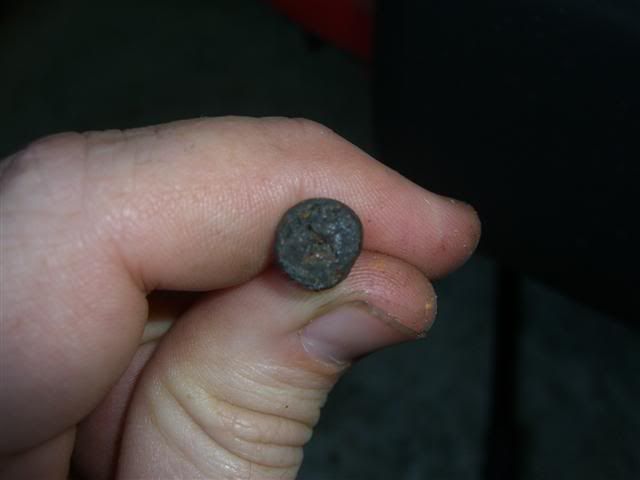
so here's why I couldn't find the screw under the cover plug:
(more like a nail than a screw!)
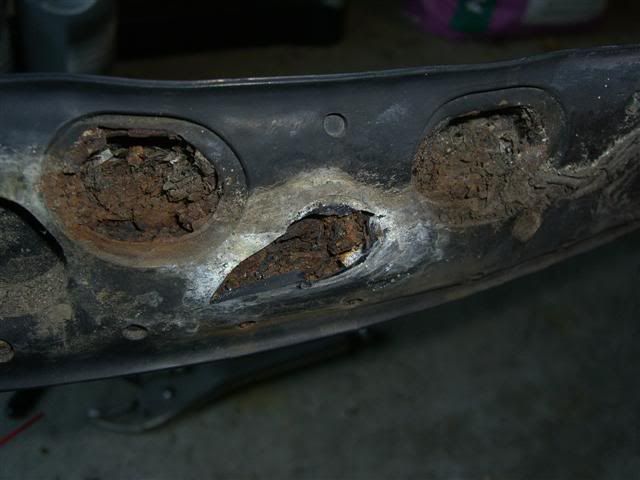
Here's the backside of the rubber strip:
One of the nuts was pretty tough to get off of the bolt:
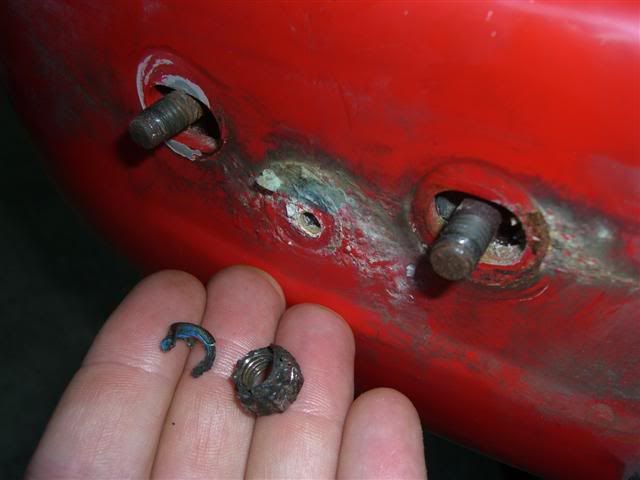
That's the worst I've ever mangled a nut yet still removed it without cutting the whole bolt.
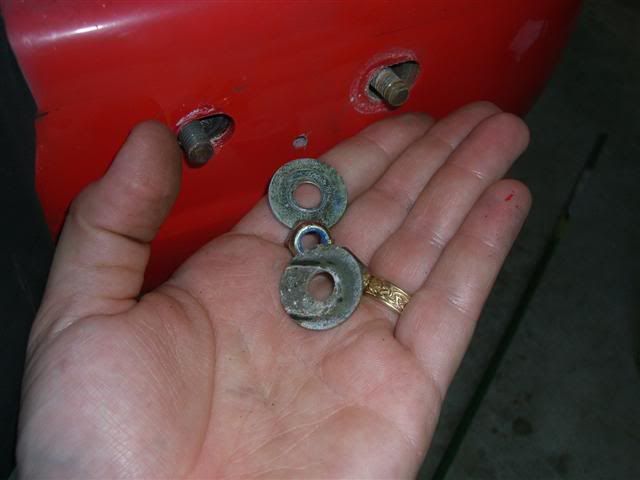
Here's the other side....they're in great shape:
(more like a nail than a screw!)
Here's the backside of the rubber strip:
One of the nuts was pretty tough to get off of the bolt:
That's the worst I've ever mangled a nut yet still removed it without cutting the whole bolt.
Here's the other side....they're in great shape:
Trending Topics
05-30-2007, 08:56 PM
#8
Poseur
Rennlist Member
Rennlist Member
Here's a little technique that I used years ago to deal effectively with all that rust potential. If you get around to buying one of the new reproduction bumperettes make sure that the 'rubber' stuff on the back is sealed up. Quite often the molding process leaves little gaps here and there and that is where water ultimately gets in and begins to attack the untreated metal inside the rubber. In about ten years (less in the NorthEast) you can write them off. Same, too, for the narrow rubber strips. Get in there with something like JB Weld or a good sealing resin and coat the back side of these parts where the metal shows through to slow down the corrosion process. I would also suggest stainless steel hardware (nuts, washers) for the ends of the bellows studs as well as the screws for securing the rubber strips as much as possible. (This applies if you intend to keep the car a long while, or if you are in a high corrosion area). For those larger bolts that secure the larger bumperettes I suggest a good coating of GE Silicon that you can protect taht raw metal with yet still manage to get a nut onto. Follow it up with some kind of oil-based lubricant, or perhaps Anti-Seize. You need to protect these vulnerable spots. Otherwise, you will have nothing but rusted bits to break off later, much like you have pictured herein.
05-31-2007, 10:18 AM
#9
Intermediate
Thread Starter
Join Date: Apr 2007
Location: Reston, VA
Posts: 41
Likes: 0
Received 0 Likes
on
0 Posts
Dan-
I think the existing bumperettes will make it, but I see what you're saying.
You think filling in those voids on the back of the bumper with an adhesive silicon caulk would work?
I'm certainly going with SS hardware, and I'll apply a liberal dose of silicon to the bumper shock bolts to stave off more corrosion.
Don
05-31-2007, 10:45 AM
#10
Intermediate
Thread Starter
Join Date: Apr 2007
Location: Reston, VA
Posts: 41
Likes: 0
Received 0 Likes
on
0 Posts
and let me add for posterity:
the rubber strips are attached at two points....a phillips head screw that is accessed after removing the small (and obvious) hole plugs, and a bolt that is molded into the rubber strip by the bellow end, and secured on the inside of the bumper with an 8mm nut.
the bumperettes each have three molded-in bolts and are secured by 12mm nuts on the inside of the bumper.
05-31-2007, 02:35 PM
#11
Poseur
Rennlist Member
Rennlist Member
Not sure if an adhesive silicon caulk will work. Try for something that will adhere to the rubber well. ANYTHING, as you will see, is better than leaving them alone. The rubber is long lasting but with all the voids in the molding process on the back it leaves them open to destruction from within. Anything that can help resist corrosion or delay it is a step in the right direction, particularly on areas you just don't get into normally.