Oil Change 718 GT4-Spyder DIY with pics
#16
I have a 4-post lift and a 2-post asymmetrical one. If you are not planning on using the lift for storage, I personally don't think there is any comparison. For working on a car, the 2-poster can't be beat. The arms come in from the outside, leaving the entire underside of the car free and accessible. I've had my 2-poster for more than 10 years. To this day, every time I use it, it makes me smile. The 4-poster is great for storage, but I've never been tempted to use it for maintenance/service. The runways are just too obstructive. Just my opinion and only relevant if you have a choice. Obviously a 4-poster is great compared to just a floor jack.
Also, the 4 posts take up a lot more space and I have to walk around them and constantly maneuver stuff around them. It's always in the way. In comparison, the 2-posts of the service lift don't really interfere with the garage function, but obviously that depends on the garage layout. Just food for thought...
Sorry for veering off topic!
My conundrum is the lift space is also a parking space for my truck, no other place to keep it inside and I have 2 garages! 2 post is my desired option but the outside post would continually get in the way of my truck doors. An asynchronous 2 post might work but I’ll Probably end up with an open center scissor lift.
#17
Thanks for the write up. You're a brave man filling up the oil with just a funnel. I always lay out a garbage bag and poke the funnel through it just in case an earthquake would occur, or a naked woman would happen to walk by, or I'd sneeze, or something and spill some oil into the trunk. That would be a disaster! I've never spilled a drop in 8 times (my prior BS), but I just won't take a chance. Also, it looks like I have the exact same 4-post lift as you. (But I use that for storage. I have a 2-poster that I use for service.)
You didn't say anything about the drain plug. I assume you installed a new one. I haven't experienced the plastic plug yet. Did you install it with a screw driver or did you use the special tool? Also, does it seat with a positive, reassuring, unmistakable "click"?
You didn't say anything about the drain plug. I assume you installed a new one. I haven't experienced the plastic plug yet. Did you install it with a screw driver or did you use the special tool? Also, does it seat with a positive, reassuring, unmistakable "click"?
A few answers:
-I installed a new drain plug, screwed it in with the same screwdriver. It seats and block at the end of its “course“. Positive: Yes. Reassuring: No! Dont like plastic for this application. Cheap VW stuff.
-Good obsvervation for the filling hole. I did cover the trunk before pouring the oil. I'm not that brave... ;-)
-As for the lift, I use it to store a car. I do have an hydraulic center jack for the wheel though. Essential option to me when you buy a 4 posts lift. Check it on Atlas website!
Merry XMAS
#18
RL Community Team
Rennlist Member
Rennlist Member
Joined: Dec 2019
Posts: 9,291
Likes: 4,800
From: Victoria, BC, Canada
Considering how much the dealers rape us for basic oil changes it's almost easy to justify buying a lift. Actually I don't need much justification but I'm practicing for when the wife grills me 
The only question is 4 post, 2 post or scissor lift...... Decisions, decisions.

The only question is 4 post, 2 post or scissor lift...... Decisions, decisions.
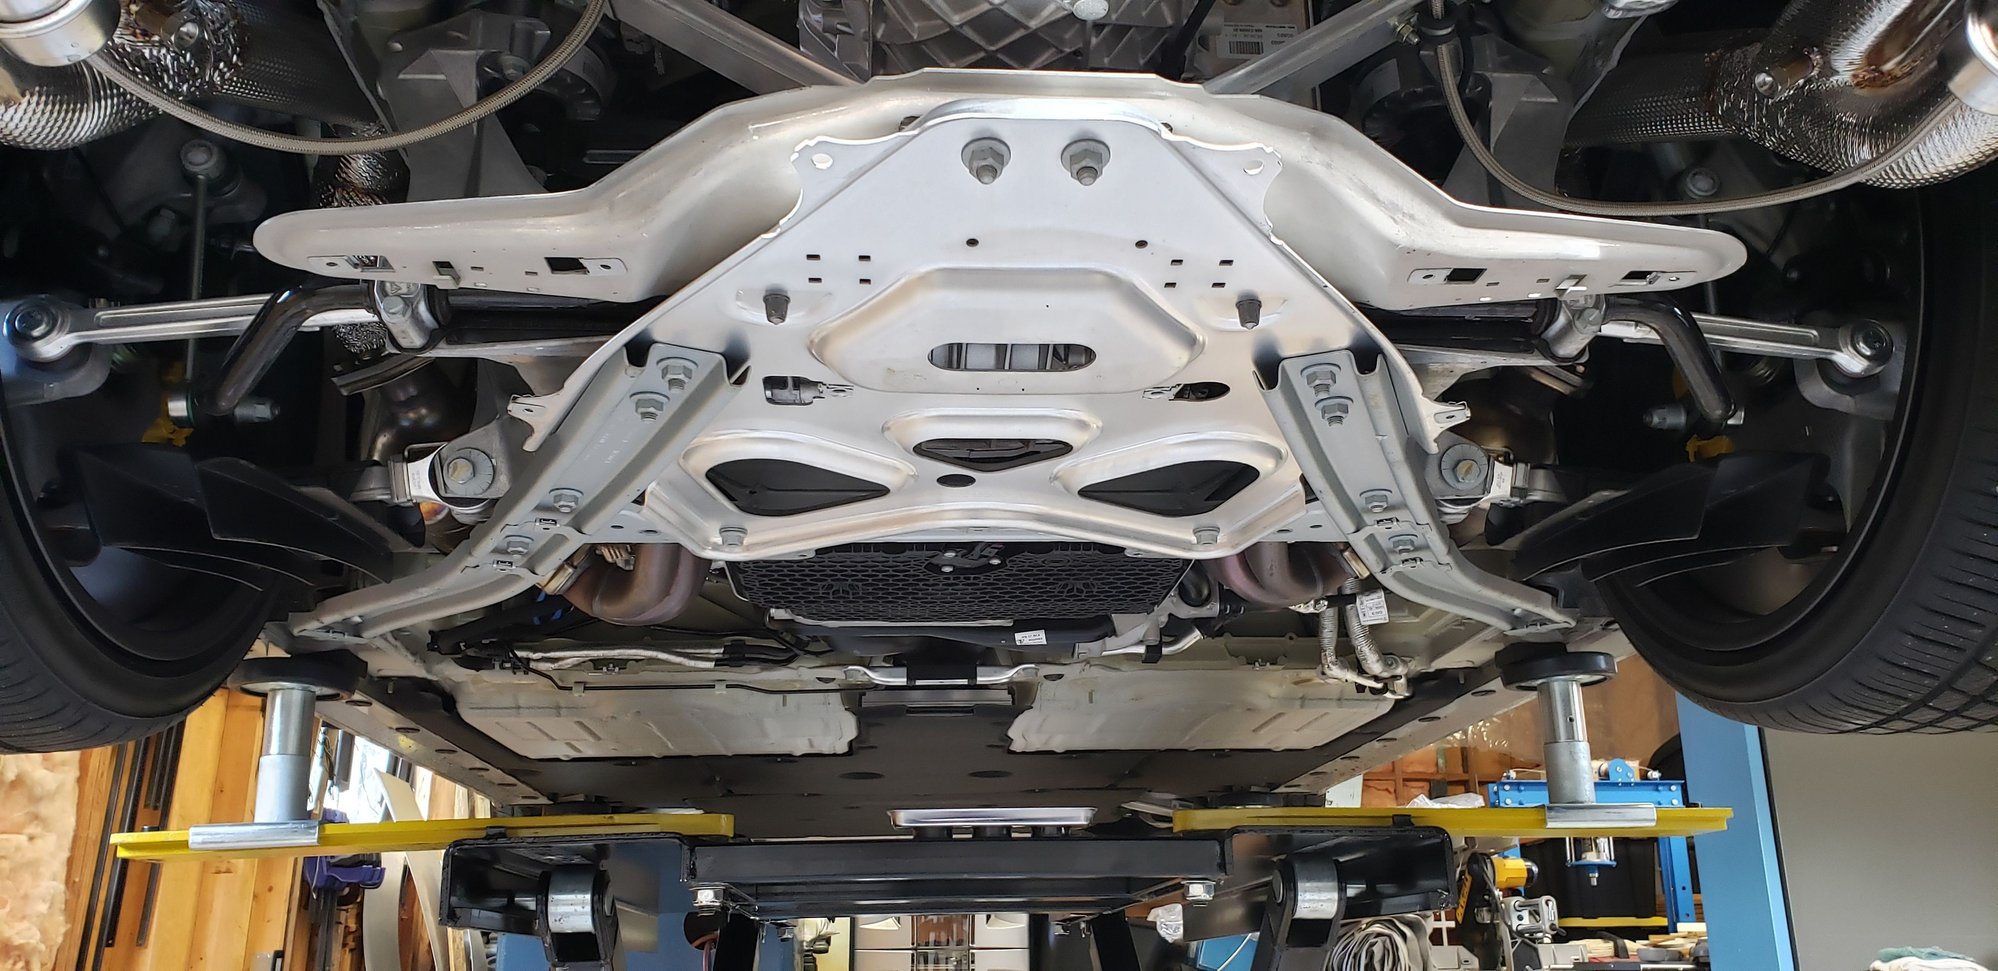
Back to the scissor lift, the belly pan directly under the engine is scalloped around the rear lift points (see picture below), with the lift arms coming from under the vehicle they are be in the way for getting this belly pan out of the way. I am going to try my lift point extensions to see if they will provide enough clearance for the pan to drop and be removed, otherwise it is a no-go on this style of lift.
A two post lift has the lift arms coming in from outside of the car so they are not in the way, and of course the 4-post @PierreTT used has no arms to get in the way...
BTW @PierreTT thanks for the pictures and writeup!
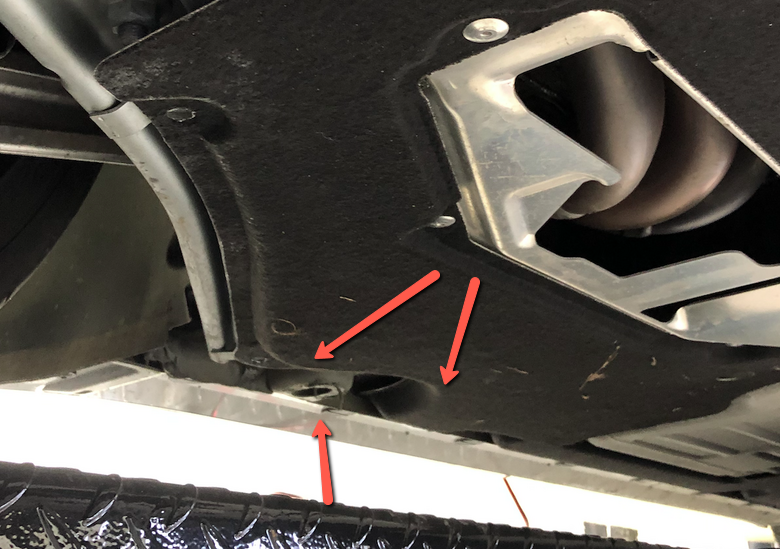
Engine belly pan and lift point clearance
#19
I have a Dannmar Scissor lift and will let you know if it is even possible on this style, I have the oil and filter on the way (arrives next week) because of course the dealer has none!
Back to the scissor lift, the belly pan directly under the engine is scalloped around the rear lift points (see picture below), with the lift arms coming from under the vehicle they are be in the way for getting this belly pan out of the way. I am going to try my lift point extensions to see if they will provide enough clearance for the pan to drop and be removed, otherwise it is a no-go on this style of lift.
A two post lift has the lift arms coming in from outside of the car so they are not in the way, and of course the 4-post @PierreTT used has no arms to get in the way...
BTW @PierreTT thanks for the pictures and writeup!
Engine belly pan and lift point clearance
#20
RL Community Team
Rennlist Member
Rennlist Member
Joined: Dec 2019
Posts: 9,291
Likes: 4,800
From: Victoria, BC, Canada
Good point about the scissor-jack - I’d imagine that extensions long enough to enable the pan to be removed wouldn’t clear the sills with the jacks in place. I like Pierre’s 4-post - I’d have to be very sure of my concrete foundation to trust a 2-post - the force vectors suck imho and a lot at stake !
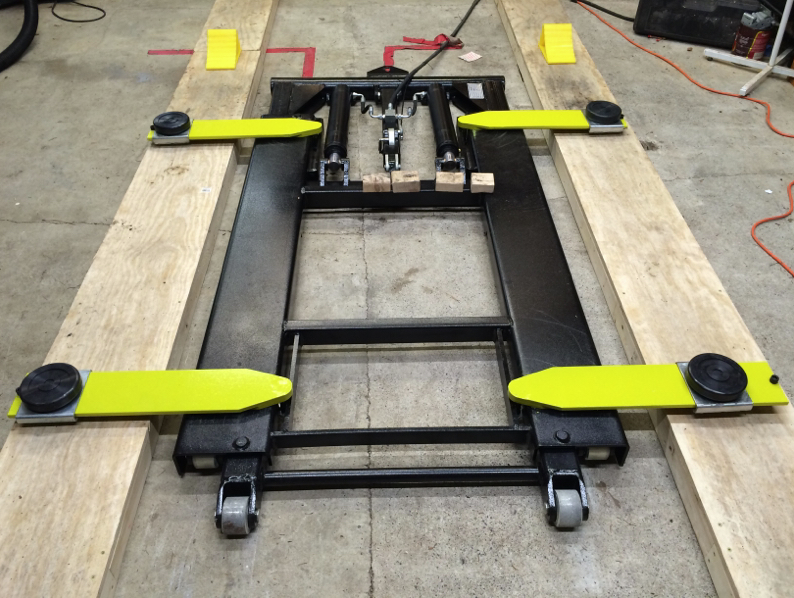
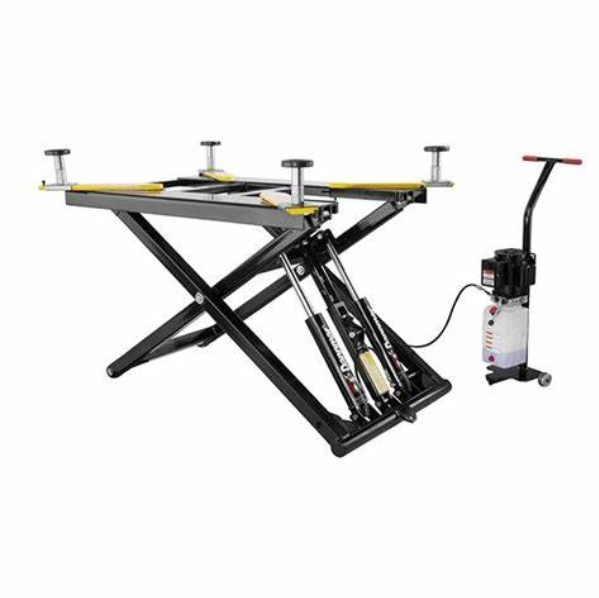
Regarding the bolded statement, this is why I went to the scissor style and I didn't want columns on each side of the car when it was up.
#21
Yep I was thinking vertical extensions as you describe -,looking at your pic I guess the wooden runners either side would give the extra clearance needed to be able to fit them in 🤔- I like the ‘serving platters’ on the extensions !!
Look forward to hearing how it works out in practice 🤞
Look forward to hearing how it works out in practice 🤞
#22
Nice post and thanks for all your work on this.
My mechanic uses a pce of plastic cut from an old washer fluid bottle and fits it between the filter and the lower suspension arm. That way when he takes off the filter it keeps the oil from getting into hard to clean places. He also fills it to approx. 75% to allow for expansion.
This guy is a 20+ year P mechanic that works on Carrera GTs, etc. Its interesting to watch him work, its all about efficiency and technique.
#24
RL Community Team
Rennlist Member
Rennlist Member
Joined: Dec 2019
Posts: 9,291
Likes: 4,800
From: Victoria, BC, Canada
See the picture where I highlight the lift point, you can see some of the screws for the pan there...
Last edited by Westcoast; 12-25-2020 at 08:08 PM.
The following users liked this post:
HooosierDaddy (08-06-2021)
#25
Actually that style will make the matter worse, there are screws very near the outside edge that would be covered by those wide plates and with no clearance between the plate and lift point it will be impossible to get that engine belly pan off, that is why I intend on trying the extensions.
See the picture where I highlight the lift point, you can see some of the screws for the pan there...
See the picture where I highlight the lift point, you can see some of the screws for the pan there...
I guess it depends on your primary use for the lift. If it’s to swap wheels, do brakes and work on exhaust most of the time and oil changes are a once or twice a year task then this type is left intrusive when not in use. These platform lifts also comes in handy for detailing, it brings the car up so there’s a lot less sitting and bending when doing the sides.
The other hybrid option is the Max Jack if you need something that’s out of the way when not in use but it gets in the way when you are using it.
Last edited by mjw930; 12-27-2020 at 09:47 AM.
#26
RL Community Team
Rennlist Member
Rennlist Member
Joined: Dec 2019
Posts: 9,291
Likes: 4,800
From: Victoria, BC, Canada
Yes and no. If you are doing something where you need access to the area between the lift and car simply lift the car enough to get a 4” block under each wheel, lower the car onto the blocks then space out the lift with 4” Jack point spacers under the jacking pucks. That gives you 4 additional inches between the lift track and the underside of the car. It’s not perfect but it’s an option. It’s pretty much what you did for yours.
I guess it depends on your primary use for the lift. If it’s to swap wheels, do brakes and work on exhaust most of the time and oil changes are a once or twice a year task then this type is left intrusive when not in use. These platform lifts also comes in handy for detailing, it brings the car up so there’s a lot less sitting and bending when doing the sides.
The other hybrid option is the Max Jack if you need something that’s out of the way when not in use but it gets in the way when you are using it.
Also agreed that the 2-post would be easier for this one activity but for me all of the other times it would be in the way as you describe, especially detailing!
#27
Considering how much the dealers rape us for basic oil changes it's almost easy to justify buying a lift. Actually I don't need much justification but I'm practicing for when the wife grills me 
The only question is 4 post, 2 post or scissor lift...... Decisions, decisions.

The only question is 4 post, 2 post or scissor lift...... Decisions, decisions.
the lift propably pays itself in a couple of years
thanks for the diy writeup.
mmm beer 🍺
#28
RL Community Team
Rennlist Member
Rennlist Member
Joined: Dec 2019
Posts: 9,291
Likes: 4,800
From: Victoria, BC, Canada
Yep I was thinking vertical extensions as you describe -,looking at your pic I guess the wooden runners either side would give the extra clearance needed to be able to fit them in 🤔- I like the ‘serving platters’ on the extensions !!
Look forward to hearing how it works out in practice 🤞
Look forward to hearing how it works out in practice 🤞
Considering how much the dealers rape us for basic oil changes it's almost easy to justify buying a lift. Actually I don't need much justification but I'm practicing for when the wife grills me 
The only question is 4 post, 2 post or scissor lift...... Decisions, decisions.

The only question is 4 post, 2 post or scissor lift...... Decisions, decisions.
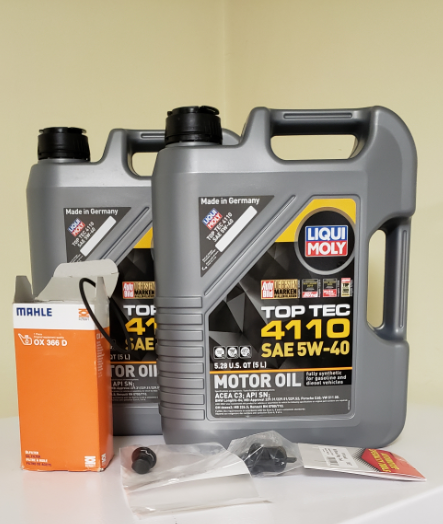
For this change I used warranty approved 5w-40 Liqui Moly purchased from FCP Euro, they supplied the filter, drain plug and removal tool as well.
One of the items I noted in the posts above was the need to get the pan off that resides directly under the engine, by using the lift risers included with the Dannmar unit I was easily able to access all bolts and screws as well as slip the aero panel out from under the Spyder.
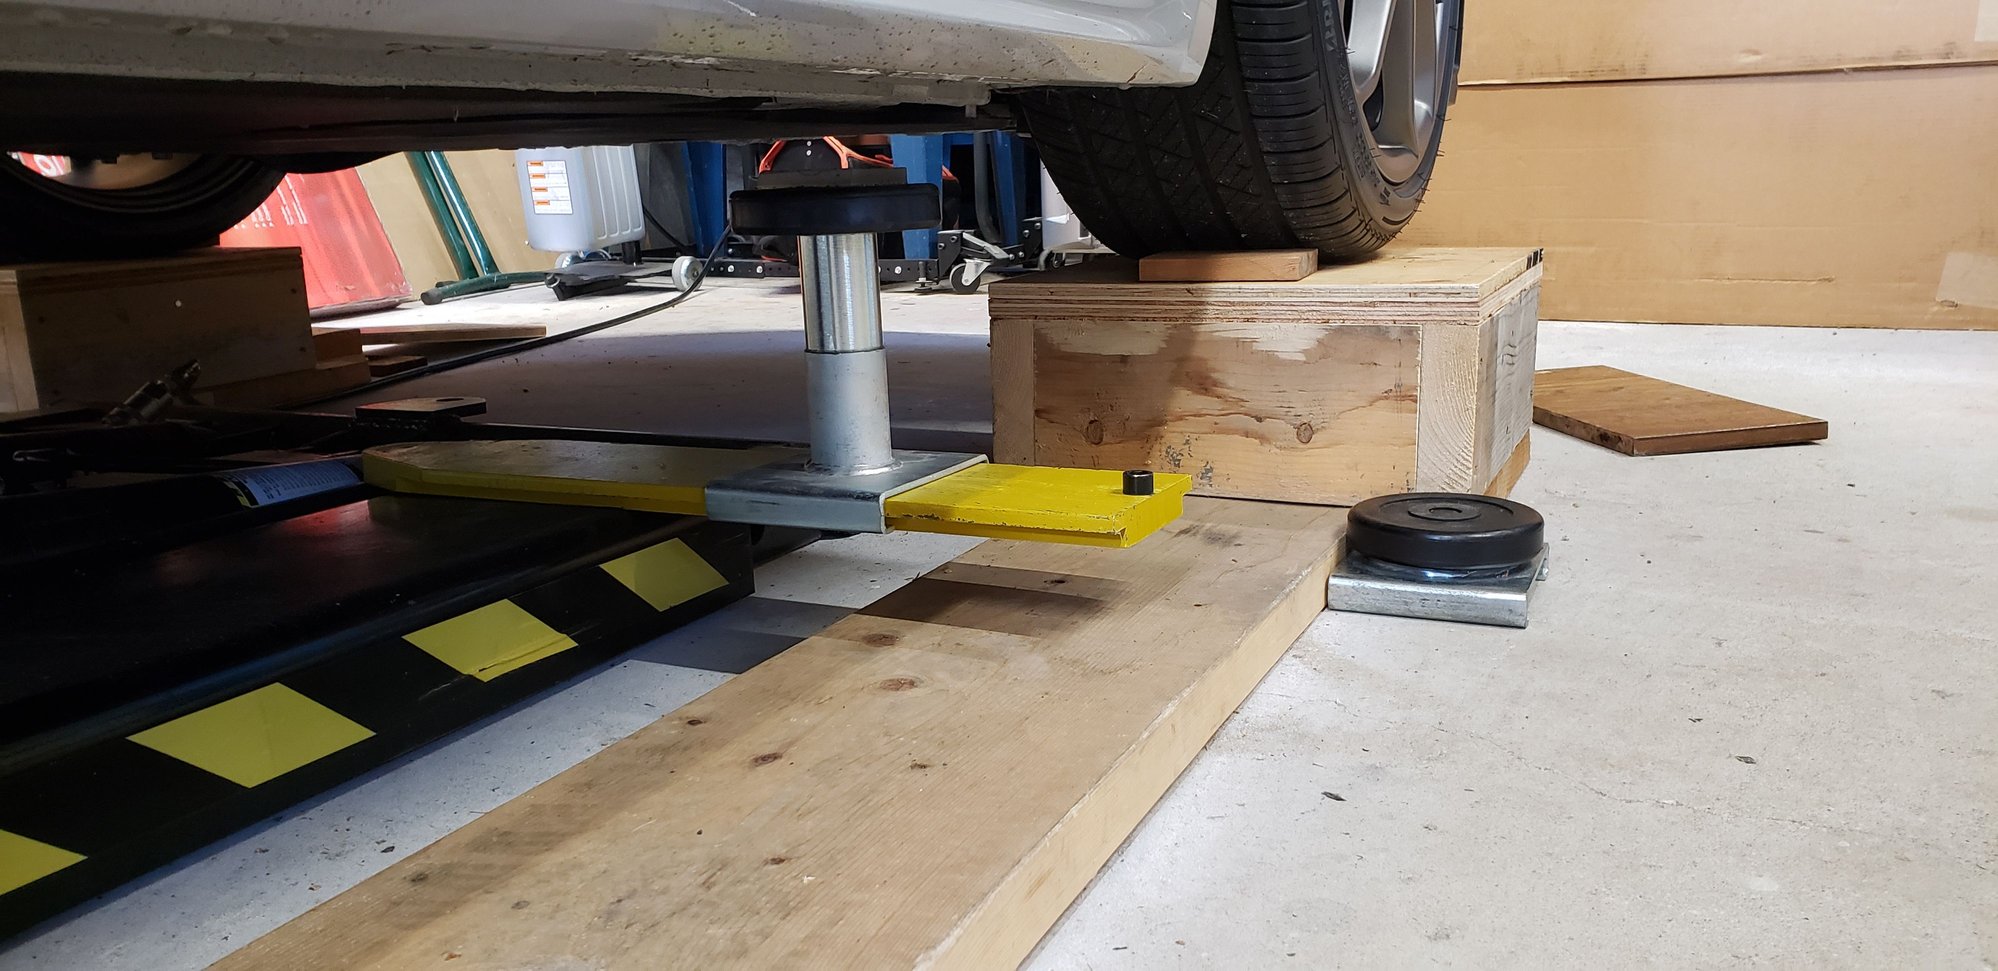
Here is a close up of the riser boxes that I already have from back in the day before I bought the scissor lift, they allowed me to do an interim lift to then replace the low-rise pads with the extended ones.
The filter cannister was tucked up quite far, two 6" extensions (one with a wobble end) were required to reach it (Hazet 2169 filter wrench), I wrapped the crossmember at that point so prevent oil from getting on it, good thing because I had to tilt and manipulate the filter housing to get it past and some did spill, slow and methodical is the key to a clean exit here! After pulling the filter I checked for metal particles in the cannister, virtually clean, there was but one or two sparkles to be seen.
 Next after flushing out the housing, I inserted the new filter and new lubricated o-ring and reinstalled the cannister and torqued to 25Nm as specified. Last step was to install the new pan plug, it has a decent feel to it, and nice twist then click as it seats into place.
For reference, here is the OEM filter that I removed showing the Mahle part number and the Porsche part number.

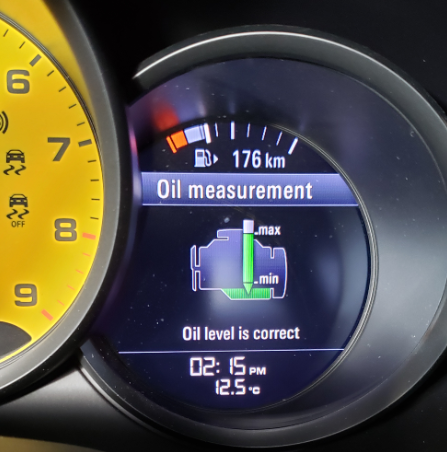
I let the oil drip for nearly 2 hours then refilled with 7.5l of fresh oil, here is the level as shown at start-up...
Sorry no beer break after this job, the sun was out and there was a road test to be done!

FWIW the oil level remained as shown here throughout the drive, oh and as the sun was still out a bonus car wash afterwards.

#29
I'm reading all this thread with interest. I sold my 981 CGTS and take delivery of a new GTS 4.0 in March at PEC ATL. The plastic pan and plug will be new, the filter is the same one that fit my 981, the underbody panels are new. I expect less on the GTS than the GT4 but there will still be some. I have a MaxJax 2 post lift so I can speak from that perspective. I previously had a scissors lift that I used with my 987 CS, and it was fine for oil changes, tire/brake work, and I even did a clutch R&R with it. But when the MaxJax became available I jumped at it. My garage floor is 5+" thick so no worries there. I have never regretted getting it, wish I had clearance for a full rise but that's not gonna happen so I'm content with the mid-rise and my little short rolling seat that affords me easy access to everything underneath. Re the oil change, you can use a large Ziplock bag to catch the spills from the filter, which, BTW, is the same as it was on the 981. I have the LN Engineering adapter from my 981 that I plan at some point to install on my 982 once it arrives, makes for less messy changes plus I like the spin-on filter over the plastic cannister one. I considered a 4 post, but besides the height concerns I didn't like the lack of access due to the ramps, and I learned with the scissors lift about the interference with the underbody panels, I had to work around that sometimes.
Great writeup, OP, I hate the plastic sump and may look into the LN Engineering deeper one ($2500, yikes!) but I am old school, it works for intakes so I guess it will for oil pans as well.
Great writeup, OP, I hate the plastic sump and may look into the LN Engineering deeper one ($2500, yikes!) but I am old school, it works for intakes so I guess it will for oil pans as well.
The following users liked this post:
PierreTT (01-11-2021)
#30
I just performed this as well, also using Liqui Moly from FCP.
I used my QuickJack, with the following general procedure to get around the fact that the QJ covers some of the aero + aero fasteners.
Hope this helps !
I used my QuickJack, with the following general procedure to get around the fact that the QJ covers some of the aero + aero fasteners.
- Get the car up using the QJ, remove the two rear-most panels
- Remove all the fasteners I can on the 3rd panel just under the oil pan. (NOTE: the back-side edge of the 3rd panel slides in to 2 metal "lips" where it gets fastened... important for when you put it back)
- Note: Also remove the 4 fasteners in the narrow section where the 3rd panel underlaps the 4th (adjacent) aero panel closer to the front of the car. You can then pull the 3rd panel's lip out from under the 4th.
- Drop the car, remove the remaining (which is just one right by the frame rails) fastener
- Now the 3rd panel will just fall down... remove it and continue w/ the oil change.
- Drop the car, move the QJ away from the sides of the car, and slide that 3rd panel under the car
- You need to first get your arm under the car from the side (just on the front side of the rear tire) and push that 3rd panel's back edge into the 2 "lips" from the procedure above.
- Then raise the front edge and tighten but don't make tight the fasteners that are covered by the QJ. Do that on both sides of the car.
- Now you can raise the car w/ the QJ and put everything back.
- Note: You'll have to put that front-side narrow section back under the 4th piece of aero and re-install the fasteners.
- When finished, drop the car, and tighten the 2 fasteners mentioned 2 bullet points above.
Hope this helps !
The following users liked this post:
PierreTT (01-11-2021)


