Front Main Seal Replacement...DIY?
 07-11-2013, 09:31 AM
#1
Race Car
Thread Starter
Anyone DIY the front main seal on their motor? After posting a personal best at Mid Ohio this weekend she has started to leak on me and the seal needs replaced.
I'm really not as concerned about procedure as I am with what specific seal puller and press are needed to do the job. Getting to the seal is not that hard just want to make sure I do it right the first time and don't have to do it twice.
Thanks in advance.
I'm really not as concerned about procedure as I am with what specific seal puller and press are needed to do the job. Getting to the seal is not that hard just want to make sure I do it right the first time and don't have to do it twice.
Thanks in advance.
 07-11-2013, 11:45 AM
#2
Rennlist Member
I just had it done, same scenario. Its about $700. BTW, they put a "new updated helix one in" it's back in the shop today because it leaks the next day. They are putting in the "old style" back in today. FWIW
07-11-2013, 11:53 AM
#3
Race Car
Thread Starter
no part numbers though..my parts guy gave me a part number for the rear main seal...that isn't going to work either.
I'm 99% sure I"ll do it myself just need more info on the proper seal puller and press. Stopping at the dealer to talk to a buddy who is a tech this evening to try to get more info.
07-11-2013, 12:39 PM
#4
Rennlist Member
I wonder how much of this thread applies-
https://rennlist.com/forums/997-gt2-...-oil-leak.html
Claims the bolt and the pulley gets replaced during the process.
https://rennlist.com/forums/997-gt2-...-oil-leak.html
Claims the bolt and the pulley gets replaced during the process.
07-11-2013, 01:50 PM
#5
Rennlist Member
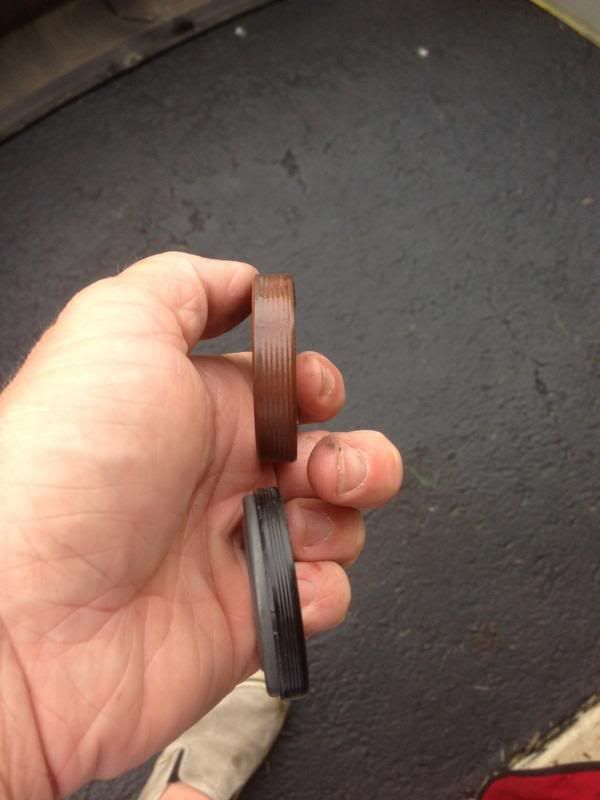
Can u take a pic of old fms if u plan on doing it. Just clean it off. Kinda curious how seals look like after 9 yrs. If possible can u take pic of old and new fms. Thanks. Mike
 08-08-2013, 09:49 AM
#7
Race Car
Thread Starter
Updates if anyone cares :-)
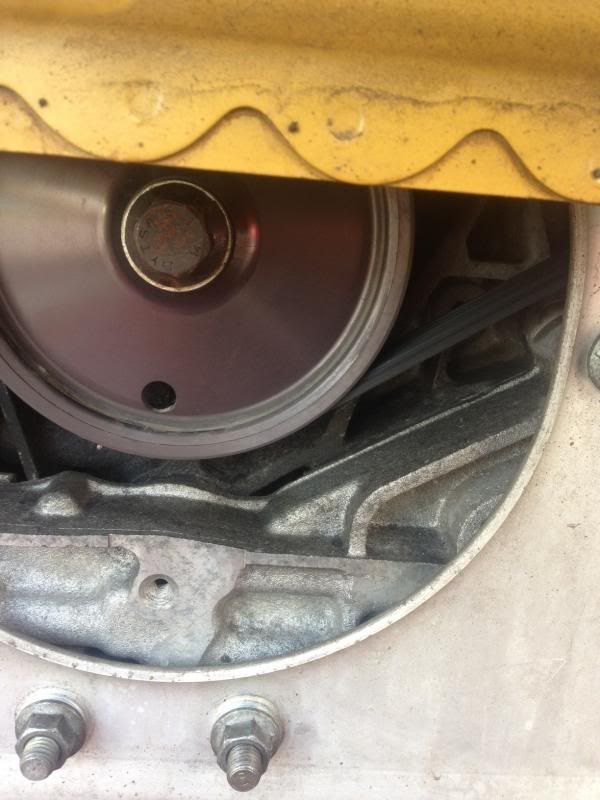
Pull rear bumper, pull mufflers (if you have them), pull cat pipes, pull bumper bar, pull heat sheilds. Really that takes 45 min tops and gets you a great view of the pulley, the associated bolt for the pulley, etc. Here's a shot of what you can see with everything removed. There's just enough room for socket to clear the rear member to get the pulley off.
**Procedural note here** The proper way to hold the pulley while removing the pulley bolt is with the special factory pulley holder tool. That tool is $300-400. You can probably get someone to make you one locally if you have time/ effort to do so. Personally I put the car on the ground, put the car in 4th gear, got my big but in the drivers seat and pumped up the brakes and held firm as my friend took the bolt loose. I've read you can risk damage to the driveline if you remove the pulley this way but on a car that makes more torque via the engine than that bolt is torqued to I have a hard time thinking it would cause any damange. None the less you've been warned, the pulley holder is the proper way.
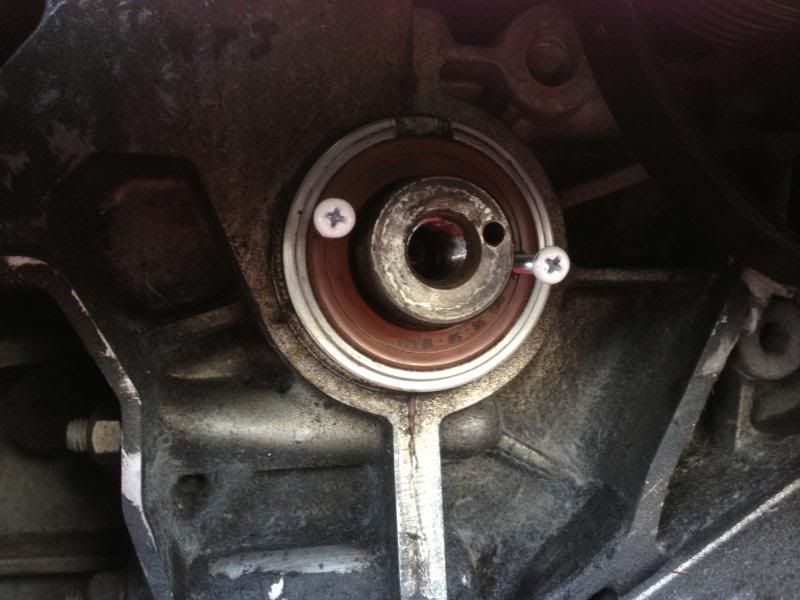
Pulley off, self tapping screws run into the old seal ready to be pulled. I actually cheated a little I have a slide hammer that I used with the self tappers and the seal came right out.
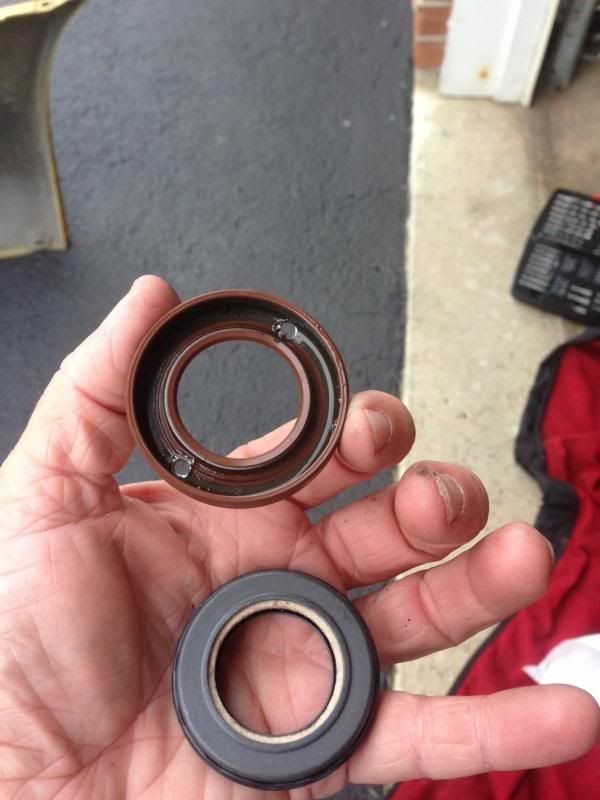
So here's where the old vs. new seal argement comes in. The new Seal is completely different. Hearing horror stories has me scared. I could not locate the part number for the old seal, nor could my parts guy. Also I'm guessing this long after a re-design it might be impossible to get that seal anyhow.
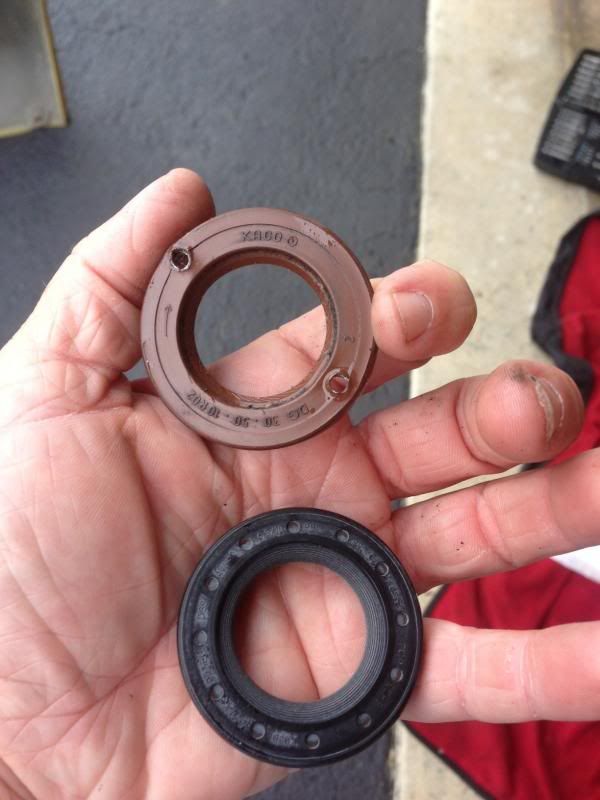
Onto the pictures...these seals are DRASTICALLY different. I have an older PET I used for reference and even that PET has the new part number ( 997.102.265.91). Looks like the new seal is going in and I'll hope for the best.
That's all the further I got last night. I searched and searched until I finally gave up on finding that old seal part number. New one is going in and I hope it works.
A couple of notes. The motor is going to have to come down an inch or two to properly re-install the seal. I"ll make sure I document and take pictures of the rest of the procedure for you guys. I realize the tear down pictures are lacking but it's pretty straight forward.
Pull rear bumper, pull mufflers (if you have them), pull cat pipes, pull bumper bar, pull heat sheilds. Really that takes 45 min tops and gets you a great view of the pulley, the associated bolt for the pulley, etc. Here's a shot of what you can see with everything removed. There's just enough room for socket to clear the rear member to get the pulley off.
**Procedural note here** The proper way to hold the pulley while removing the pulley bolt is with the special factory pulley holder tool. That tool is $300-400. You can probably get someone to make you one locally if you have time/ effort to do so. Personally I put the car on the ground, put the car in 4th gear, got my big but in the drivers seat and pumped up the brakes and held firm as my friend took the bolt loose. I've read you can risk damage to the driveline if you remove the pulley this way but on a car that makes more torque via the engine than that bolt is torqued to I have a hard time thinking it would cause any damange. None the less you've been warned, the pulley holder is the proper way.
Pulley off, self tapping screws run into the old seal ready to be pulled. I actually cheated a little I have a slide hammer that I used with the self tappers and the seal came right out.
So here's where the old vs. new seal argement comes in. The new Seal is completely different. Hearing horror stories has me scared. I could not locate the part number for the old seal, nor could my parts guy. Also I'm guessing this long after a re-design it might be impossible to get that seal anyhow.
Onto the pictures...these seals are DRASTICALLY different. I have an older PET I used for reference and even that PET has the new part number ( 997.102.265.91). Looks like the new seal is going in and I'll hope for the best.
That's all the further I got last night. I searched and searched until I finally gave up on finding that old seal part number. New one is going in and I hope it works.
A couple of notes. The motor is going to have to come down an inch or two to properly re-install the seal. I"ll make sure I document and take pictures of the rest of the procedure for you guys. I realize the tear down pictures are lacking but it's pretty straight forward.
Trending Topics
08-08-2013, 10:52 AM
#8
Race Car
Thread Starter
Update...digging through parts numbers this morning I think I've found the part number that most closely resembles the seal that came out of my car.
999.113.290.41
It's stupid cheap in comparison to the 997 seal, I'm going to have it ordered and determine when I've got both in my hand.
999.113.290.41
It's stupid cheap in comparison to the 997 seal, I'm going to have it ordered and determine when I've got both in my hand.
08-08-2013, 12:36 PM
#9
Rennlist Member
I helped the PO of my car replace the seal.
He borrowed the P tool from his buddies @ Newport Porsche / Audi.
Cheers
Craig
08-08-2013, 12:54 PM
#10
Rennlist Member
Does the nose have any burrs or "run in" marks?
08-08-2013, 02:59 PM
#11
Basic Sponsor
Rennlist
Site Sponsor
Rennlist
Site Sponsor
That sounds like a 993 seal maybe? Interesting, I'll look it up as well and check back to your update.
Mark/Pelican Parts
Mark/Pelican Parts
__________________
Your Trusted Source For DIY and Parts
FREE SHIPPING over $99 click here
Porsche Parts | DIY Tech Articles | Facebook | Twitter | Instagram | YouTube | Promos
888.280.7799 | 6am - 5pm PST

FREE SHIPPING over $99 click here
Porsche Parts | DIY Tech Articles | Facebook | Twitter | Instagram | YouTube | Promos
888.280.7799 | 6am - 5pm PST
08-08-2013, 03:12 PM
#12
Race Car
Thread Starter
Mark @ Pelican: I appreciate that, if you've got one in inventory and could verify it looks like what came out of my car that would be really great. Wouldn't surprise me if it's an old design...the block has been around for quite some time.
The funny part to me is if you look at several threads even 997 RS cars have the same seal in them that my car has (orangy / red one) which makes me wonder if the new black seal I've got is a 997.2 part number? Mikmyu has a thread dedicated to FMS leak that shows the same seal, There's a RS pulley install thread in the 997 section also has red seal and in Serge's 4.0L build thread you can see in the reassembly pics (page 7) where he also uses the red seal.
08-09-2013, 04:44 AM
#15
Racer
The red seal leaks because sand/dirt can get caught under the wedged in lip and not only open a door for a leak, but the sand can then abrade the circumference of the crank, making it worse. The black seal is a much better design because it has the white felt ring around the perimeter of the opening to protect lip from dirt and debris, and the rubber lip is inverted to wedged out as it should be for a 997 GT3 which produces a crankcase vacuum, and needs the lip to wedge out so that with vacuum, it pulls in the lip tighter, just like it's rear main seal. Not sure how you mounted the new seal as you have them shown on opposing sides in your hand. But with the black seal, it is supposed to be mounted with the white side facing out.