Installed: H&R Sport Springs (How-To Included)
 04-21-2010, 01:16 PM
#1

Last weekend I installed a set of H&R Sport springs in my 04 911 C2. I looked around and there were really no good install threads on how to do this, so I took my camera and documented my install.
The install wasn't really anything out of the ordinary if you have done suspension installs before. You will need a full set of tools, but the only special tool you will need is a 21mm strut nut tool, which allows you to hold the strut in place while removing the 21mm strut nut on the top of the assembly. I purchased this from German Auto Parts - $42.

Aside from that, you just need a full selection of metric sockets and box wrenches, along with a torque wrench. PB Blaster (or similar) is also absolutely necessary! Also, you need a 10mm hex bit socket to remove the caliper. Since it needs to be torqued to 68 ft-lbs, you should get this in 1/2" drive. I have a full set of 1/2" drive [url=http://www.skhandtool.com/Default.aspx?fusemode=10&pid=41430[S-K hex bit sockets[/url], and they are great:

With that said, I called up my friends at H&R and picked up a set of H&R Sport Springs for 911 C2 (Part Number 29513). These retail for $499, but you can pick them up from TireRack for about $340 or so. Also, these H&R Sport Springs do not require trimming of the bump stops. Be sure to check the data sheet in the box to see if the set for your car requires trimming (although I don't think any do).

The only reason why I wanted to lower the car is because I put on a set of GT3 fitment wheels, and with the wider width and higher offset, it made the car look like a 4x4. I enjoyed the ride stock, and since I drive this car every day, I didn't want anything too stiff or firm. The H&R sport springs with progressive coils in the rear were the right choice. Here is the stock wheel gap:
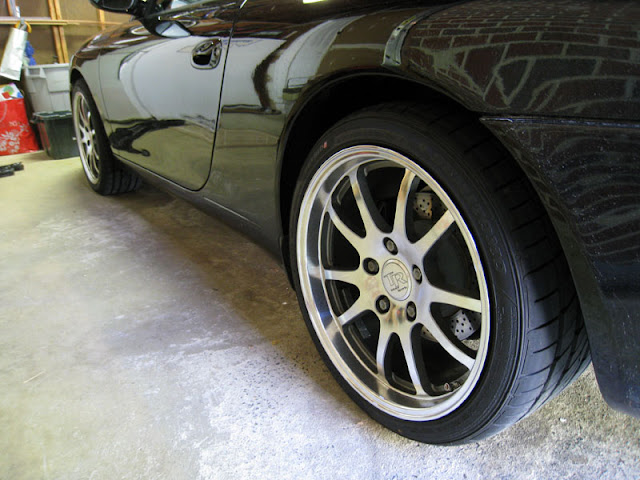
Pretty bad, yeah?
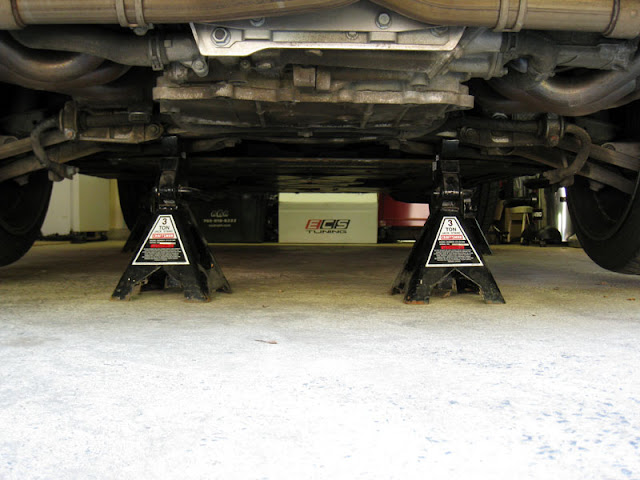
There is a lot of discussion on how to get the 911 on to jackstands, and I refuse to jack up via the engine. So I lifted the car from the rear jack points and placed one jack stand under the front lift point, and then one in the rear under the suspension crossmember. I did the same for the other side and the car was securely sitting on 4 jackstands:
My car only has 20,000 miles on it, and I didn't feel it was prudent to replace the strut bushings at this time, so I reused all of the existing mounting hardware.
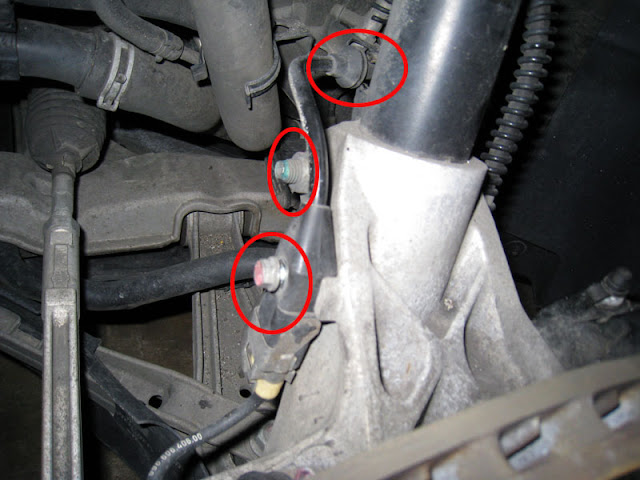
Now, before you start, you absolutely must break loose the strut nut at the top of the strut mounting assembly. If you removet he strut without breakign this nut loose first, you'll never get it off. Get a Torx 25 and remove the bolt that secures the cover in the frunk (front trunk) and gain access to the top of the strut mount:

Get a 21mm deep socket and a breaker bar and loosen this nut. You won't be able to remove it, because once it breaks loose, it will just turn the whole strut. More on that later.
Once you have done this, you can start freeing the strut. It's quite straightforward, and only requires removing a couple of bolts:
The only tricky one to remove is the sway bar end link which secures the strut in place in the spindle. I don't exactly remember what size socket and wrench you need for this, but I'm pretty sure it is 17mm. I have this written down at home and will update this thread with exact socket sizes later.

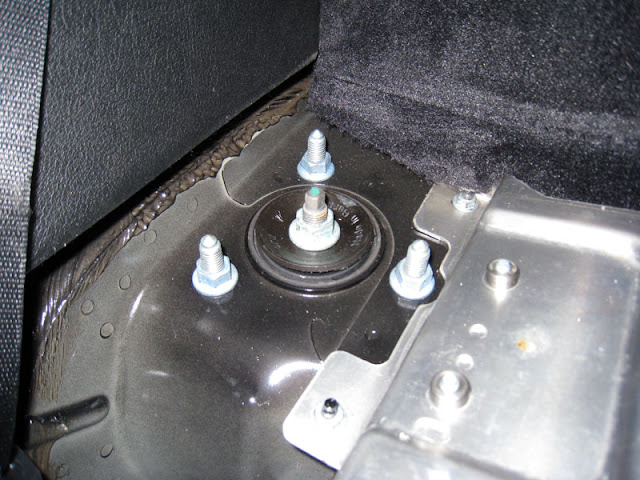
Once you have the strut "Free" in the spindle, you need to remove the three 13mm nuts in the frunk. Take note of where these are placed, as theses control the camber adjustment. Granted you'll need an alignment after the suspension install, but you don't want your camber to be way out of whack. You should easily be able to see the ring left by the nut, so just match it up when you are reinstalling the strut assembly.
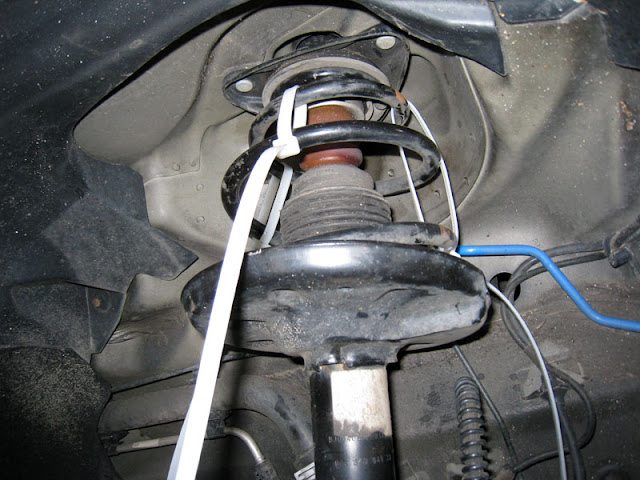
Pulling the strut out from the fender well is a little tricky, and it would help if you have a second person to help with this. Here's a little trick - rather than using a spring compressor to compress the spring, just get some 175lb tensile strength zip-ties (these are very heavy duty) and compress the strut via the control arm with a floor jack. Then wrap a few zip-ties around the compressed spring, and you will easily be able to pull it out now. You should wear eye protection while doing this in the unlikely case one of the zip-ties breaks, although these are not very high spring rates, so you shouldn't have anything to worry about.
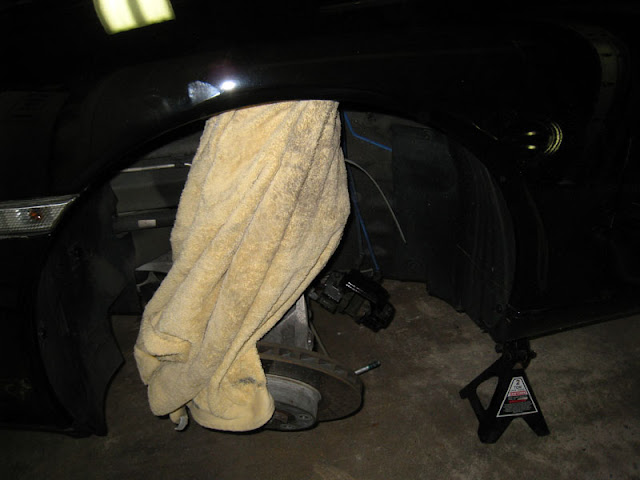
Then cover the strut with a bath towel and pull it out of the fender well. Step on the spindle with one foot while pulling the strut out. It's tricky and that's why it will help if you have a second person for this part: (take note of the caliper suspended with bungee cords - don't just let it hang via the brake line)
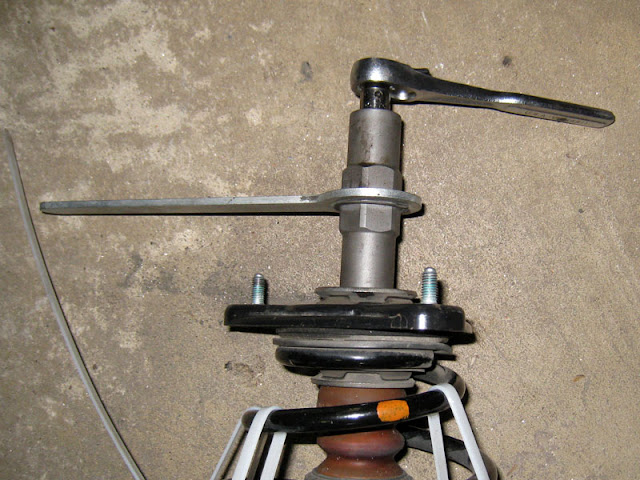
Once you have the strut free, you need to remove the strut nut and the strut mount. To do this you have to use the special tool I linked to above:
Once you removed the strut nut, you can pull off the strut mount. Take note to remember how everything goes back together. Take note of the two arrows on the strut mount; these must be facing the outside of the car. However, I don't think you can install the mount to the body without the arrows being in the correct position (it's not a perfect triangle). What's also odd is that the part number of my strut mounts started with 997, so perhaps since mine is a 2004 model, I got some updated parts.

Since the H&R spring is shorter, you don't need a spring compressor or anything to reinstall the strut mount. However, on the driver's side (not necessary on the passenger side), I had to use a compressor to get the whole strut assembly back into the car:

This chewed up the paint on the spring seat, so after I was done, I just took some black touchup paint and touched it up.
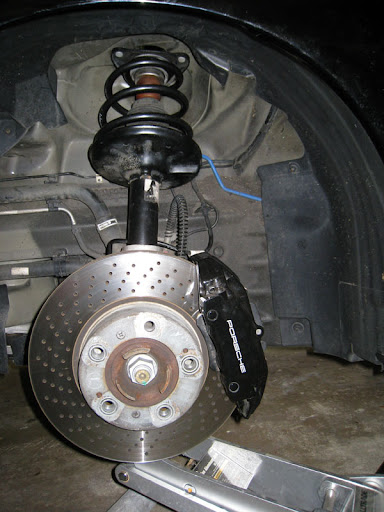
Fully installed in the front:
As for the rear, this was kind of a pain in the ***. Again, be sure to break the 15mm nut loose from inside the car before you remove the strut:
Also you have to remove both sway bar end links in order to do the rear (16mm Outer, 17mm Inner):

Once you have done that, you just need to remove the bolt that passes through the eye hole at the bottom of the strut, and then remove the assembly. Removing this bolt is tricky, as it comes out towards the front of the car, and space is limited. Be sure to place a floor jack under the strut in the rear and every so slightly compress it so that you can easily remove the bolt. You may need to tap out the bolt with a hammer and a long tool that will fit inside the mounting hole. The bolt is 16mm and the nut on the end is 18mm (wrench diameter).
Once you have the strut free, just take note of how everything goes together. There is a washer that sits under the bump stop/dust cover, and it's easy to lose this when you swap the springs.
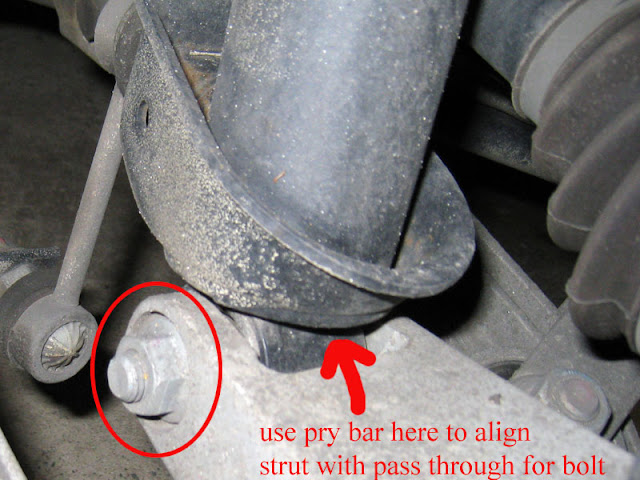
Putting the rear strut back in is really, really tricky. You need to use a floor jack to position the rear strut at the bottom mounting point, and then you need to use a pry bar or something similar to allow you to pass the bolt through again:
I'm sorry that I don't have any better photos of this, but it was getting late and I was getting tired, so my photos dwindled for the rear install. It tooke me a LONG time to get the one side in, but then doing the other side only took 30 minutes.
Also for not having photos, I forgot to take pictures of the wheel gap afterwards! Before the install, there was a 3 finger gap between the wheel and the fender, and now that's down to about a 1 to 1.5 finger gap - it's perfect. After I wash the car tomorrow I will update this thread with photos of the drop.
As for the ride, it is very similar to stock, just maybe a bit more firm, but not at all stiff. If anything, the stock suspension was quite stiff over bumps, and I think the H&Rs are better at this, most likely thanks to the progressive coils in the rear.
When I get home, I'll get the torque specs and sizes of the bolts and update this thread.
One thing I'd like to add is when to do an alignment. After you have installed a new suspension, you want to let it all settle before you go and get an alignment. This is especially true if you've replaced the struts and/or any bushings. It takes about a week or two for everything to settle, and then you should go get your alignment. Many shops will sell you an alignment right after the install, and then another one in two weeks, so that may be something you want to do if you are going to be driving a lot inbetween. I have only put about 100 miles on the car since the suspension install, and I am planning on getting an alignment at the Porsche dealer later this week. What really needs to be corrected is the camber in the rear, as it is rather negative and that will eat up your tires quickly.
Hope this helps. Feel free to ask any questions...
- Anthony
***EDIT***
Here are the torque specifications for the bolts/nuts:
Front strut/spindle bolt - 85 Nm
Front strut mount to body - 33 Nm
Front brake caliper to wheel carrier - 85 Nm
Rear strut mount to body - 46 Nm
Rear strut to wheel carrier - 100 Nm
As for the strut nuts, these need to be around ~50 Nm, but it's virtually impossible to measure them, since you need to hold the strut in place so it doesn't spin. I believe there is a special type of torque wrench for this, but alas, I do not have one.
The install wasn't really anything out of the ordinary if you have done suspension installs before. You will need a full set of tools, but the only special tool you will need is a 21mm strut nut tool, which allows you to hold the strut in place while removing the 21mm strut nut on the top of the assembly. I purchased this from German Auto Parts - $42.
Aside from that, you just need a full selection of metric sockets and box wrenches, along with a torque wrench. PB Blaster (or similar) is also absolutely necessary! Also, you need a 10mm hex bit socket to remove the caliper. Since it needs to be torqued to 68 ft-lbs, you should get this in 1/2" drive. I have a full set of 1/2" drive [url=http://www.skhandtool.com/Default.aspx?fusemode=10&pid=41430[S-K hex bit sockets[/url], and they are great:
With that said, I called up my friends at H&R and picked up a set of H&R Sport Springs for 911 C2 (Part Number 29513). These retail for $499, but you can pick them up from TireRack for about $340 or so. Also, these H&R Sport Springs do not require trimming of the bump stops. Be sure to check the data sheet in the box to see if the set for your car requires trimming (although I don't think any do).
The only reason why I wanted to lower the car is because I put on a set of GT3 fitment wheels, and with the wider width and higher offset, it made the car look like a 4x4. I enjoyed the ride stock, and since I drive this car every day, I didn't want anything too stiff or firm. The H&R sport springs with progressive coils in the rear were the right choice. Here is the stock wheel gap:
Pretty bad, yeah?
There is a lot of discussion on how to get the 911 on to jackstands, and I refuse to jack up via the engine. So I lifted the car from the rear jack points and placed one jack stand under the front lift point, and then one in the rear under the suspension crossmember. I did the same for the other side and the car was securely sitting on 4 jackstands:
My car only has 20,000 miles on it, and I didn't feel it was prudent to replace the strut bushings at this time, so I reused all of the existing mounting hardware.
Now, before you start, you absolutely must break loose the strut nut at the top of the strut mounting assembly. If you removet he strut without breakign this nut loose first, you'll never get it off. Get a Torx 25 and remove the bolt that secures the cover in the frunk (front trunk) and gain access to the top of the strut mount:
Get a 21mm deep socket and a breaker bar and loosen this nut. You won't be able to remove it, because once it breaks loose, it will just turn the whole strut. More on that later.
Once you have done this, you can start freeing the strut. It's quite straightforward, and only requires removing a couple of bolts:
The only tricky one to remove is the sway bar end link which secures the strut in place in the spindle. I don't exactly remember what size socket and wrench you need for this, but I'm pretty sure it is 17mm. I have this written down at home and will update this thread with exact socket sizes later.
Once you have the strut "Free" in the spindle, you need to remove the three 13mm nuts in the frunk. Take note of where these are placed, as theses control the camber adjustment. Granted you'll need an alignment after the suspension install, but you don't want your camber to be way out of whack. You should easily be able to see the ring left by the nut, so just match it up when you are reinstalling the strut assembly.
Pulling the strut out from the fender well is a little tricky, and it would help if you have a second person to help with this. Here's a little trick - rather than using a spring compressor to compress the spring, just get some 175lb tensile strength zip-ties (these are very heavy duty) and compress the strut via the control arm with a floor jack. Then wrap a few zip-ties around the compressed spring, and you will easily be able to pull it out now. You should wear eye protection while doing this in the unlikely case one of the zip-ties breaks, although these are not very high spring rates, so you shouldn't have anything to worry about.
Then cover the strut with a bath towel and pull it out of the fender well. Step on the spindle with one foot while pulling the strut out. It's tricky and that's why it will help if you have a second person for this part: (take note of the caliper suspended with bungee cords - don't just let it hang via the brake line)
Once you have the strut free, you need to remove the strut nut and the strut mount. To do this you have to use the special tool I linked to above:
Once you removed the strut nut, you can pull off the strut mount. Take note to remember how everything goes back together. Take note of the two arrows on the strut mount; these must be facing the outside of the car. However, I don't think you can install the mount to the body without the arrows being in the correct position (it's not a perfect triangle). What's also odd is that the part number of my strut mounts started with 997, so perhaps since mine is a 2004 model, I got some updated parts.
Since the H&R spring is shorter, you don't need a spring compressor or anything to reinstall the strut mount. However, on the driver's side (not necessary on the passenger side), I had to use a compressor to get the whole strut assembly back into the car:
This chewed up the paint on the spring seat, so after I was done, I just took some black touchup paint and touched it up.
Fully installed in the front:
As for the rear, this was kind of a pain in the ***. Again, be sure to break the 15mm nut loose from inside the car before you remove the strut:
Also you have to remove both sway bar end links in order to do the rear (16mm Outer, 17mm Inner):
Once you have done that, you just need to remove the bolt that passes through the eye hole at the bottom of the strut, and then remove the assembly. Removing this bolt is tricky, as it comes out towards the front of the car, and space is limited. Be sure to place a floor jack under the strut in the rear and every so slightly compress it so that you can easily remove the bolt. You may need to tap out the bolt with a hammer and a long tool that will fit inside the mounting hole. The bolt is 16mm and the nut on the end is 18mm (wrench diameter).
Once you have the strut free, just take note of how everything goes together. There is a washer that sits under the bump stop/dust cover, and it's easy to lose this when you swap the springs.
Putting the rear strut back in is really, really tricky. You need to use a floor jack to position the rear strut at the bottom mounting point, and then you need to use a pry bar or something similar to allow you to pass the bolt through again:
I'm sorry that I don't have any better photos of this, but it was getting late and I was getting tired, so my photos dwindled for the rear install. It tooke me a LONG time to get the one side in, but then doing the other side only took 30 minutes.
Also for not having photos, I forgot to take pictures of the wheel gap afterwards! Before the install, there was a 3 finger gap between the wheel and the fender, and now that's down to about a 1 to 1.5 finger gap - it's perfect. After I wash the car tomorrow I will update this thread with photos of the drop.
As for the ride, it is very similar to stock, just maybe a bit more firm, but not at all stiff. If anything, the stock suspension was quite stiff over bumps, and I think the H&Rs are better at this, most likely thanks to the progressive coils in the rear.
When I get home, I'll get the torque specs and sizes of the bolts and update this thread.
One thing I'd like to add is when to do an alignment. After you have installed a new suspension, you want to let it all settle before you go and get an alignment. This is especially true if you've replaced the struts and/or any bushings. It takes about a week or two for everything to settle, and then you should go get your alignment. Many shops will sell you an alignment right after the install, and then another one in two weeks, so that may be something you want to do if you are going to be driving a lot inbetween. I have only put about 100 miles on the car since the suspension install, and I am planning on getting an alignment at the Porsche dealer later this week. What really needs to be corrected is the camber in the rear, as it is rather negative and that will eat up your tires quickly.
Hope this helps. Feel free to ask any questions...
- Anthony
***EDIT***
Here are the torque specifications for the bolts/nuts:
Front strut/spindle bolt - 85 Nm
Front strut mount to body - 33 Nm
Front brake caliper to wheel carrier - 85 Nm
Rear strut mount to body - 46 Nm
Rear strut to wheel carrier - 100 Nm
As for the strut nuts, these need to be around ~50 Nm, but it's virtually impossible to measure them, since you need to hold the strut in place so it doesn't spin. I believe there is a special type of torque wrench for this, but alas, I do not have one.
Last edited by adg44; 05-02-2010 at 06:41 PM. Reason: Added Content
 04-21-2010, 04:07 PM
#3

Very nice job with this tutorial !
Great pics and great info about what tolls are needed to start the job.
My main question is how does the car drives while it is out of alignment ? I wonder how far off alignment you think you might be, it would be interesting to see your alignment values before they are corrected. Did you try to 'adjust' the alignment as much as you could, or you just put everything back there without worrying about it ?
Last thing, do you thing a newbie can install some PSS9 ? I mean I know how to wrench but never touch a suspension part ever.
Last edited by philooo; 04-21-2010 at 09:19 PM.
04-22-2010, 05:32 AM
#4
Rennlist Member
Thank you for tutorial!!!!!!!!!!!!!
I am Tackling this saturday....not really looking forward to it. Does look less painfull than the audis Ive done in the past, where the strut top is hidden underneath sheet metal. I picked up a set of o2 sensor removal bolts that will work for the strut tops and allow an allen key to hold the struts.
Would it be easier to turn the strut top bolts with the weight of the car on each side? (for the front anyways)
04-22-2010, 07:55 PM
#5
 When you lower a car, the toe will get out of spec, but it will still be equal to the left and right side (since you are lowering the car the same amount on both sides), so it will still track straight. I think I feel the wheels fighting each other sometimes, but it's not really noticeably.
Did you try to 'adjust' the alignment as much as you could, or you just put everything back there without worrying about it ?
Last thing, do you thing a newbie can install some PSS9 ? I mean I know how to wrench but never touch a suspension part ever.
- Anthony
04-22-2010, 07:57 PM
#6
But yes, you should break the nut loose while the car is still on the ground.
- Anthony
Trending Topics
05-02-2010, 07:06 PM
#9
Pics after the install (sorry, they are from my camera phone. Real pics to follow shortly):

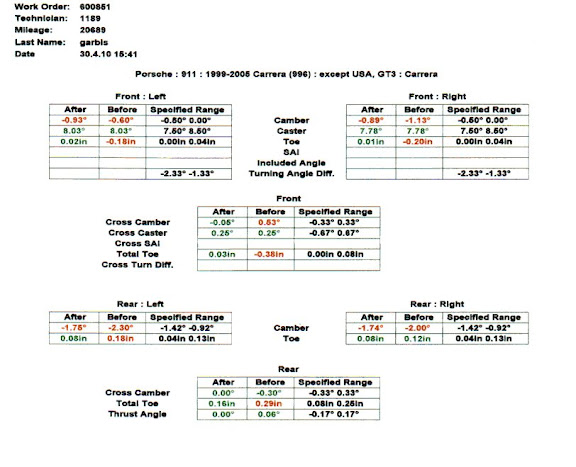
And my alignment report - the rear camber won't come in spec with the lowering springs, although it's not too far out. I assume they make some different bushings or eccentric bolts that allow for more adjustment, but I haven't looked into that yet.
- Anthony
And my alignment report - the rear camber won't come in spec with the lowering springs, although it's not too far out. I assume they make some different bushings or eccentric bolts that allow for more adjustment, but I haven't looked into that yet.
- Anthony
Last edited by adg44; 05-02-2010 at 07:06 PM. Reason: .

 05-07-2010, 11:18 AM
#13
Rennlist Member
BEFORE
AFTER
 05-11-2010, 11:15 PM
#14
I asked H&R about this and they said using the sport springs on the factory dampers was fine as well.
Granted if you want maximum performance a set of Bilstein Sport struts would be your best bet (unless you do coil-overs).
- Anthony
04-19-2011, 11:22 PM
#15
I know it is another old thread revival, but as I am finishing my RoW-M030 suspension installation, and I used this thread to help me doing the job, even more than the one on renntech.
I want to add a couple of details for those who will do this on their own using this thread.
- You don't really need the special tool mentionned to un-screw the nut on top of the strut. I was able to do it easily with an open wrench (22mm) and
an hex key (10mm)
- There is no information about how to remove the brake caliper. It is very easy to do, just remove the two main bolt on the caliper and ALL the electric cables going to it. you will find them easily but you indeed need to remove them all.
- I was able to remove the front and the back strut by myself without problem. Instead of a second person to help, I had a pry bar. I placed one end of the pry bar under the cross member and the other end on top of the suspension arm, on which I was able to apply pressure with my foot. There is not much force needed and you can control it while pulling the strut out. If you have another person, I think they will need the pry bar anyways as it is not easy to apply downward pressure on the rotors. Having the wheels screws on the rotor sometime help to jiggle them up and down.
- As mentioned in the article, you want to have a 10mm hex socket to be able to use your apply the proper torque to it.
Overall pretty easy work to perform yourself. time consuming but all fun. Just make sure you have a full set of flat wrench and sockets, but the essential are A PRY BAR and a SPRING COMPRESSOR.
Last edited by philooo; 04-20-2011 at 02:03 PM.