
DIY: Mass air flow (MAF) sensor replacement for Mk1 996 C4
 03-08-2013, 12:59 PM
#1
Race Director
Thread Starter
The MAF sensor is a common cause for a MIL (check engine light). If you install an aftermarket, oiled air filter, or if you clean and over-oil your aftermarket filter, your MAF stands a good chance of being fouled and needing replacement.
This DIY rates 0 out of 8 bloody knuckles. It's a piece of cake.
The image below shows the Durametric readout of the diagnostic trouble codes for my 996. Having both P1128 and P1130 is a great indication that you need a new MAF. If you only have one code, do not clear it. Drive for another couple of days and check again for both P1128 and P1130.

Tools you will need:
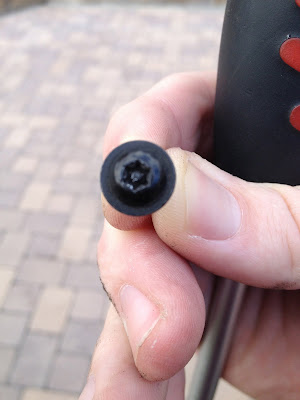
A Torx T20 security driver or screwdriver tip. See photo below. If you don't have a security torx bit or driver (the bit is hollow in the center to accept the post in the middle of the screw head), you need to find one.
No other tools are required.
Obtain a new MAF. Hint: If you don't want to pay $500, go to the Bosch web site and look up which part fits your vehicle. For a 1999 Carrera 4, the part number is Bosch 0280218009, priced on Amazon at $148.02 in March 2013. Bosch warrants the MAF for 12 months, unlimited miles.
The Bosch vehicle part finder URL: boschautoparts.com/VehiclePartFinder/Pages/VehiclePartFinder.aspx
Once the new MAF is in hand, you're ready to go. Open the engine bay. The MAF is circled in the following photo:

To remove the MAF, you need to pinch the top end of the back side of the connector to make it release.
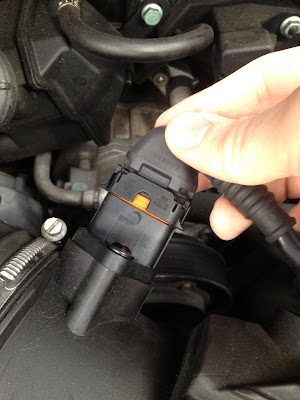
Here's the back side of the connector, to give you a better idea of what you should be squeezing. When you are pressing down in the right spot (the two parallel lines in the image below), the connector will pop off.

Once the electrical connector is unplugged, use your T20 driver to remove the two screws holding the MAF in place and remove the MAF from the intake.

Here is the Bosch MAF (below) compared to the original "Porsche" MAF (top). Look similar?

Carefully insert the new MAF into the hole from which you removed the old one. If you don't remember which way it goes, don't worry! The hole is keyed to the shape of the MAF sensor. Once the new sensor is correctly oriented, replace and tighten the two T20 screws.

Carefully plug the electrical connector into the new sensor.
That's it! Use your scantool or Durametric to clear the diagnostic codes (or disconnect the negative lead on the battery for a few minutes), and go spend some of the several hundred bucks you just saved buying the Bosch part and doing the 5-minute install on your own.
This DIY rates 0 out of 8 bloody knuckles. It's a piece of cake.
The image below shows the Durametric readout of the diagnostic trouble codes for my 996. Having both P1128 and P1130 is a great indication that you need a new MAF. If you only have one code, do not clear it. Drive for another couple of days and check again for both P1128 and P1130.
Tools you will need:
A Torx T20 security driver or screwdriver tip. See photo below. If you don't have a security torx bit or driver (the bit is hollow in the center to accept the post in the middle of the screw head), you need to find one.
No other tools are required.
Obtain a new MAF. Hint: If you don't want to pay $500, go to the Bosch web site and look up which part fits your vehicle. For a 1999 Carrera 4, the part number is Bosch 0280218009, priced on Amazon at $148.02 in March 2013. Bosch warrants the MAF for 12 months, unlimited miles.
The Bosch vehicle part finder URL: boschautoparts.com/VehiclePartFinder/Pages/VehiclePartFinder.aspx
Once the new MAF is in hand, you're ready to go. Open the engine bay. The MAF is circled in the following photo:
To remove the MAF, you need to pinch the top end of the back side of the connector to make it release.
Here's the back side of the connector, to give you a better idea of what you should be squeezing. When you are pressing down in the right spot (the two parallel lines in the image below), the connector will pop off.
Once the electrical connector is unplugged, use your T20 driver to remove the two screws holding the MAF in place and remove the MAF from the intake.
Here is the Bosch MAF (below) compared to the original "Porsche" MAF (top). Look similar?
Carefully insert the new MAF into the hole from which you removed the old one. If you don't remember which way it goes, don't worry! The hole is keyed to the shape of the MAF sensor. Once the new sensor is correctly oriented, replace and tighten the two T20 screws.
Carefully plug the electrical connector into the new sensor.
That's it! Use your scantool or Durametric to clear the diagnostic codes (or disconnect the negative lead on the battery for a few minutes), and go spend some of the several hundred bucks you just saved buying the Bosch part and doing the 5-minute install on your own.
Last edited by 5CHN3LL; 03-13-2013 at 02:01 PM.

 03-09-2013, 09:31 AM
#3

Those p codes could be many things, vacuum leak, low fuel pressure and not necessarily a bad MAF. If the MAF is the culprit then the car will throw codes that are specific to the MAF. I wouldn't just start replacing expensive parts without a proper diagnosis.
03-10-2013, 10:48 PM
#6
Race Director
Thread Starter
If you get one code or the other, without getting reset happy with your scan tool, yes, there is any number of possible diagnoses. If you get BOTH codes, I'll refund one dollar toward the cost of your new MAF if that is not the culprit. 
03-10-2013, 10:52 PM
#7
Race Director
Thread Starter
If the MAF is fouled, and not broken (i.e. it still is producing voltage in the correct range), this statement is simply not true. You will wait until the cows come home for a MAF-specific code. Once the cows will come home, you will still be waiting, and the cows will talk about you behind your back.
Trending Topics
03-11-2013, 01:59 PM
#9

Bosch vs Porsche
Made by Bosch for both, exactly the same part except for Porsche logo and part number on the Porsche version.
I can't recall what the price difference was but certainly much more than the logo and part number silkscreen was worth.
Made by Bosch for both, exactly the same part except for Porsche logo and part number on the Porsche version.
I can't recall what the price difference was but certainly much more than the logo and part number silkscreen was worth.
03-11-2013, 04:07 PM
#10
Race Director
Thread Starter
SRP for the Porsche-supplied version is $495, and this was the price I saw at one of the two most commonly mentioned Porsche part sales sites on this and other forums. The Amazon price for the part number supplied by the Bosch site is $148.02, for a net savings of $346.98.
If you have an Amazon Prime account, second-day shipping is free. I apologize for the Amazon plugs... I'm not affiliated in any way with Amazon, but they should be sending me a fruit basket for Christmas given how much money I send them.
If you have an Amazon Prime account, second-day shipping is free. I apologize for the Amazon plugs... I'm not affiliated in any way with Amazon, but they should be sending me a fruit basket for Christmas given how much money I send them.
Last edited by 5CHN3LL; 03-13-2013 at 01:00 AM.
03-11-2013, 04:08 PM
#11
Race Director
Thread Starter
I took a photo of the OEM part and the replacement part side-by-side, which will go into the writeup tonight. This should silence any "I can't believe you didn't buy the Porsche part" naysaying. 