When you click on links to various merchants on this site and make a purchase, this can result in this site earning a commission. Affiliate programs and affiliations include, but are not limited to, the eBay Partner Network.
Hey guys..perhaps I'm missing something here, but why not drill all the way through both pieces and through bolt it? I don't know the shaft diameter, but I'll be it's got a lot of beef still left after you drill it for an M10 bolt. An Esna stop nut on the other side would keep it all together...jus sayin..redneck fix...Thanks, Tiger 03447...
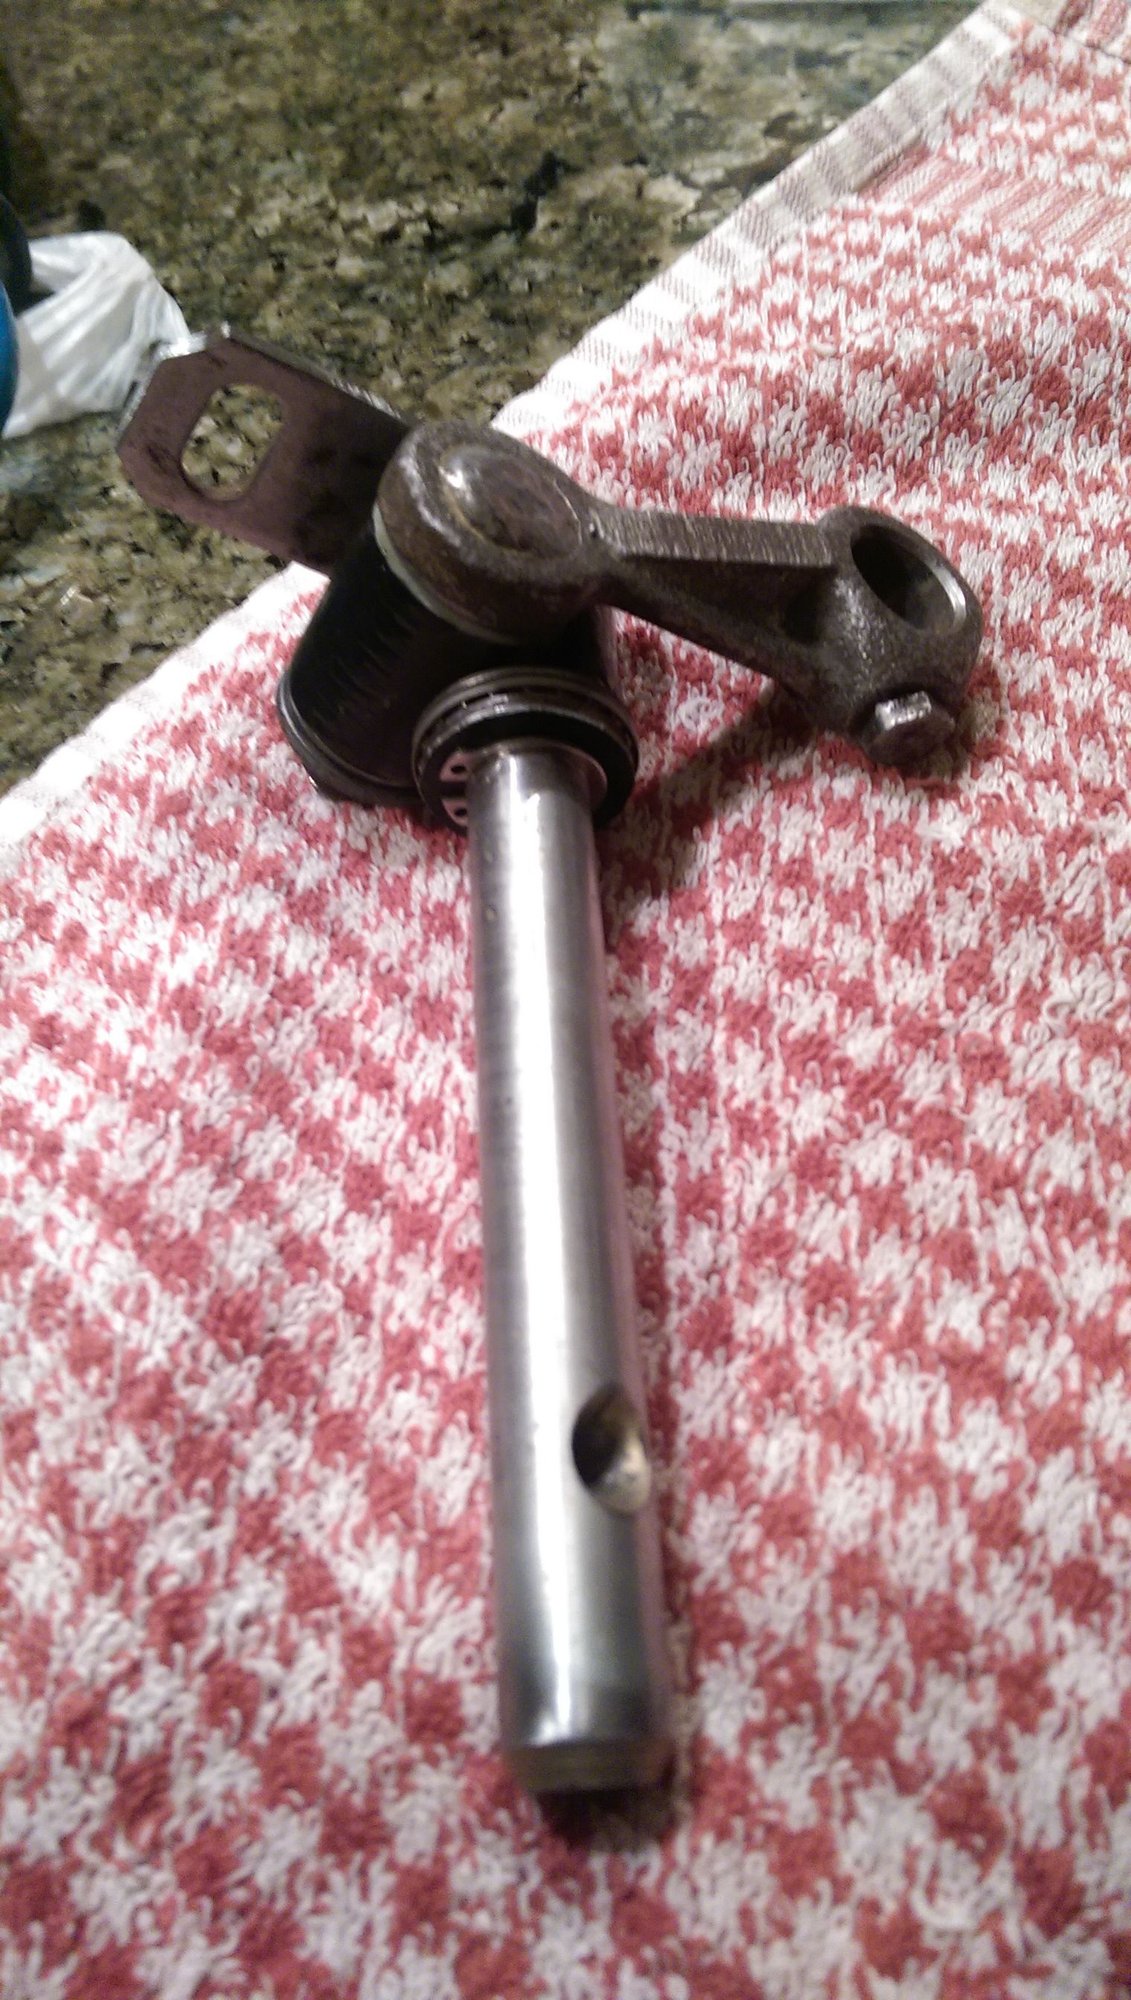
Tiger: where exactly would the bolt run? For reference, the shaft that runs front-to-back is 15mm diameter and the shaft that goes left-to-right (held by the bolt and washer on one side) is 10mm diameter.
The latter is threaded for M8x1.25mm with a shoulder on which the washer sits.
I got all the parts (except the locknut which was shipped from a different warehouse and hasn't arrived). I assembled and it's awesome - almost no play.
I had to slightly modify the 10mm shaft where the washer seats with a dremel, and had to add to layer of gorilla tape to the washer behind the snap ring on the 15mm shaft for everything to be tight. Both of these could have been avoided if I did less milling/sanding on the plastic coupler. As it is, I would honestly still feel comfortable installing it... it feels awesome and more secure than whatever loose and rusted out linkage is on my trans right now, complete with sketchy snap ring which is 50% rust on every 944 by now.
Hi, this is Kyle and I'm the owner of Only944.com.
To the original poster. You did a great job at coming up with a fix for the stock shift linkage. Using thrust bearings on those 4 point will fix all the play in the linkage and should make it work better and have no play. Great idea.
Doug, I remember you telling me about having an issue with your short shifter, and I went back and reread all our emails back and forth, which was exactly 1 year ago. I never called you crazy or even implied that. I don't think you are crazy at all and sometimes things just happen and there are issues with certain parts. We actually had a great conversation and you gave me great advice and helped me out. I also promptly refunded your money for the SS, including shipping, and apologized for the troubles it caused you. You are entitled to your own opinion about our short shifter, and that's fine with me. I believe that our short shifters are not garbage, and wouldn't make a part that I thought was garbage, especially since I use all the parts we sell on my cars, and one is a daily driver. I have never had any problems with the bolt backing out and I tightened it very tight. We also supply loctite and suggest using it on this bolt, for this reason. There is a lot of vibration in the rear and loctite will hold this bolt tight.
I will look into making this part out of steel, but I don't feel it's needed, and the cost might be too high.
Just out of curiosity, and fun, I would like to take a torque wrench and see how much torque it takes to actually strip out the aluminum. I have tried tightening that bolt very tight before and it didn't strip out, so I'm confused as to exactly what the problem is. There is always a chance that there was just something wrong with the aluminum on your part.
Hi, this is Kyle and I'm the owner of Only944.com.
To the original poster. You did a great job at coming up with a fix for the stock shift linkage. Using thrust bearings on those 4 point will fix all the play in the linkage and should make it work better and have no play. Great idea.
Thanks,
-Kyle
Thanks!
I forgot to mention in the OP but I have your linkage arm installed and it made shifts a lot nicer, so shameless plug for that. Especially cause it was only $20 or something.
For anyone following this, I updated the OP with the rest of the pictures. It's all together now and feels great.
I will look into making this part out of steel, but I don't feel it's needed, and the cost might be too high.
Just out of curiosity, and fun, I would like to take a torque wrench and see how much torque it takes to actually strip out the aluminum. I have tried tightening that bolt very tight before and it didn't strip out, so I'm confused as to exactly what the problem is. There is always a chance that there was just something wrong with the aluminum on your part.
I still think it's a good piece and love dealing with you Kyle, but there is room for improvement. Mine backed out on the race car and also on my 951. The shifter just gets sloppy and then loses connection. The race car one I was fixing in a hurry between sessions and was probably too exuberant with the wrench and pulled a nice coil of threads out pretty easily.
Here we go. I really don't want to sell a product that I don't think is good enough especially since I use everything we sell, so I tested one of the short shifters out. I wanted to see for myself just how much torque it would take to strip out the aluminum threads. I grabbed a part at random and threaded a bolt into it. I started off with 60ftlbs and the threads were fine, so I went to 80ftlbs and the threads were still fine. Then I just cranked on the bolt until it stripped out the aluminum threads. As you can see I was having a little trouble. Guess I should have bolted down the vise. lol. I'm guessing it took around 150ftlbs to strip the threads, before the bolt started getting loose again. I made a little video of me testing this parts, and the link is below.
On a side note, Justin. Backing out and stripping out are two different things. There can be a ton of vibration in the transmission, especially if you have a solid mount. I would suggest higher strength loctite, and/or safety wire. That way you know for sure a bolt won't back loose. Personally I've had mine in my daily driver for a few years now, with med strength loctite and it works great, never came loose. I do agree that steel is stronger, and might be an improvement, but I don't think it's really needed. I don't think this bolt really needs to be very tight at all, as long as it doesn't back loose. I would say 30 - 40 ftlbs and loctite on a clean bolt will work just fine.
On a side note, Justin. Backing out and stripping out are two different things. There can be a ton of vibration in the transmission, especially if you have a solid mount. I would suggest higher strength loctite, and/or safety wire.
For sure, I definitely put a lot of blame of the stripped thread into user error. When it's hot, covered in fluid from a leaky transmission and you're in a hurry... things get broken. I helicoiled it up and all is good now.
Still have no footage of it actually in use on my car... it's sitting in Houston this month but it's tight and solid. Combined with Kyle's shifter arm, it's butter.
If anyone wants one, I'll offer the labor for $30 in addition to the cost of parts. The parts, which I order, have been $34-43 shipped depending on what can and cannot be reused (washers, mainly, the old ones are sometimes too corrosion-pitted to reuse).
I really recommend also replacing or rebuilding the shifter lever in the cabin if you haven't already, it's a huge source of slop. You can check by pulling up the boot around the lever... if you move it side-to-side and the black rod running to the back of the car isn't moving, you have slop there. If it is moving, but you can still feel play, it's the linkage in the back that this thread focuses on. Check the first post in this thread for a good way to rebuild the shift lever - or if you prefer to send it out along with the linkage, PM me and we can figure something out.
A little late to the party here, but I built this nearly 5 years ago and have had zero failures. Unfortunately this thread is all I have left of the project due to a hard drive failure. In addition to building the rear, as you are, I also replaced the pin on the shifter handle. "Crisp" is the best word to describe my shifter's feel. At stock and 30% reduction, effort is light with a good "notch" feel.
A little late to the party here, but I built this nearly 5 years ago and have had zero failures. Unfortunately this thread is all I have left of the project due to a hard drive failure. In addition to building the rear, as you are, I also replaced the pin on the shifter handle. "Crisp" is the best word to describe my shifter's feel. At stock and 30% reduction, effort is light with a good "notch" feel.
Whoa! That's legit! Very impressive machine work there. I have a heim joint SSK sitting around and yours looks like a better engineered part in every way.
Originally Posted by Noahs944
SH, Just watched your vid. Props to you bud! Your work is very impressive.
Thanks! I had my smartphone hanging from vice grips so I could use two hands

 03-05-2015, 07:06 PM


") but it's tight and solid. Combined with Kyle's shifter arm, it's butter.
but it's tight and solid. Combined with Kyle's shifter arm, it's butter.
