When you click on links to various merchants on this site and make a purchase, this can result in this site earning a commission. Affiliate programs and affiliations include, but are not limited to, the eBay Partner Network.
Edit 1/18/2015: for anyone following the steps I used: be warned that I haven't really tested it in the direct sunlight for long periods of time (edit 8/25/25, the dash is holding up still), so don't put too much faith in this procedure until the tests are in. The center speaker delete method I used turned out to be no good - see page 2. Do NOT use truck bed liner!! In fact, I wouldn't recommend using anything except foam and paint/texturizer. I know the steps I used say to use undercoating, but there's a chance this can cause bubbling in high temps.
Edit 3/6/2015: I'm changing the OP so it's oriented more toward prepping the dash moreso than toward complete start-to-finish resto.
Edit 8/25/2015: The fiberglass dash has held up for the entire TX summer, being parked outside with interior temps routinely hitting 120+ F.
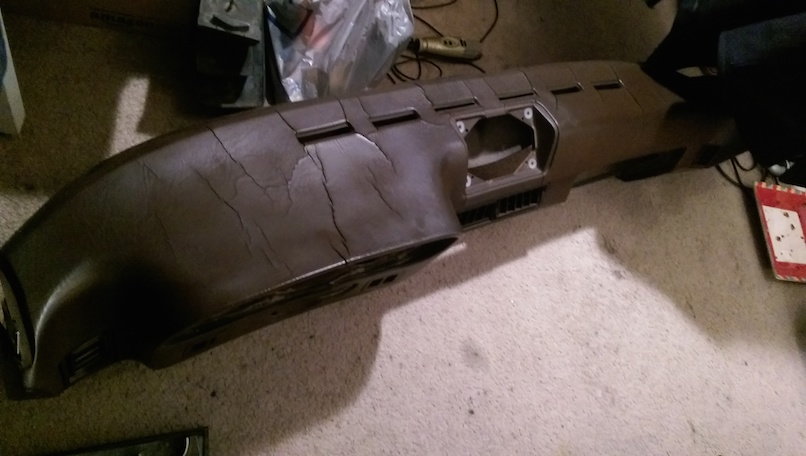
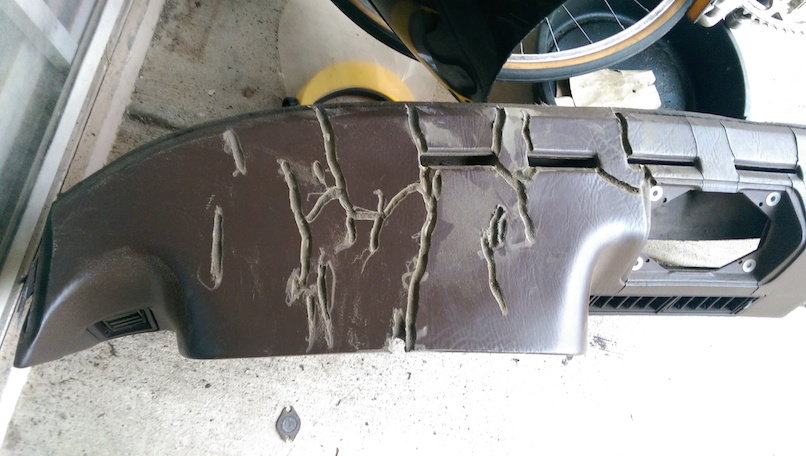
One of the most aggravating things about the 924/944.1 interior has to be the dash, uncracked examples are pretty rare. I have a dash cap on mine and it warped after a week in the Texas sun, plus having a plastic overlay (or even worse, a carpet) on the dash just makes the whole interior look cheap. I had an extra dash sitting around and attempted to refurbish it - no stitching or gluing involved, and well under $50. This post is going to seem a bit long-winded, because there are a lot of details and small nuggets of useful info that determine the quality of the finished product. So sorry in advance for the textual assault and seemingly endless steps. This is how I did my dash, there are probably many other ways, I'm sure many are superior. Please leave comments for improvements to this! I've never done anything even close to this before, so this is basically me fumbling through a dash restore.
This approach is a compromise - it's not going to look as good as a new dash, but also isn't expensive, and can look really nice if you are willing to put in the man-hours to refine it. I have about 16 hours invested personally. The final product heavily depends on the work invested. Garbage in, garbage out.
I also want to make a note about deleting the center speaker. I did it on mine and it easily doubled the amount of work. It's still not perfect, a keen eye will spot small flaws when studied up close. I'm sure many of you could do it better and without as much time investment, but be aware that it can be really aggravating to get it all level and seamless. Some integrated gauges would be an awesome addition, if I repeat this job I'm going to go that route. Edit: don't delete the center speaker using foam, see pg 2.
The dash is made from relatively dense foam with a thin layer of what looks like vinyl bonded to the top. Unlike the late dash, this can't be peeled off easily (edit: yes it can be, I just sucked, peel that crap off). I'm mentioning this because this vinyl layer makes a smooth finished surface much more challenging - when you sand the dash, the exposed foam will wear down much faster than the vinyl (despite the vinyl being thin). This is annoying because the areas with exposed foam or foam fill will become indented after sanding, leaving a "valley" where the cracks used to be. It can be worked around as you will see.
Don't get this foam on your hands, it's a PITA to get off. You have to peel it off and it usually takes a thin layer of skin with it (can confirm). Use gloves!
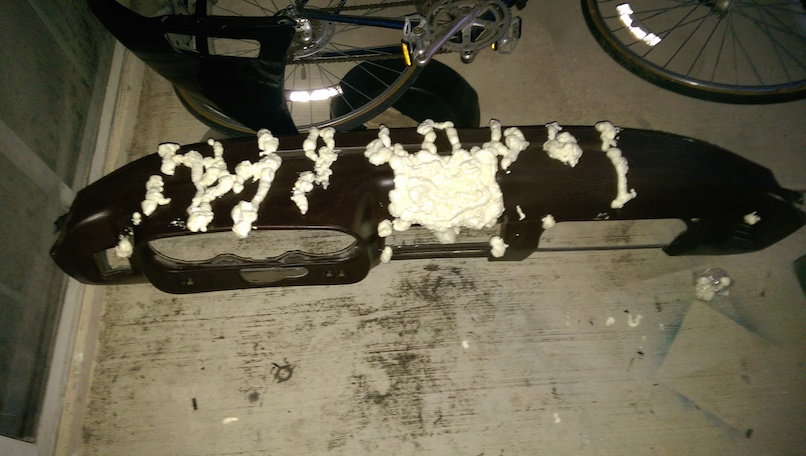
The foam can be 'tooled' by spraying a bit on a piece of newspaper and using something like a large tongue depressor to apply it. I recommend you get at least 10-20 of them, the foam hardens unevenly and expands, making them good for one 'session' each. You apply the foam like icing on a cake, being sure to compress the foam back into a paste-like consistency to eliminate most air bubbles.
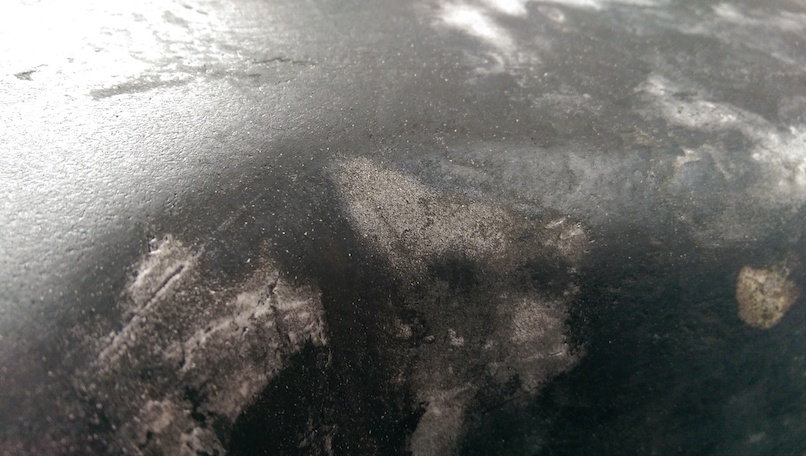
When the foam is partially set (about 10-15 mins after application), you can use a finger to mash it back down. This dramatically reduces air pockets, and when it fully dries, it will be much stiffer and is a better match to the existing foam in the dash. Pic to demonstrate. Here's another.
These are the steps broken down, and with pictures. If any of these pics ever go offline, PM me and I'll relink.
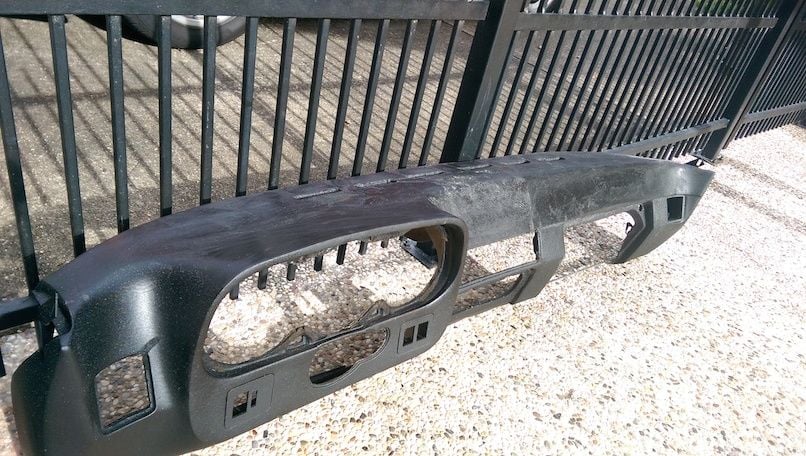
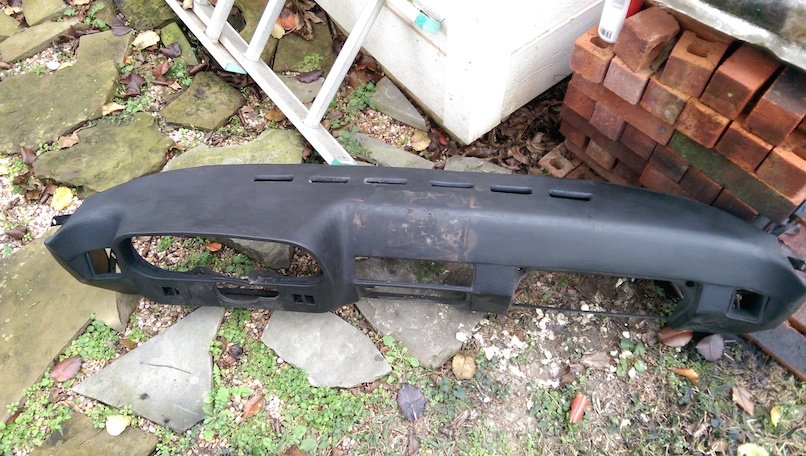
The dash I started with... cracked as usual. Remove all vents and plastic trim pieces.
I HIGHLY recommend peeling off the vinyl before proceeding. I did this job twice on the same dash. Run #1 was with the vinyl on, and it was way better after I took it off. As such, a lot of the graphics in this post are from the run where the vinyl is still on.
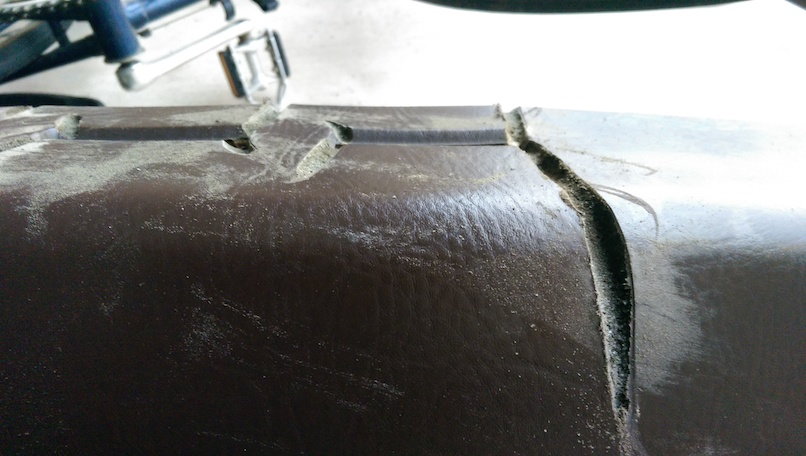
Grind out the cracked areas
I used a Dremel tool with a cone-shaped grinding bit on it, about 10mm wide. Cuts like butter, so be careful not to make more work for yourself with excessive grinding. Grind out all crack-affected areas (there's an off-color joke somewhere in there) like so:
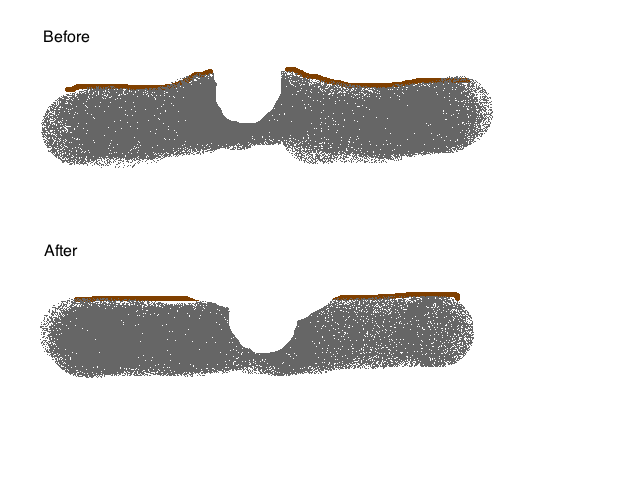
Another way to make things easier on yourself is to chamfer the edges of these new rifts a little. When the dash cracks, it bows up and buckles, so it still isn't going to be perfectly flat even though you got rid of the damaged foam. This should be your goal:
I didn't do this step when I did it, but I wish I did. Would have saved me a lot of sanding.
Fill with expanding foam and sand flush
Pretty self explanatory, crack open the Great Stuff and run a ribbon through all cracked areas. This is first application of many, so it doesn't need to be super precise, just bulk fill. If you're deleting the center speaker, fill that about halfway (it expands a lot). Put some packing tape across the back of the speaker hole to keep it from expanding out the back (learn from my mistake).
Once it's dried (I recommend leaving it overnight), use a knife you don't care about to cut off the head of the foam, and sand the remaining excess as flush as you can. If you filled the speaker hole, it probably won't even be close to dry in the center, so be careful and patient.
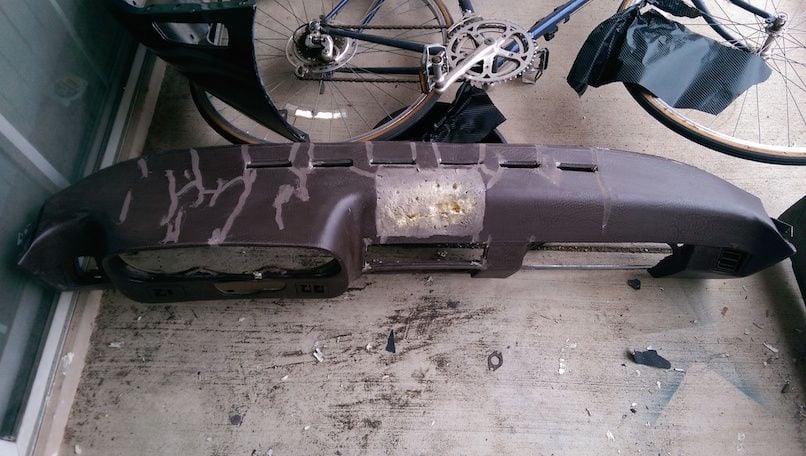
Touch up flaws and sand smooth
If you thought you were done with foam, I have bad news
This is where you 'tool' the foam into the flaws (as described in the material property block earlier). The goal here is to reduce the foam into a paste, and smear it into the areas where there are air bubbles, gaps, or ridges.
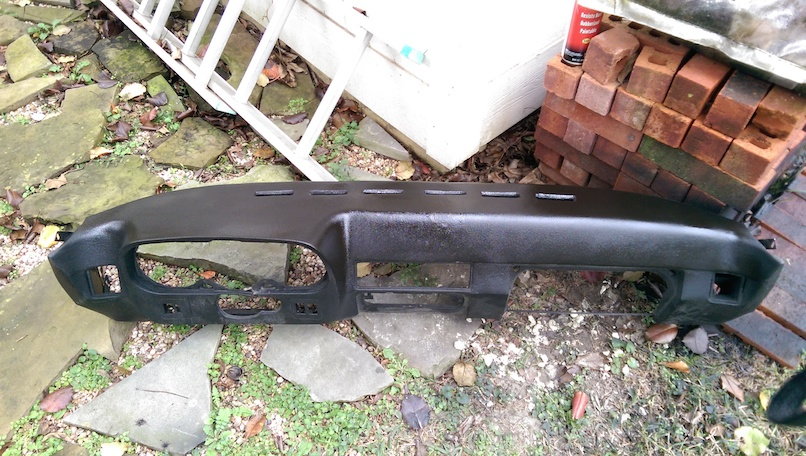
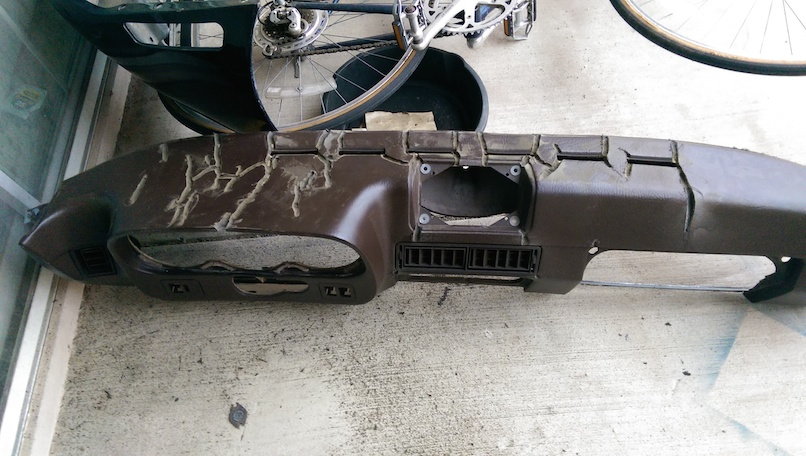
Again, cut and sand flush. There should be a lot less excess this time. Go over the whole dash with the power sander (even thinking about doing this by hand makes me cramp up). You want to get everything as even as possible, especially over the cluster. Look at it from the side to get an idea.
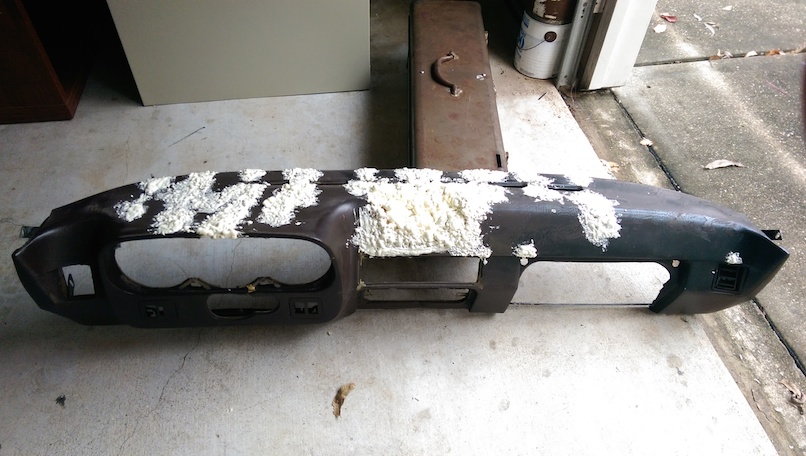
This is my dash about halfway done:
Choose a method of finishing and apply it
Ah, this is where you have to do some decision making... there are a couple options.
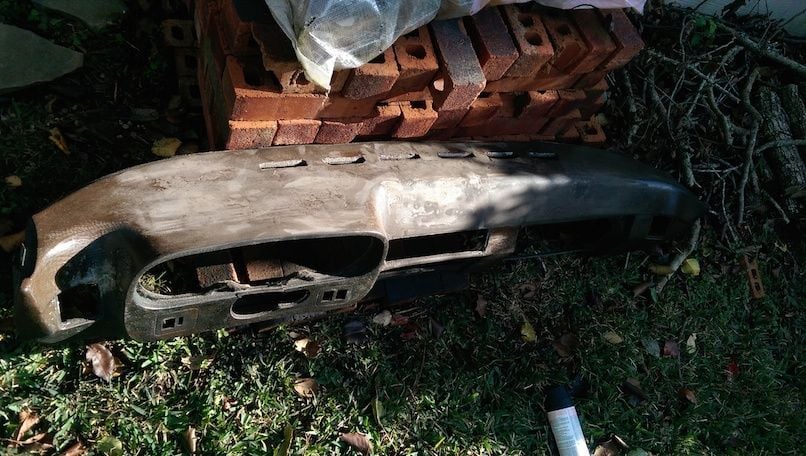
I tried out simply using undercoating and paint, which looked great but didn't hold up. If you want to see how this looked, I put the pics at the end of this post. On page 2 you can see how it didn't really hold up well in the heat. Granted that I used a heat gun, and maybe it would never get that hot, but I just didn't have faith in it.
User joeystanker used vinyl after prepping with the foam and it looks killer... read the thread, and his pics are on page 5. I think he's one of the first to DIY reupholster an early dash and have it come out well.
Another option is fiberglassing. I'm currently waiting for a good time to do this on my dash. The idea is to lay down mat and use polyester resin, it will resist cracking and hide small imperfections. I'll post detailed info if it comes out alright.
So pick a method, maybe even coming up with your own, and make it happen.
Paint and prep for install
This step doesn't really apply if you used vinyl to cover it.
Spray the texture coating on it - use a medium coating at first. When it's dry (wait at least an hour), sand it everywhere using 300-500 grit. Apply at least one or two more light layers to build up a good texture that hides small flaws well.
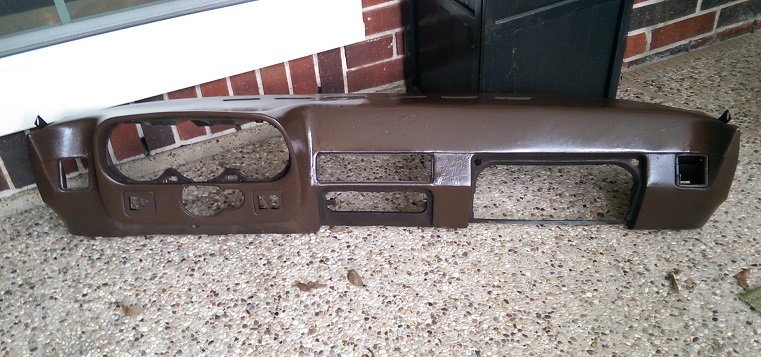
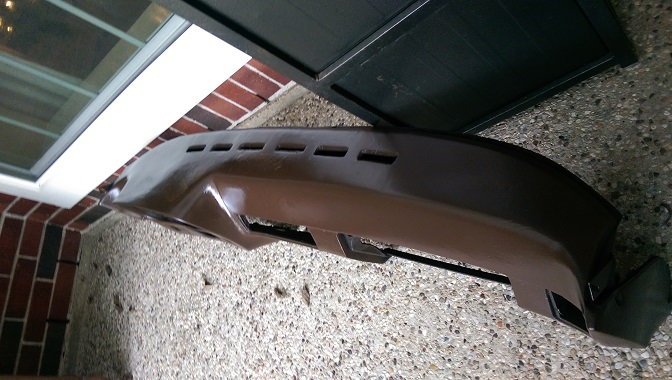
Now paint - spray the assembly in light coats, and many of them. These are some pictures from before I added texturizing spray to the mix:
Go ahead and paint the plastic trim pieces to be the same color if you have a brown dash.
If you filled the speaker, you need to drill a hole in the back of the fill to accomodate the stud which normally anchors the dash there. It should be obvious where this is. Go about 2" deep and as wide as you feel comfortable with so you can position it when installing.
That's all I have so far! Ask any detailed questions if you have any, and of course share any tips to refine this messy and repetitive process. I would say that if I knew all of this beforehand, I could have done it in half the time. And certainly a lot less if I didn't delete the center speaker. Here's an album with all the pictures I used in high res. (pictures from later in the process not in there.)
_________________________________________
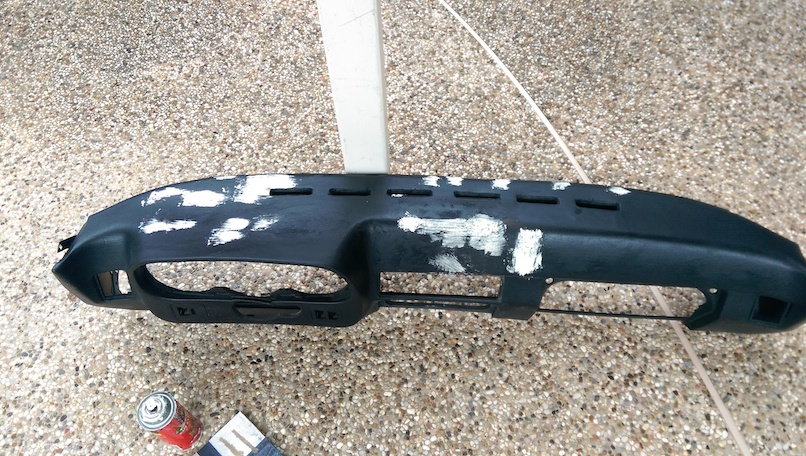
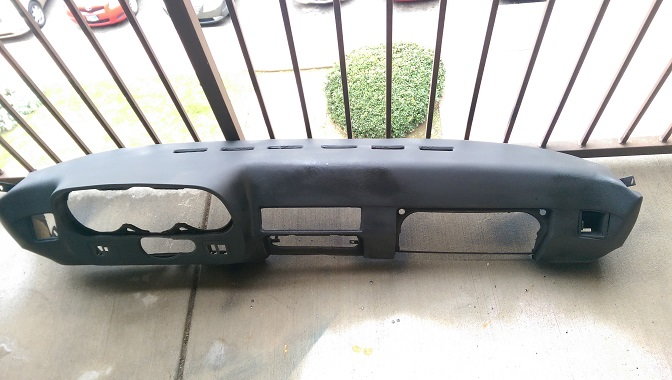
Just so you can see what it looks like using undercoating/texturizer/paint, here are the steps I took out from the original post:
Apply rubberized coating
Dust it off and give it a good coating. Not too thick, but not a light coat either. You don't want it to bead up and drip. This picture is the best one I have for this step, it's a little more refined than it normally would be at this step because it was taken later on:
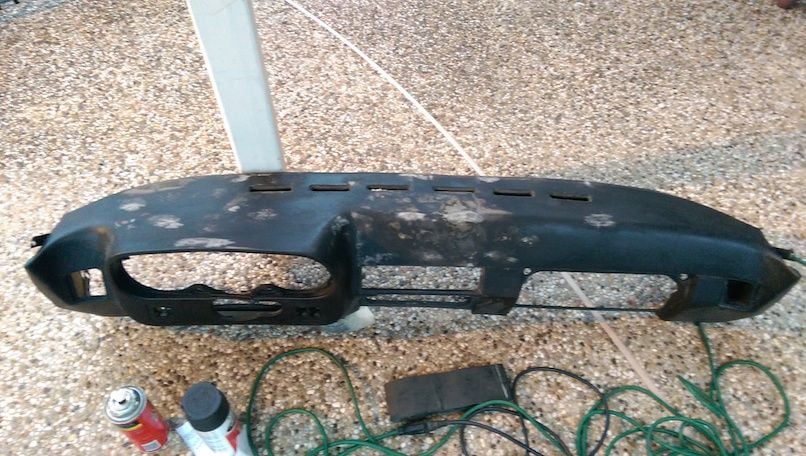
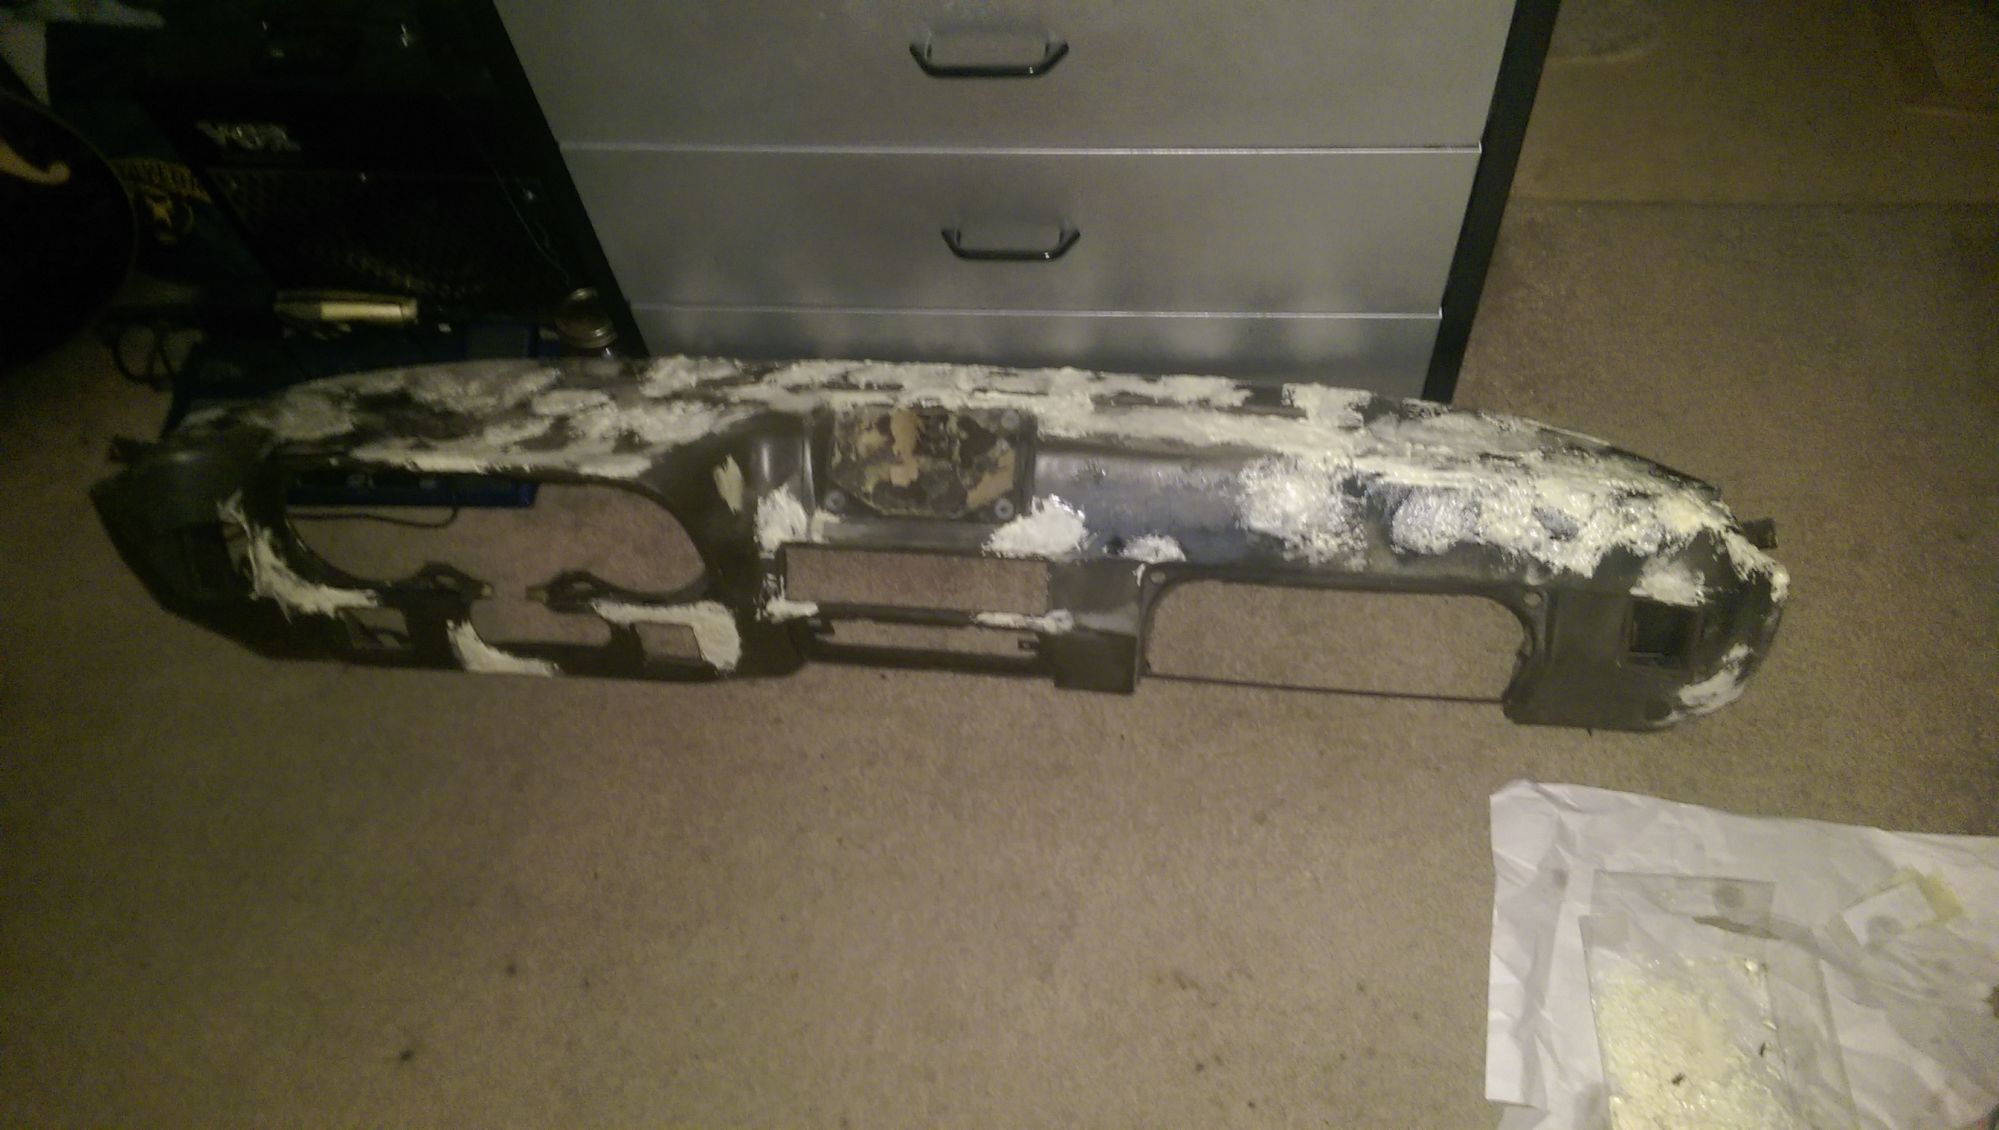
When it dries, you will be able to see the seams and many imperfections. These will be fixed by applying very thin coats of foam and refining them to be smooth.
Repeat until desired level of finish is obtained
This is 95%+ of the time you'll be investing - waiting for stuff to dry, and reapplying. Apply thin layers of foam (tooling it as per above) directly onto the undercoating.
This seems weird, and the truth is that I discovered it by mistake. I mentioned previously that the vinyl makes it hard to get a seamless finish, but the undercoating 'consolidates' the surface in a way. When this is lightly sanded, the seams disappear. Additionally, the foam bonds very well to the undercoating, and the sanding allows to make the transition very smooth:
Here are some pictures from my project. I probably did 10 cycles, it was annoying but I'm glad I put in the effort.
I've been wanting to make a fiberglass or CF race dash for my car that has the form of the original dash. I think this process to fill the cracks, holes, and vents, plus some bondo and a glossy coat of paint would be perfect to pull a mold off of.
I have to say I hate working with expanding foam though. Nasty stuff.
I have heard the green foam that is used to pot fake plants can be shaped easily and maybe could be used to fill larger holes. I'm not sure if it's density would be a good choice for spiffing up an old dash like you did but for my purpose it may work well to fill holes and create a "console" extension down to the tunnel for switches.
I agree, that foam is a love/hate relationship. That's an awesome project, be sure and share the results!
Originally Posted by Parawhore
I saw your post on Facebook.
I planned on doing this over the summer regardless using the dash out of my parts car, but your writeup helps A LOT.
BTW, you have one of the nicest early cars I've seen IMO.
Thanks! I would have no qualms recommending someone to do this project on the side, spending maybe 30 mins a day on it. It isn't terribly hard, just tedious at times.
I'm curious as to how well the center speaker hole fill-in holds up. That's a big area, and with thermal expansion/contraction etc of the two materials, only time will tell!
I'm curious as to how well the center speaker hole fill-in holds up. That's a big area, and with thermal expansion/contraction etc of the two materials, only time will tell!
I'll report back if anything crops up. The foam is a pretty good match to the original foam when it's packed down (when semi-dry) so I'm hoping it plays nice. That's one of the reasons I ruled out body repair stuff like bondo, I'm sure it would crack as soon as the temperature shifted enough.
Originally Posted by joeystanker
Great work Mike!
Thanks for the walkthrough.
Thanks! Any progress with your car? I haven't come across any early clock pods unfortunately.
The car is going great Mike.
I refurbed the back hatch area. I light sanded out the surface rust in the spare tire area, primed, and repainted. I even cleaned up the spare and painted it in the color scheme of the Fuchs. I also cleaned up the wiring back there (Bundled it into conduit from Frys) and installed those tail light sockets you gave me (Thank You). I also replaced the sound deadening with new stuff.
This inspired me to get in front and do the same. I'm pulling my dash to refurb it like you. I am prying up the old dash cap and finding a demolished dash. I am going to fix it. I'm cleaning up wiring along the way. Re-ran the power to the Car stereo and now it doesn't cut out. I have been deleting the old car alarm as I find it. I'll get the rest of the interior out re-sound deaden the whole thing. Thanks for the news on the clock and thanks for looking, I'll get one. Cheers, Joey
That is a very impressive job! The before to the current pics show a huge undertaking with stellar results. I am in the process of doing an 85.5 dash. I grabbed a kit from Classic 9 but didn't read the direction correctly pertaining to the defrost vents. Now I will get another donor dash to complete the project. (I cut way too much material off and do not want to try to recreate defrost vents from scratch) The instructions say to use fiberglass body filler (Or flexible body filler) on the cracks but I like the foam approach better - I have already noticed a crack in my repairs. I have ground out the crack with a die grinder and thoroughly cleaned the area, but still doesn't seem nearly flexible enough. I am going to test out a SEM flexible filler (like bumper repair) if I can find it locally. Hope to post pics of my project soon. Thanks for sharing some great pics and ideas - cheers!
That is a very impressive job! The before to the current pics show a huge undertaking with stellar results. I am in the process of doing an 85.5 dash. I grabbed a kit from Classic 9 but didn't read the direction correctly pertaining to the defrost vents. Now I will get another donor dash to complete the project. (I cut way too much material off and do not want to try to recreate defrost vents from scratch) The instructions say to use fiberglass body filler (Or flexible body filler) on the cracks but I like the foam approach better - I have already noticed a crack in my repairs. I have ground out the crack with a die grinder and thoroughly cleaned the area, but still doesn't seem nearly flexible enough. I am going to test out a SEM flexible filler (like bumper repair) if I can find it locally. Hope to post pics of my project soon. Thanks for sharing some great pics and ideas - cheers!
Scott,
I have a friend's late dash a couple hours away and the Great Stuff foam I used is a decent match for the late dash foam material below the vinyl. Especially when you tool it and manually deflate it with finger pressure (I have a blurb on that in the OP).
Check your email! My texts have been going to a blank number. And hell yeah we are, I've spent easily 15 hours on this project over the break so I'll be going back with lots of tricks up my sleeve to make it nice.
 12-30-2014, 05:46 PM