When you click on links to various merchants on this site and make a purchase, this can result in this site earning a commission. Affiliate programs and affiliations include, but are not limited to, the eBay Partner Network.
Doesn't sound like the balance shaft bearings are an issue. I wouldn't consider "minor scuffing" to be an issue. If there are any burrs, etc. I'd remove them. The bearings are essentially hydrostatic bearings that use the engines oil pressure to keep the balance shaft centered in the housing, riding on a film of oil. Clean it up, make sure it spins freely and you should be OK.
I'm not sure what the clearance is, and what tolerance is allowed for wear, but that's another way to test the bearing is to measure its fit to the shaft.
Working in "the lab" this weekend and the wife and kid will be out of town. Hoping to make some real progress. I got valve cover gasket, spark plug seals, rubber grommets, and chain tensioner pads replaced and pinned for install. Front engine seals are going in and oil filter housing and maybe lower balance housing are coming out. I picked up some oil to lube o-rings and bearings. I don't dare say what weight oil I picked up without my flame suit on.
Finished installing the valve cover gasket, spark pug seals, and bolt grommets. For reference the permatex 51813 was VERY tacky but cleaned up easily. It easily held the gasket in place during install. I also used it in a few places in the gasket channel where the coating had chipped to help prevent wicking. Also installed the upper balance shaft seals and crank seals. One odd observation was the center bolt hole of the three centralized on the valve cover did not want to thread. I tried a couple bolts and generally if a bolt doesn't thread I move on and try another. As I was applying anti-seize I noticed one bolt had almost no threads. It was as if it were cross threaded from the factory and even the pitch seemed coarser. Any how it threaded into the problem hole just fine and torqued to spec.............so oh well. Only other hiccup was figuring the orientation of the upper balance housing. Tomorrow I will finish removing the god forsaken heat shield and finish the oil filter housing. The 1,1/4" cap worked well for the balance seal but I had to use the coupler for the crank seal. Overall I would recommend both considering the $1.50 spent. Old chain tnsioner pad compared to new install.
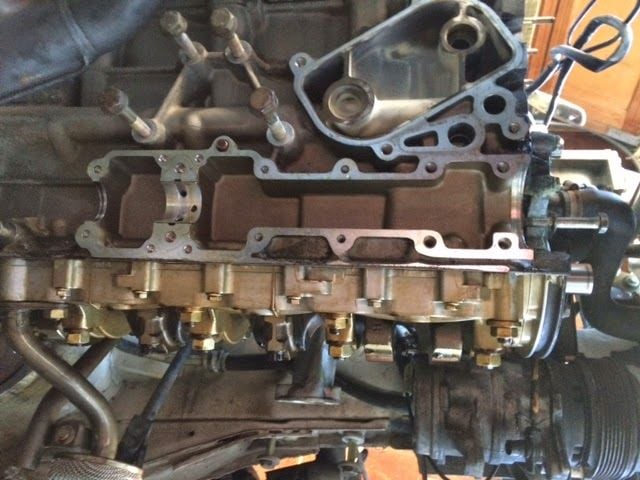
I finally slayed the beast! The oil filter housing is out and a German engineer did a really good job of putting everything in the way. I was able to get it out without pulling the exhaust manifold as well. Things that needed to come out: PS pump, oil cooler hoses, heat shield, swaybar, swaybar bracket (passenger), oil pressure sender (maybe could have stayed in), oil pressure relief valve, four bolts. The heat shield was a pain, but I bought a set of ball end allan keys to help. After the three allan bolts were removed the three 10mm bolts were removed to split the shield. The top right housing bolt is tight, but I got it out with a deep socket and 3/8" to 1/2" adaptor on my breaker bar and it was the perfect length. This was with the handle of the bar in front of the manifold runner. Found this walkthrough after the fact and he does it a bit different. There is also coolant in the housing which I wasn't expecting. There is no outlet so no circulation per-see but it must be used as a oil warmer on short trips to help it come up to temp. It is snug and I kept thinking there has to be one more bolt but between the gasket sticking and the connector pipe having to come straight out it just didn't want to let go.
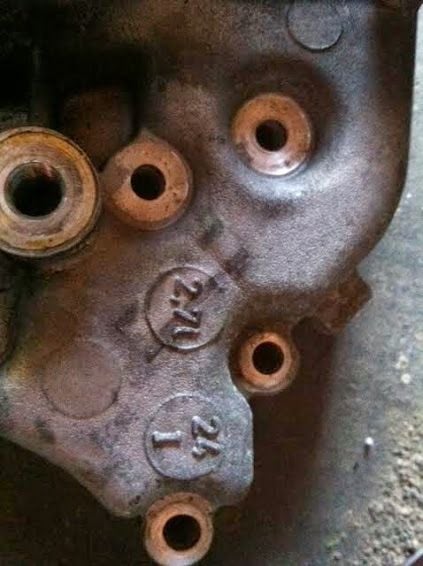
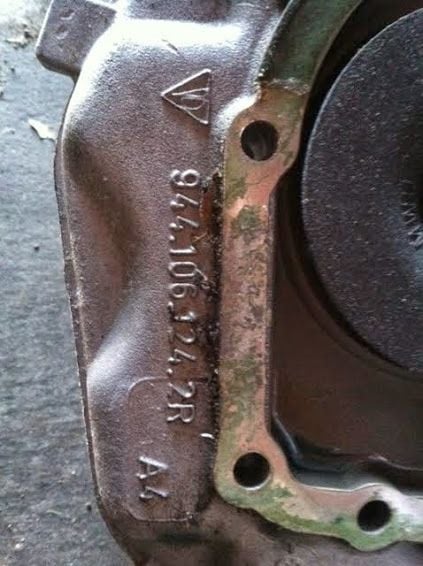
I saw in another thread where a gentleman had a 2.7L water pump on his S2. I thought I would post a pic of mine since it is the same and I can prove with service records it is the original for the car. I thought I would post the front and part number for reference. The other odd part is the part number is also a 2.5L pump so...................hope that's clear as mud.
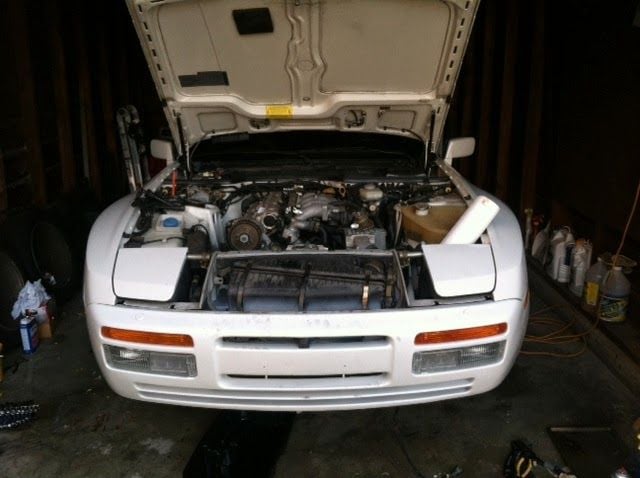
Been thinking and I believe I will bite the bullet and go ahead and drop the cross member. Might as well support the engine without all of the auxiliary adding weight and getting in the way. I bet a lot of you will be surprised by my engine support solution. I will be sure and take a picture. I have to order engine mounts and oil pan gasket.
I made some real progress today. I modified my engine support for a more traditional DIY style from our 928 brothers. If anyone would like some measurements let me know and I will post them. There was no amount of beating that could get the tie rod ends out so I picked up a screw type remover not the pickle fork. I have to say it worked great. This car never ceases to make me laugh sometimes. There have been several times I have looked at a bolt and said now how in the hell am I supposed to get that out or do I really have to take off ALL of this to fix a leaking gasket. Onwards and upwards.
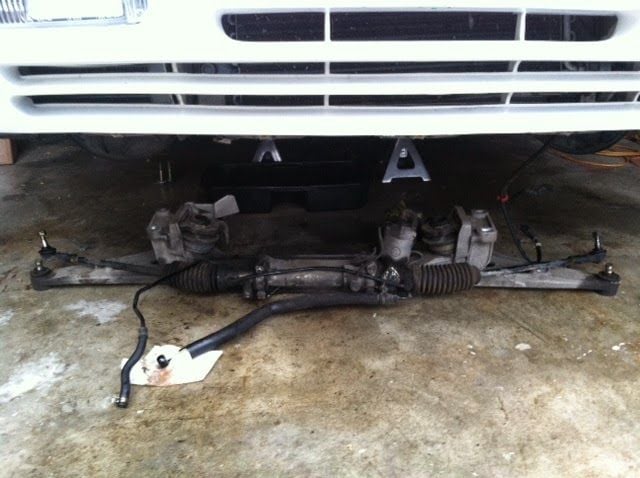
Since the rack and pump are out I might just go ahead and rebuild them both. Weather is starting to turn and I will need some inside projects.
my hero. just haven't gotten the nerve up to do it yet, but considering do this job over the winter. I'm about to hit 200k, and i thought this would be a good time to do belts and seals…especially since my oil pan is dripping. love the 4x4 engine support.
its gotten really cold really quickly out so may be time for her to hibernate anyway.
my hero. just haven't gotten the nerve up to do it yet, but considering do this job over the winter. I'm about to hit 200k, and i thought this would be a good time to do belts and seals�especially since my oil pan is dripping. love the 4x4 engine support.
its gotten really cold really quickly out so may be time for her to hibernate anyway.
You can pull it off. Go ahead and buy a box of ziplocks and label all nuts and bolts based on component. So the water pump nuts and bolts all go together and idlers with accompanying bolts together. Where possible I will put a bolt back into the block where removed or a nut back on a stud. Do lots of reading and come up with a game plan. Everything can be fixed except for starting the engine too far out of time. Then it's valve......have you met my friend piston?
Oil pan is out and a few things of note. I could not get the bolt out directly behind the A/C compressor without removing the two mounting bolts and allowing it to hang. Maybe you have more swivels and three hands but I couldn't make it work. There is a heat shield just above the oil level sender that needs to come out as well as a dust cover on the bottom of the bell housing. The oil level sender has to be rotated 180* for removal and don't forget to remove the dipstick. I started on the lower balance shaft cover................sigh and I have resigned to my fate. The exhaust manifolds will be coming off. At least the one and four runners. I will see if two and three can stay in place. The rear most upper bolt can not be removed with the manifold in place. Another bolt just under the "engine carrier" cannot be removed without first removing the engine carrier. It's as if there were five engineers working on the front end of this car and they all went to competing schools in the German SEC conference. The interference of bolts and components continues to befuddle me. I removed all but the two said bolts sprayed the exhaust nuts/bolts and cleaned up. With all of that said not having the manifold in place will help in reassembly. Going to have to start a REAL list, O-rings and seals are getting hard to remember. I will have to take a better look at the rear crank seal but it might be weeping as well. Bad rainy day but I shall over come. Sorry no pics but nothing interesting to see.
I have made a little progress but with travel and work Porsche time has been slim. I will post the pic then elaborate on how I accomplished it.
I did a little reading about removing the exhaust manifolds and found everyone removed the studs from the block in the process. This to me defeats the entire purpose of a stud and if I had to resort to this route a stainless bolt would have strongly been considered. Alas I was able to remove the 1-4 runner without removing the studs but I had to get a little clever. The three nuts were removed from the studs, three nuts were removed from each runner to the cat pipe, O2 sensor was removed, and finally the two bolts on the front exhaust mount. The engine carrier mount needs to be removed and this can be done before or after the manifold is loosened. I wish I had a step by step for the wiggling process but believe me it can come out. I will say the lower three bolt flange has to come forward the clear the #4 flange. You will have to press on the intake manifold to get just enough clearance and the manifold will come out the bottom so this could not be done with the crossmember in place. I will be replacing the lower six bolts and nuts on the exhaust. Some basic cleaning of the mating surfaces was done but will follow up with acetone before install. There didn't seem to be any noticeable sealant on the balance shaft cover but the permatex mentioned earlier will be used on reseal. Waiting on a custom rear seal to replace the OEM ring and dipstick O-ring then install will begin.Today went better than expected and I still may opt for stainless bolts on the manifolds unless there are objections.
Great write up! Just a suggestion, dont use anything but oem front seals. I had an aftermarket main seal push out of the pump housing after about 8 hours of use and oil everywhere. A porsche tech said they had same issue with aftermarket seals and only use oem now. Not worth saving a few bucks, trust me, it will really suck if if happens to you.
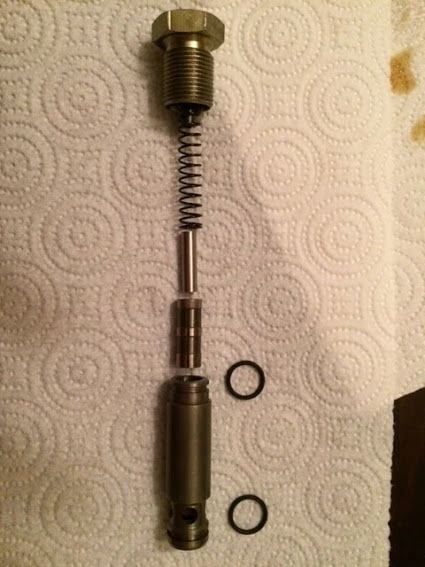
Clean, prep, oil. Cleaning up the lower balance cover and oil filter housing for tomorrow's install. I also replaced the two O-rings in the "one piece" oil pressure relief valve. I used quotes because as you can see below there are actually five pieces to it.
I had originally planned to loosely install the housing, order the alignment tool, and complete. Then I put my thinking cap on and I don't see how this later style OPRV could bind. As long as the exposed o-ring is seated in the block to properly isolate pressure signal the piston housing is more than rigid enough to prevent out of round and warp. All o-rings replaced and gasket surfaces prepped with acetone until no color transfers to the rag. I will update tomorrow afternoon after installing cover, housing, oil pan gasket, and seals. First start up may place egg squarely on face if my theory is incorrect.
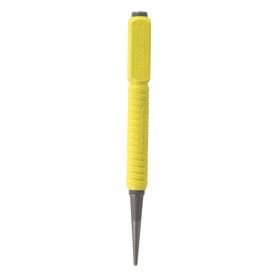
Today was a frustrating day so lets just get it all on the table. That oil pan gasket install is like pushing a rope. I was chugging along getting bolts started and all was well until I encountered the passenger corner long bolt. The gasket was just bound up and nothing I did lined up the gasket with the hole. So I stepped back and punted. I will see how the button up goes tomorrow morning before going into detail on my plan of attack. On a positive note one tip I can pass along is a nail set (something like below) works wonders for lining up the gasket. You insert it through the pan and gasket and use it to pull the gasket in the desired direction. It worked great but was no match for the "hell" hole.
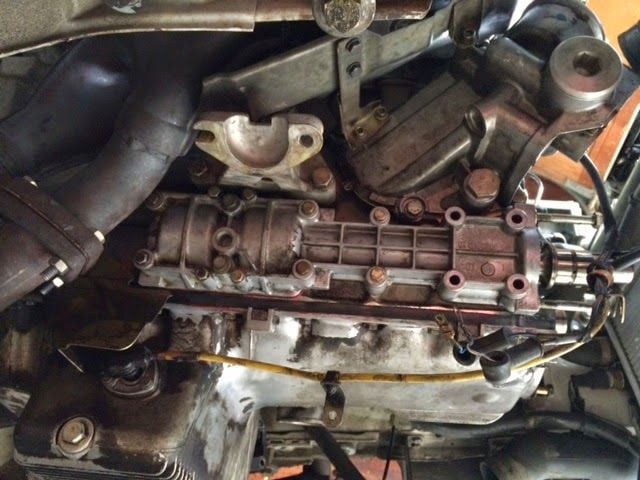
I did wrap up the oil filter housing, lower balance cover, heat shield, and engine carrier. As for the OPRV I discussed in the above post it went in without a hitch. I loosely threaded the four housing bolts then fully threaded the OPRV giggling the whole way in. There was no resistance so I tightened the four housing bolts. I then backed out the OPRV and met some resistance and about the first two turns but it could still be turned by hand. To be safe I repeated the process but only backed out the bolts just enough to allow movement. When I backed out resistance was felt loosening and tightening on the last two turns again. Then it hit me, said resistance is the spring compressing in the housing and providing the slightest extra pressure felt. It also explains why I did not feel it on the first try since the housing was loose enough to take up the slack. One of the front four M8 holes on the balance cover galled so I will have to pick up a thread chase to clean up the hole. I will snap a picture when the oil pan is back on.
Well my plan worked, now I will see if it holds oil. The main issue I ran into that forced me to switch it up was the gasket relaxing and the inability to get all of the holes lined up. I lightly smeared the permatex on the block and the hump. I pressed the gasket into place and used short bolts in the eight corner holes and every other bolt. I snugged all of them and left it to sit overnight. After coming out this morning and removing all the bolts it stayed in place with all of the bolt holes lined up perfect. I started all four long bolts and then worked my way out from the center. I wished the short bolts were 1/16" longer at times with the new thicker gasket. I had originally used dental floss to tie the gasket to the pan but could not get it tight enough. I saw a post where they made studs and inserted them into the block to hold the gasket in place and after going through the install that seems to be best idea. After snugging up all the bolts I went trough and tightened them all by hand in sequence three times. I went through the torque sequence fives times and I would say this is the minimum. All I can tell you is be patient. It isn't as bad as pulling your own wisdom teeth, it's just a bit tedious. Final install took maybe forty five minutes this morning and thirty of that was tightening. Now I just have to figure out where this wire bracket goes. Heatshield went back in WAY easier and picked up some stainless hardware for the exhaust. Going to rebuild the power steering pump and rack. Not sure what after that. So if you're reading this get out and work on your P-car already. I got this car and had zero Porsche wrenching experience so you can do it.
 10-27-2014, 02:48 AM