
928 Block Damaged by Water Pump Repair
 08-29-2009, 12:36 AM
#1
Rennlist
Basic Site Sponsor
Basic Site Sponsor
Thread Starter
Here's the "official" thread of how to repair your block, when it is damaged from the water pump impeller.
The tools officially work and all the pieces are made. These pictures were taken from a "real damaged" engine, while being repaired. Everything is available for "use". We simply need to charge for the inserts, drill, taps, screws, etc. and recover the costs of the cutting tool. For the time being, we are going to set the cost for this at $200.00. If you guys end up breaking a bunch of drills and taps, etc., the costs will go up. If you don't tear things up, and after about 10 repairs (which is what it will take to pay for the tool) we'll drop the price.
Many thanks to Dave A., for some good ideas about how to build the drilling fixture, Steve Hattori for the time to build the fixture and the inserts, and to Mark Anderson for the items he gave to enable us to build the pieces. And thanks to all you other un-named Rennlisters for providing ideas and feedback to make this happen. This is a "community" effort and therefore a "community "tool". Use it, as if it was yours.
Attachment 381908
Damaged block. This one is severely damaged. With this repair, the amount of damage is insignificant.
Attachment 381909
Cutter tooling installed. Grease shaft w/high pressure grease (enclosed). Lubricate cutter through hole in top of housing w/cutting fluid (enclosed). Turn cutter slowly with a suitable drill. I use a 90 degree air drill. If you need this drill, please let me know and I'll send it. You will obviously need an air compressor, but I assume if you are going to undertake a repair like this, you have one of these.
Set cutter depth with a feeler gauge. Gently push the cutting tool back until it touches the damaged area. (The repaired area is actaually bigger than the damaged area, so this is easy to do.) Insert feeler gauges between the fixture and the stop, to set this depth. The first insert is .074" thick, so your first cut will be .074". Tighten the stop securely.
Make your cut. Vacuum out debris as you proceed. If the cutter catches and jambs, simply lift slightly and continue cutting. Smooth, even pressure is needed. Cut until the stop hits the fixture and continue cutting until you can feel no more cutting. There are 3 "windows" machined into the fixture that allow chips to fall out and to allow you to look in and see how things are going.
Attachment 381910
Remove and inspect cut. If damage is still present (as in this case), re-attach the cutting tool, lubricate the cutter, and set the cutting depth to .010". Recut.
Attachment 381911
Keep cutting and inspecting until you get a smooth continuous cut surface. Inserts are provided with thicknesses of .074", .084", .094', .104", and .120", so you can keep increasing your depth of cut, as needed, until you get a good surface, for the insert to sit on.
Attachment 381912
Note the size of the "pieces" coming out of the cutter. Compare these pieces with the prior pictures and you will see that these pieces are the complete length of the cutting blade on the cutter. This obviously means that you are getting a complete cut all the way across the damaged area. The damage will always be worse at the top of the surface than the bottom, but when you start to see pieces like these, you are getting close.
Attachment 381922
Like this. This surface is very, very smooth. You can't feel those marks. These are machining "witness" marks. The trick to getting a smooth surface is to allow the cutter to continue to turn against the stop, until you feel no more cutting.
Attachment 381923
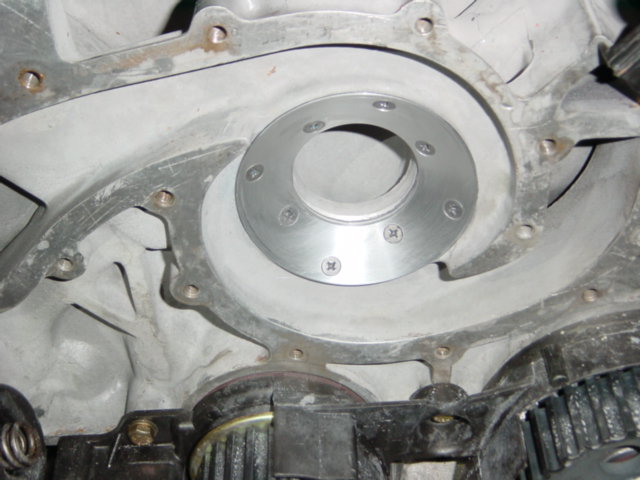
Clean the area. Grease the backside of the insert and "stick it" into the cut area.
Attachment 381924
Atttach your water pump with a couple of screws, tightening slowly as you turn the pump. You are checking the depth from the insert to the impeller. Ideally, these will hit and you will need to make a small cut to provide clearance between the insert and the impeller. Porsche seems to be running about .005" clearance, without a gasket. The gaskets are right at .020" thick, so they are running about .025" of clearance. If the insert doesn't touch the pump, install the next thickness insert and recheck. In this case, the insert did hit the impeller...which is what we wanted. We recut the surface another .007" and rechecked everything. The pump then turned freely.
Attachment 381925
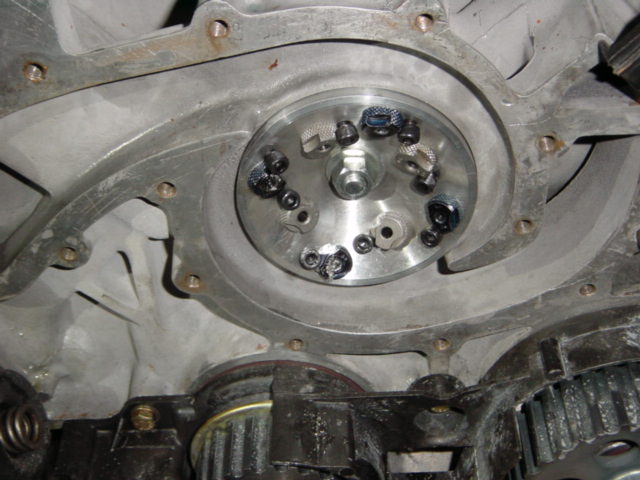
Install and center the drilling/tapping fixture. Tighten the center bolt, to securely hold the fixture in place. Note that the fixture can be oriented so that only one of the drilled and tapped holes will "communicate" with the outside of the block. This occurs on the right side (facing the block), between about 1 o'clock to about 3:30. By carefully clocking the fixture, you can ensure that only one hole "punches" through. I prefer to make this one hole an "inner" hole. Make sure that the "dark" inserts are on the inner set of holes. Tighten the allen screw hand tight only! We don't need the holes in the fixture stripped out!
Attachment 381926
Drill the inner 4 holes. (Drills enclosed) Drill deep enough to allow the taps to cut deep enough to allow the holes to be fully tapped for the enclosed screws. Use cutting fluid! If the drill gets dull and cutting is hard...use another one!
Swap dark insert with light inserts. Clean and blow the area free of any chips at all opprotunities.
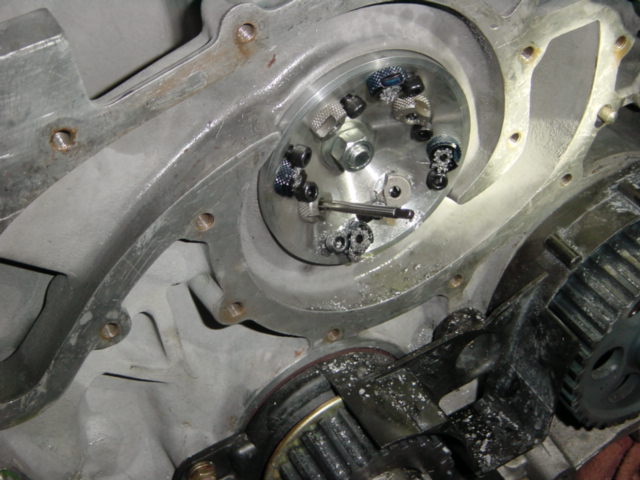
Tap the inner holes (taps enclosed). Drill the outer holes. Swap the inserts one more time (back to how the tool looked, in the very first "fixture picture") and tap the outer holes. Yes, I know that it is not necessary to have all the inserts installed at the same time, when just tapping the outer holes, but I'm trying to not have the inserts lost. They are expensive.
Drilling and tapping should be done. Remove the fixture. Clean up debris from the area. Clean the drilled and tapped holes throughly. Use lacquer thinner, as a final cleaner.
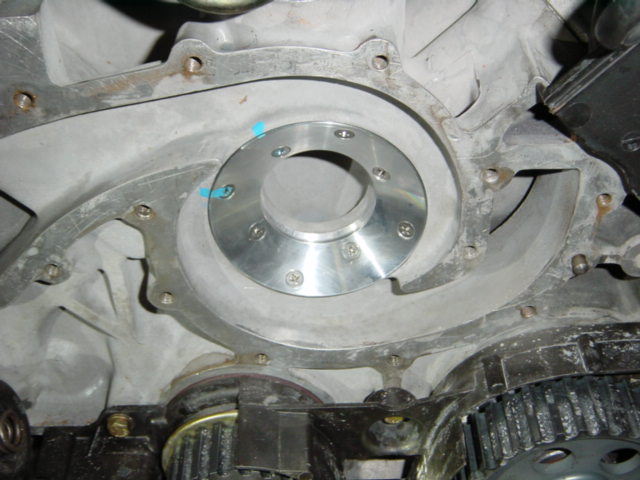
Final trial fit. Fit the screws. They should all be below the surface of the insert, if you tapped all the holes properly.
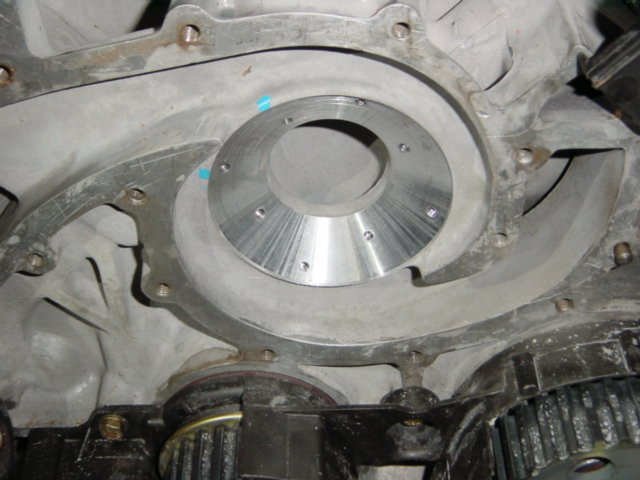
Apply epoxy (enclosed) in a very thin layer on the backside of the insert. Yes, it is JB Weld. Shut up...I don't want to hear it! Yes, it is common and not seemingly very trick, but it is a very high grade epoxy that is both water proof and good to 600 degrees. Apply exopy thoughly to the backside of the screws. Push some "extra" epoxy into the screw hole that communicates with the outside of the engine. Don't push extra epoxy into the "other" holes. You don't want the epoxy to keep the screws from getting tight.
Tighten the screws uniformly. You should see the epoxy "squeeze out" from behind the insert. Wipe up the excess. This would be a good time to put the water pump into place and do a final check on the clearance....before the epoxy sets up!
Done. Easy.
greg brown
The tools officially work and all the pieces are made. These pictures were taken from a "real damaged" engine, while being repaired. Everything is available for "use". We simply need to charge for the inserts, drill, taps, screws, etc. and recover the costs of the cutting tool. For the time being, we are going to set the cost for this at $200.00. If you guys end up breaking a bunch of drills and taps, etc., the costs will go up. If you don't tear things up, and after about 10 repairs (which is what it will take to pay for the tool) we'll drop the price.
Many thanks to Dave A., for some good ideas about how to build the drilling fixture, Steve Hattori for the time to build the fixture and the inserts, and to Mark Anderson for the items he gave to enable us to build the pieces. And thanks to all you other un-named Rennlisters for providing ideas and feedback to make this happen. This is a "community" effort and therefore a "community "tool". Use it, as if it was yours.
Attachment 381908
Damaged block. This one is severely damaged. With this repair, the amount of damage is insignificant.
Attachment 381909
Cutter tooling installed. Grease shaft w/high pressure grease (enclosed). Lubricate cutter through hole in top of housing w/cutting fluid (enclosed). Turn cutter slowly with a suitable drill. I use a 90 degree air drill. If you need this drill, please let me know and I'll send it. You will obviously need an air compressor, but I assume if you are going to undertake a repair like this, you have one of these.
Set cutter depth with a feeler gauge. Gently push the cutting tool back until it touches the damaged area. (The repaired area is actaually bigger than the damaged area, so this is easy to do.) Insert feeler gauges between the fixture and the stop, to set this depth. The first insert is .074" thick, so your first cut will be .074". Tighten the stop securely.
Make your cut. Vacuum out debris as you proceed. If the cutter catches and jambs, simply lift slightly and continue cutting. Smooth, even pressure is needed. Cut until the stop hits the fixture and continue cutting until you can feel no more cutting. There are 3 "windows" machined into the fixture that allow chips to fall out and to allow you to look in and see how things are going.
Attachment 381910
Remove and inspect cut. If damage is still present (as in this case), re-attach the cutting tool, lubricate the cutter, and set the cutting depth to .010". Recut.
Attachment 381911
Keep cutting and inspecting until you get a smooth continuous cut surface. Inserts are provided with thicknesses of .074", .084", .094', .104", and .120", so you can keep increasing your depth of cut, as needed, until you get a good surface, for the insert to sit on.
Attachment 381912
Note the size of the "pieces" coming out of the cutter. Compare these pieces with the prior pictures and you will see that these pieces are the complete length of the cutting blade on the cutter. This obviously means that you are getting a complete cut all the way across the damaged area. The damage will always be worse at the top of the surface than the bottom, but when you start to see pieces like these, you are getting close.
Attachment 381922
Like this. This surface is very, very smooth. You can't feel those marks. These are machining "witness" marks. The trick to getting a smooth surface is to allow the cutter to continue to turn against the stop, until you feel no more cutting.
Attachment 381923
Clean the area. Grease the backside of the insert and "stick it" into the cut area.
Attachment 381924
Atttach your water pump with a couple of screws, tightening slowly as you turn the pump. You are checking the depth from the insert to the impeller. Ideally, these will hit and you will need to make a small cut to provide clearance between the insert and the impeller. Porsche seems to be running about .005" clearance, without a gasket. The gaskets are right at .020" thick, so they are running about .025" of clearance. If the insert doesn't touch the pump, install the next thickness insert and recheck. In this case, the insert did hit the impeller...which is what we wanted. We recut the surface another .007" and rechecked everything. The pump then turned freely.
Attachment 381925
Install and center the drilling/tapping fixture. Tighten the center bolt, to securely hold the fixture in place. Note that the fixture can be oriented so that only one of the drilled and tapped holes will "communicate" with the outside of the block. This occurs on the right side (facing the block), between about 1 o'clock to about 3:30. By carefully clocking the fixture, you can ensure that only one hole "punches" through. I prefer to make this one hole an "inner" hole. Make sure that the "dark" inserts are on the inner set of holes. Tighten the allen screw hand tight only! We don't need the holes in the fixture stripped out!
Attachment 381926
Drill the inner 4 holes. (Drills enclosed) Drill deep enough to allow the taps to cut deep enough to allow the holes to be fully tapped for the enclosed screws. Use cutting fluid! If the drill gets dull and cutting is hard...use another one!
Swap dark insert with light inserts. Clean and blow the area free of any chips at all opprotunities.
Tap the inner holes (taps enclosed). Drill the outer holes. Swap the inserts one more time (back to how the tool looked, in the very first "fixture picture") and tap the outer holes. Yes, I know that it is not necessary to have all the inserts installed at the same time, when just tapping the outer holes, but I'm trying to not have the inserts lost. They are expensive.
Drilling and tapping should be done. Remove the fixture. Clean up debris from the area. Clean the drilled and tapped holes throughly. Use lacquer thinner, as a final cleaner.
Final trial fit. Fit the screws. They should all be below the surface of the insert, if you tapped all the holes properly.
Apply epoxy (enclosed) in a very thin layer on the backside of the insert. Yes, it is JB Weld. Shut up...I don't want to hear it! Yes, it is common and not seemingly very trick, but it is a very high grade epoxy that is both water proof and good to 600 degrees. Apply exopy thoughly to the backside of the screws. Push some "extra" epoxy into the screw hole that communicates with the outside of the engine. Don't push extra epoxy into the "other" holes. You don't want the epoxy to keep the screws from getting tight.
Tighten the screws uniformly. You should see the epoxy "squeeze out" from behind the insert. Wipe up the excess. This would be a good time to put the water pump into place and do a final check on the clearance....before the epoxy sets up!
Done. Easy.
greg brown
__________________
greg brown

714 879 9072
GregBBRD@aol.com
Semi-retired, as of Feb 1, 2023.
The days of free technical advice are over.
Free consultations will no longer be available.
Will still be in the shop, isolated and exclusively working on project cars, developmental work and products, engines and transmissions.
Have fun with your 928's people!
greg brown
714 879 9072
GregBBRD@aol.com
Semi-retired, as of Feb 1, 2023.
The days of free technical advice are over.
Free consultations will no longer be available.
Will still be in the shop, isolated and exclusively working on project cars, developmental work and products, engines and transmissions.
Have fun with your 928's people!
 08-29-2009, 12:48 AM
#3
Rennlist
Basic Site Sponsor
Basic Site Sponsor
Thread Starter
Yeah, thanks a bunch, Brian.
Steve and I talked about this and knew we were going to catch crap over the epoxy. We looked around and couldn't find much else that was water proof and temperature rated where we wanted it to be. The silly inserts fit so well and the cut is so nice, that you really don't need anything there...we just decided to put epoxy back there, because we could.
Steve and I talked about this and knew we were going to catch crap over the epoxy. We looked around and couldn't find much else that was water proof and temperature rated where we wanted it to be. The silly inserts fit so well and the cut is so nice, that you really don't need anything there...we just decided to put epoxy back there, because we could.
08-29-2009, 12:50 AM
#4
Race Director
Yeah, thanks a bunch, Brian.
Steve and I talked about this and knew we were going to catch crap over the epoxy. We looked around and couldn't find much else that was water proof and temperature rated where we wanted it to be. The silly inserts fit so well and the cut is so nice, that you really don't need anything there...we just decided to put epoxy back there, because we could.
Steve and I talked about this and knew we were going to catch crap over the epoxy. We looked around and couldn't find much else that was water proof and temperature rated where we wanted it to be. The silly inserts fit so well and the cut is so nice, that you really don't need anything there...we just decided to put epoxy back there, because we could.
I HOPE this is a solution I never have to use
 but knowing my luck its highly likely
Last edited by IcemanG17; 08-29-2009 at 12:51 AM. Reason: spelling
08-29-2009, 02:18 AM
#5

Beautiful. Does anyone thing less than .025 would be good for more pump efficiency?
08-29-2009, 02:34 AM
#6
Shameful Thread Killer
Rennlist Member
Rennlist Member
It looks nice, thanks for getting this done. I've clicked the links and they are invalid right now. Maybe they'll be up later.
For those that use this tool, be careful if you haven't worked with Aluminum before. You may think it's easy to work with, but cutting it can be more difficult than working with iron or steel.
For those that use this tool, be careful if you haven't worked with Aluminum before. You may think it's easy to work with, but cutting it can be more difficult than working with iron or steel.
08-29-2009, 02:42 AM
#7
Shameful Thread Killer
Rennlist Member
Rennlist Member
The field machinist could go with a thicker insert if they wanted that impeller gap to be smaller. For example, cut for .084" and then use a .104" insert. Install gasket and pump while turning the impeller, and test.
Trending Topics
08-29-2009, 03:54 AM
#9
Under the Lift
Lifetime Rennlist
Member
Lifetime Rennlist
Member
$200! Is that all? In that case I'll just keep using the cheap metal impeller rebuilt pumps, saving a bundle more than $200, knowing that an easy, cheap fix is out there if I need it. THANKS!

08-29-2009, 07:06 AM
#11
Three Wheelin'
Join Date: Jun 2008
Location: Surprise, Arizona
Posts: 1,914
Likes: 0
Received 0 Likes
on
0 Posts
F-ing Brilliant I say! In aircraft construction and maintenance they use "structural adhesive" in abundance. I don't think many people would feel very confident knowing that the abrasion strips on helicopter blades were held on with JB weld... But that's exactly what it is. You could buy scotchweld structural adhesive (available in quart containers, and single use small quantity ready packs from mcmaster-carr no affiliation) and at least won't have to call it JB weld anymore... But I too digress.... Excellent design and execution!!!! Thank you Greg for your generous contrubution to the 928 comunity!
08-29-2009, 07:42 AM
#13
Former Vendor

Join Date: Feb 2004
Posts: 2,139
Likes: 0
Received 0 Likes
on
0 Posts
Nice fix Greg B., Steve and company! This is a great option and solution for those that suffered this problem! And it seems you've got your first potential customer, Dwayne, already knocking on your door. Couldn't think of a better candidate to use it out in the field and report back on his install.
I don't understand the disrespect given to JB Weld. It's been a proven product for years and it works extremely well with great properties to it. The makers struck upon a formula that works, have made it affordable and available just about anywhere. What's the problem? Somewhat ironic if any 928er doesn't think it's worthy enough since it seems perfect for the 928 owner being it's cheap and it works. Heck, I'll buy some, repackage it with fancy, high brow name and re-sell it for more money if that will make anyone feel better about using it.
Bill, even though this is a great fix and affordable in the scheme of things, I personally would not want to play with fire and install water pumps with a metal impeller and try my luck. Don't forget that the aluminum shavings that will invade the water system can and will get lodged in areas that could cause more problems in the future.
Again, great work Greg B., Steve and company! The 928 community is extremely fortunate.
Cheers,
08-29-2009, 09:34 AM
#15
Official Rennlist
Borat Impersonator
Rennlist Member
Borat Impersonator
Rennlist Member
the problem with JB weld is too many hacks use it for EVERYTHING including body work etc, thats where it gets the bad rep