When you click on links to various merchants on this site and make a purchase, this can result in this site earning a commission. Affiliate programs and affiliations include, but are not limited to, the eBay Partner Network.
Over the years I've benefited from many of the DIY guides that have been posted here, so having not found anything yet for the caster puck install, I thought it was about time to contribute one of my own.
For some reason, Porsche has decided that the GT4/Spyder should have non-adjustable rubber caster bushings in the front control arms (despite having solid caster bushings in the rear arms). If you've ever tried to get more front camber by adding shims to the LCA, you've inadvertently increased the positive caster, pushing the wheel forward in the wheel well with no way to dial it back. Swapping to adjustable caster bushings allows us to control our caster without losing the camber the car needs. Rubber bushings also tend to deflect under load, so solid bushings should noticeably improve steering responsiveness and feel. Also, at less than $300, they're not a terribly expensive upgrade for the car.
Disclaimer: I am not a mechanic and have no idea what I'm doing 😅
Steps 1. Lift the car and remove the front wheels
I used a QuickJack to lift the car. While it may be possible to do this job with floor jacks, it will really limit your working space.
I leave a soft towel on the PCCB rotors/calipers to account for my potential clumsiness.
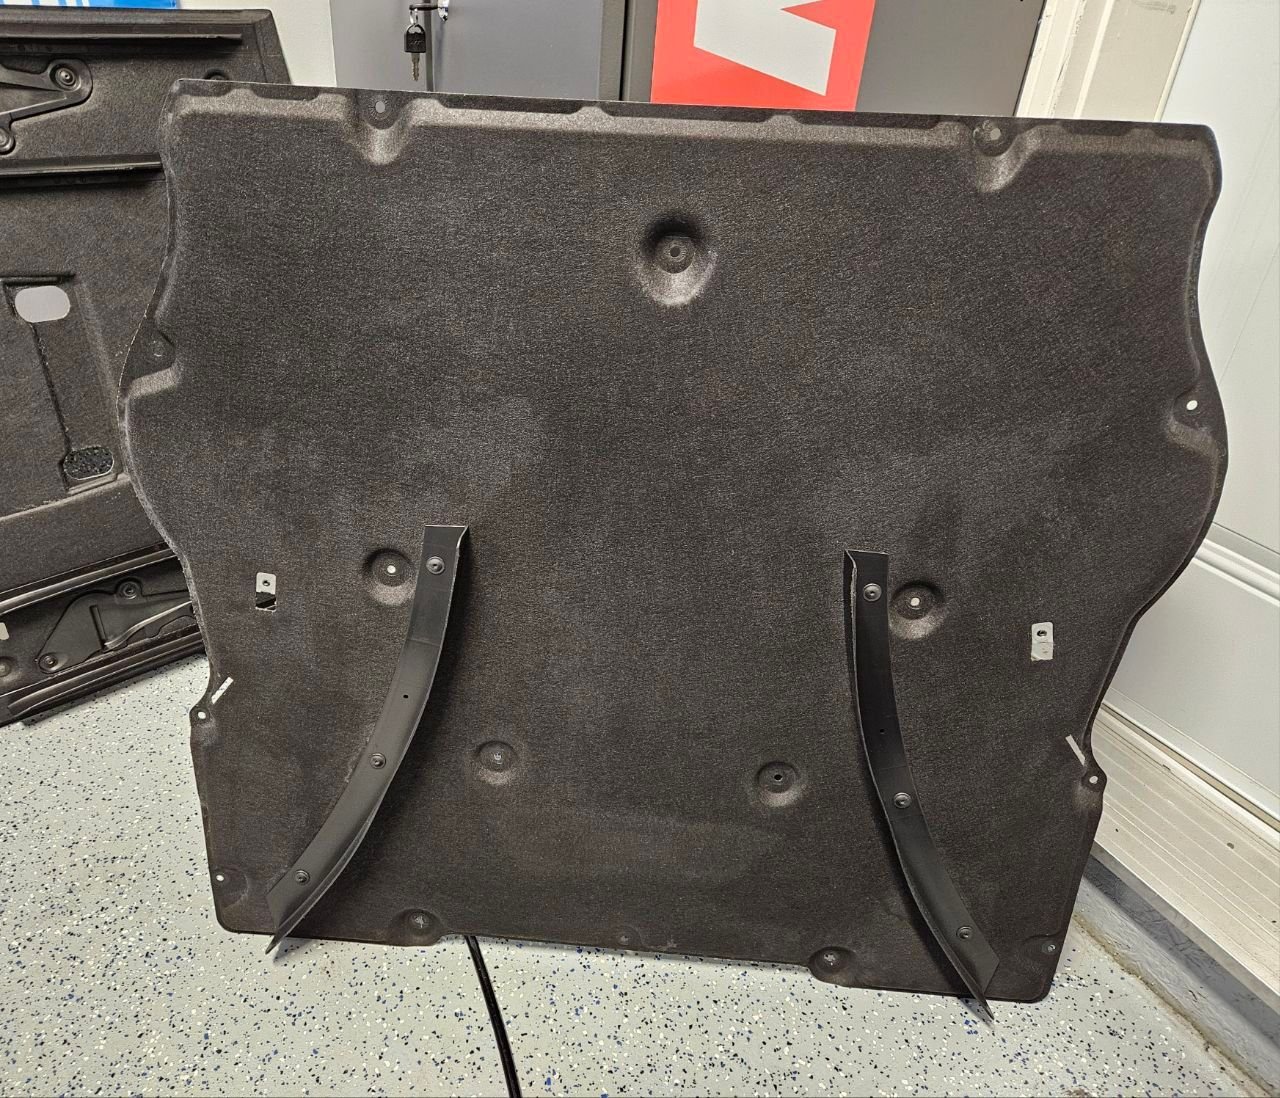
2. Remove the front under-tray panel
Unfortunately this needs to be removed to have access to the inner side of the LCA. This is just held on with a bunch of T25 screws, 2 10mm plastic nuts, and 2 T27 screws (take note of where you removed these).
If you have the 4RS underbody aero strakes, the middle set will need to be removed first before removing the under-tray panel.
3. (Opt) Use a second jack to jack up the wheel hub to ride height
Use a tape measure to get a rough idea of your current caster. You can measure from the axle nut out to front of the wheel well - the idea is just to get some numbers for relative comparison.
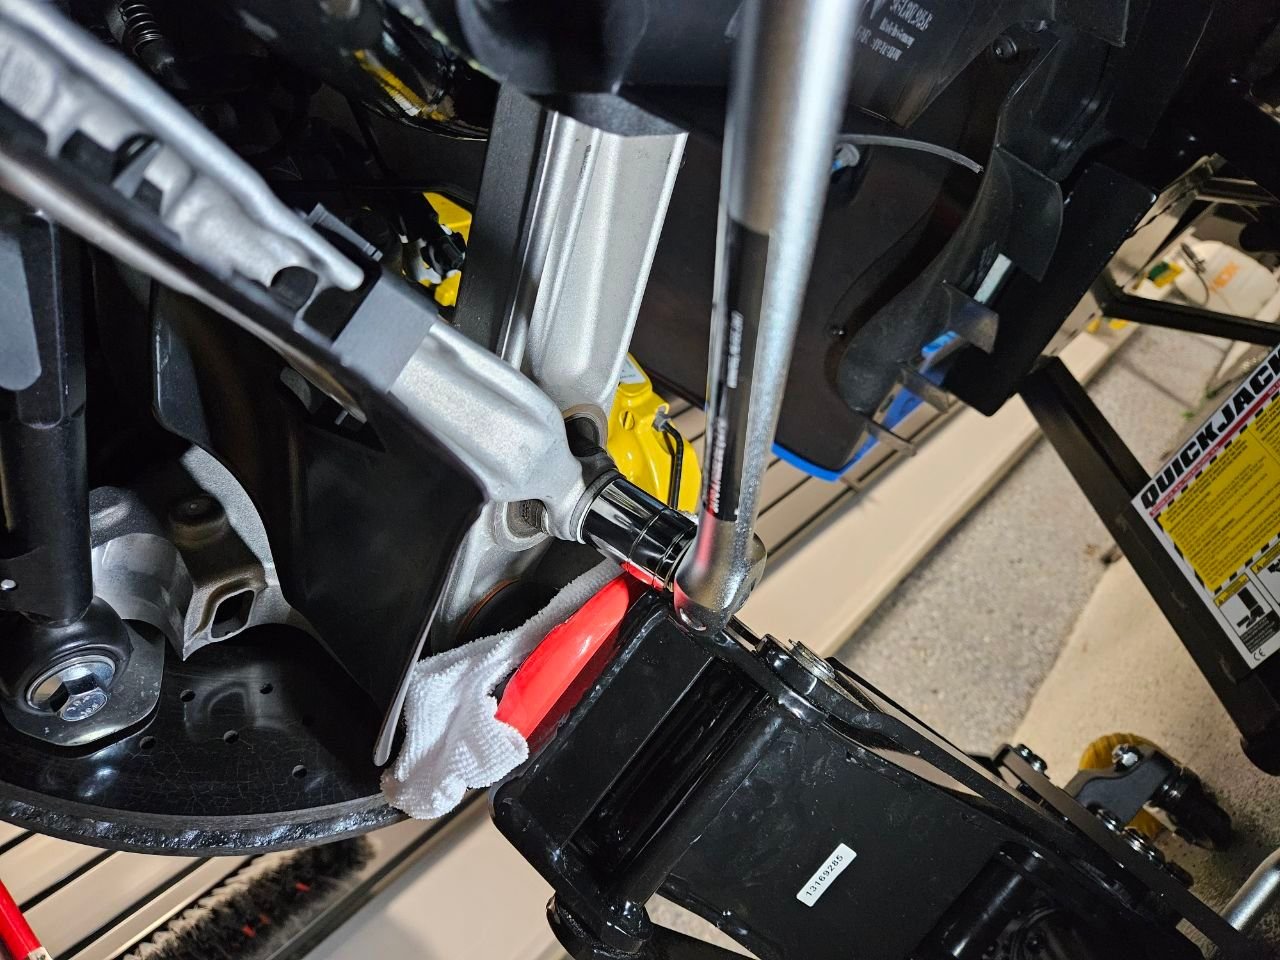
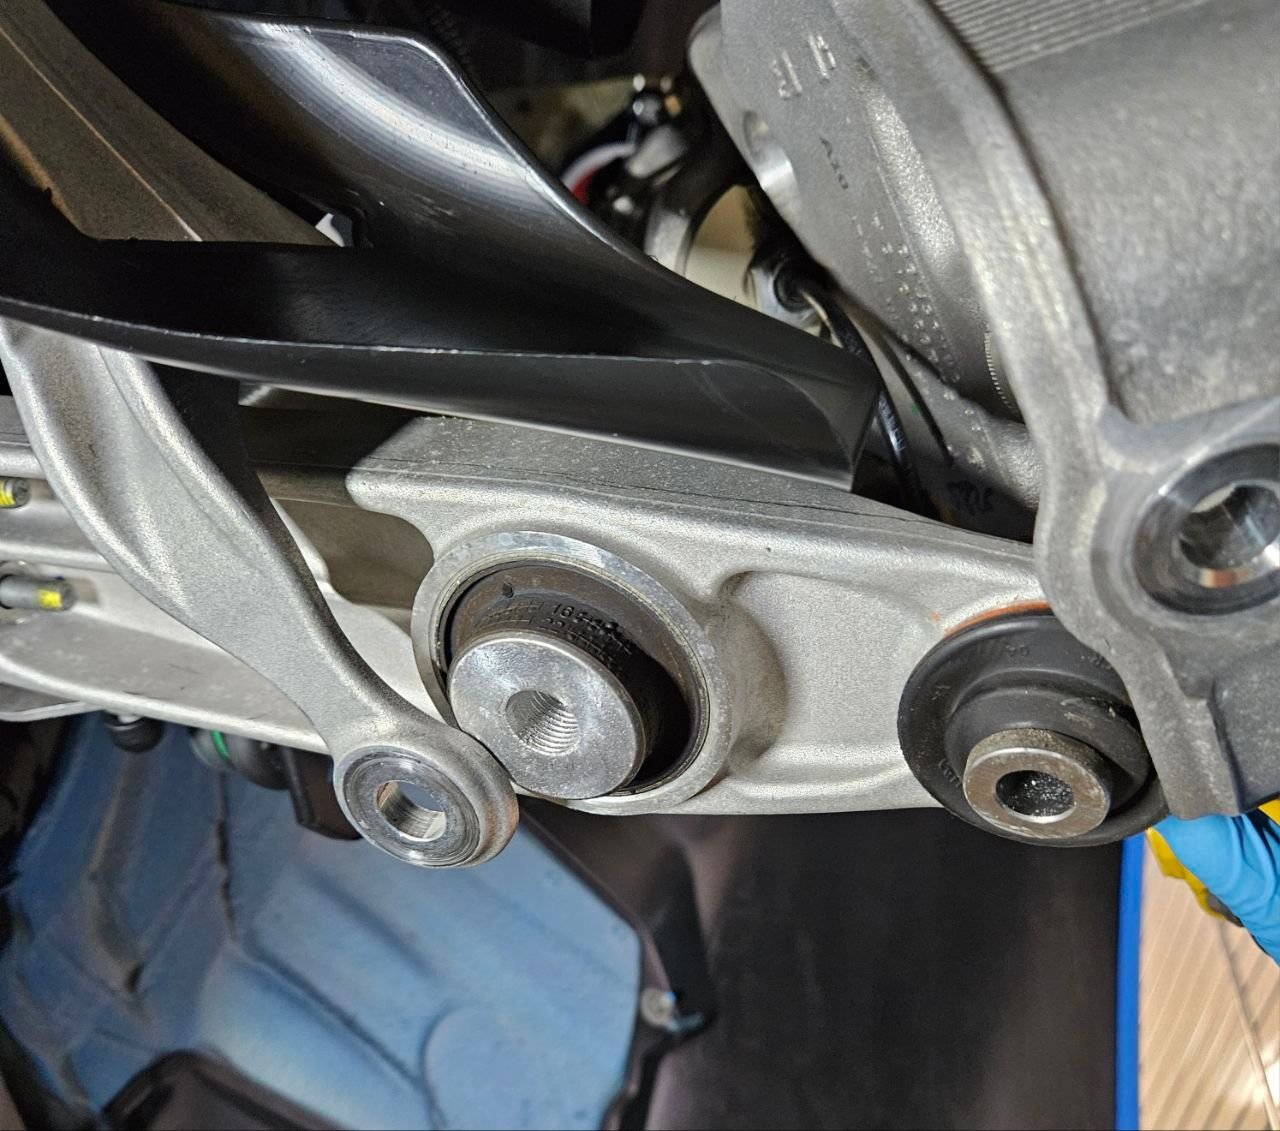
4. Remove the thrust arm bolt that goes through the caster bushing
It's a 21mm bolt head. You will need to counter-hold the nut on the other side with a 21mm wrench.
I used a breaker bar to break it loose because it is on there pretty tight.
After you get it out, you should be able to slide the thrust arm off to the side.
At this point, you might be tempted to wonder if you can just press out the bushing with the control arm still on the car.
You can't - there's just not enough room.
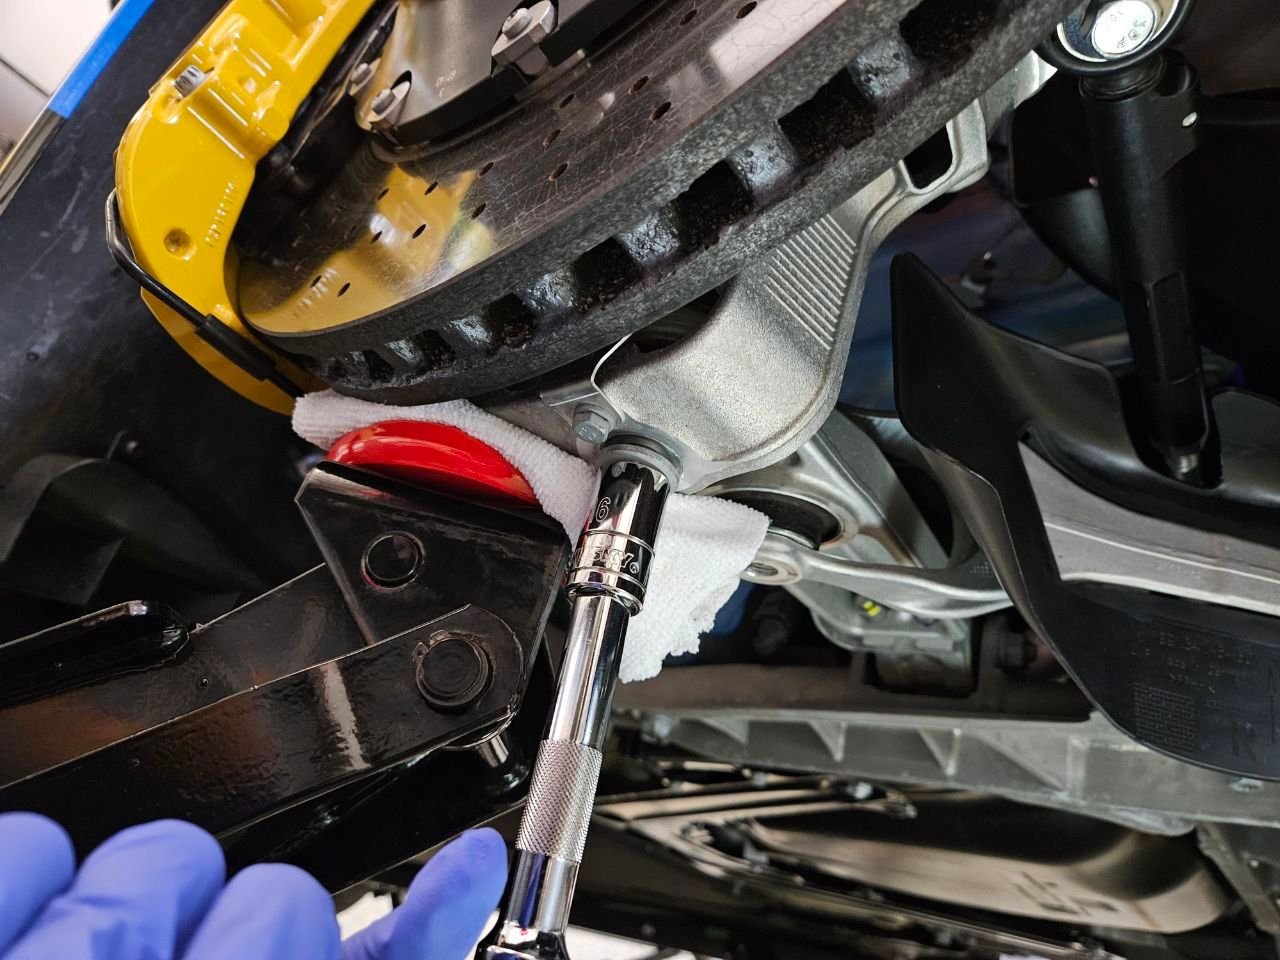
5. Disconnect the control arm from the wheel hub.
On the GT4/Spyder, there is a 16mm bolt that threads directly into the wheel hub and attaches the lower control arm.
On the GTS4.0, I believe there is a standard ball joint. In that case, you will need to carefully use a ball joint separator to get this end of the control arm out.
6. Turn the wheel opposite to the side you are working on and separate control arm.
If you are working on the passenger side, turn the wheel to the left. This should give you enough space to push the wheel hub out and get the control arm separated.
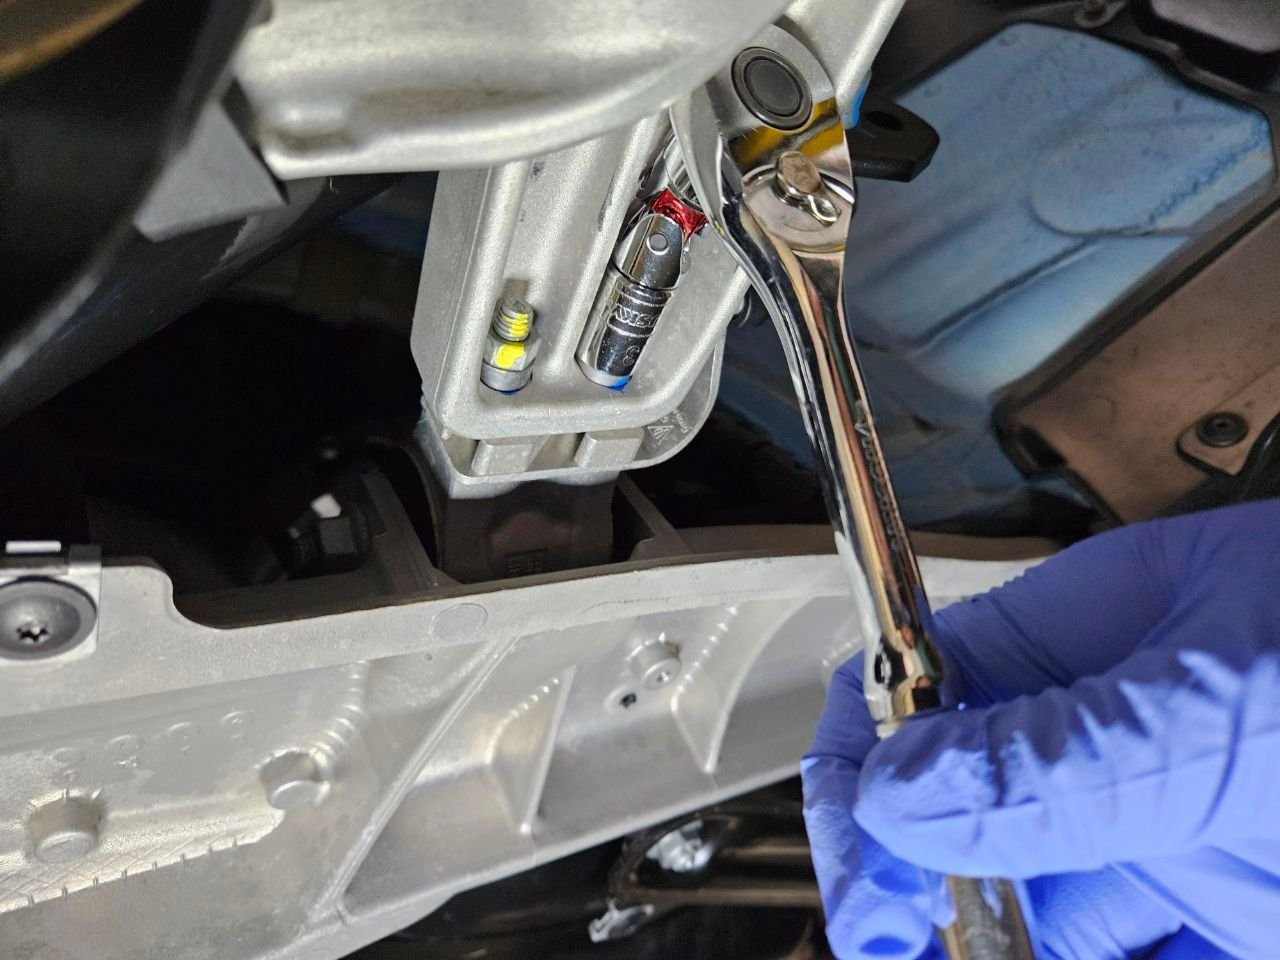
7. Separate the control arm halves.
At this point, most people would go ahead and try to remove the entire control arm.
On the GTS4.0, this is still the recommendation: you should have an eccentric inner control arm bolt that is easy to access.
On the GT4 and Spyder, this bolt is not used for alignment and is tucked deep into the subframe. I could not get the leverage to break this free and knew I would not have the room to torque it to spec afterwards (89 ft-lbs).
Instead I opted to separate the control arm halves in situ. Please don't crucify me. Remove the two 13mm nuts that connect the inner and outer control arm. You may need a flexible joint in order to get a ratchet in there.
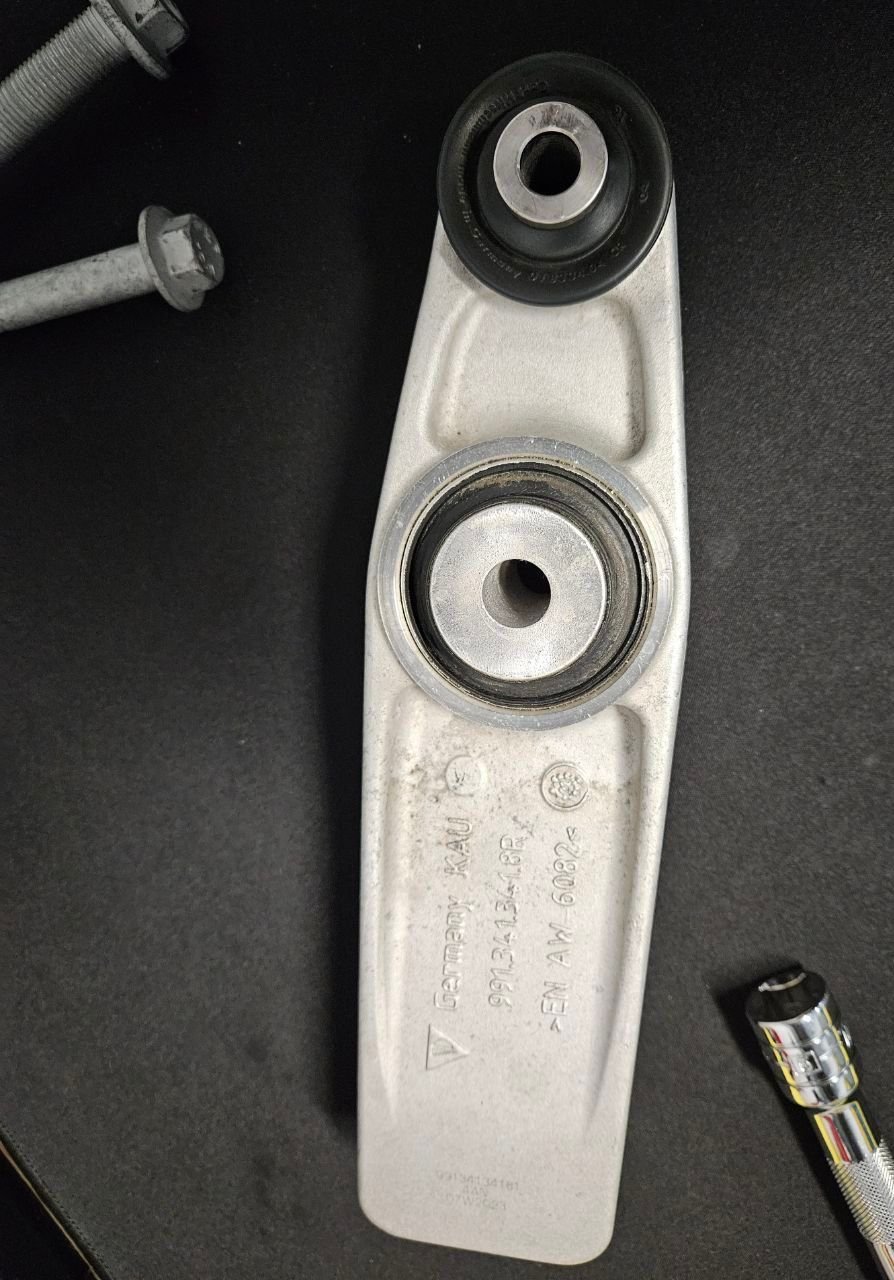
8. Remove the outer control arm.
Push the wheel hub out and away from the car and that should give you enough space to get the outer control arm off of the car.
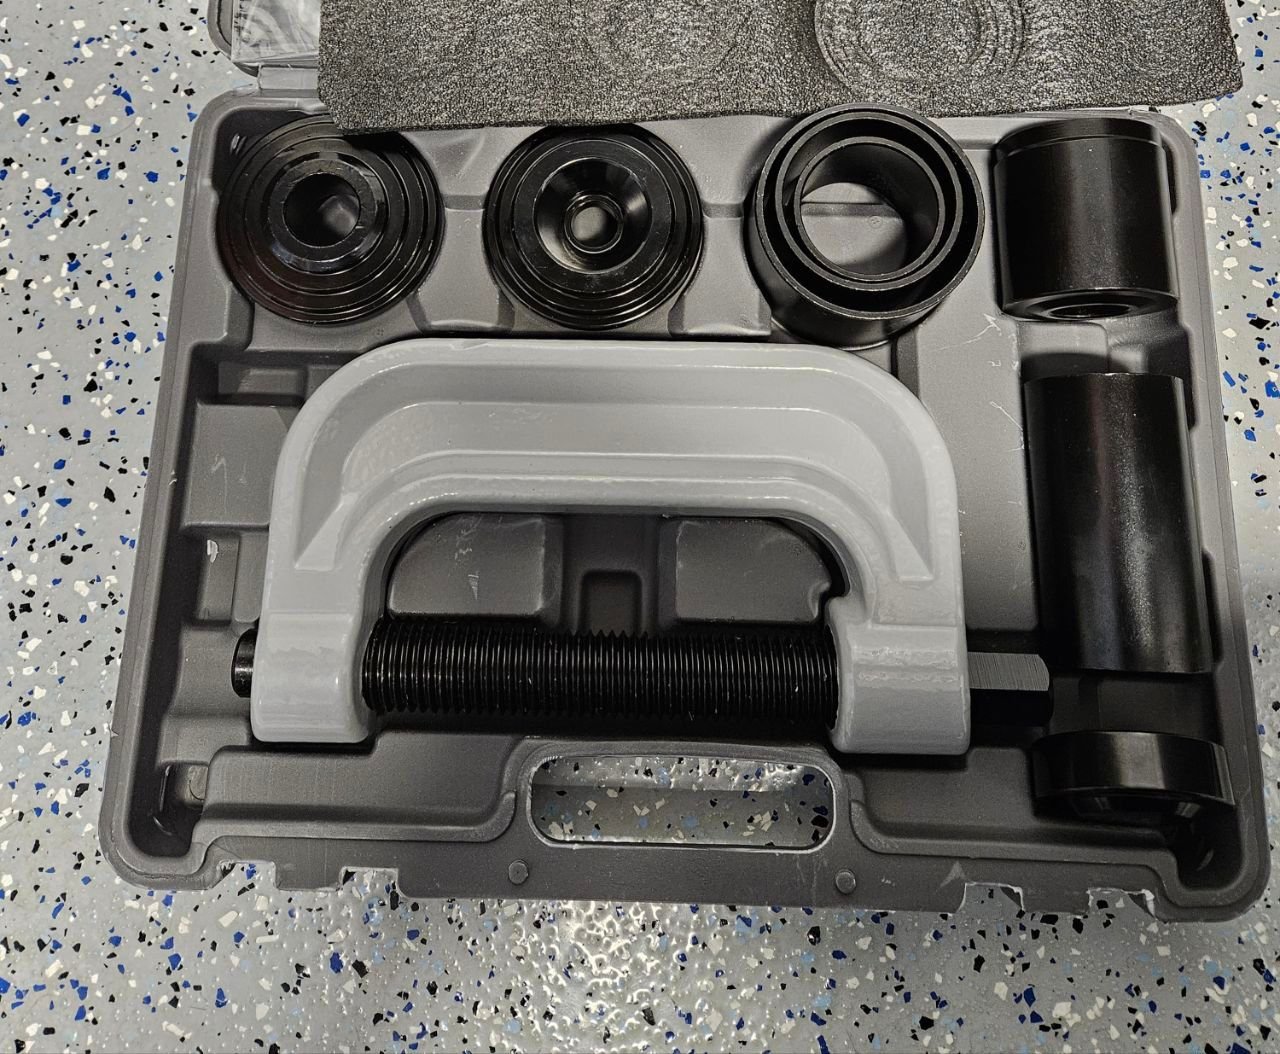
9. Press out the rubber bushing
This will by far be the most frustrating part of the install. If you access to a friend with a hydraulic press, that is the ideal approach. But if, like me, you have a lack of friends with cool tools, you can buy a ball joint press kit from Harbor Freight (or Princess Auto for the Canadians).
Spray the edges of both sides of the caster bushing with some penetrating fluid. A little lubrication will help get the sucker out.
When using the C-clamp press, make sure your receiving cup is larger than the diameter of the bushing. Apply force slowly and make sure everything is straight and true.
I do recommending work on a soft surface unless you want to scratch and gouge up your control arm.
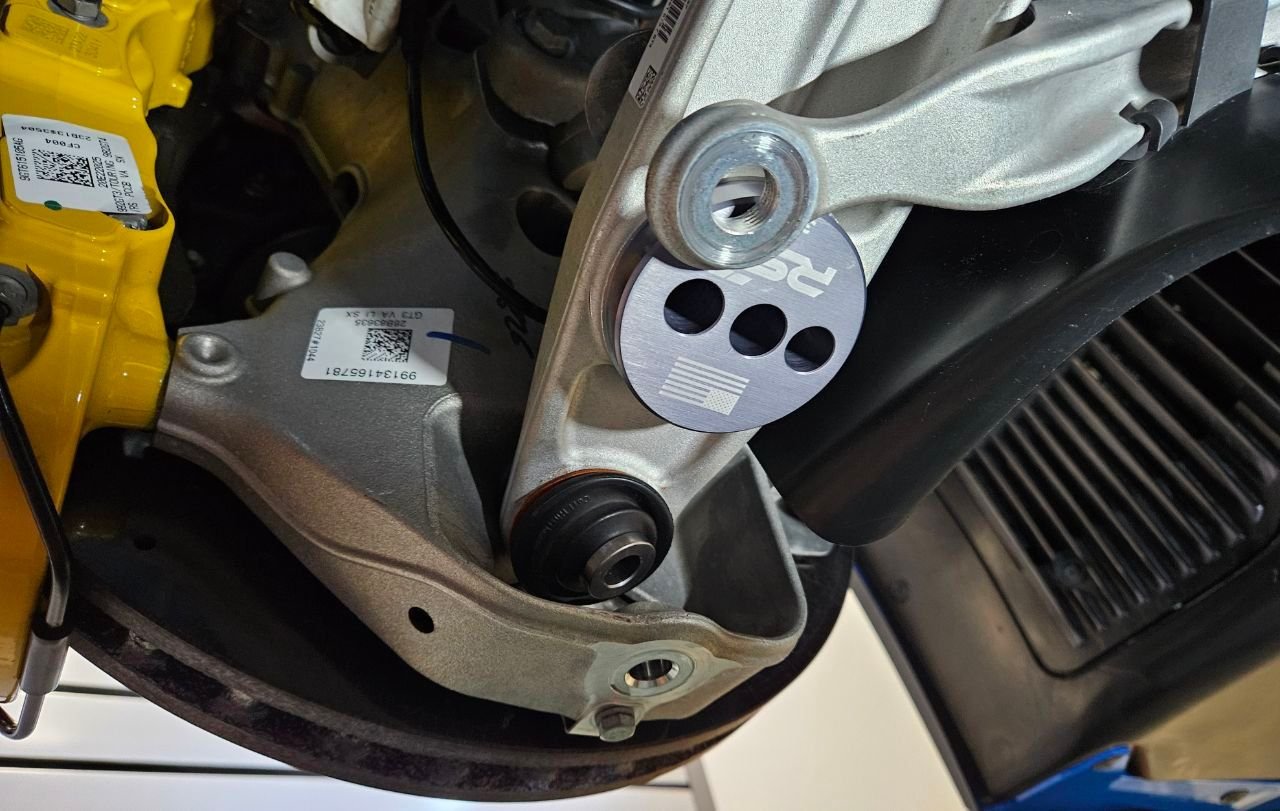
10. Install your solid caster bushings.
Thankfully, the RSS ones don't need to be pressed into the control arm. It is made up of two identical halves that attach with a small locking bolt.
The smaller hole on the left is where the bolt that connects the two halves goes. The next two holes are options for where the thrust arm bolt can go.
The 'center' hole is not actually in the center of the puck. It is eccentric, allowing for minor adjustments in caster depending on how you rotate the puck in the control arm. The right hole is for much bigger adjustments in caster.
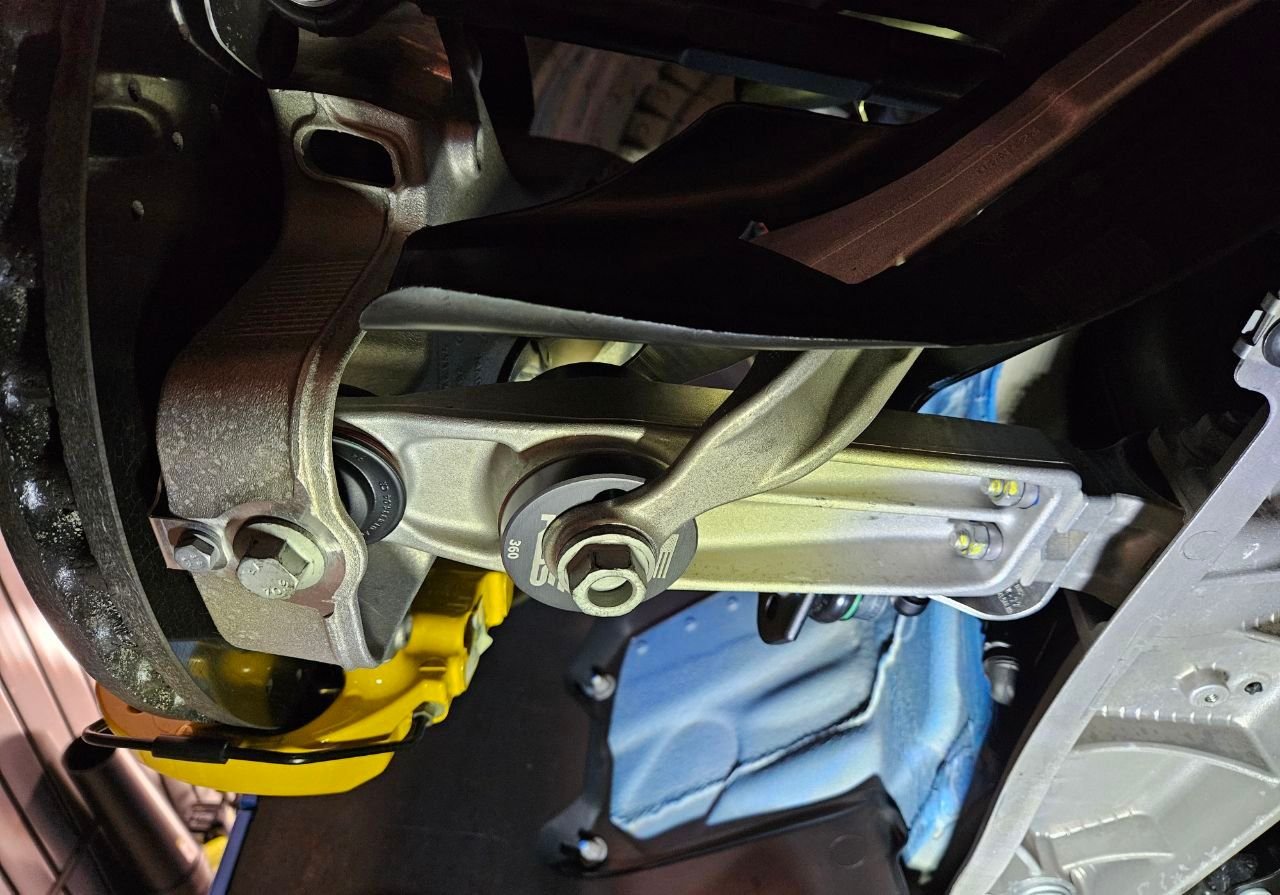
I opted to set my control arms up like below and used the center hole. This should dial my caster back a small amount - I'll let my alignment guy fine-tune the rest.
11. Reinstall the outer control arms
Move the wheel hub out of the way and reattach the outer control arm to the inner control arm through the threaded inserts.
You need to keep the wheel hub of the way so that you can keep the control arm straight while you tighten the 13mm nuts.
My trick for this is to add a tiny but of pressure to the wheel hub with a floor jack, then push them both away from the control arm to give yourself some space. The floor jack will keep the wheel hub in place.
Don't tighten the control arm halves with the wheel hub pressing against the outer control arm or you may damage the threads on the inner control arm.
Tighten the 13mm nuts to 19 ft-lbs.
12. Re-attach the control arm to the wheel hub
This step can be a little tricky on the GT4/Spyder. You'll have to manipulate the wheel hub until you can slot the control arm bushing perfectly into its spot in the wheel hub.
It took me a few tries and few beers before I got it right.
On the GTS4.0, it is much simpler, just re-attaching a ball joint.
13. Re-insert the bolts
Insert the wheel hub bolt once you have the bushing lined correctly.
Line up the thrust arm over the hole you want to use, and insert the thrust arm bolt and thread the corresponding nut.
14. Jack the wheel hub up to ride height.
As a general rule, we want to only torque suspension components (especially anything with rubber) when the vehicle is at ride height.
15. Torque the control arm bolts
Torque the wheel hub bolt to 89 ft-lbs. (It's 63 ft-lbs for a GTS4.0 ball joint)
Torque the thrust arm bolt to 118 ft-lbs. Counter-hold with a 21mm wrench on the nut.
16. (Opt) Measure the new caster
Since you have the suspension at ride height, might as well take a second measurement of your axle nut to wheel well and see how much it has changed.
17. Repeat on the other side
If you didn't do both sides at once, you'll have to repeat the process.
18. Re-install your under-tray panels, aero strakes, and wheels
Having an electric driver of some sort here will really save your wrists.
19. Go get an alignment
That's it - you're done! A little more involved than most DIY jobs, but entirely do-able with at-home tools and I don't imagine there's too much you can irreversibly screw up.
Last edited by carsarepain; 08-20-2024 at 12:18 AM.
Outstanding write-up. It is not just about getting a caster number, but also tightening up the whole front end by removing the flexible rubber for more precise handling.
Caster adjustment also gives you fine/granular wheel base adjustment�which is very useful, for managing the stability and agility of the car, so a great mod.
And with this being a solid mount now you�ll also have some improved steering feel.
I did it as an additional extra on my 718MR with the Clubsport part.
4RS comes with this part as standard, which is great.
Very good write up. If you do have access to a press it looks like that kit you posted above would still provide good arbors for use on the press. Half the battle is finding something the perfect size when pressing out a bushing or bearing.
BTW on the 718 GT cars these are already solid on the rear from the factory. On the 981s I believe they are not. This was a change in they made from 981 to 718.
I like how the RSS solid bushings are one piece. The Tarett ones are thinner and require you to use spacers. Seeing this I may return my Tarett set I have sitting on the bench and replace w/ RSS.
I like how the RSS solid bushings are one piece. The Tarett ones are thinner and require you to use spacers. Seeing this I may return my Tarett set I have sitting on the bench and replace w/ RSS.
The RSS bushings are two-piece - there is a small locking bolt to fasten the two halves together once they are in the control arm. Ya, thankfully they don't need spacers/adapters like the Tarett ones.
The RSS bushings are two-piece - there is a small locking bolt to fasten the two halves together once they are in the control arm. Ya, thankfully they don't need spacers/adapters like the Tarett ones.
Can the RSS bushings be spun in the control arm to fine tune the caster if needed? Or do they only go straight and you just have to use different holes?
Can the RSS bushings be spun in the control arm to fine tune the caster if needed? Or do they only go straight and you just have to use different holes?
Originally Posted by carsarepain
The RSS bushings are two-piece - there is a small locking bolt to fasten the two halves together once they are in the control arm. Ya, thankfully they don't need spacers/adapters like the Tarett ones.The 'center' hole is not actually in the center of the puck. It is eccentric, allowing for minor adjustments in caster depending on how you rotate the puck in the control arm.
Can the RSS bushings be spun in the control arm to fine tune the caster if needed? Or do they only go straight and you just have to use different holes?
Yup, you can spin both halves in the arm to whatever orientation you prefer, then the locking bolt that connects them keeps them in position while the pressure from the thrust arm fork prevents them from shifting while on the car.
Yup, you can spin both halves in the arm to whatever orientation you prefer, then the locking bolt that connects them keeps them in position while the pressure from the thrust arm fork prevents them from shifting while on the car.
Thanks! Nice not to have the spacers like Tarett does and probably way easier to adjust.
Caster adjustment also gives you fine/granular wheel base adjustment�which is very useful, for managing the stability and agility of the car, so a great mod.
And with this being a solid mount now you�ll also have some improved steering feel.
I did it as an additional extra on my 718MR with the Clubsport part.
4RS comes with this part as standard, which is great.
I may be wrong, but I don't think Porsche sells those caster pucks as individual parts.
The 981 and 718 clubsport should share the same front control arm though, and the PMNA part no for that is 9813410418A.
You'll need a PMNA account (or to know somebody who has one) to order one.
Very good write up. If you do have access to a press it looks like that kit you posted above would still provide good arbors for use on the press. Half the battle is finding something the perfect size when pressing out a bushing or bearing.
BTW on the 718 GT cars these are already solid on the rear from the factory. On the 981s I believe they are not. This was a change in they made from 981 to 718.
I like how the RSS solid bushings are one piece. The Tarett ones are thinner and require you to use spacers. Seeing this I may return my Tarett set I have sitting on the bench and replace w/ RSS.
the 981 GT4 is already solid in the rear as well.
besides being able to adjust caster, this mod improves steering feel. Worth doing for that alone.


 08-20-2024, 12:00 AM