When you click on links to various merchants on this site and make a purchase, this can result in this site earning a commission. Affiliate programs and affiliations include, but are not limited to, the eBay Partner Network.
Yes, definitely on the vacuum hoses. I will replace all those. I'm not sure what you mean about the "venturi tube", Black51. Is that amongst the rat's nest under the intake manifold?
The heater control valve and hose are on back of engine exactly and perfectly positioned so when the annoying thing leaks it drips right into the bell housing onto your beautiful new clutch disc. I learned 25 years ago to replace those two hoses and heater valve. And make sure parts are in Porsche bags or boxes marked with the vP of factory parts. Unless you like practicing doing clutches.........
If you are that deep anyways, you might want to consider doing the pan gasket and rod bearings. It looks like you are leaking there like most of these cars. It is a bear of a job, but you will be 80% there already.
Yes, definitely on the vacuum hoses. I will replace all those. I'm not sure what you mean about the "venturi tube", Black51. Is that amongst the rat's nest under the intake manifold?
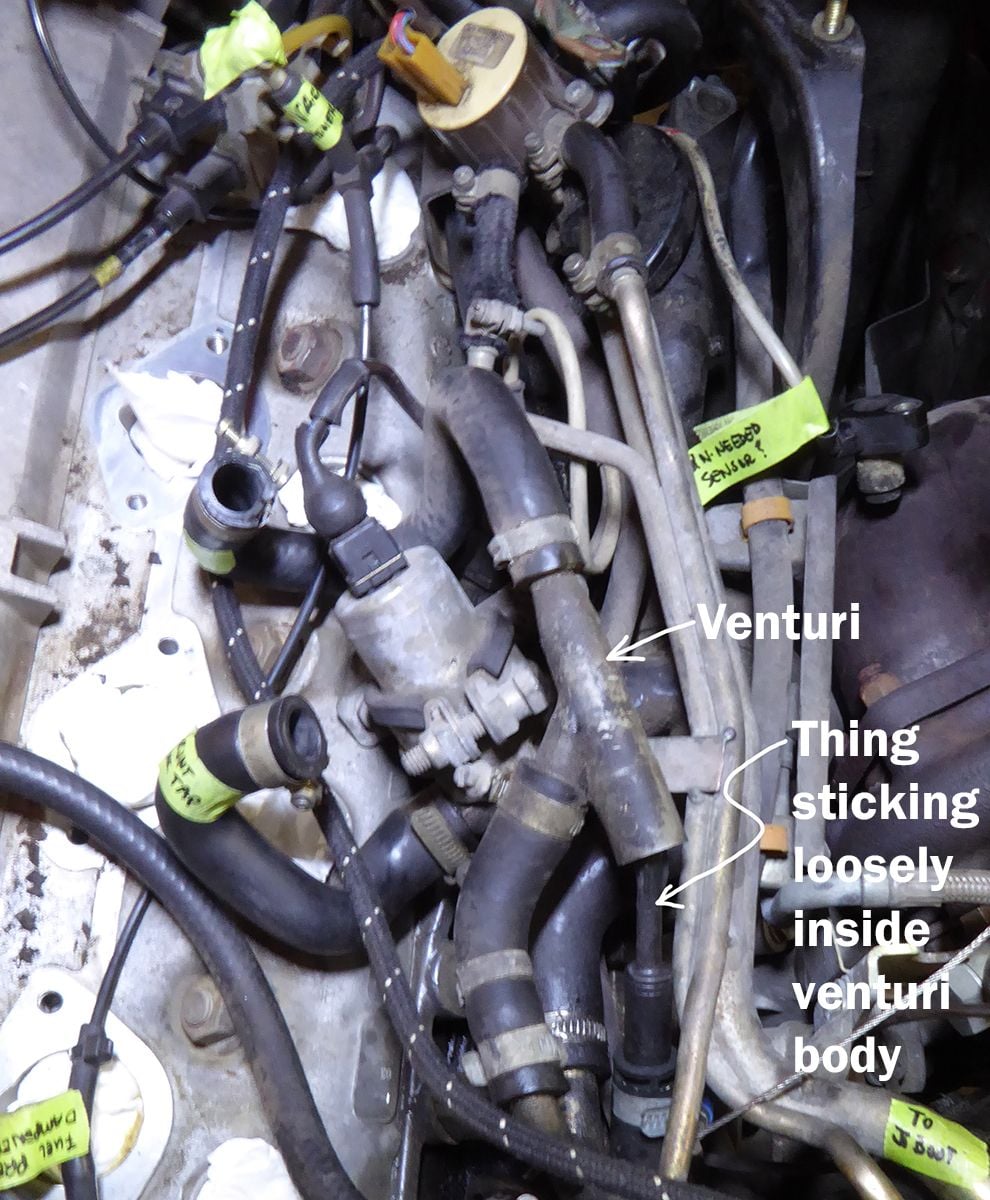
The venturi tube is the plastic 'Y' shaped tube located right in the middle of that rat's nest. In your pic after taking the manifold off, it's just above the turbo outlet hose. When you delete it, you can get rid of that entire metal tube thing it attaches to as well. It cleans up the engine bay quite a bit, and more importantly, helps eliminate the possibility of vacuum leaks. The venturi is notorious for vacuum leaks.
Black51, thanks for the suggestion on the venturi. I think I've identified it in the photo here. The black plastic thingy was sticking loosely in there, which I'm assuming is correct since it's supposed to suck air in around it like a venturi? (I guess the small plastic point shoots air into the Y tube, creating a venturi effect, drawing air in...) When you delete it, how do you do the plumbing? Any photos of your setup? I guess I can search the forums... probably somebody's got some photos of it. By the way, the idle control valve was flopping around in there and it seems like many of the hoses are loose. I'll definitely be able to seal off some vacuum leaks here. Showing venturi.
As I posted in the FB group just now, I'm discovering that one of the joys of working on the 944 Turbo is that you can spend two full hours trying to get one bolt out and still come away empty-handed. The stinkin' allen head bolt (6 mm I think) holding the sensor bracket on has resisted every effort from every direction. The allen hole, which is invisible, is somehow resisting the allen socket from seating all the way down in there.
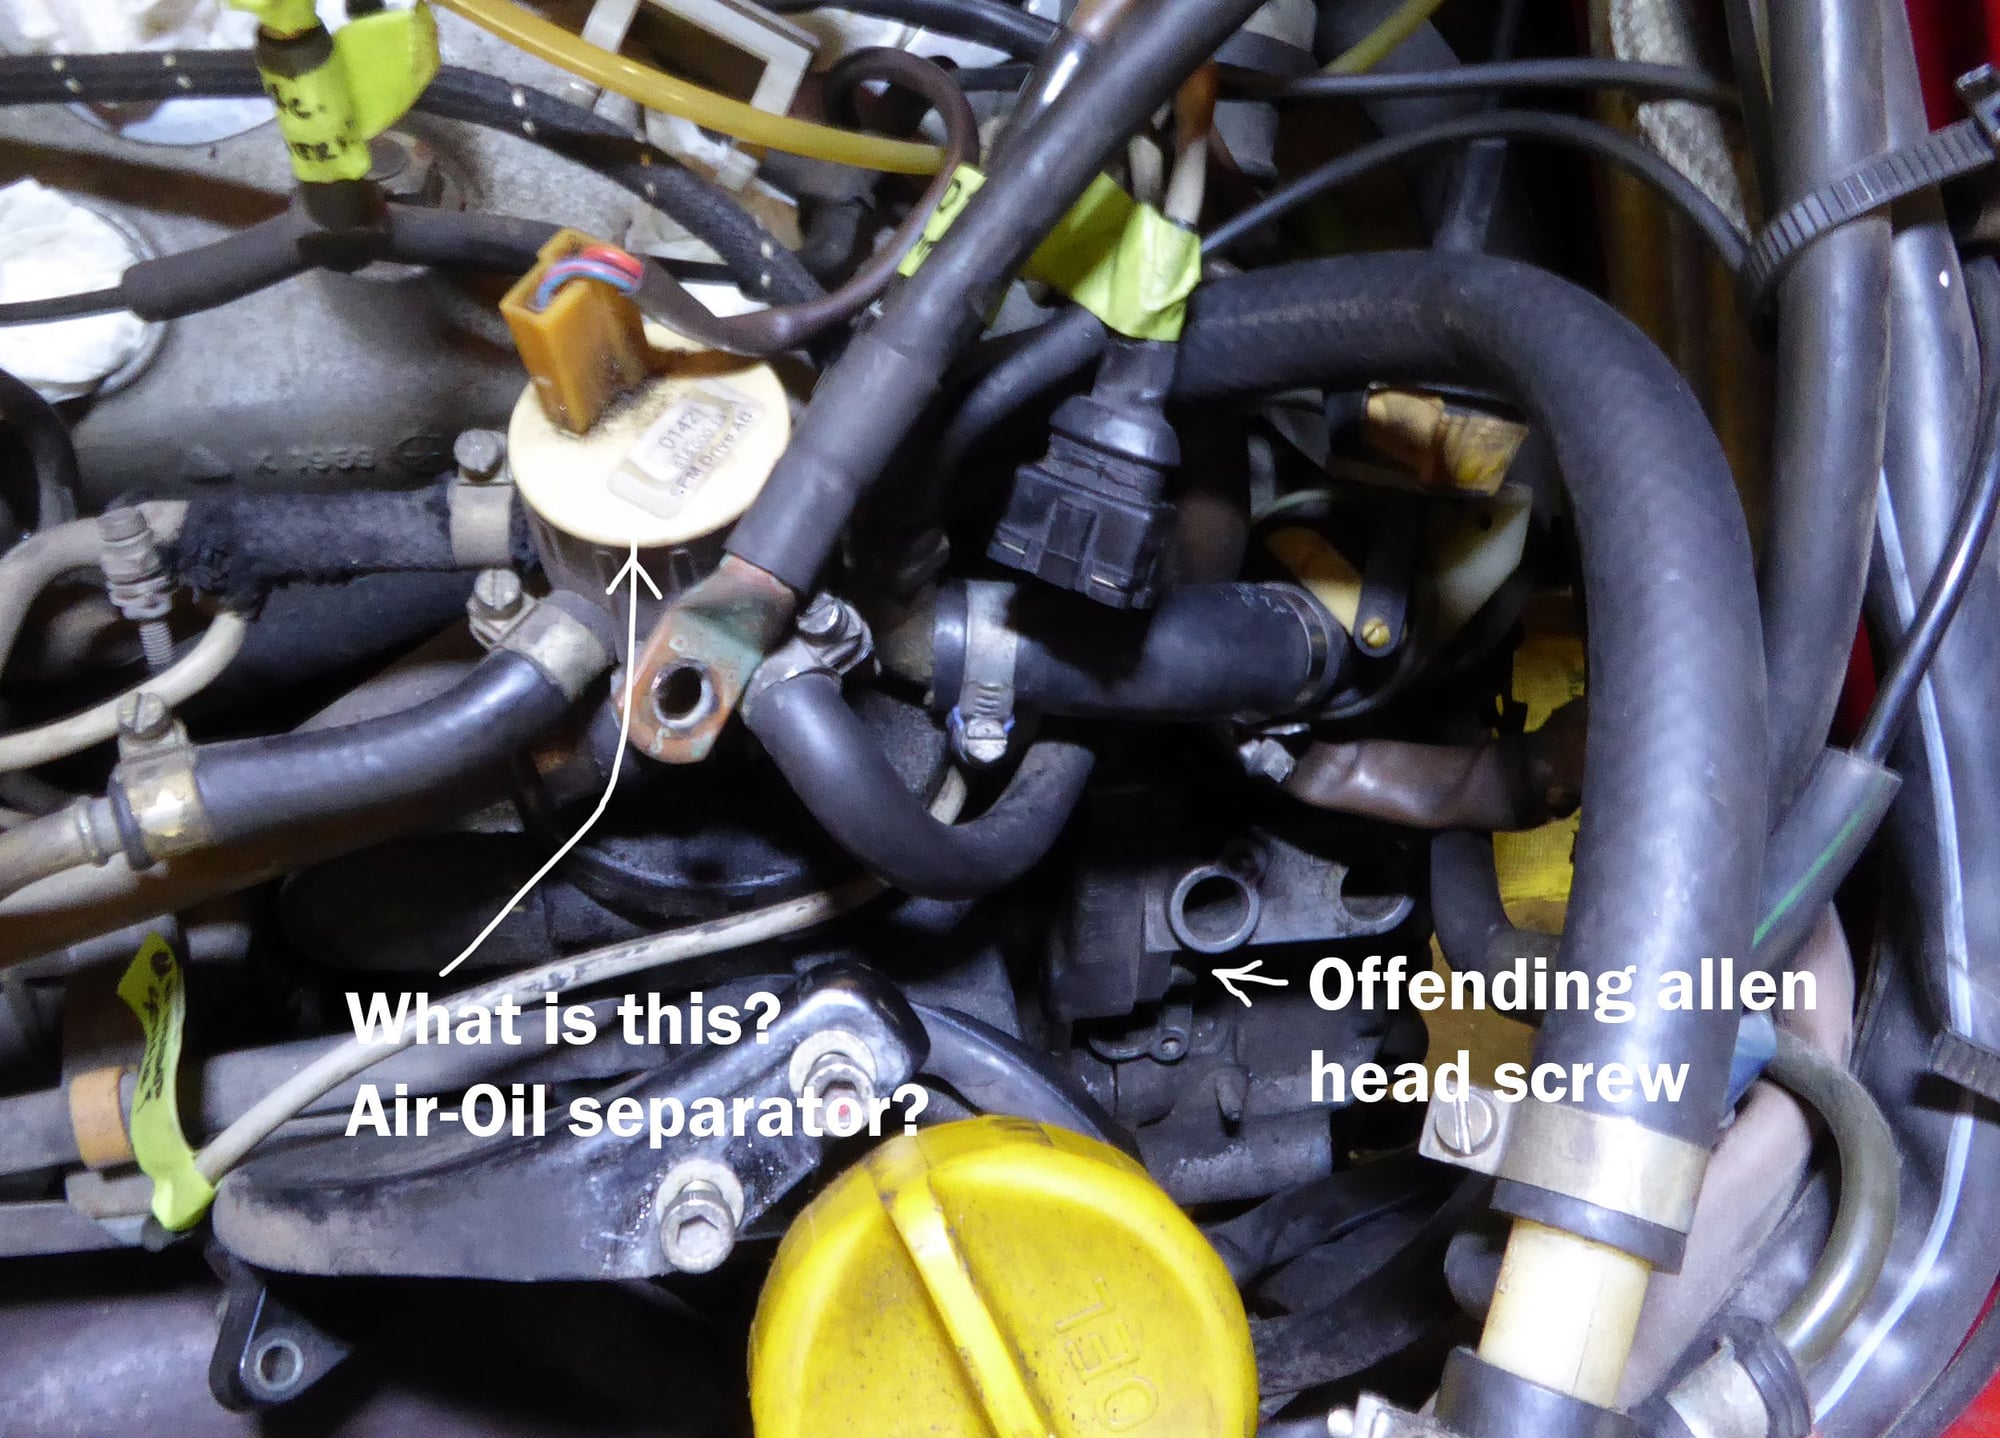
Any tips on getting this out? It's too tight for me to get an air tool or cutoff wheel in there. I'm thinking maybe I should remove the oil filler neck and that cluster of hoses (I learned that's the cycling valve, not the air-oil separator) so I can get better access? I'm thinking chisel right now...
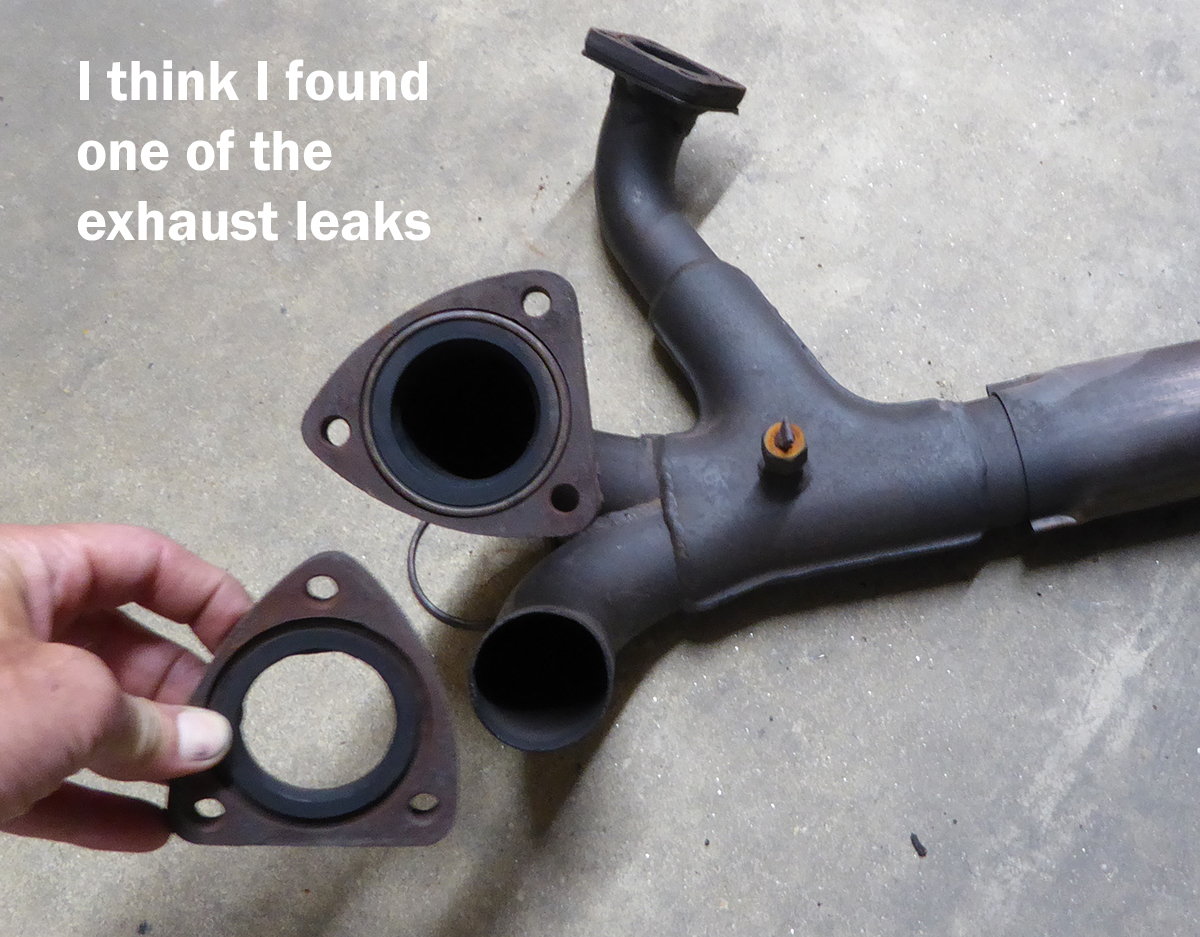
Final discovery for tonight... the source of one of my exhaust leaks! Everything looks to be in good shape; I'm assuming I can weld this flange back on and I'll be in good shape, right?
By the way, still working on the clutch replacement. This stuff is just trying to get the bellhousing off. The main problem I'm having at this point is getting the last screw holding the sensor bracket on.
You don�t have to remove the sensor bracket. I did the first couple but soon discovered it�s not integral to removal. Yep. That flange will leak. The brown and tan piece with three ports and electrical connection is the cycling valve.
The thing you are calling oil filler neck is the AOS. Air oil separator. The way I do clutches, which in 1986 I began and was by the book. You learn short cuts. It helps to clean out the rats nest above the bell housing and the window. There are two large bell housing bolts up top. Remove the reference sensors and mark them because it matters where they go. You got a small clamp holding clutch hydraulics tube and s wiring harness clamp. I get most from the bottom. Drop the exhaust. Shielding. Alternator. Slave cyl. If you go in cockpit and unhook shifter, I typically unbolt it and remove it. Underneath again you have to loosen the exhaust mounts off the torque tube. At rear, remove drive axles. Fuel filter. Inside the torque tube rear housing pull the rubber plugs. You will see two shafts held together with a coupler. You have to rotate assembled to get lined up. Originally we used to mark the orientation for balance but I haven�t verified that by testing. Slide the collar back. Put a jack or tranny jack under the ring and pinion area. Btw. You have removed exhaust shield for muffler. Unbolt the shifter from linkage it�s a ten mm set scre that�s safety wired. Push the rod forward into cabin far as you can. Fun angle. Fight. Rest. Plastic pass throu sleeve out. If not you can wrestle it and tranny as it comes down. Unbolt four bolts, I think two are Allen and two are hex. You release the two large out board bolts on tranny mount then pluck back just enough that then edges are disengaged from torque tube. Lower tranny slowly and unhook back up light switch and speed sensor. Watch for arms of tranny mount catching on fuel filter lines or wires. Trannys not that heavy, just unbalanced. When younger I used to set it on my chest, so be careful but don�t fear it. After it�s out look at the big tube running across rear of car in front of rear wheel and where torque tube crosses. There are welded hooks. You can turn the torque tube over and pull it backward( after unbolting four bolts at front bell housing). Pull that tube back out of way so you can see and work. To pull bell housing is four bolts but first the clutch arm. There�s a bolt with a set nut on passenger side. That bolt is screwed into a flat area on pivot pin the locked with that but. Loosen this bolt and nut. Now find a fairly long bolt matching threads in the end of shaft. Screw in deep so you don�t damage threads in pivot. Now try to pull it straight out first by hand. If that fails is pliers. If that fails put a pair of vice grips on you bolt and tap the vice grips with a hammer. That�s most I�ve had to do. So now you pull the four bolts and bell housing and clutch fork are off and there�s your throw out bearing, pressure plate clutch. Flywheel and rear main. Little tips. Use centering tool. Do the main. When putting pressure plate together with throw out nearing read carefully and use spacers and clips exactly. It talks about compressing it by standing on it and that�s fine. You mess up u won�t know til first time you drive and push in clutch and t/o bearing pulls. Then you get to do job over. Hope this helps. Sure there�s tons of posts but maybe I added something. Just be patient. Take your time and laugh cuz we use to charge 2400+ to do one. You�re saving tons
Thanks so much for the clutch change summary, 951nut2.0! Your one-paragraph description rivals that in the Porsche service manual (I actually laughed at how the manual breezes over so many important procedures and leaves others out altogether). Without Rennlist, Clark's Garage, YouTube, the FB group, and other enthusiast-curated resources, I'd never be able to attempt this job. Thanks for the encouragement.
Thankfully, I have gotten through 80% of your procedure. I've removed the four big bellhousing bolts. As I was trying to pry the bellhousing off the block, it came loose at the bottom but the top was stuck. So that's where I am now... trying to get the allen head bolt that holds the reference sensor bracket off. I spent two hours trying to get an angle on it last night, but the allen wrench won't seat all the way. I'm going to make a custom tool today that extends the allen section back so the socket doesn't hit the bracket itself and jack it to the side; I think that might be part of the problem. Once I get the socket back far enough, I think I can wrench it from the bottom. I'll definitely fix this problem when I go back together with a custom bolt.
Sure... zoom in (blow up) the image and you'll see two setups: one for each bolt. One is reached with a ratchet underneath the car. This 3/8" ratchet reaches the allen with a combination of extension, universal joint, and 6mm allen socket. I forget if I've got something removed underneath first like the starter (probably). I've also used two U-joints before--it depends on the allen socket length.
The other bolt is reached with a flex-head 1/4" long-handled ratchet, the handle of which is almost hitting the camera lens. I use a bit holder from a screwdriver set--it's skinny--and a 6mm allen bit held in place with a paper towel.
If I could time-travel only once, it would be to watch Porsche techs remove these all day long
To the Original Poster: originally, to get the bellhousing off, you didn't need to remove this bracket. Then, the starter changed and an RF shielding sleeve was added to one of the sensors. This sleeve fits into an opening in the BH, making it impossible to remove the BH. They put a "slot" (cut the BH) so bracket removal wasn't necessary, but this caused RF problems (tech bulletin exists). Eventually, the BH slot was eliminated and all BH removal required bracket removal.
You may have a shielded bracket
Also, BH often gets hung up because the release fork pin can't be removed. In this case, simply remove all pressure plate bolts through the starter hole (turning as you go).
Thanks a lot for the clearly annotated photo, Dan! I'll take advantage of your advice and attack that bolt with newfound gusto. I will not be defeated! And I too would like to see the special tools and setups the Porsche mechanics used back in the day.

 06-09-2019, 10:07 AM