When you click on links to various merchants on this site and make a purchase, this can result in this site earning a commission. Affiliate programs and affiliations include, but are not limited to, the eBay Partner Network.
More prep. The defects have been repaired with body filler. A couple of coats of enamel paint provide a hard and smooth surface for the fiberglass.
Good prep work will pay off when the part comes out of the mold. Ideally, little post prep should be needed. We'll cover more of that as we go.
Hopefully you have your supplies in order. I have found mat and cloth is easily obtained at boating supply shops. The resin can be sourced from auto parts stores. Lots of cheap paint brushes, soft rags (cloth diapers), solvent (acetone) and wax. Do not forget the wax!
I apply about ten coats of wax to the inside of the mold. It serves as a release agent to aid in part removal from the mold.
Lots of disposable containers (water bottles in this case) and paint brushes. Fiberglass mat and cloth. Not shown is the gallon can of resin.
Fiberglass cloth (L) and mat (R).
Lay out the pieces ahead of time. Cut and keep them in order so they can be properly placed, quickly. This is the mat layer.
This is the cloth layer. I like to have this as the layer closest to the outer surface of the part. It is less chaotic and provides a better surface finish. Mat is better at providing thickness and strength.
I use water bottles cut in half to mix the resin. I fill to an approximate level. By knowing what percentage of the bottle is filled, I can estimate how many ounces of resin are there and therefore how many drops of hardener need to be added. This is important. Follow the recipe on the resin can.
Get all the stuff situated ahead of time and organized to the side of your work area. It's best to do it all in one go. If the resin sets too soon, you have to wait before you can add more layers, etc.
Once a batch of resin is used up, a new container should be used to mix the next batch. Lots of containers, on hand, is a good idea. And lots of cheap paint brushes (1"-1.5" chip brushes used for cleaning metal cutting machines are my choice).
Be sure to support the mold so it is not deflected. Any distortion or deflection will be reflected in the part when it cures.
Start off by applying a coat of resin directly to the inside of the mold. Alternatively a jel coat surface could be applied. I have not messed with jel coat. Can't say if it would be better. For me, simple is better.
Saturate the fiberglass with the resin. Work quickly, but efficiently. I use what I call a "pogo-stick" motion with the brush. It pushes the resin down into the fiberglass and aids in full saturation. When no more white is seen, saturation is complete. Force out all air bubbles. Also be sure to soak the fiberglass about 1/2", or more, beyond the edge of the part.
Last edited by Scott at Team Harco; 04-20-2017 at 02:18 PM.
The cloth layer is down and now the mat layer is going on.
The part has cured. There is a "happy" time before the resin cures when it is still a little pliable. This is the time to cut to the final shape of the part. A fresh razor knife works well for this. Let the part fully cure before attempting to remove from the mold. If enough wax was put-down, the part should separate from the mold with little drama. If body filler was needed to repair defects in the mold, there is a good chance it will have bonded to the fiberglass during the thermal reaction of the cure. This is easily sanded off of the fiberglass surface.
By now, you should have developed a plan for attachment to the car. In the case of a hood, you need to decide if it will hinge or lift off. I wanted to keep the original hood hinges for this application. I needed to find a way to duplicate the bolt holding capability of the original hood.
I trimmed down some hardwood blocks and then used 5/16" (close to M8) T-nuts pressed in from the back side of the blocks. The blocks were then positioned and glassed into place.
Hardwood blocks with T-nuts inserted on backside. Resin and mat used to hold in place.
I used hood pins to hold the hood down, and had their location determined in advance. I also wanted some cooling vents to let the hot turbo cool quicker. Very little science went into how effective this would be at speed. It was primarily to let heat out when sitting still.
Shape and location of the vents were determined with the hood in-place on the car. A cardboard template was used to mark the shapes to be cut out. Holes were drilled in the corners to define the radii and then a jig saw was used to connect the dots.
Last edited by Scott at Team Harco; 04-20-2017 at 02:21 PM.
Hardware screen was used to keep large bits of debris from getting into the engine compartment. More mat and resin is used to enclose the screen in place.
OK - now you have a nice piece that fairly closely resembles the original part. It fits nicely (albeit smaller in dimension by twice the thickness of the sheetmetal) and is significantly lighter. But - it has no structure!
Let's take care of that right now.
Balsa wood strips held in place with C-clamps while the resin hardens. Note the markings for the hood pins. Do this so structure doesn't get put in places that will interfere with functionality.
Above you can see the beginnings of adding structure. The cured part needs to get scuffed in the places where more resin is to be applied. I purchased a bunch of balsa wood strips from a hobby shop (think wooden airplane kits). These are very light and effectively provide the inner ("hollow") part of fiberglass "tube" structure.
A bit of trial and error and a good look at the original inner structure, can give clues as to where to best place this new structure. In particular, the whole perimeter of the part usually needs help. Additionally, the part will twist and flex in the middle. Add strips and glass them in place. Keep adding more until the part satisfies your strength requirements.
Note the slit in the balsa wood piece at the top of the image above. This is to allow a little curvature of the strip to best fit the contour of the part. Creativity often pays off in keeping things simple and economizing on materials and weight.
The inside is nearly done. Triangular shapes work well to reduce flexing.
Notice no need for additional structure in the area of the hood bulge. It provided its own structure by its very shape. By covering the wooden strips with fiberglass and resin, a box section "tube frame" structure is effectively created.
Prior to (outer) surface clean-up. The vents have been installed, but paint and other imperfections have pulled from the mold and are still on the surface of the part.
Part way into final surface prep. The paint and body filler that was pulled from the mold has been sanded off. A coat or two of primer was applied. Now wet sanding to achieve the final surface finish prior to the final paint coat.
First primer coat on, over final surface finish work. Hood pins in place. One of the windshield washer squirters is installed.
Working out the final details. The prop rod needs a little pocket. The washer squirters need to be installed and secured. The hose that supplies washer fluid to the squirters needs to be routed and secured.
Now the last items come together easily. A simple pouch was created with glass and resin for the prop rod to slide into and keep the hood up.
Not covered yet. The mold had holes in it where the washer squirters live. These holes were covered with tape on the backside of the mold to keep too much resin from dripping through. The resulting bump on the part marked the location for the holes needed to reinstall the squirters. I don't recall what I did to secure them. Probably silicone sealer.
I then taped the hoses to the hood and again used glass and resin to make little strips to keep the hose in place. Enough gap was left to allow for service removal. Clever use of painters tape kept things from sticking where I didn't want them to and yet allowed for the creation of guides for the hose.
There are tradeoffs between this method and the traditional method. I find this works well for me. Best of luck regardless of which method you go with.
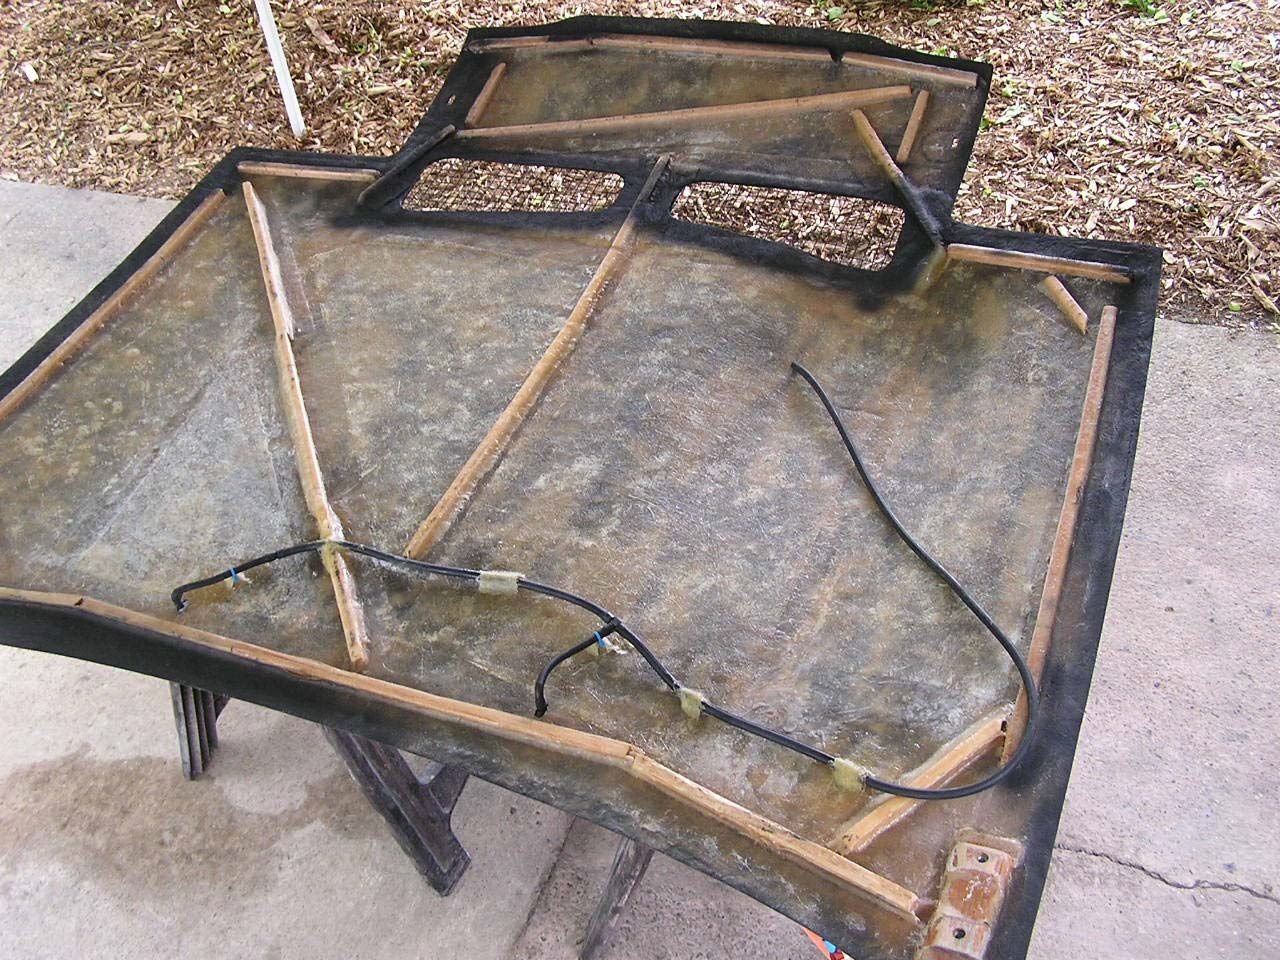
One more picture. This shows the final accessories on the inside. I found this picture in the story I wrote about this. The pdf file may be useful, should anyone desire a copy.
 04-20-2017, 11:50 AM