When you click on links to various merchants on this site and make a purchase, this can result in this site earning a commission. Affiliate programs and affiliations include, but are not limited to, the eBay Partner Network.
This information would have helped me going into this project, so I decided to create a post to share the knowledge I gained.
I've been searching the used parts resources for an affordable replacement mirror motor and glass for quite some time without much luck. The plastic arm had the teeth wear away, cause the drivers mirror glass to shake. The passenger side mirror had also started to delaminate, so I hoped to find a passenger side assembly and swap over the motor to the drivers side, solving both problems in a single purchase.
Unfortunately, eBay and other retailers didn't have much to offer. Most mirrors were the wrong design, heavily used, or well over $100 for just the motor or glass. I wasn't interested in prying out the glass from the plastic frame for a cheap solution... as I didn't think the heating element would work correctly with whatever adhesive I came up with , or risk it falling out over time.
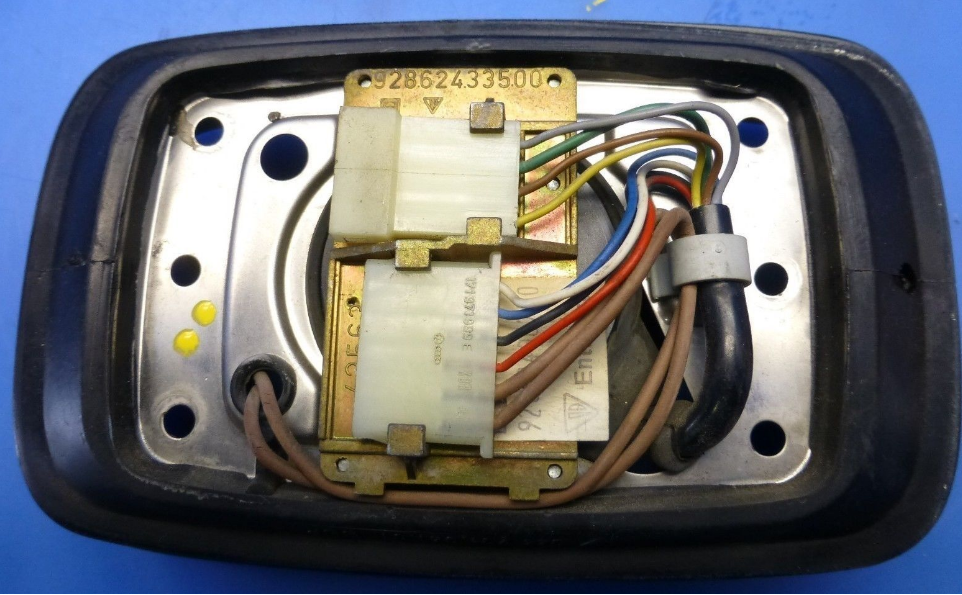
I ended up buying a passenger side mirror assembly for $80 shipped that had dual flat connectors on the back. My mirrors, however, had a barrel connector. So, some surgery was necessary. The motor with the two molex connectors has a circuit board built in, and 10 wires... because the circuit board controls polarity reversing for multi direction. The motor with the barrel connector does NOT have a circuit board, and 6 wires... because the polarity reversing is controlled by a solenoid. 2 of those wires for each design are used for the heating element. The motor gasket that seals out moisture and debris is also different.
Besides the above differences, the two motors are nearly identical. Therefore, the motor with 8 wires can be converted to a 4, but not the other way around (because the circuit board is necessary). So, all that was required was to de-solder the circuit board and swap over the wiring harness from my damaged motor to the new one. The wires solder directly to the motor leads identically as to how they are soldered on the barrel connector motor.
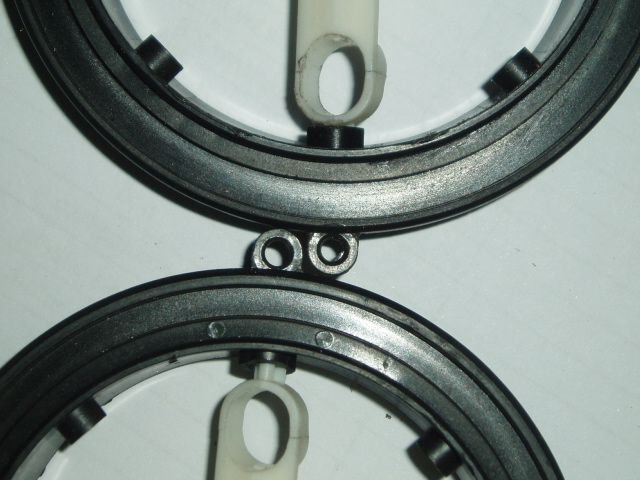
The motor mounting plates have different standoff lengths, and need to be paired with their respective motors. So, if you are doing this swap/conversion, you NEED the motor surround as well. Otherwise, the glass will be positioned too far forward or backward in the housing, and will not be snug.
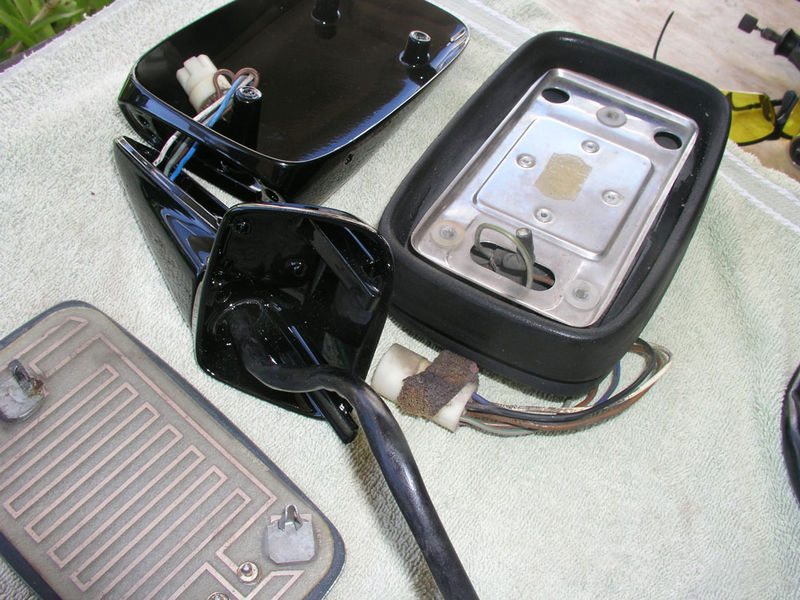
Old style of motor and mirror. These cannot be swapped to a newer style without a complete mirror swap including black rubber surround, mid-year motor with barrel connector, and updated glass design.
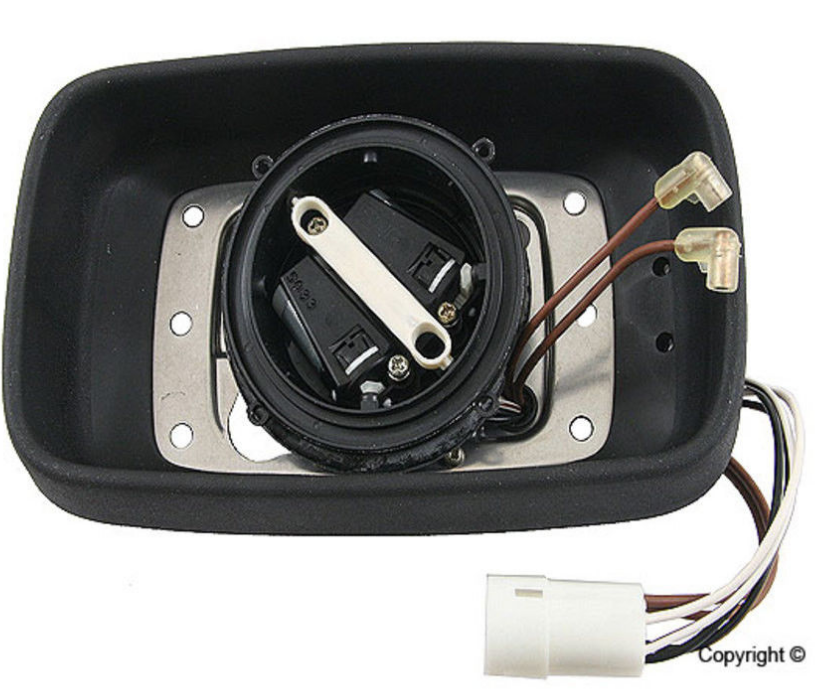
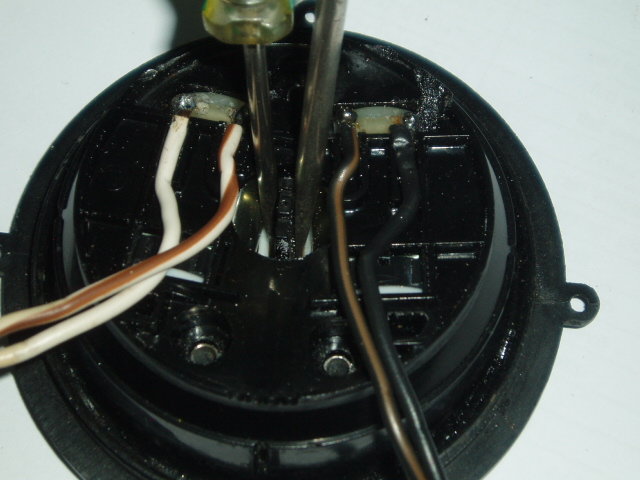
This is the mid-year mirror style. It uses a barrel connector, but has the newer style motor with a locking ring to mount the glass. There is no circuit board in this motor. Polarity reversal is controlled at the switch and the wires are soldered directly to the motors.
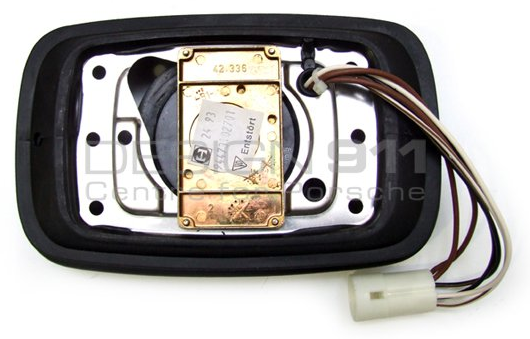
This is the mid-year mirror mounting plate and backside of the connector. This backing plate must be paired with a mid-year style motor.
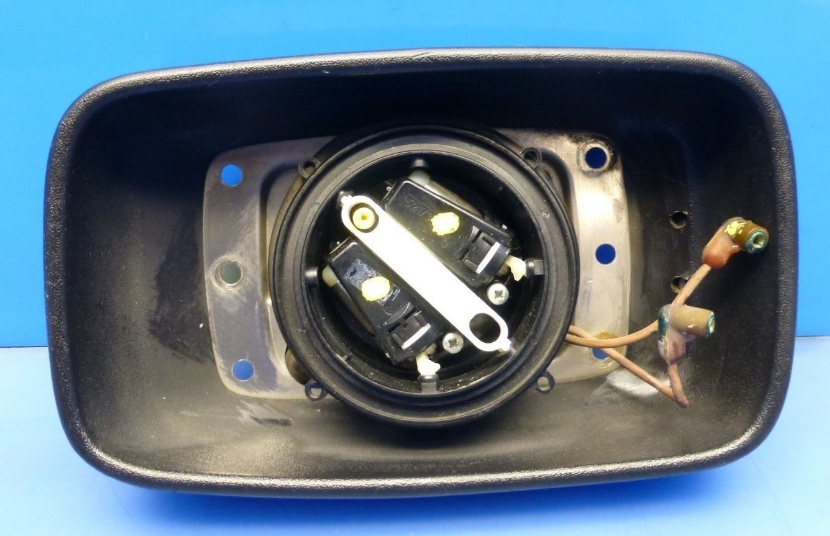
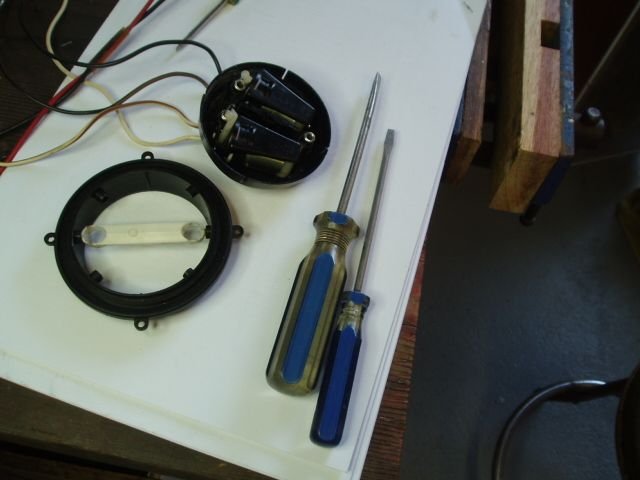
This is the newest style flag mirror. The motor is similar to the mid-year style, but has a circuit board that controls polarity reversal. The circuit board can be removed, so the motor operates similarly to a mid-year motor.
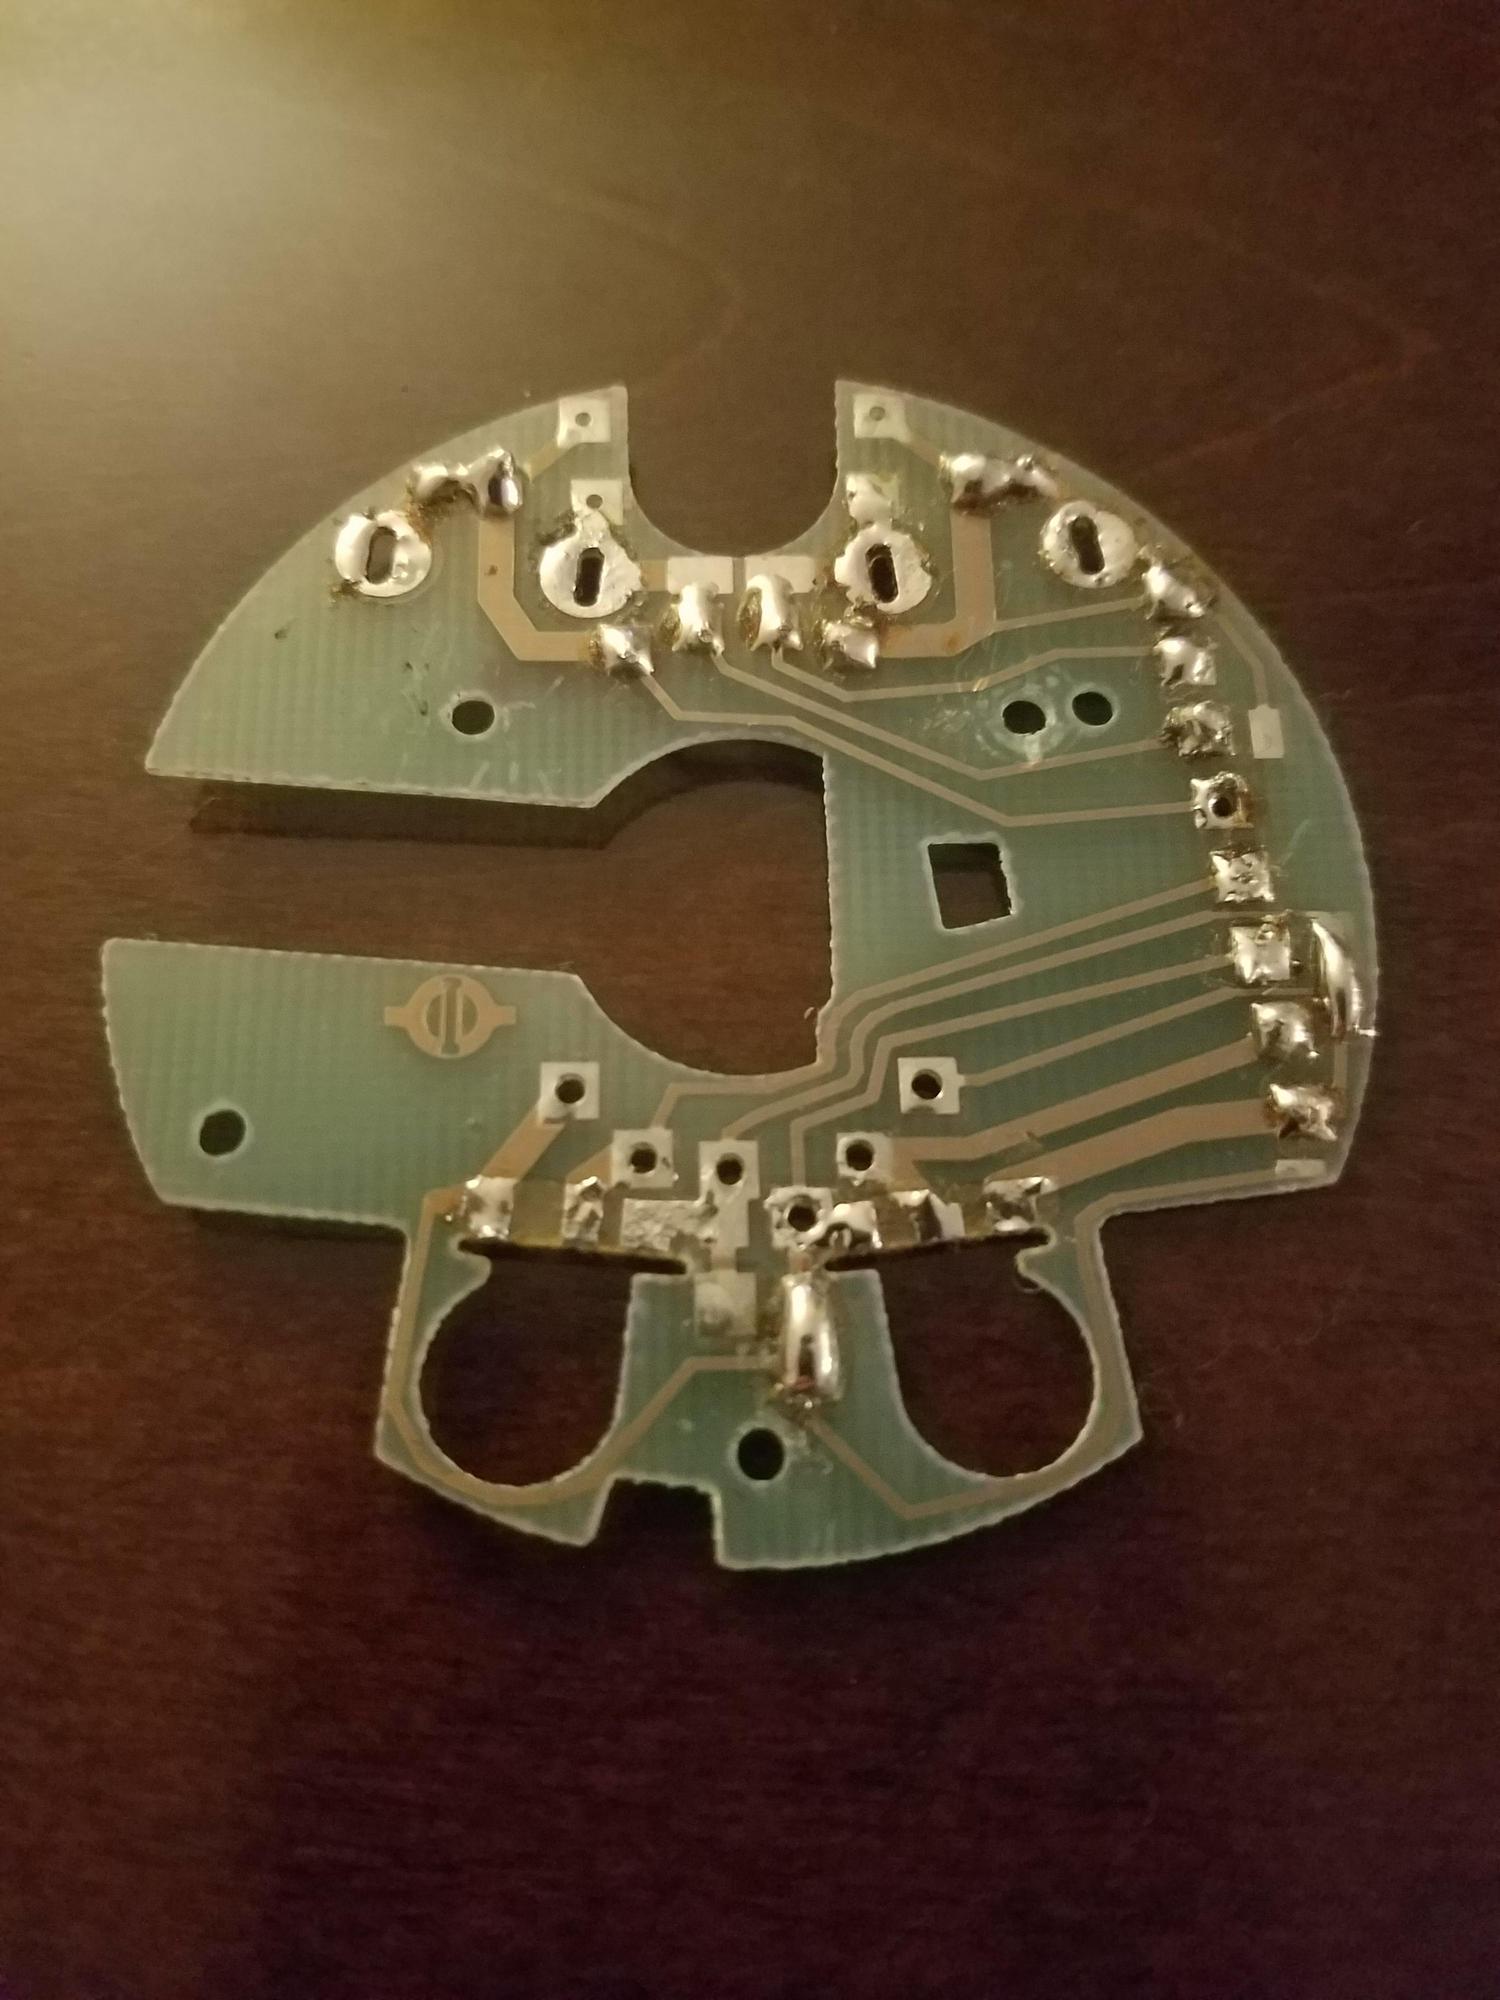
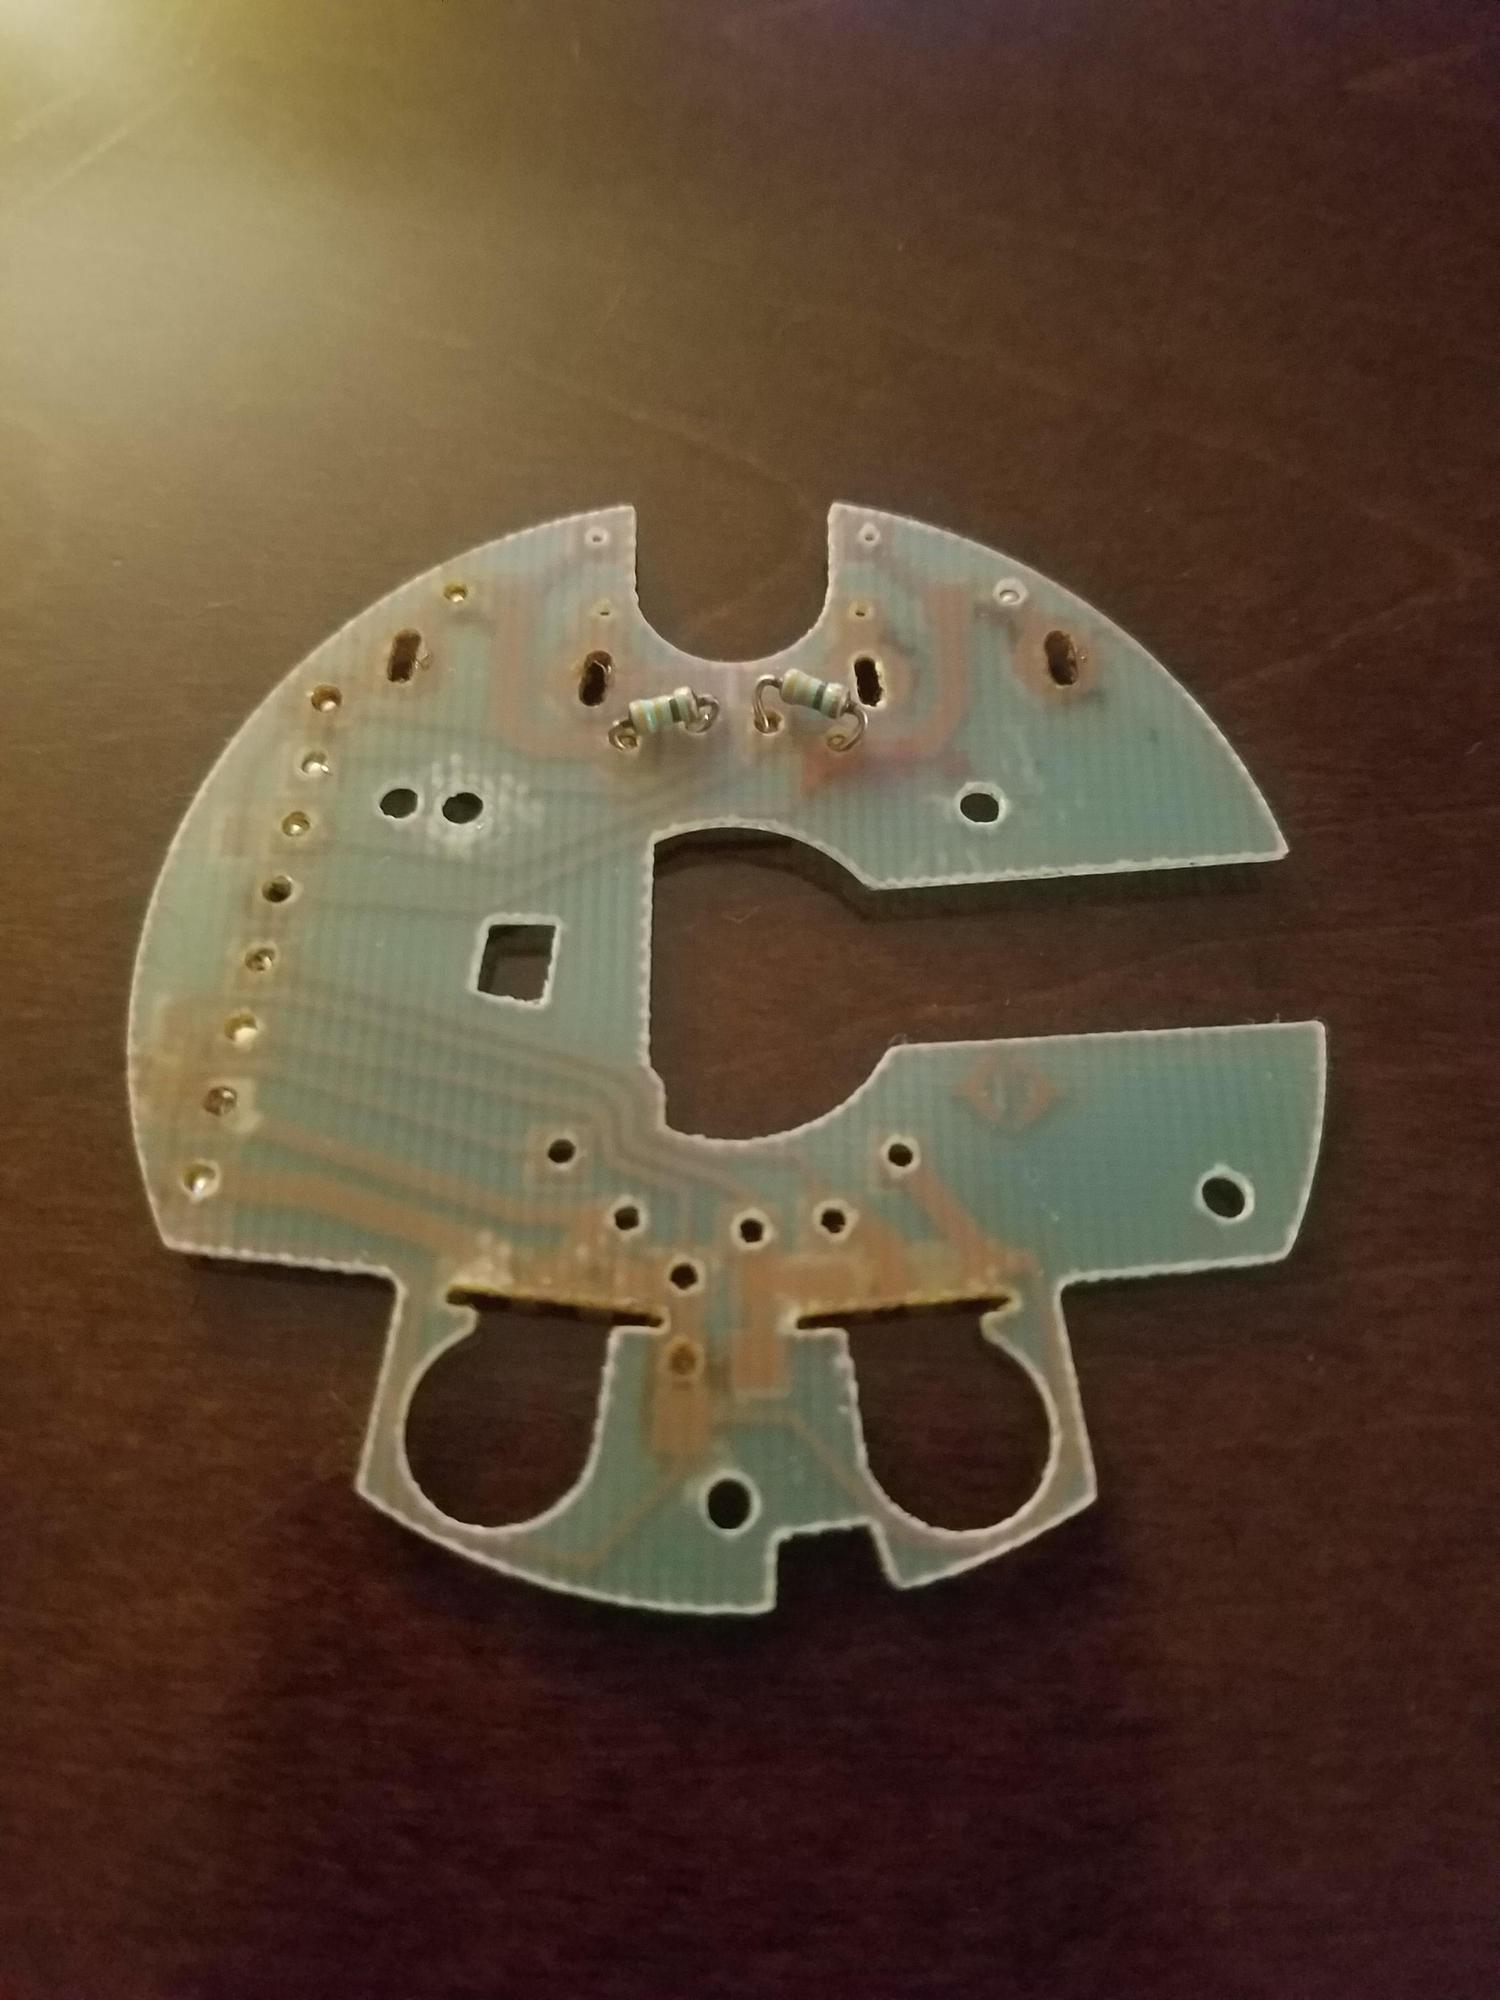
This is the desoldered circuit board for the newst style flag mirror motor. Some wires are already removed so I could salvage the rubber motor gasket by sliding out the wiring harness.
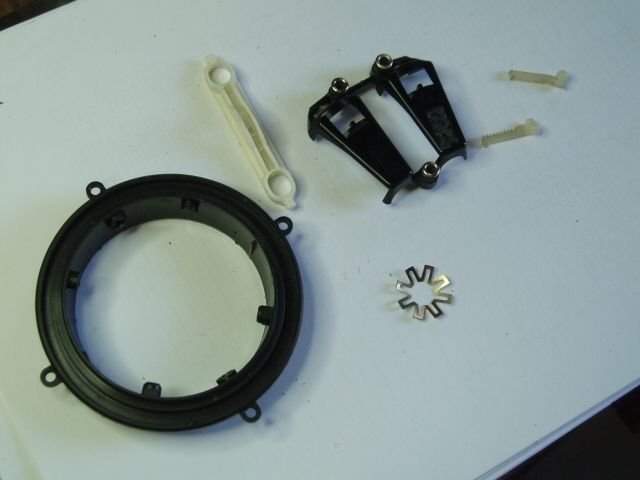
This is the newest flag mirror motor mounting plate. This backing plate must be pared with a newer style motor, as the overall depth of the newest style motor is different from a mid-year motor.
This is the old style mirror glass. It is not compatible with the mid-year or newest style motors.
This is the mid-year and newest style of mirror glass. It is compatible with both motor types.
Last edited by traxtar928; 10-20-2016 at 12:52 PM.
Do you have the mirrors working correctly electrically. There is a big diffference between the solenoid type and the dual motor types from a controls perspective.
They work perfectly. The motors are simple in that they have a (+) and (-) terminal. Reversing polarity reverses the direction of the motor. Since the old 4-wire style is direct-to-motor, it's a relatively easy and straightforward conversion.
Keep in mind, this thread doesn't cover aero mirrors.
They work perfectly. The motors are simple in that they have a (+) and (-) terminal. Reversing polarity reverses the direction of the motor. Since the old 4-wire style is direct-to-motor, it's a relatively easy and straightforward conversion.
Keep in mind, this thread doesn't cover aero mirrors.
Aero mirrors are exactly the same functionally as the late flag configuration (excepting colors) and are no more complicated (and not different functionally) for the basics as the mid flag configuration. Over the mid flag config. they just add the additional feature for the position feedback potentiometers - but you can just ignore these if you don't have a means to use them. The real challenge is between early flag (Pre-S4) single motor+solenoid types and the later dual motor mirrors. Mostly folks tend to want to put newer mirrors on an older car - and the early car switchgear can't directly support the dual motor mirror configuration.
Can you show the other side of the circuit board? I am not familiar with an 8 connector mirror... early solenoid flags had 6 connections, mid dual mirror flags (S4) had 6 connections and later memory flags and 928 Aeros have the same motors & switch gear with 10 connections. Is there something else in between? OR was this a special conversion to enable solenoid flags to be used on a dual motor car? (or even V-V?). Or possibly are you just not counting the heater connections in your numbers?
Anyone else seen this on a given model year or have insights? - it is a new one on me.
I'll take a photo of the circuit board and update this post.
From the factory, the circuit board was positioned on the back of the motor housing using plastic locating pins, which were then melted down to "tack weld" the circuit board to the housing. I just used the tip of the soldering iron to melt the plastic and pull away the board from the motors, after de-soldering all the wire connections.
There was also a small circuit board at the opposite end of each motor, that each had three small solder points that attached to the main board. Unfortunately, I didn't think to take pictures of them. If I had to guess, they were there to simply redirect voltage depending on which wires were powered during movement.
I have been messing with the non memory mirrors on my 87 S4 recently and thought I would share the information here.
The little gear arms pop out of their sockets easily if you have wound the motor gear all the way to the bottom of the little gear arm.
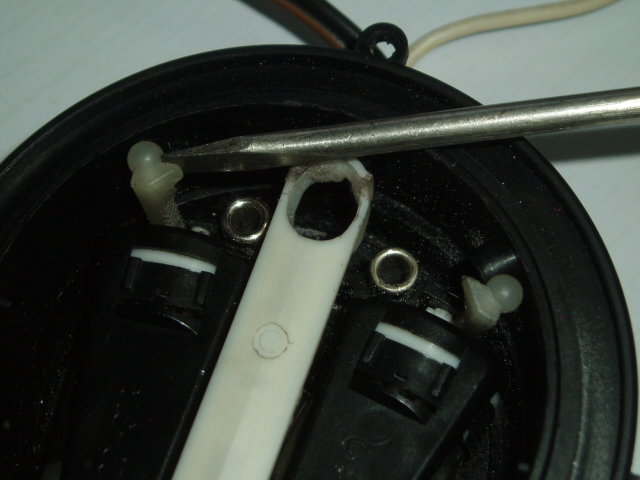
To remove the central white pivot arm that is between the motors, turn the motor assembly over and prize apart the white tabs from the black mounting point to separate the upper and lower sections of the motor assembly.
Three hands are better to separate the halves because the white pivot arm keeps clicking back into position when you try to hold the screwdrivers while applying pressure to separate the upper and lower sections.
The motors appear to be interchangeable between memory and non memory motor assemblies. The upper section is interchangeable. The motor housing and base are not interchangeable.
Top section of housing on left is interchangeable, but the motor housing on the right is not.
I found that I could remove the central pivot arm from one of the upper sections but not the other. The one that I could remove it from had a chamfer cut into the mount that allowed enough room for the pivot arm to be pulled out while using firm hand pressure to flex the upper housing.
You can see the chamfered mount on the bottom and the non chamfered on the top.
Last edited by G.P.; 12-22-2016 at 03:44 AM.
Reason: Added Photo
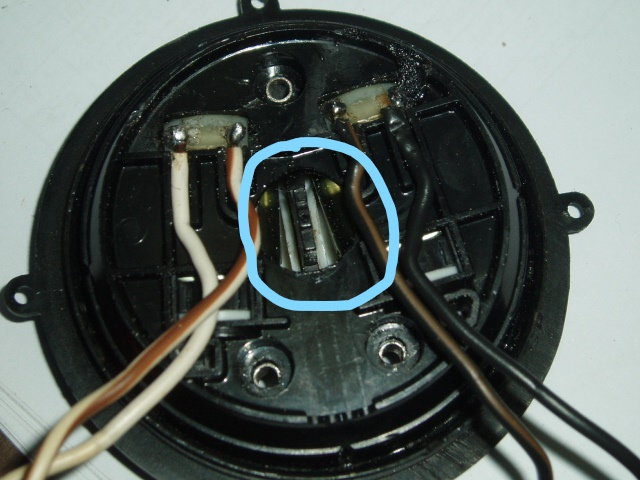
Here are close up images of the circuit board in the 8 wire mirror. The are also two smaller boards that are connected to the motors and solder to this board. You can see the two slots where they fit in.
The main component that breaks on these motor assemblies is the little toothed arm that engages with the motors. There's no way to replace that item, unless someone can 3D print them. Otherwise, it requires a salvaged motor assembly for parts.
Another part that's different between the 4 and 8 wire motors is the rubber boot and lip it fits into on the plastic housing, that protects the electronics from the elements. Therefore, the only efficient option is to swap the entire motor assembly.
This information would have helped me going into this project, so I decided to create a post to share the knowledge I gained.
I've been searching the used parts resources for an affordable replacement mirror motor and glass for quite some time without much luck. The plastic arm had the teeth wear away, cause the drivers mirror glass to shake. The passenger side mirror had also started to delaminate, so I hoped to find a passenger side assembly and swap over the motor to the drivers side, solving both problems in a single purchase.
Unfortunately, eBay and other retailers didn't have much to offer. Most mirrors were the wrong design, heavily used, or well over $100 for just the motor or glass. I wasn't interested in prying out the glass from the plastic frame for a cheap solution... as I didn't think the heating element would work correctly with whatever adhesive I came up with , or risk it falling out over time.
I ended up buying a passenger side mirror assembly for $80 shipped that had dual flat connectors on the back. My mirrors, however, had a barrel connector. So, some surgery was necessary. The motor with the two molex connectors has a circuit board built in, and 10 wires... because the circuit board controls polarity reversing for multi direction. The motor with the barrel connector does NOT have a circuit board, and 6 wires... because the polarity reversing is controlled by a solenoid. 2 of those wires for each design are used for the heating element. The motor gasket that seals out moisture and debris is also different.
Besides the above differences, the two motors are nearly identical. Therefore, the motor with 8 wires can be converted to a 4, but not the other way around (because the circuit board is necessary). So, all that was required was to de-solder the circuit board and swap over the wiring harness from my damaged motor to the new one. The wires solder directly to the motor leads identically as to how they are soldered on the barrel connector motor.
The motor mounting plates have different standoff lengths, and need to be paired with their respective motors. So, if you are doing this swap/conversion, you NEED the motor surround as well. Otherwise, the glass will be positioned too far forward or backward in the housing, and will not be snug.
Old style of motor and mirror. These cannot be swapped to a newer style without a complete mirror swap including black rubber surround, mid-year motor with barrel connector, and updated glass design.
This is the mid-year mirror style. It uses a barrel connector, but has the newer style motor with a locking ring to mount the glass. There is no circuit board in this motor. Polarity reversal is controlled at the switch and the wires are soldered directly to the motors.
This is the mid-year mirror mounting plate and backside of the connector. This backing plate must be paired with a mid-year style motor.
This is the newest style flag mirror. The motor is similar to the mid-year style, but has a circuit board that controls polarity reversal. The circuit board can be removed, so the motor operates similarly to a mid-year motor.
This is the desoldered circuit board for the newst style flag mirror motor. Some wires are already removed so I could salvage the rubber motor gasket by sliding out the wiring harness.
This is the newest flag mirror motor mounting plate. This backing plate must be pared with a newer style motor, as the overall depth of the newest style motor is different from a mid-year motor.
This is the old style mirror glass. It is not compatible with the mid-year or newest style motors.
This is the mid-year and newest style of mirror glass. It is compatible with both motor types.
I have the mid year newest style of mirror glass. I removed it so I can re install the mirror glass and noticed the wires that hook up to it were detached and seem to be missing the connectors. Can I buy those connectors or would a generic work?
@Rexxus : It looks like the connectors are actually still there, attached to the posts, and underneath all that crumbling coating. The wires are just soldered into the barrel connectors and it looks like yours have detached. I'll bet you can dig out the connectors, clean them up, and resolder them. I don't have a good solution to the insulation bit, however.


 10-19-2016, 12:33 PM