When you click on links to various merchants on this site and make a purchase, this can result in this site earning a commission. Affiliate programs and affiliations include, but are not limited to, the eBay Partner Network.
I've been digging around behind my CE panel of my '90 S4 for the last couple of days and I just fixed the aftermath of a couple of fuses which were in the process of melting, but there is at least one more issue in the CE panel that I would like to address.
When I bought the car this summer I was told that the HVAC blower didn't work, and looking at the CE panel I can see why--the fuse had obviously melted at some point in the past. There is no longer a fuse present, and all that I can see is its charred remains. I flipped the panel over yesterday to take a look at what things looked like behind the panel but it seems as if the wiring behind the fuse has been removed. I presume that the wires were roasted and that's why they were pulled, but I would like to fix the fuse receptacle and wire it back up so that it can work again.
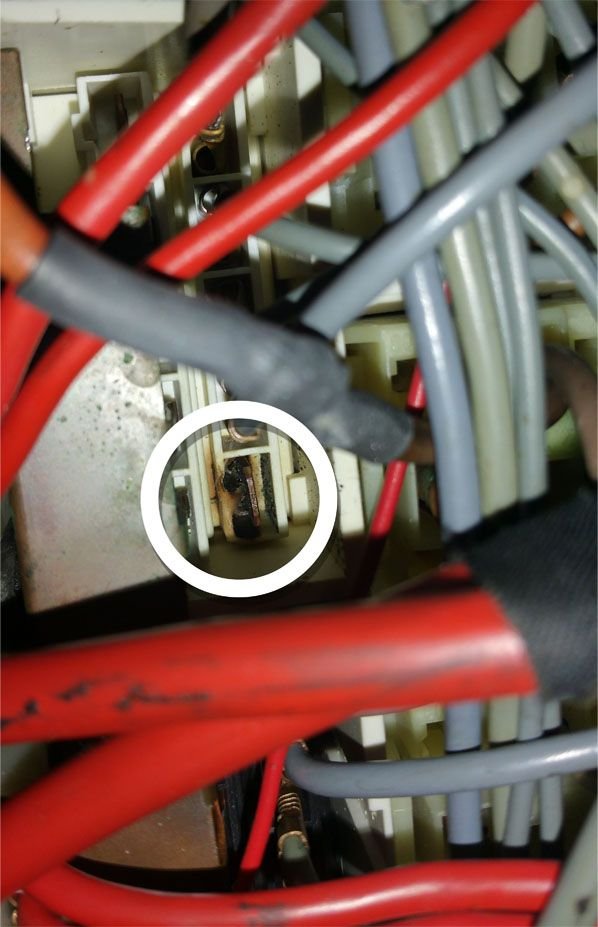
My question: Does anybody know what wiring needs to be installed in order for me to get the HVAC blower working? I assume that a wire has to go in the connector shown below (this is directly behind the HVAC blower fuse), but I don't know where the other end needs to go, and I also don't know if there are any other wires in this circuit that are attached to the CE panel that I may be missing as well. Any help would be appreciated!
Simon - Again, make sure you've disconnected the ground strap at the battery. I use a bungee to hold it up and away from metal contact. In your picture you'll see the connector from the copper input plate to the left of your circled connector (the input is above the ruined connector if viewing the panel topside up).
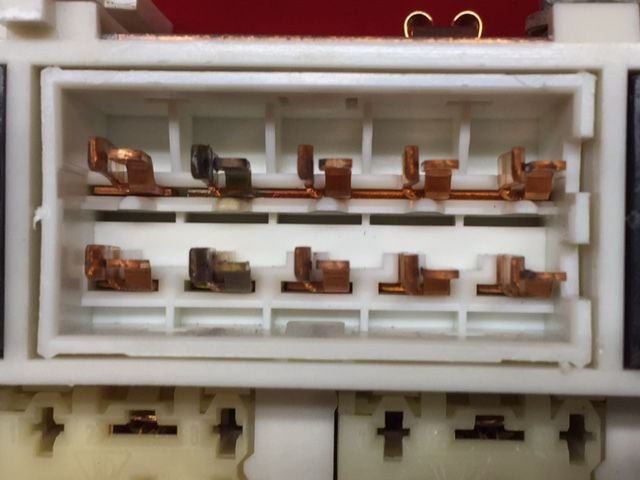
I suggest you remove the numbered face cover and inspect the contacts. The lower contact may be toast. Same might be true for the upper contact. And the input "tine" (for lack of knowing the real word for it) of the copper plate may be degraded also. Hope not.
Fresher contacts that haven't been heated up give some piece of mind. If you decide to pop the face plate off, take a close look. I believe this is fuse #17. If so, the upper contact for 17 is connected to its three neighbors to the right.
Notice the lower contacts are not connected. If it turns out only the lower one (the one with the missing wire) is badly degraded from heat and oxidation, I can send you a few nice single contacts right away. If the upper contact (the one connected to it's right neighbors) is a mess, that would require some work to remove, but I have two weeks of vacation coming up and I might be able to help you with that one, too.
You should see a dangling gray wire on the backside of the panel. It looks like the female connector stayed on the contact you circled...hard to tell.
This one is a bigger job because of the copper input plate connecting to the upper contact of #17. It's why I chose to clean up what you see in the pic above and hope for the best. So I may need that connected set of four contacts if 17 continues to melt fuses. We'll see...another one for the AC on test.
Don't be discouraged. To me the worst case is this takes a week instead of a day to get sorted. Take your time. I'm sure more help is coming...this is a pretty common problem.
Last edited by Captain_Slow; 12-08-2016 at 06:00 AM.
Thanks so much, that is a really generous offer. The help given here never ceases to amaze me. As a matter of fact, since there were no wires to cut and since I already had an inline fuse kicking around I decided to just quickly wire the fuse up from the top post to pin 30 on relay XII to see if it worked, and sure enough it did! I still intend to open up the front face of that fuse block to inspect though. I figure that if I can fix it properly I will, but if it requires some hard to find jumpered contacts then it might take some time for me to hunt down the correct pieces and rebuild. If worse comes to worse though, the inline fuse should do the trick and keep the air blowing until I can find the right parts.
Thanks again for your help! And also thanks to everyone for the ground strap reminders. I always disconnect it whenever I even think of doing anything electrical.
Simon, below is something I posted for a fellow a while back who was having hvac issues. His compressor was not engaging. His reason why was his blower relay was down. Note the path for your future reference. His fuse/relay #'s are different for his model year.
'The power to operate the A/C compressor clutch comes thru fuse #17 to Relay X, the blower relay. If the A/C blower works, the fuse and this relay are good - if the blower doesn't work, neither will the compressor.
From the relay, power goes to the A/C switch on the dash.
From the A/C switch, power goes to the A/C control head. There is a small relay in the control head that controls the power to the compressor clutch - this relay can fail.
The power then goes to the antifreeze switch on the A/C evaporator. If the evaporator gets below freezing, the switch opens, cutting off the compressor.
From the freeze switch, power goes back to the central power panel, and goes to both the supressor in Position XI and out to the low pressure switch on the A/C receiver/dryer forward of the radiator. From there, power goes to the ccompressor clutch.'
Attached Images
________________________________________________________________________ _________________
If you're not familiar with pin designations of the relay, here is a simple SPST (single pole single throw) relay.
85/15 - ground
30 - current/power in
86 - signal from appliance switch
87 - current out to appliance
As a matter of fact, since there were no wires to cut and since I already had an inline fuse kicking around I decided to just quickly wire the fuse up from the top post to pin 30 on relay XII to see if it worked, and sure enough it did!
Great idea. I think an alternative wiring solution may be best in this case. You're electrical skills exceed my own, and Maine Porsche has the info you need. You'll have this sorted soon.
Thanks for that info MainePorsche! I am not yet at the point where I get much out of wiring diagrams, so that explanation of how the circuit is powered is really helpful.
And Jon, I can assure you that my electrical skills are about as basic as basic can be. I'm the type of guy who hates not knowing anything about stuff that I have interactions with every day, and my two main voids in this regard were automotive and electrical. I literally knew nothing about either, so I decided to get a 928 as I thought it would be cool and it would force me to learn. I had an '84 that needed a ton of mechanical work so I was forced how to learn to wrench real quick, and I was also able to chase down some basic electrical issues there as well. Now that I've bought a '90, the majority of my issues seem to be electrical in nature, so I'm beginning to learn a bit more about that subject as well. Learning is fun, and making these cars work properly is pretty rewarding.

 12-07-2016, 05:16 PM