When you click on links to various merchants on this site and make a purchase, this can result in this site earning a commission. Affiliate programs and affiliations include, but are not limited to, the eBay Partner Network.
I finally got tired of riding around with the seatbacks laying the floor. Looks tacky in a Porsche. I searched for ways to fix the problem. I tried epoxying the plastic do-dads back in place only to have them fall off. I tried velcroing the back on and that too failed. I wanted a way to mechanically fasten the back to the seat. This was the closest thing I could come up with and not be visible or drill holes thru the seatback.
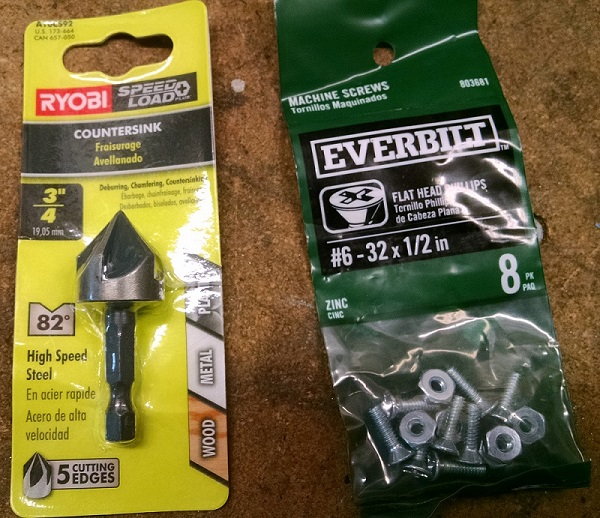
Materials bought from HomeDepot:
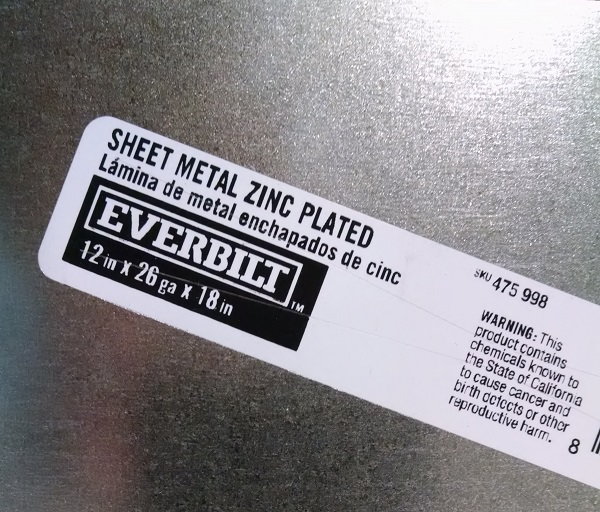
12�x18�x26 ga. galvanized sheetmetal
3/4� x 82 degree countersink tool
#18 or 11/64� drill bit
#6-32 x 1/2� flat head screws w/nuts
2 small roles of 3M trim tape. 3M Acrylic Plus is best if you can find it.
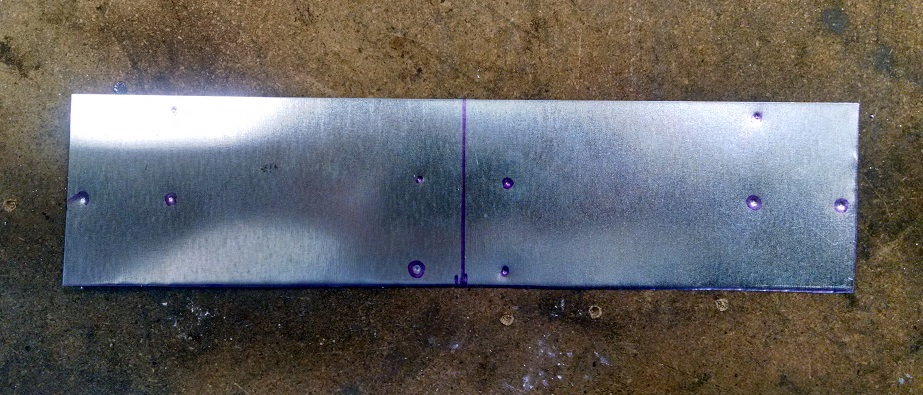
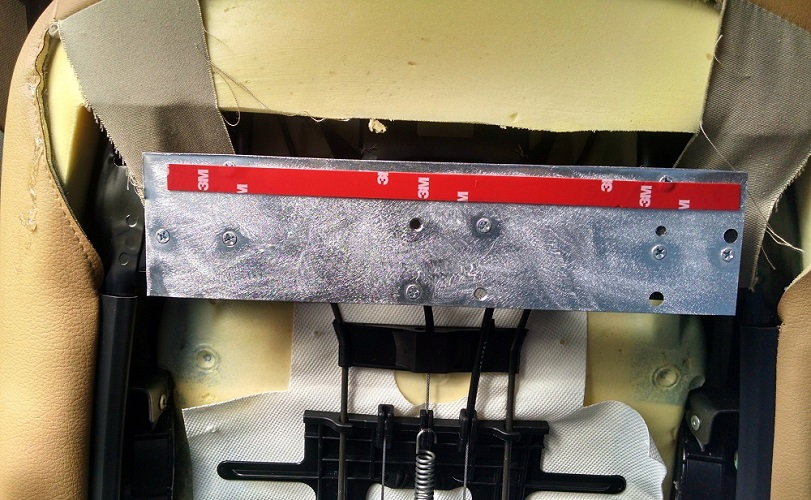
I went over to HomeDepot and bought a piece of 12�x18�x26 ga. galvanized sheetmetal (so it won't rust). I used 26 ga because it is easy to cut and it is thin so it won't take up much space. With the plastic do-dads still on the seat I measured from outside to outside both vertically and horizontally. To get the vertical dimension I laid a straight edge across the top of the plastic do-dads and measured down. I used those dimensions to layout the blanks on the sheetmetal. I used aviator shears (tin snips) to cut the blanks out.
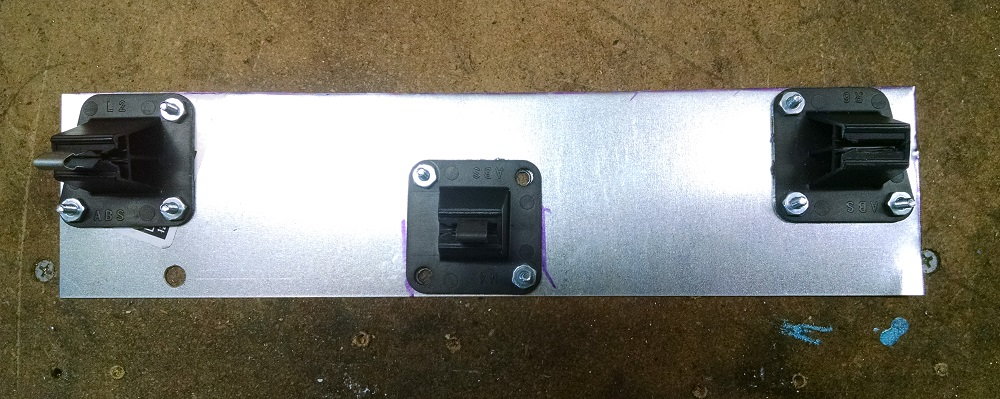
Next I pulled the plastic do-dads off and laid them on the cut material. You need to be pretty close with your layout but not dead nuts accurate. There is some movement left to right built in to the do-dad mounts. I marked and drilled the clearance holes. Now you have to flip the part over and use the countersink tool for the heads of the bolts. Be very, very careful with this step. If you drill to much the head of the bolt will pull thru. You only want the head to be recessed a little so it does not protrude above the blank. This is just to get the mounting surface as flat as possible. The head of the screw will protrude up some. I went head and used a piece of sand paper to rough up the surface to remove any oils or slick finish. It will help with the tape adhesion. Now bolt the plastic do-dads to your plate.
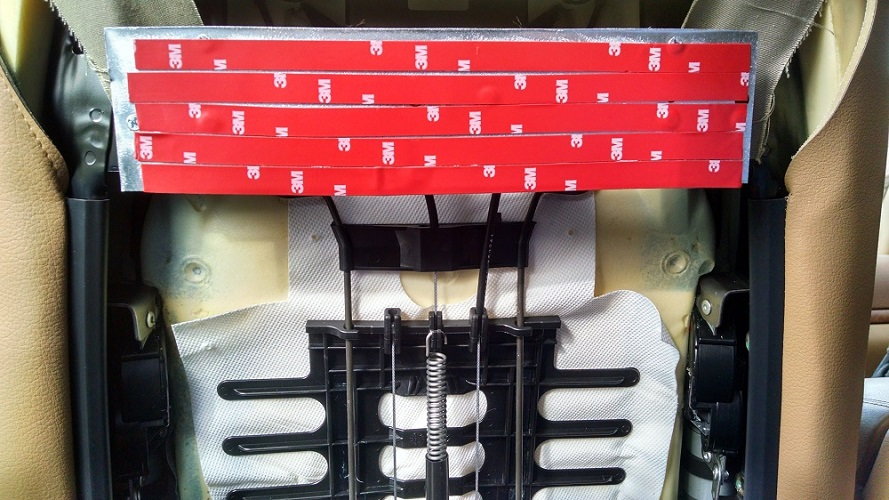
Next install the plastic do-dads back into the seat with the plate attached. Now you can start covering the plate with the 3M tape. Start at the top, don't leave a small gap as I did. It will take the entire small role to cover the entire plate. Now all you have to do is peel the protective coating off the tape and stick the seatback on. Alignment here is critical to the appearance of the seatback. Do a couple of dry fits to get an idea of where your seatback is going to land on the back of the seat. You are done!!
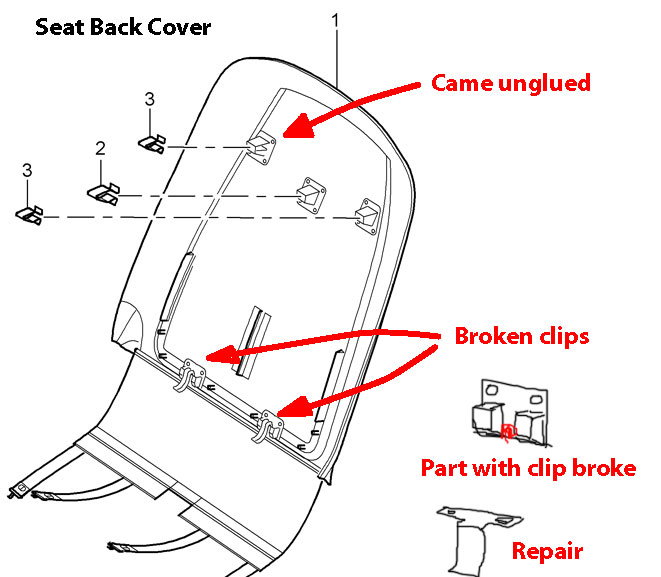
A couple of notes. I removed my seatbacks completely from the vehicle. I did this because I wasn't completely sure of how I was going to fix them and I also needed to carry a passenger in the rear. There was a little fiddling involved to get the elastic straps unhooked and I ended up cutting the ones on the inside near the transmission tunnel. You will also have to unhook a plug under the seat because it is run thru one of the hooks holding the skirt up. With the seatbacks out it gave me better access to fixing the plastic �U� shaped clips that brake off when the seatback falls off. Gorilla glue would not work so I used good old Testor's model car glue to fix that. Worked like a champ. I also used a sander on the inside of the seatback just to rough up that area to help with adhesion.
My vehicle sets outside and gets pretty warm on the inside. We have had some warm days here, in the low 80s. It has been three months since I did the first seat and so far my �fix� has held up. This summer will be the real test.
What year is your vehicle? I have a '14. Is this a common issue?
Mine is a 06 first generation. Yes, it is a common problem. The epoxy they use does not hold up. The inside of the seatback has kind of a "hair" surface that the epoxy does not like to stick to. It is probably more of an expansion rate issue with the dissimilar materials.
Shoe Goo also works well, to keep the backing clips intact. It also does an excellent job mending the busted lower plastic seatback anchor hooks. Just be mindful of the 72 hour cure times...
My drivers seat back fell off. Only one of the top clip mounts came unglued. It looked like it had been reglued with a glue that stuck to the fibre board but not the plastic clip base. However, the clip part of the bottom clips was broken off both and nowehere to be found. Figured the top clips would hold fine with either some gorilla glue or shoe glue that is designed to soak in to fiberous material like the seat back cover and stick to the hard plastic of the clip holder AND if the bottom clips were holding their weight too.
Saw where someone had drilled holes and used zip ties to replace the lower clips.
I decided I could get some thin sheet metal at the hardware store and use the blocks left on the lower clip to screw on a T shaped metal clip replacement part. And then it would clip on and remove just like the stock clips but be much stronger.
Remove the clips from the seat, put them back in the brackets drill 2 holes in each bracket where they belong on the seat back and use black finish screws to attach them and be done with it .....and still have the ability to remove the seat back if necessary and if anyone has anything to say about the screws in your seat back tell them to get out and walk
My clip mounts came unglued the same as the rest who have had this problem. I used silicone to reglue them, its a 5 min fix, never had an issue after that.
Remove the clips from the seat, put them back in the brackets drill 2 holes in each bracket where they belong on the seat back and use black finish screws to attach them and be done with it .....and still have the ability to remove the seat back if necessary and if anyone has anything to say about the screws in your seat back tell them to get out and walk
10 minute fix
My son asked about the screw heads and I said it added 10hp
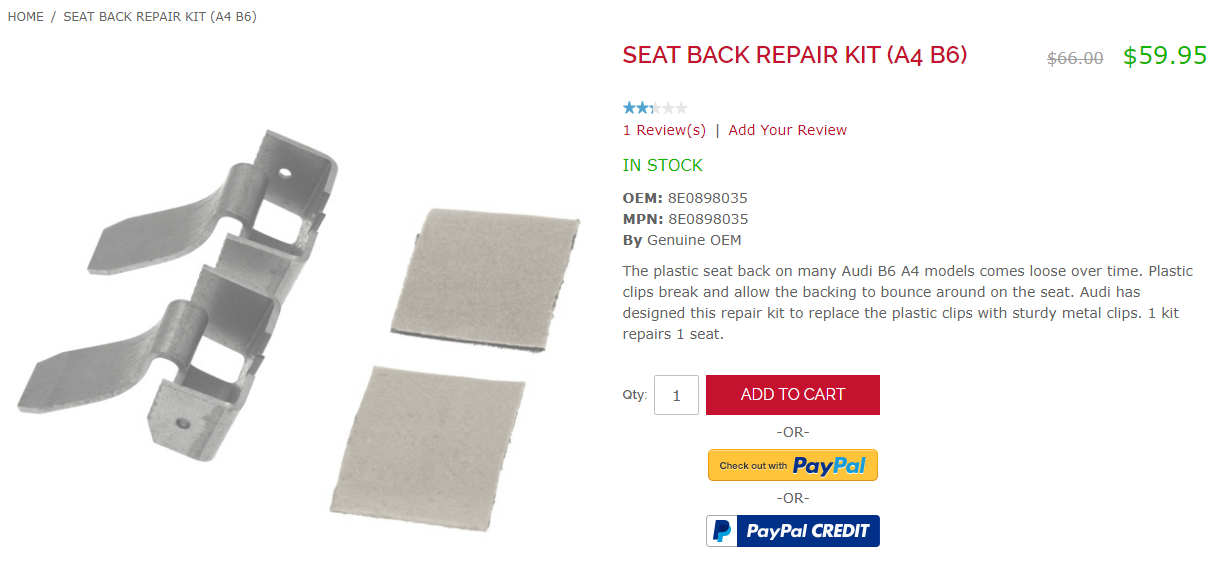
Spend $600 for new, failure-prone panel, or fabricate?
They are 3x the beef of OEM lower clips. If these don't fail.. the seatback stays UP indefinitely!
Failure of the lower hanger clips is actually what compromises strength of the three upper snap clips, in short order. I 3D printed lower clips instead. Remember, no adhesive(except Silicone-based) likes to support close to 3 pounds of panel, in high heat/humidity. Now, it's set-and-forget...
Last edited by Dilberto; 07-12-2017 at 10:36 PM.
Reason: Add photo
are you still making the lower clips. my 09 Cayenne GTS is really in need of a set...or maybe even 2 sets. i figure the other seat back can't be far behind.
thanks,
mark
sarasota, fl

 03-16-2016, 11:26 AM