
DIY install - updated wiper arms for 955 Cayenne
 03-30-2014, 07:46 PM
#1
4th Gear
Thread Starter

Join Date: Mar 2014
Posts: 4
Likes: 0
Received 0 Likes
on
0 Posts
Like many 955 Cayenne owners (mine is a 2006), I have had trouble with the wipers dragging and chattering across the windshield. I tried all the normal remedies:
- Replacing wiper blades (many brands and lengths, including Porsche OEM)
- Bending the wiper arms to be as parallel to the windshield as possible
- Using Rain-X and Aquapel coatings on the windshield to make the surface slicker
However, none of those worked, although I did eliminate some of the problem. The last resort was replacing the wiper arms. When I went to order in February, the dealer said Porsche no longer stocked the arms, as they were replacing the arms/blades with new parts. So I waited until the new parts were available early March and purchased the first ones in the warehouse:
Left wiper arm, p/n 95562802822
Right wiper arm, p/n 95562802922
Front wiper blades (set of 2), p/n 95562893911
My hope was that Porsche re-designed the parts because of the widespread issues with Cayenne wipers. And as I detail below, the parts are somewhat different than my originals (note there were date codes on my wiper arms that indicated they were the originals installed on the car).
I finally got them installed today, and thought I would describe the process and detail the differences between the old and new parts. One note � according to Porsche, you can't replace just one part, you must replace both arms and blades together with the new, updated parts. However, during the course of my install I found this not to be true, as you could re-use the old blades, and I tested with a new driver's side arm and an old passenger side arm and had no issues. But fair warning � replace just one part at your own risk.
The usual disclaimers before I start......do any part of this process at your own risk! Although it is a easy process from a mechanical perspective, you have to take your time to line up the wiper arms correctly on the windshield, and you also have to be careful not to damage your hood.
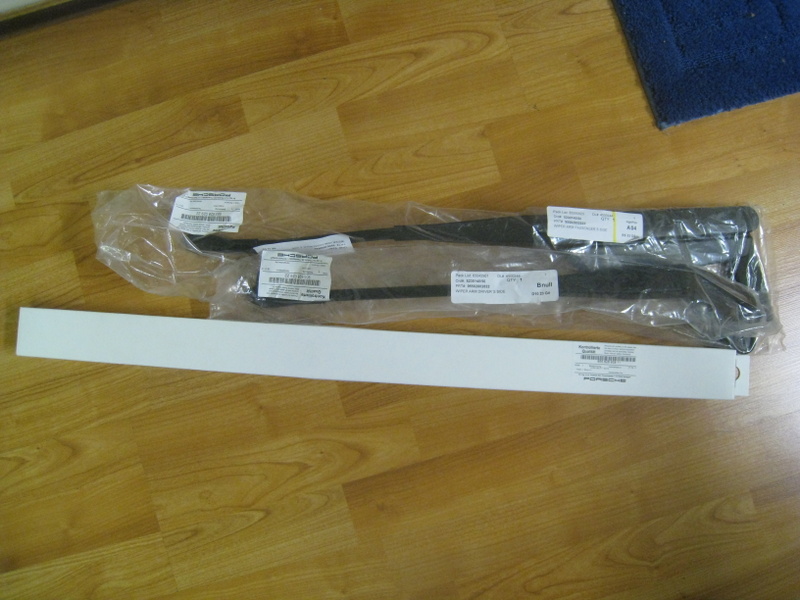
Here is a picture of the parts as they came from the dealer:

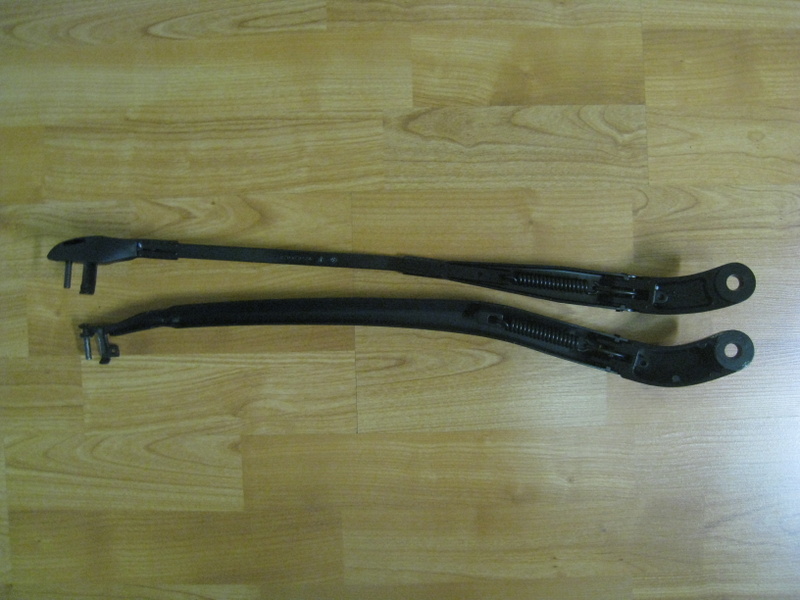
And here's a comparison of the old/new arms on the driver's side (new version on top):
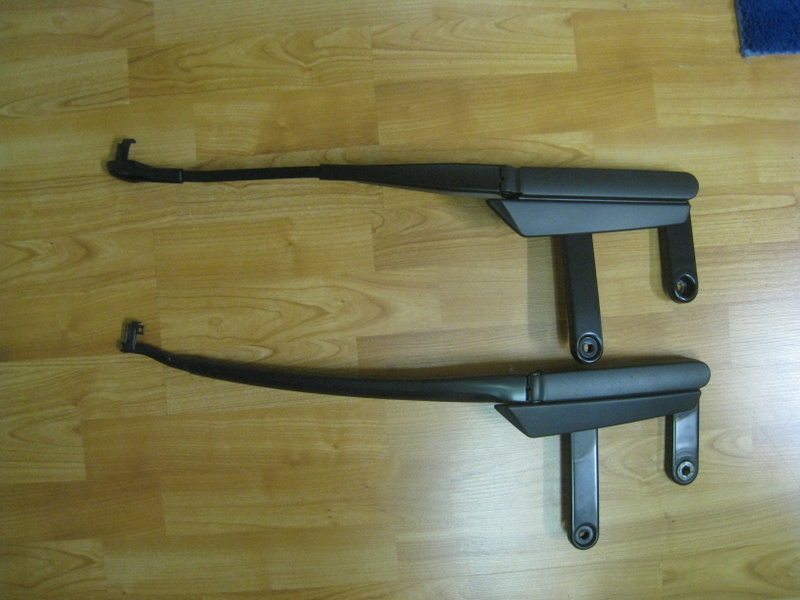
And here's a comparison of the passenger's side (new version on top):
First, the driver's side. If you've removed a wiper arm before, there are no surprises here, except because of how the wiper arm is located you must move the hood out of the way to give room to remove the arm. This is not hard, but is best done with two people.
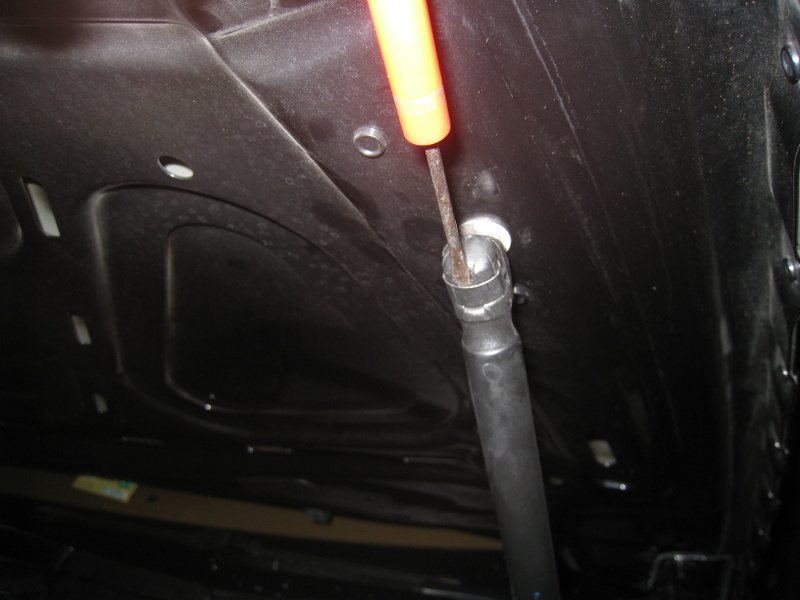
Raise the hood and unclip the strut holding it up by carefully prying out the spring holding the strut to the hood. Only pry out a little bit, don't let the clip come all the way out. The strut will then separate from it's connection to the hood.
Hold up the hood and carefully lay the strut down in the engine compartment. Have your helper hold the hood pointing straight up during the next step while you remove the driver's side wiper arm.
Before doing anything else, mark on the windshield where the wiper rests. This is important, as the sweep of the wiper on the Cayenne is unusually wide, and you don't have much margin for error. I used blue painter's tape (you can see it in one of the pictures below) to mark the top and bottom of the blade.
The arm is removed by pulling off the cover for the attaching nut (use your fingernails), and removing the nut w/a 16mm wrench.
The nut will come off fairly easily, but the arm will stay on. To remove the arm you need to use a puller; there are many inexpensive versions available. Here's one I picked up ages ago:
Position the puller's arms under the wiper arm and tighten; the arm will �pop� off. Putting on the new arm is the reverse of removing it, although keep test-fitting the arm to make sure you get it in the same position as the old one. Tighten down the nut, attach the nut cover, and you're done with the easy side.
Here's a pic of the driver's side when I was done; notice how I marked the position of the blades with the blue tape:
The passenger side is trickier because it is attached with two connection points, and each attaches slightly differently. Remove the covers for the two nuts (use your fingernails), and you will see the two 16mm nuts that hold on the arms. Remove both nuts. Hold on to the arms as you remove the nuts; if you just apply force the linkage will move and mess up the wiper blade alignment (as well as putting stress on the linkage which has been known to be somewhat fragile).
The �outside� arm (closest to the passenger side) will be easy to pop off; you may not even need the puller. Note that the bolt and the arm are both notched, so it only goes on one way. Also, there is a bushing (really a thick washer) that goes underneath the nut. Don't lose it, as the new arm does not come with one. Here's a pic of the arm after removing the covers, with the bolts still on. The �outside� arm is on the left.
The �inside� arm (closest to the driver's side wiper arm) comes off the same way as the driver's side arm. But underneath the nut is a special splined bushing that you will need to press or pry out of the old arm and put it in the new one. I used my puller to push it out from the bottom.
Installation, as they say, is the reverse of removal. But you will need to have patience to get both arms aligned so that they fit AND keep the wiper blade in the correct position. Everyone has their own technique; find what works best for you. When you have everything lined up, fully tighten down both nuts and put on the covers.
As for the new wiper blades, the old ones and the new ones are both 26 inches long (same size on driver and passenger side). You can re-use your old blades, but the new ones have a notch that fits the new arms very nicely. And a special treat � the new arms eliminate that stupid plastic cover that snaps over the connection between the arm and blade. No more fiddling with that annoying, tacky, easy-to-lose piece of plastic. If you are not the first owner of your car you may not even know the covers exist, as most Cayennes I see have them missing.
BTW, the new arms are made by Bosch, and have a Bosch part number. Interestingly, the blades did not have a manufacturer on them, although I would assume they were made by Bosch.
Now the moment of truth � testing. But here you will run across something interesting. Since I didn't know if I was going to have to remove the arms again, I did not re-attach the hood strut yet, I just put the hood down against the first latch. But Porsche must have put in some sort of fail-safe, as the wipers will NOT work if the hood is not completely latched. Believe me, it took me 20 minutes of checking fuses etc. etc. to figure out the hood latch thing. So you will have to re-attach the hood strut and close the hood completely for testing. Luckily it was raining the day I did this, so it was easy to test by pulling the car out of the garage and into the rain.
So did it fix the noise and chattering? Absolutely! I don't know why.....the re-designed arms, blades, whatever. Maybe it was weight; the new arms are much thinner and lighter than the old ones. It does make you wonder, though. why Porsche re-designed a part for a car that came out 12 model years ago?
The two new arms and both wiper blades cost me about $250, including shipping, and will be worth every penny when it rains. I probably spent about 3 hours on this, although if I were to do it again it would take about 30 minutes.
- Replacing wiper blades (many brands and lengths, including Porsche OEM)
- Bending the wiper arms to be as parallel to the windshield as possible
- Using Rain-X and Aquapel coatings on the windshield to make the surface slicker
However, none of those worked, although I did eliminate some of the problem. The last resort was replacing the wiper arms. When I went to order in February, the dealer said Porsche no longer stocked the arms, as they were replacing the arms/blades with new parts. So I waited until the new parts were available early March and purchased the first ones in the warehouse:
Left wiper arm, p/n 95562802822
Right wiper arm, p/n 95562802922
Front wiper blades (set of 2), p/n 95562893911
My hope was that Porsche re-designed the parts because of the widespread issues with Cayenne wipers. And as I detail below, the parts are somewhat different than my originals (note there were date codes on my wiper arms that indicated they were the originals installed on the car).
I finally got them installed today, and thought I would describe the process and detail the differences between the old and new parts. One note � according to Porsche, you can't replace just one part, you must replace both arms and blades together with the new, updated parts. However, during the course of my install I found this not to be true, as you could re-use the old blades, and I tested with a new driver's side arm and an old passenger side arm and had no issues. But fair warning � replace just one part at your own risk.
The usual disclaimers before I start......do any part of this process at your own risk! Although it is a easy process from a mechanical perspective, you have to take your time to line up the wiper arms correctly on the windshield, and you also have to be careful not to damage your hood.
Here is a picture of the parts as they came from the dealer:
And here's a comparison of the old/new arms on the driver's side (new version on top):
And here's a comparison of the passenger's side (new version on top):
First, the driver's side. If you've removed a wiper arm before, there are no surprises here, except because of how the wiper arm is located you must move the hood out of the way to give room to remove the arm. This is not hard, but is best done with two people.
Raise the hood and unclip the strut holding it up by carefully prying out the spring holding the strut to the hood. Only pry out a little bit, don't let the clip come all the way out. The strut will then separate from it's connection to the hood.
Hold up the hood and carefully lay the strut down in the engine compartment. Have your helper hold the hood pointing straight up during the next step while you remove the driver's side wiper arm.
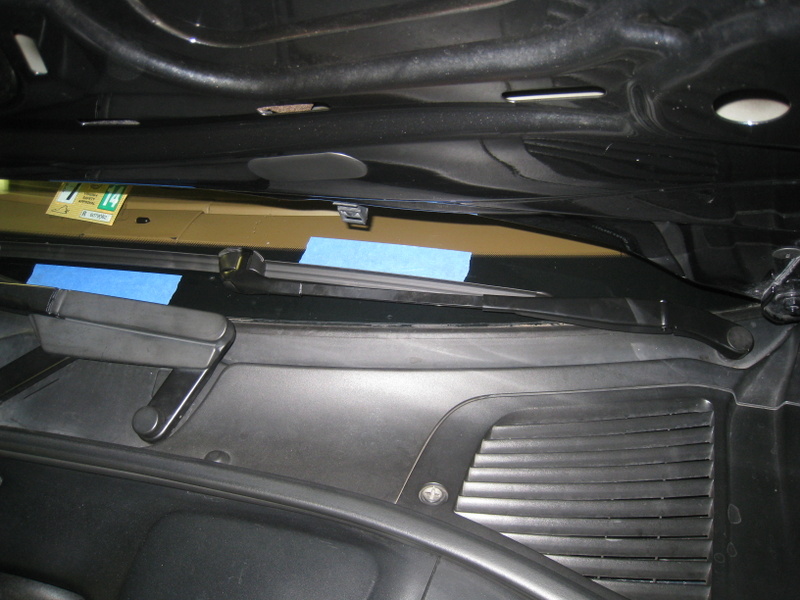
Before doing anything else, mark on the windshield where the wiper rests. This is important, as the sweep of the wiper on the Cayenne is unusually wide, and you don't have much margin for error. I used blue painter's tape (you can see it in one of the pictures below) to mark the top and bottom of the blade.
The arm is removed by pulling off the cover for the attaching nut (use your fingernails), and removing the nut w/a 16mm wrench.
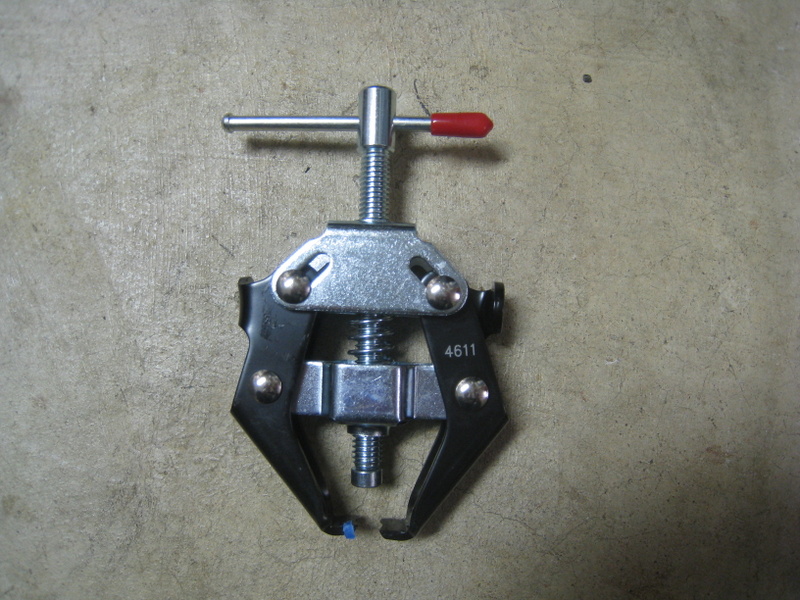
The nut will come off fairly easily, but the arm will stay on. To remove the arm you need to use a puller; there are many inexpensive versions available. Here's one I picked up ages ago:
Position the puller's arms under the wiper arm and tighten; the arm will �pop� off. Putting on the new arm is the reverse of removing it, although keep test-fitting the arm to make sure you get it in the same position as the old one. Tighten down the nut, attach the nut cover, and you're done with the easy side.
Here's a pic of the driver's side when I was done; notice how I marked the position of the blades with the blue tape:
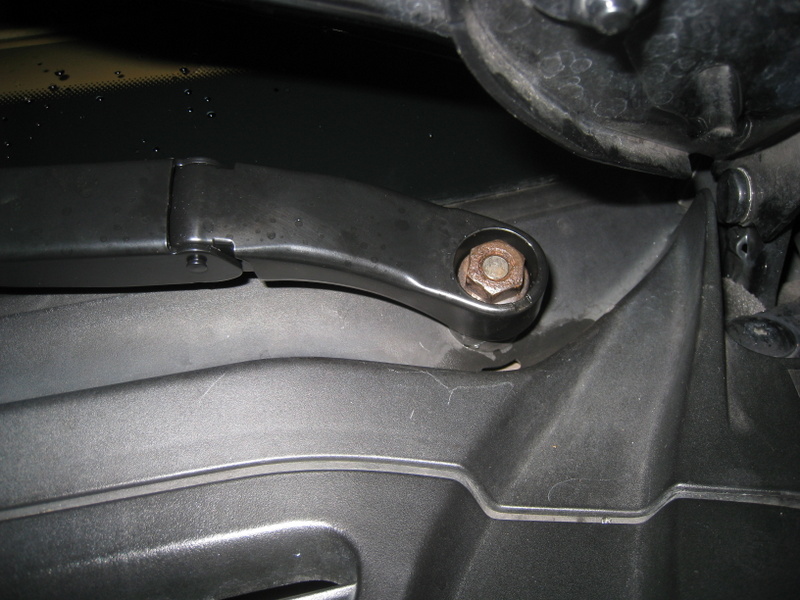
The passenger side is trickier because it is attached with two connection points, and each attaches slightly differently. Remove the covers for the two nuts (use your fingernails), and you will see the two 16mm nuts that hold on the arms. Remove both nuts. Hold on to the arms as you remove the nuts; if you just apply force the linkage will move and mess up the wiper blade alignment (as well as putting stress on the linkage which has been known to be somewhat fragile).
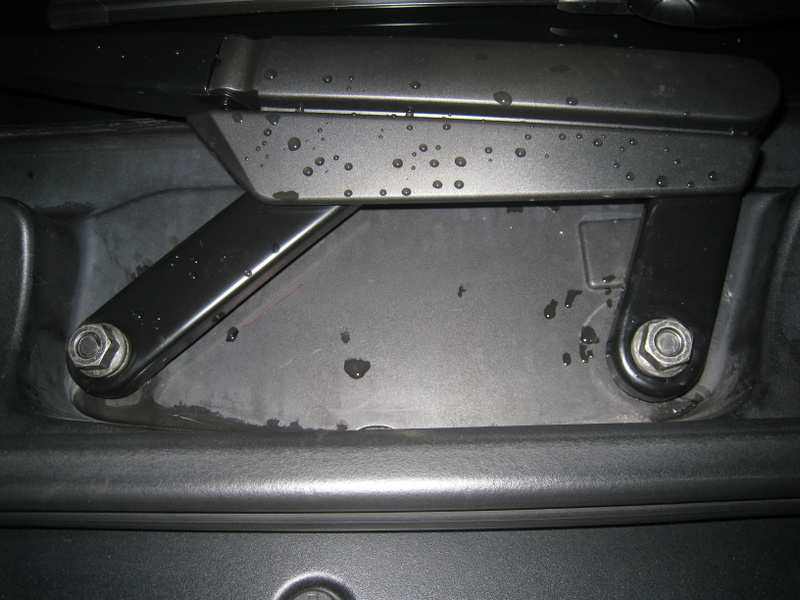
The �outside� arm (closest to the passenger side) will be easy to pop off; you may not even need the puller. Note that the bolt and the arm are both notched, so it only goes on one way. Also, there is a bushing (really a thick washer) that goes underneath the nut. Don't lose it, as the new arm does not come with one. Here's a pic of the arm after removing the covers, with the bolts still on. The �outside� arm is on the left.
The �inside� arm (closest to the driver's side wiper arm) comes off the same way as the driver's side arm. But underneath the nut is a special splined bushing that you will need to press or pry out of the old arm and put it in the new one. I used my puller to push it out from the bottom.
Installation, as they say, is the reverse of removal. But you will need to have patience to get both arms aligned so that they fit AND keep the wiper blade in the correct position. Everyone has their own technique; find what works best for you. When you have everything lined up, fully tighten down both nuts and put on the covers.
As for the new wiper blades, the old ones and the new ones are both 26 inches long (same size on driver and passenger side). You can re-use your old blades, but the new ones have a notch that fits the new arms very nicely. And a special treat � the new arms eliminate that stupid plastic cover that snaps over the connection between the arm and blade. No more fiddling with that annoying, tacky, easy-to-lose piece of plastic. If you are not the first owner of your car you may not even know the covers exist, as most Cayennes I see have them missing.
BTW, the new arms are made by Bosch, and have a Bosch part number. Interestingly, the blades did not have a manufacturer on them, although I would assume they were made by Bosch.
Now the moment of truth � testing. But here you will run across something interesting. Since I didn't know if I was going to have to remove the arms again, I did not re-attach the hood strut yet, I just put the hood down against the first latch. But Porsche must have put in some sort of fail-safe, as the wipers will NOT work if the hood is not completely latched. Believe me, it took me 20 minutes of checking fuses etc. etc. to figure out the hood latch thing. So you will have to re-attach the hood strut and close the hood completely for testing. Luckily it was raining the day I did this, so it was easy to test by pulling the car out of the garage and into the rain.
So did it fix the noise and chattering? Absolutely! I don't know why.....the re-designed arms, blades, whatever. Maybe it was weight; the new arms are much thinner and lighter than the old ones. It does make you wonder, though. why Porsche re-designed a part for a car that came out 12 model years ago?
The two new arms and both wiper blades cost me about $250, including shipping, and will be worth every penny when it rains. I probably spent about 3 hours on this, although if I were to do it again it would take about 30 minutes.
 03-30-2014, 08:39 PM
#2
Rennlist Member
Nice write up, glad your problem is now solved. I have an 06 as well and have not experienced any issues with the wipers not working correctly. Glad to know that there is a soulution if needed.
03-30-2014, 10:53 PM
#4
Rennlist Member
Thanks for the write up! I'll be doing this when the temps turn north of 55F.
One question regarding removing the hood struts to get the hood more vertical. C0ould there be a "mechanism" at the hinge to enable the hood to do this? All of the Benzes I've had in the past had it where it enabled to get the hood from 60 degrees to 90 degrees. Basically, the mechanism required you to push it in at the base of the hinge and lean the hood back where it would lock.
One question regarding removing the hood struts to get the hood more vertical. C0ould there be a "mechanism" at the hinge to enable the hood to do this? All of the Benzes I've had in the past had it where it enabled to get the hood from 60 degrees to 90 degrees. Basically, the mechanism required you to push it in at the base of the hinge and lean the hood back where it would lock.

The following users liked this post:
jack.mcguire (12-05-2019)
04-01-2014, 08:39 PM
#6
4th Gear
Thread Starter
Join Date: Mar 2014
Posts: 4
Likes: 0
Received 0 Likes
on
0 Posts
Thanks for the write up! I'll be doing this when the temps turn north of 55F.
One question regarding removing the hood struts to get the hood more vertical. C0ould there be a "mechanism" at the hinge to enable the hood to do this? All of the Benzes I've had in the past had it where it enabled to get the hood from 60 degrees to 90 degrees. Basically, the mechanism required you to push it in at the base of the hinge and lean the hood back where it would lock.
One question regarding removing the hood struts to get the hood more vertical. C0ould there be a "mechanism" at the hinge to enable the hood to do this? All of the Benzes I've had in the past had it where it enabled to get the hood from 60 degrees to 90 degrees. Basically, the mechanism required you to push it in at the base of the hinge and lean the hood back where it would lock.
I was VERY careful as I raised up the hood, but the hinge actually allowed a lot of movement (well past vertical). When my "helper" (i.e. significant other) got tired of helping, I actually piled about 6 inches of towels on the windshield and let the hood lean back against them.
Trending Topics
04-02-2014, 03:01 PM
#8
Do the new arms remove the problem of poor contact when in the seated position?
My passenger side (a UK car so left side is sat inside the car) doesn't contact at the fixing point when parked so doesn't wipe a large patch, ever.
My passenger side (a UK car so left side is sat inside the car) doesn't contact at the fixing point when parked so doesn't wipe a large patch, ever.
04-02-2014, 10:49 PM
#9
4th Gear
Thread Starter
Join Date: Mar 2014
Posts: 4
Likes: 0
Received 0 Likes
on
0 Posts
The new wiper blades are also more significantly curved than the old Porsche blades; that may also help the blades cover more glass.
11-27-2016, 07:29 PM
#10
Drifting
Sorry to revive this....but What does it mean when the passenger wiper remains stationary while the driver's side only operates? I can freely move the passenger side.Without removing the arms - I noticed the wiper are is not catching inside the splined bushing.
11-27-2016, 08:22 PM
#11

The arm movement system underneath all the plastic is broken. Happened to my SO's 957 when she turned on the wipers with loads of snow on the windshield.
My indy took it apart and replaced in about 3hrs. Not 100% sure but he might have used a treg part.
My indy took it apart and replaced in about 3hrs. Not 100% sure but he might have used a treg part.
11-27-2016, 11:37 PM
#12

If the shaft moves within the wiper arm (which what I think you described) then just tighten the nut and it should solve your problem. (You may have to remove the passenger side arm to clear out the splines of any metal shavings; those metal shavings may prevent the splines from biting into the arm)
11-27-2016, 11:42 PM
#13
Three Wheelin'
Could be broken but since we're looking at the passenger side I think the friction bushing needs to be replaced. There is only a bushing on the passenger side, why? Who knows. The part is cheap (around $4~$7): 955-628-313-00. The wipers won't work (auto disabled) with the hood open but turn them on (if you have never updated them pull off the plastic cap over the nut) and see if the nut moves. If it does then it is just the friction bushing is bad.
12-02-2016, 07:22 PM
#14
Drifting
Driver wiper works. The passenger side oscillates only at the shaft, despite installing a new cone washer(friction bushing). It's like when the shaft turns - the passenger arm is still not making a solid connection to the splined bushing.
The Pelican site shows I still need washers...which the dealer knows nothing about. This is becoming a conundrum....
The Pelican site shows I still need washers...which the dealer knows nothing about. This is becoming a conundrum....
12-03-2016, 09:55 PM
#15
Rennlist Member

Nothing complicated here, if you can move the wiper it sounds like the bushing within the wiper arm is slipping....new wiper arm time.
If your dealer can't figure this out in 5 minutes you need to run away fast.
If your dealer can't figure this out in 5 minutes you need to run away fast.

