When you click on links to various merchants on this site and make a purchase, this can result in this site earning a commission. Affiliate programs and affiliations include, but are not limited to, the eBay Partner Network.
I know that this is reviving a well and truly old thread but I am just putting together the parts to change the pipes and tees on a new to me '06 CTTS.
It's done 48k miles but not had either changed.
I have got some aluminium (I'm in the UK) tees made up and was going to order replacement hoses and replace the tees. I think this is still the best way to go for the bigger diameter tee that comes off the main coolant pipes.
For the smaller diameter tee do you think it would be possible/preferable to just change out the tee without removing the pipes at their other ends or is access too limited?
It seems a lot of effort to get the lowest end of one of the pipes when it seems the tees rather than the pipes fail but is there enough access to change the tee in-situ?
The pipes do not need to be disturbed in order to the the Tees. I recently did this and did not have to touch the Tees. That said, you will have everything torn apart and it will be "right there," so I would say Man-up.
BTW replacing the Tees was one of the worst automotive jobs I've ever done. You really need those remote hose clamp pliers, or you will never get it done. Progress is slow and knuckles will bleed. Access is tight. After you're done, however, you can probably become a laproscopic surgeon.
Everyone seems to regard the Tees as one of their most difficult experiences - so I'm focussing on the feeling of achievement that I will have in the end once it's done.
I probably wasn't the most clear in my description - I will change main plastic coolant pipes as I have experienced these failing on my 2006 CS. I also still have the email from Porsche GB confirming that there wasn't really a problem with the design and that they had performed exactly as expected.
I hadn't 'expected' them to explode and leave me stranded on the road needing a tow!
What I was really wondering was - can the pipes that are attached to the smaller Tee behind and above the back of the engine be left in place and just the Tee itself be replaced in-situ or is there not room to access it for removal and replacement with the pipes that connect to it left in place?
Its easier to unbolt the metal coolant lines from the side of the bellhousing and remove the rubber hoses from the coolant pipes that go umder the intake. Then romove the whole deal as an assembly, do your work, and put it back.
That is very interesting - I've not seen anyone mention that approach before.
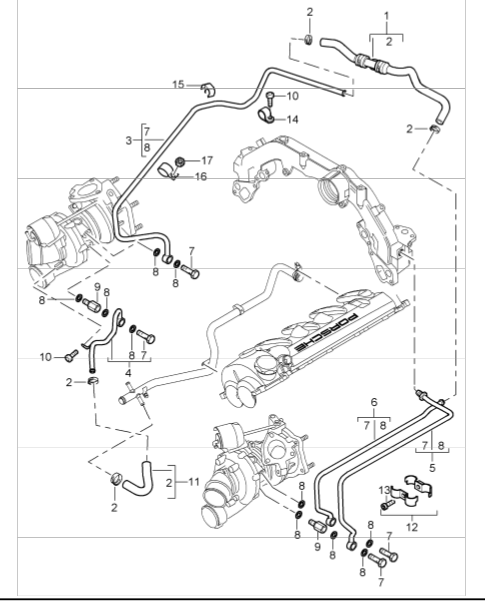
The metal coolant lines that you are referring to near the bell housing - are they items 22 and 25 on the diagram on the previous page?
Are they easier to get at to remove and install than the hoses connected to the tees? - I assume you would access them from underneath?
That is very interesting - I've not seen anyone mention that approach before.
The metal coolant lines that you are referring to near the bell housing - are they items 22 and 25 on the diagram on the previous page?
Are they easier to get at to remove and install than the hoses connected to the tees? - I assume you would access them from underneath?
Thanks
22, 25 are the rubber hoses that go to the heater core/after run pump. 22 is held to the bellhousing by 2 allen screws. That is not the correct diagram for the turbo. It does not show the other tee. Yes, pull the metal lines out tge bottom with the tees and associated hoses connected. It it much easier to get to the two hose clamps at the back of the manifold than the ones on the tees. Order metal replacement tees from jagsthatrun.
I called jagsthatrun but they were having a hard time and weren't able to process an order. I found a company in the UK that manufactures aluminium tees so I'm going to give those a try. I will order the replacement tees and remove the hoses and fit to new ally tees. Did you use standard jubilee clips? I was thinking of oetiker clips as I really don't want them to loosen up and leak when I put them back.
I found the other image that has the correct tee.I assume 6 is the metal pipe to remove?


 11-01-2017, 04:04 PM