When you click on links to various merchants on this site and make a purchase, this can result in this site earning a commission. Affiliate programs and affiliations include, but are not limited to, the eBay Partner Network.
Symptoms of failed oil cooler are:
a) External coolant leak
b) Internal oil/coolant intermix
c) External Oil leak
Note: Although oil pressure is considerably higher than coolant pressure - there is higher likelihood of oil first contaminating coolant. Chances of coolant mixing with oil is quite low, but why chance it? I sent my oil with only 1400 miles to Blackstone Labs for analysis.
Tools Required:
~ 3/8" drive ratchet, with 3" and 8" long extensions, 13mm & 10mm short socket, 8mm Hex drive, T30 and T25 Torx drivers, wobbly extension
~ 1/4 drive ratchet, with wobbly extension, 8mm long socket
~ Long flathead prybar, flathead screwdriver(long and short)
~ Long needle-nosed pliers, with 90-degree bent tips
~ Large capacity drain pans: 10qt for oil, 2 gallons for coolant
~ Adequate portable lighting
~ Hydrometer
~ Oil filter tool
Parts Required:
~ OEM equivalent oil filter and o-ring (Mahle, Hengst, Mann-Filter)
~ 2 Gallons Porsche or VW G12 coolant, 2 gallons Distilled Water
~ Nine US quarts of 0W-40 motor oil (Mobil1, Castrol, Motul, Red Line, Shell Rotella T6)
~ Replacement oil cooler (Behr/Hella #948.107.276.03, Nissens #90375)
~ OEM Porsche oil cooler seals x2 #948.107.175.00
~ High-temperature Heavy Grease
Step One:
~ Raise Turbo to Special Terrain Level - set suspension to "Regulation Switched Off."Non-Turbo needs to be raised on ramps or jackstands.
~ Remove all belly pans, lower air deflectors, including transmission cover(10mm, T25)
~ Remove lower subframe cross bar, forward of oil cooler(T30, 13mm)
~ Drain coolant from reservoir, with Hydrometer. Spray heavy degreaser in tank to dislodge trapped oil. Top off with distilled water, for subsequent flushing
~ Finish draining coolant from either coolant petcock(2003-2005) or disconnect lower radiator hose, at radiator(flathead driver, to unlock Henn Coupler clip)
~ Drain all oil from upper and lower drain ports. Vehicle MUST be completely level
Step Two:
~ Raise factory oil cooler spring clamps(coolant side) to clear coolant hose joint flare. Passenger side is easy. Driver side has only less than 4" clearance to fan shroud. The spring clamp rests below oil return line(Turbo). Use long needle-nosed pliers, with curved tips to bring clamp up to the high part of the hose(second hand necessary):
~ Place drain pan or shallow baking sheet below oil cooler to capture coolant first. Do this by pulling both hoses off now. Do one hose at a time. Expect to see 1/2 gallon of coolant pour out
~ Remove the four T30 bolts holding the oil cooler to adapter bracket. Keep another drain pan ready below. Oil will seep, once the bolts become loose. One quart of oil will gush out, once the bolts are off. A second set of hands greatly helps, here
~ Remove oil filter(oil filter tool)
~ Remove and dispose of spring clamps, they suck
~ Clean up oil cooler mounting adapter bracket and oil filter housing boss
Step Three:
~ Place new screw-in band type hose clamps exactly as follows:
Passenger side clamp rests on top of cooler adapter bracket, with worm screw portion facing OUTWARDS towards passenger front wheel. Screw faces directly forward. Coolant hose threads through loosened clamp.
Driver side clamp rests on top of cooler adapter bracket, with worm screw portion facing OUTWARDS towards driver front wheel... but below Turbo oil return line. Screw must always face directly forward. Coolant hose threads through loosened clamp. Due to nearly zero visibility of this clamp - a second hand must keep clamp screw facing forward, by feel alone!
~ Prepare cooler oil seals by applying liberal amount of grease to adapter bracket oil openings. Pay close attention to orientation of oil seal rubber nubs. They only go in one-way. The grease should hold the seals up in place
~ Pre-Install new oil cooler by lubing the oil cooler hose necks with coolant. Then start the hoses in, meeting the pipe connection necks first. Torque all four oil cooler mounts to adapter bracket(T30). Using curved, long needle-nosed pliers - gently pinch each hose at the soft portion as you pull-down hoses to mate the oil cooler body, on both sides.
~ Now tighten hose clamps, making sure the screw heads face forward, at all times. Passenger side is easy. Driver side requires patience and lots of cursing. Use second hand to keep worm screw head always facing forward. Due to the design of the oil cooler adapter mounting bracket - the band clamp on driver side must not shift... or else a telescoping magnet needs to bring screw head and correct clamp orientation back into position. This is arguably the most difficult part of the entire job
~ Install new oil filter and torque(oil filter wrench)
~ Re-torque coolant drain petcock or reconnect lower radiator hose connection. If the latter - test by making sure lower hose connection cannot pull itsef apart
~ Install lower subframe cross bar and four Torx bolts to lower front valance(13mm, T30)
Step Four:
~ Refill pre-mixed, fresh coolant back into system. Minimize trapped air, by pouring coolant very slowly, almost a drizzle until level reaches MAX mark of reservoir. Leave coolant cap off
~ Refill 8 quarts of fresh 0W-40 oil initially
~ Start vehicle and run heater on HIGH. Top-off coolant as needed
~ Check oil level to make sure oil cooler accounted for oil capacity reached. Most likely oil cooler will require an additional 1/2 quart of oil
~ Leave belly pans OFF and monitor for external leaks for the next 24 hours. Top-off all fluids, as necessary. Belly pan install is reverse of removal
2016 S e-hybrid
Purchased as a CPO
As of 03/2018 has 29,000 miles and only work so far related to oil level. Had it in twice for too much oil and once for low oil warnings. There was a "campaign" to update firmware and educate the dealers about proper fill level. Has been about 4,000 miles since last time so hopefully it's fixed.
Cayenne S "Update". Bought in April 2016, with 39,000 miles for $20,000. Within 1,000 miles coolant pipe blew, fixed. Replaced all rotors, sunroof wouldn't close..fixed it..car has 94,000 miles now, in 24 months...that's 27,500 a year that we have put on it..bulletproof, nothing else has failed save a left turn signal electrical gremlin that is sporadic in it''s appearance.
Previous owner had replaced the front driveshaft coupler I believe. We know we should sell it and move on, but a 340 HP 5,600 Lb car that handles like a sports car with 14" front rotors, just like a GT3. Next time I need from rotors, I'll put SERBO GT3 slotted on just for fun.
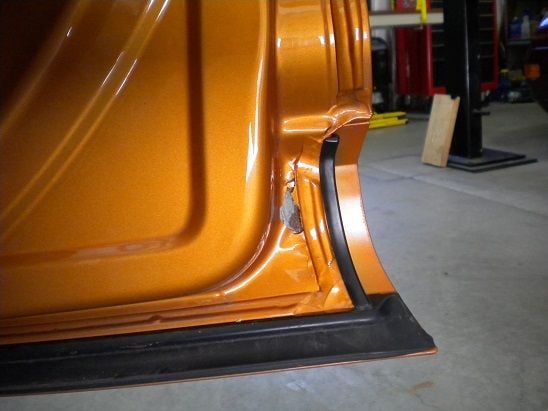
corrosion warranty claim 20 days before 10yr warranty expired.
lower passenger side front door paint bubbled and flaked off.
small claim, probably less than 500 bucks.
good news is the dealer took care of it.
bad news, body shop left the door open for the paint to cure, interior is now filled with sanding dust.
bad news, someone stepped on glue or bondo and smashed it into driver's side footwell carpet, big ugly mess.
bad news, someone caught a shoe on the door sill trim popping it off and bending it.
they pressed it back in place but it looks bad.
moral of the story, for a warranty claim less than thousands of dollars just take care of it yourself.
'06 CS Ti. Replaced the front and rear upper and lower control arms (only one upper in the rear. Didn't know about any others) at ~175,xxx miles. Probably first time been done. Did the front uppers myself then tried doing the lowers and couldn't get the front ball joint out on one side and on the rear lowers couldn't get one of the bolts at the frame out. Had a shop do it all. They had to use a 3/4" impact on the stubborn bolt! Rides like new now! Wife is pleased.
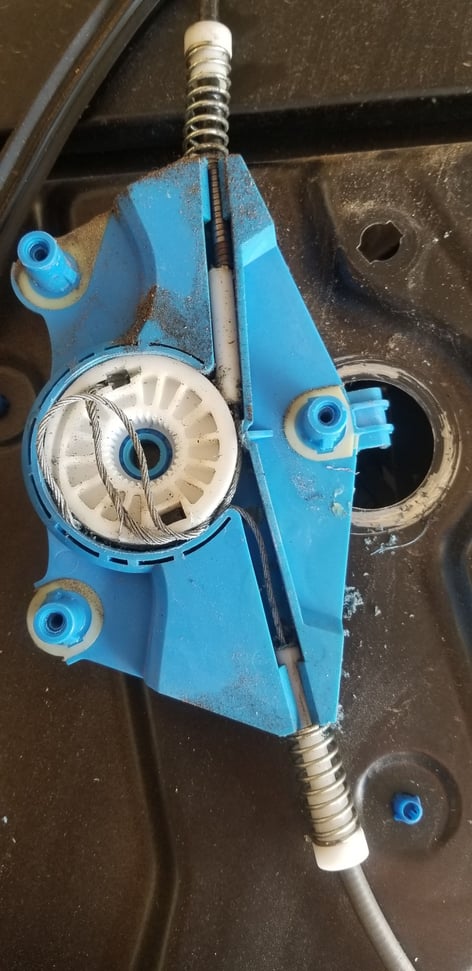
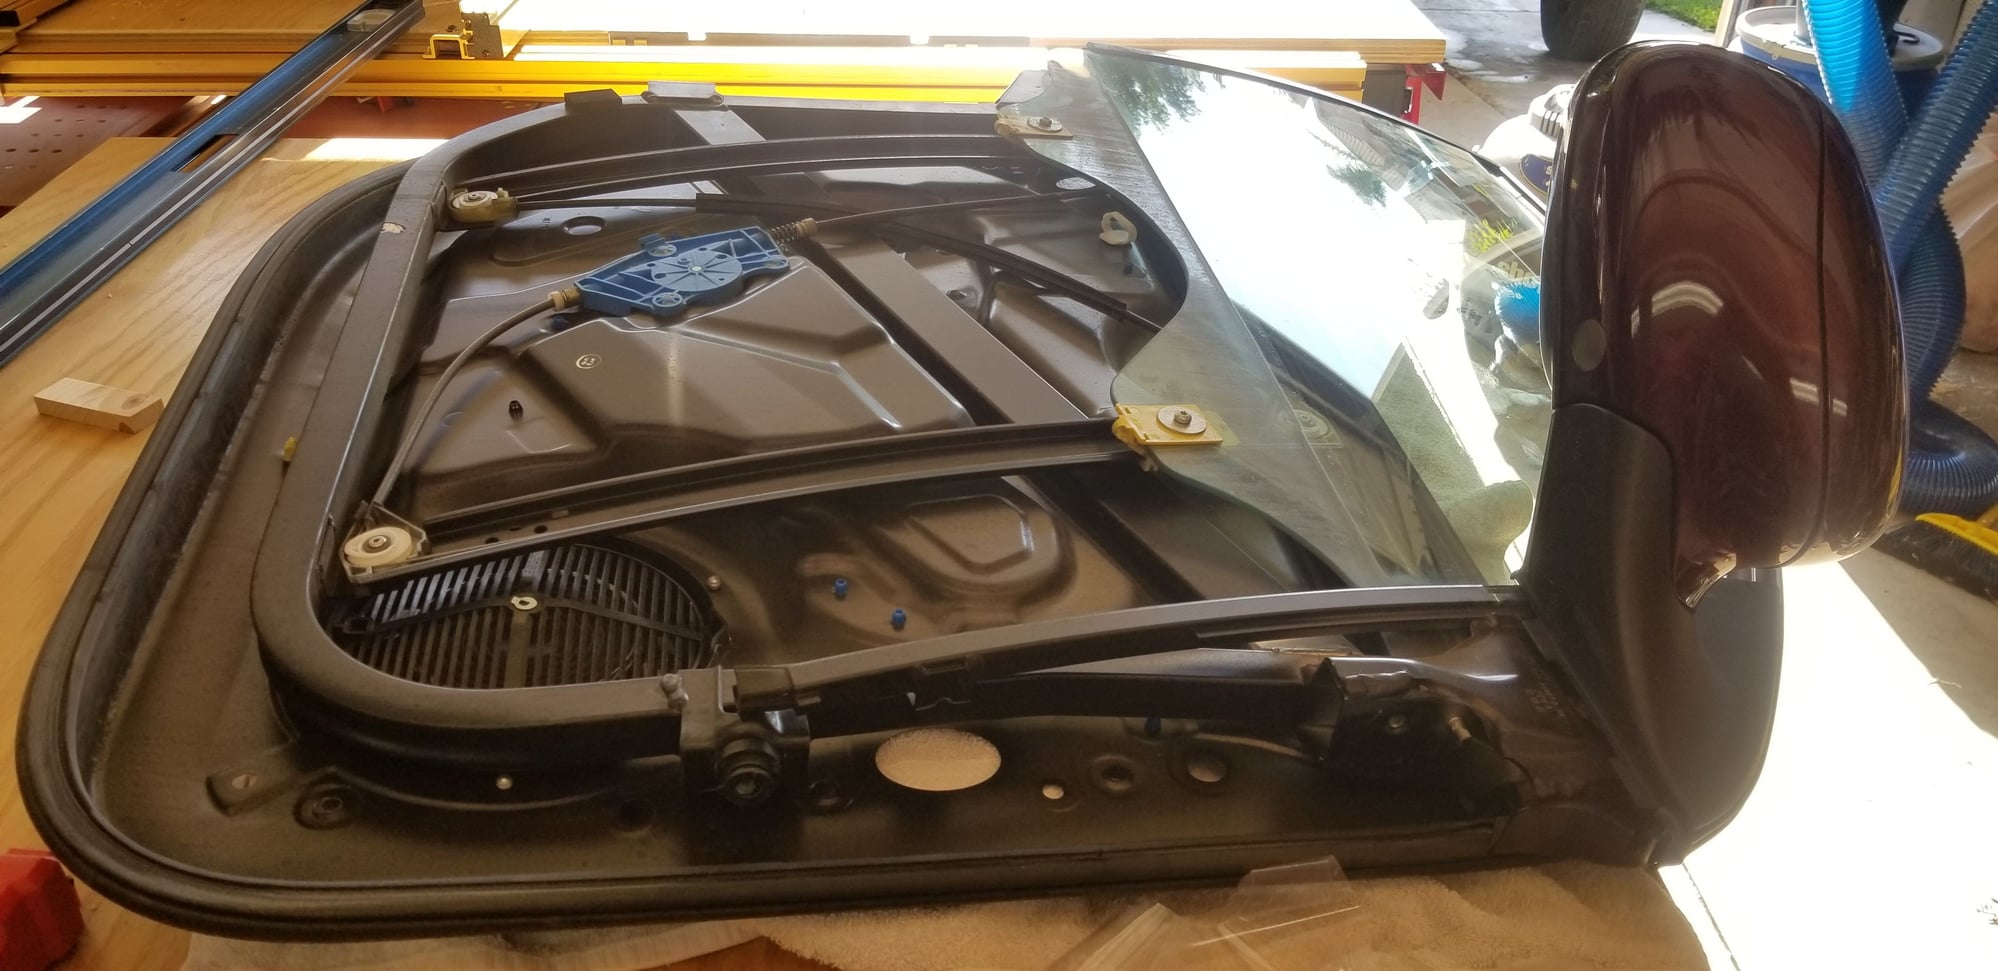
2006 Cayenne S:
Front Passenger Window stopped working so ordered a replacement Window Regulator (PartsGeek). After watching a few YouTube videos I took the plunge and began the tear down process of the door after work yesterday. The process wasn't to difficult, would have been much easier with someones help to hold the frame while disconnecting the various plugs and cables. The whole job took me about 2.5 hours
2008 v6 3.6
Dad bought new in September 2007 and I took over in April 2017
I have partial records from 0-155k (Dad period) and full records from 155-215k (my period)
42k, unknown date, one tire valve replacement
80k, April 2013 (5.5 years old), replace rear drive shaft.
unknown mileage, December 2014 (~7 years old), replace pulley for serpentine belt
unknown mileage, July 2016 (~9 years old), replace cabin air blower regulator
160k, May 2017, (9.5 years old), replace all 4 tire valves
162k, June 2017, (~10 years old), replace front passenger side bearing
180k, Summer 2018 (~11 years old), moonroof has a mind of its own. Removed fuse when it was in the closed position.
190k, November 2018 (11 years old), driver door would not open, don't know how shop fixed it
191k, December 2018 (11 years old), replaced clamps on exhaust system near rear passenger side
201k, December 2019 (12 years old), horrible rumbling coming from engine bay. Is she finally done? Nope. for $10 in OEM bolts and a gasket, reconnected two pipes that were part of the exhaust system near front passenger area.
206k, March 2020 (12.5 years old), replace front driver side bearing
206k, April 2020 (12.5 years old), replaced 6 spark plugs and rear most coil
208k, June 2020 (~13 years old), replace a leaky AC line
Was at 215,600 this morning (12/31/2020; old enough to see a PG-13 movie) Here's to a healthy and prosperous additionally 200k miles on this lovely automobile.
Again, thank you to this community.

 09-05-2017, 11:36 PM