Center Lock – lessons learned
 11-18-2010, 06:25 PM
#1
Pro
Thread Starter
I recently removed the wheels from my 997.2 GT3 and had a chance to get a close up of the Center Lock inner workings. Since there were some eureka moments for me, I thought I'd pass them along here as lessons learned for those who have yet to fool around with them.
Center Lock Mechanisms
locking pin || center lock bolt and locking pin || complete assembly
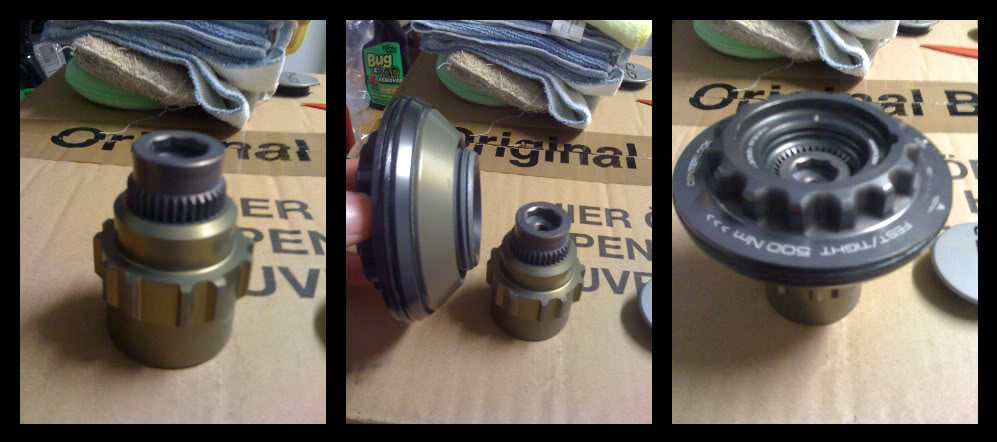
Locking pin must be flush
If your center locking pin is not fully flush with the inner teeth of the center lock bolt, the locking pin is not fully secured. Porsche bulletins do note the locking pin should be flush with the inner teeth, but it was never clear to me how flush was flush; a full glass does not mean to the brim. When I pulled the center caps and found 2 of my locking pins flush and the other 2 partially recessed, the light flicked on.
I learned that a partially locked pin indicates that it is not fully seated. In other words, the notches on the base of the locking pin are not meshing with the receiving notches located inside the wheel hub on the car. It also means there is a gap in the CL assembly and the small teeth at the top of the locking pin will not be fully engaged with the teeth on the CL bolt (think steering wheel half way tightened down).
Locked (good) vs. partially locked (bad)
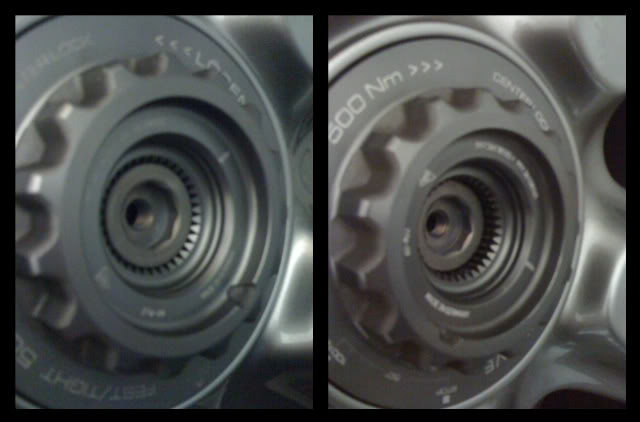
Alternative way to seating the locking pin
Tightening the wheel back to the hub using Porsche's 3 step tightening procedure (torque, loosen, torque again) does not guarantee the locking pin will be flush. I found that if the locking pin does not fully seat after the wheel has been torqued, the locking pin can still be re-seated. The tip of the locking pin had 8 recessed flat edges. I didn't have an eight sided socket, but a 14mm 6 sided sockets seemed to fit well enough. With a little jiggle and slight left/right rotation, the locking pin seated itself inside the hub and sprang outward, flush with the inner teeth of the locking bolt.
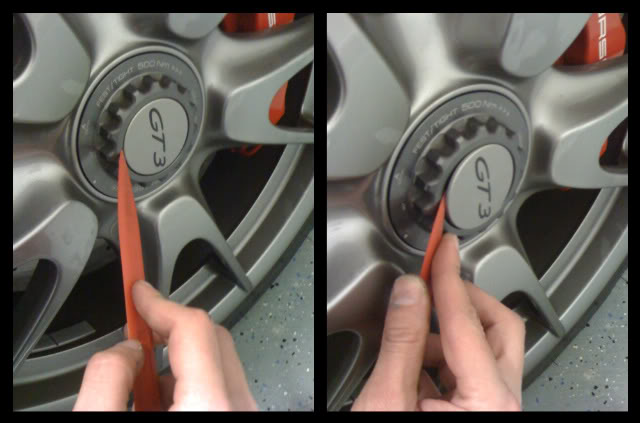
Use plastic on center caps/CL bolt
I've tried removing the center caps using paint can openers, small flat-head screw drivers with painter’s tape etc. Nothing worked for me without bending/creasing the center cap or marring the Center lock’s soft aluminum. At $30 a cap, I opted to try an alternative. One tool that seems to work well is a plastic interior pry tool that is shaped like envelope opener. With the pointed tip inserted in the center lock’s cutout followed by a subtle push inward (think opening an envelope), the cap "popped" right off. Be ready to catch the center cap because mine flew right passed me and landed face down on the concrete.
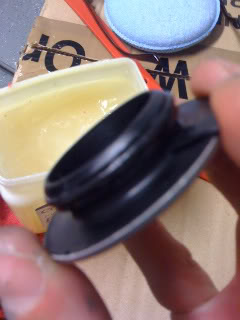
Grease the o-rings
Perhaps it is overkill, but each center caps has a rubber o-ring the helps create a seal once it is installed on the center lock bolt. A little dab of petroleum jelly on the o-ring and subsequent installation and removal of the center caps were much easier. Time will tell if greasing them will prove a bad idea if they take flight at speed (so far they are 155mph safe).
For good measure, I put a little petroleum jelly on the center lock bolt's o-ring as well.
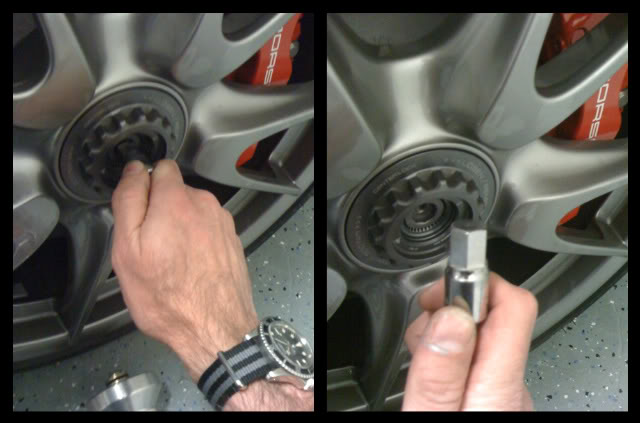
Other lessons learned:
**Most breaker bars and torque wrenches have a self-locking ball on the drive head; where a socket attaches. Once secured, the center lock socket cannot be removed until the locking ball is depressed. Keep a small allen key or equivalent handy to free the socket.
**Grease the 3/4 drive receptacle of center lock socket to make removal from breaker bar and torque wrench fight free. Mine literally got stuck on my new torque wrench and took me a half-hour to find a way to safely pry it off without destroying the socket or torque wrench.
**If you have a precision instruments torque wrench (from ToolTopia.com), take note of how you assemble the 3 piece assembly. The torque stop feature on the bar is directional and needs to be facing up if you want to actually know when you reach 500NM. My lessoned learned is to torque in smaller increments (200, 250, 300 etc.) to be sure the torque stop is working in the right direction. Get it wrong and you will over torque the wheel and not know it.
Center Lock Mechanisms
locking pin || center lock bolt and locking pin || complete assembly
Locking pin must be flush
If your center locking pin is not fully flush with the inner teeth of the center lock bolt, the locking pin is not fully secured. Porsche bulletins do note the locking pin should be flush with the inner teeth, but it was never clear to me how flush was flush; a full glass does not mean to the brim. When I pulled the center caps and found 2 of my locking pins flush and the other 2 partially recessed, the light flicked on.
I learned that a partially locked pin indicates that it is not fully seated. In other words, the notches on the base of the locking pin are not meshing with the receiving notches located inside the wheel hub on the car. It also means there is a gap in the CL assembly and the small teeth at the top of the locking pin will not be fully engaged with the teeth on the CL bolt (think steering wheel half way tightened down).
Locked (good) vs. partially locked (bad)
Alternative way to seating the locking pin
Tightening the wheel back to the hub using Porsche's 3 step tightening procedure (torque, loosen, torque again) does not guarantee the locking pin will be flush. I found that if the locking pin does not fully seat after the wheel has been torqued, the locking pin can still be re-seated. The tip of the locking pin had 8 recessed flat edges. I didn't have an eight sided socket, but a 14mm 6 sided sockets seemed to fit well enough. With a little jiggle and slight left/right rotation, the locking pin seated itself inside the hub and sprang outward, flush with the inner teeth of the locking bolt.
Use plastic on center caps/CL bolt
I've tried removing the center caps using paint can openers, small flat-head screw drivers with painter’s tape etc. Nothing worked for me without bending/creasing the center cap or marring the Center lock’s soft aluminum. At $30 a cap, I opted to try an alternative. One tool that seems to work well is a plastic interior pry tool that is shaped like envelope opener. With the pointed tip inserted in the center lock’s cutout followed by a subtle push inward (think opening an envelope), the cap "popped" right off. Be ready to catch the center cap because mine flew right passed me and landed face down on the concrete.
Grease the o-rings
Perhaps it is overkill, but each center caps has a rubber o-ring the helps create a seal once it is installed on the center lock bolt. A little dab of petroleum jelly on the o-ring and subsequent installation and removal of the center caps were much easier. Time will tell if greasing them will prove a bad idea if they take flight at speed (so far they are 155mph safe).
For good measure, I put a little petroleum jelly on the center lock bolt's o-ring as well.
Other lessons learned:
**Most breaker bars and torque wrenches have a self-locking ball on the drive head; where a socket attaches. Once secured, the center lock socket cannot be removed until the locking ball is depressed. Keep a small allen key or equivalent handy to free the socket.
**Grease the 3/4 drive receptacle of center lock socket to make removal from breaker bar and torque wrench fight free. Mine literally got stuck on my new torque wrench and took me a half-hour to find a way to safely pry it off without destroying the socket or torque wrench.
**If you have a precision instruments torque wrench (from ToolTopia.com), take note of how you assemble the 3 piece assembly. The torque stop feature on the bar is directional and needs to be facing up if you want to actually know when you reach 500NM. My lessoned learned is to torque in smaller increments (200, 250, 300 etc.) to be sure the torque stop is working in the right direction. Get it wrong and you will over torque the wheel and not know it.

The following 4 users liked this post by Clifton: