DIY: Boxster Accessories Belt Replacement
 04-03-2013, 12:23 AM
#1
Racer
Thread Starter
DIY Guide to Replacing the Accessories Belt in the 987
Questions/comments: PM or email me: lithium_1330@yahoo.com
You can download the PDF here: https://www.box.com/s/32ftofdw935rrizmmfr4
This is a suggestive guide detailing steps one can take to replace the accessories drive belt in the engine bay of the 987 (Boxster/Cayman) cars. It is a relatively simple job that most of us can tackle. For this job, you do not need to put the Boxster top in service position, but opening it up � way will give you more standing room to work with. Like everything else you do on your car� you�re hereby fully responsible for everything.
Per PCNA, the accessories belt should be replaced every 6yrs or 60k miles. Good news is if the accessories belt snaps, you engine will still run..., but it will also cause you a nice detour from whatever you were doing. So, it's wise to get the belt replaced at the recommended service interval. And because it's a relatively easy "job", this is very much a DIY with a couple hours of time.
Here is the link to the PCNA service interval page: http://www.porsche.com/usa/accessori...anceintervals/
Remove the firewall carpeting behind seats.
� Move both seats up to the forward most position so you have room to work.
� Un-latch and move the subwoofer back (no need to remove the unit) so you can access the fasteners on firewall carpeting. If you don�t know how to un-latch the subwoofer, you can find that information � page down in my other DIY article.
� Once the sub is pushed back a few inches, you�ll be able to lift up on the top carpet. Underneath which you�ll find these plastic fasteners - lefty-losey. There should be 4 of them (IIRC).
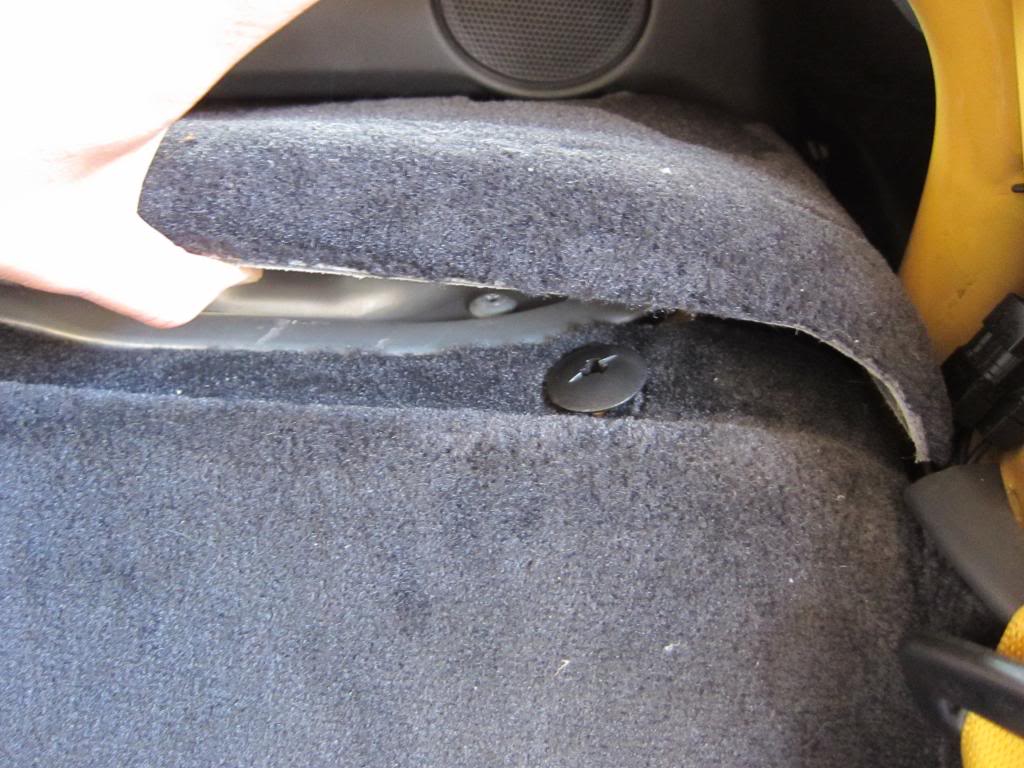
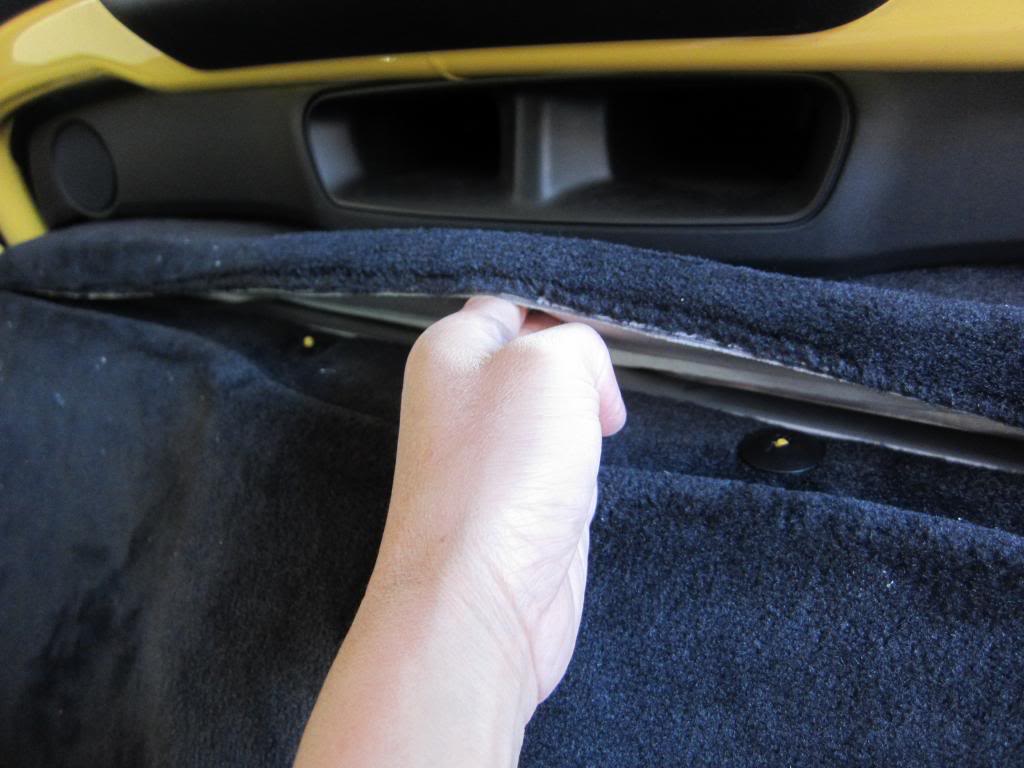
� After undoing the fasteners, you can lift the firewall carpet from top, up and out. The sides and bottom of the carpet is simply tucked in to the trims.
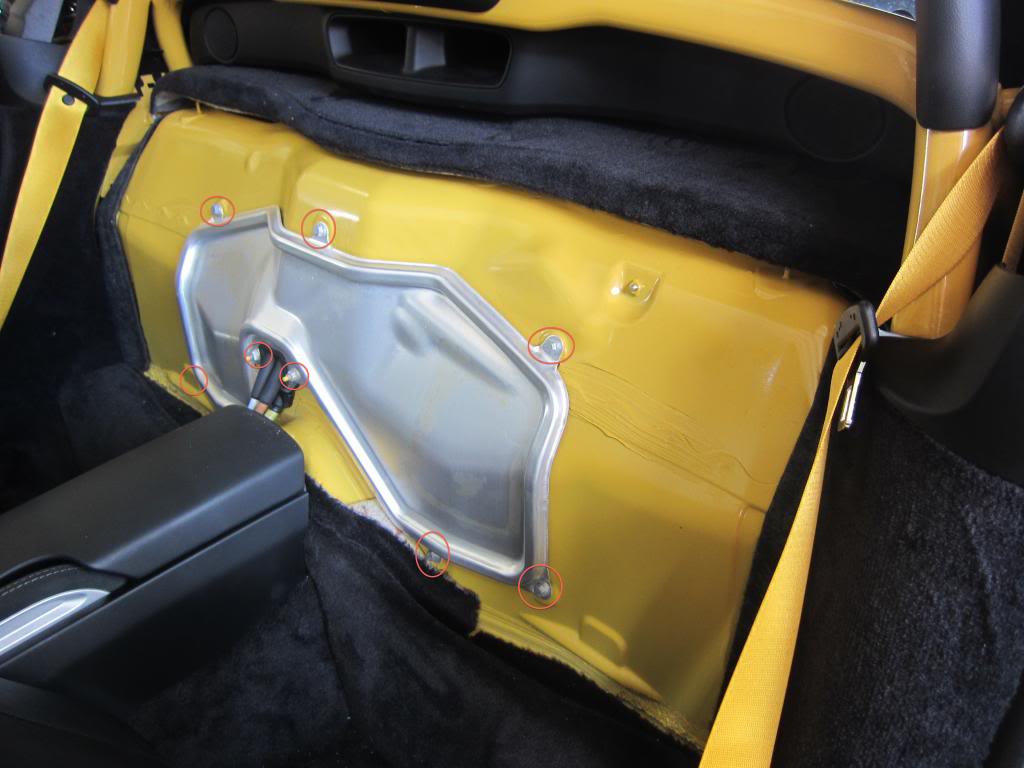
� This will then expose the aluminum firewall, connect to the car by 9 bolts with 10mm head. 8 of them are circled in picture below, the 9th is right behind the arm-rest. You can�t miss it. The alum trim can be sharp, so wear gloves & also put a towel over the arm rest so nothing gets cut up.
� After you removed the alum cover, you�ll have the engine & belt in front of you.
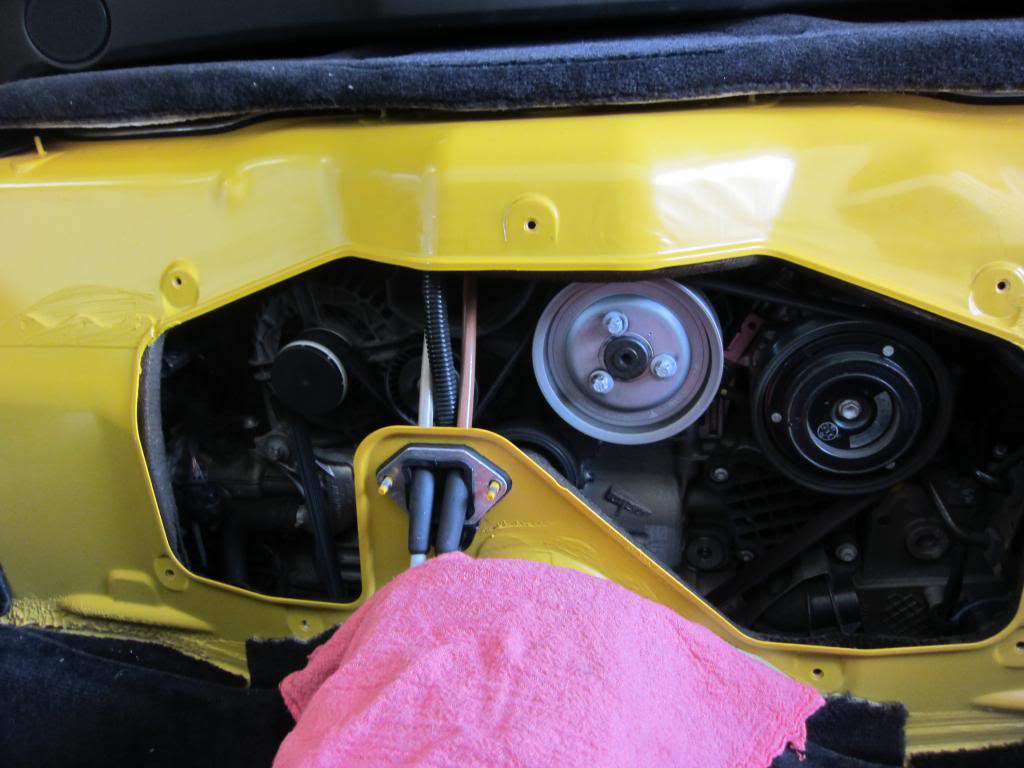
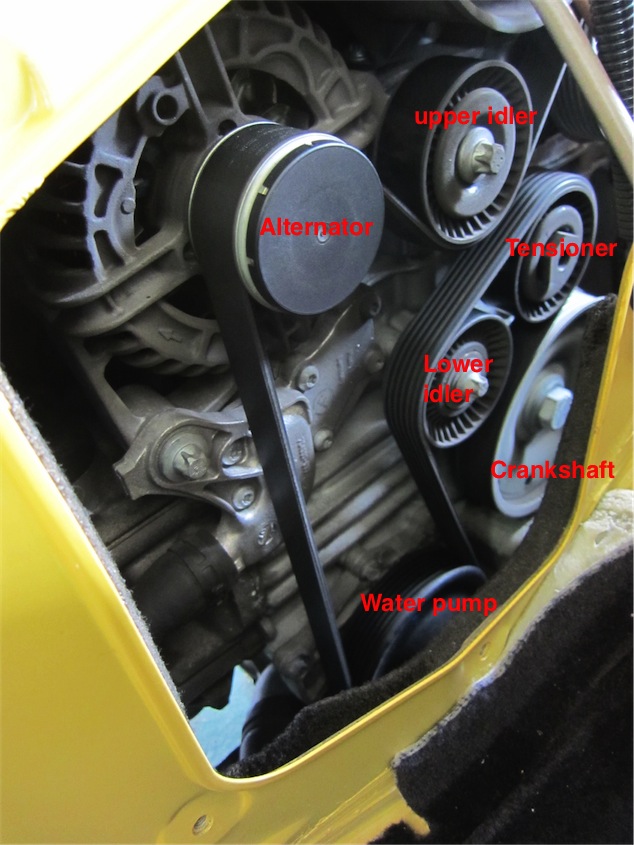
� Next step is to remove the belt. IMPORTANT: Before you proceed further, take note on how the belt runs around the different pulleys. You can draw a diagram, take pictures, capture in videos, or if your spouse is the type who never forgets a thing, have him or her memorize how the belt runs around the different accessory pulleys before proceeding � note side that�s ribbed vs. not. You need this information so you can put the new belt back on the same way it came off.
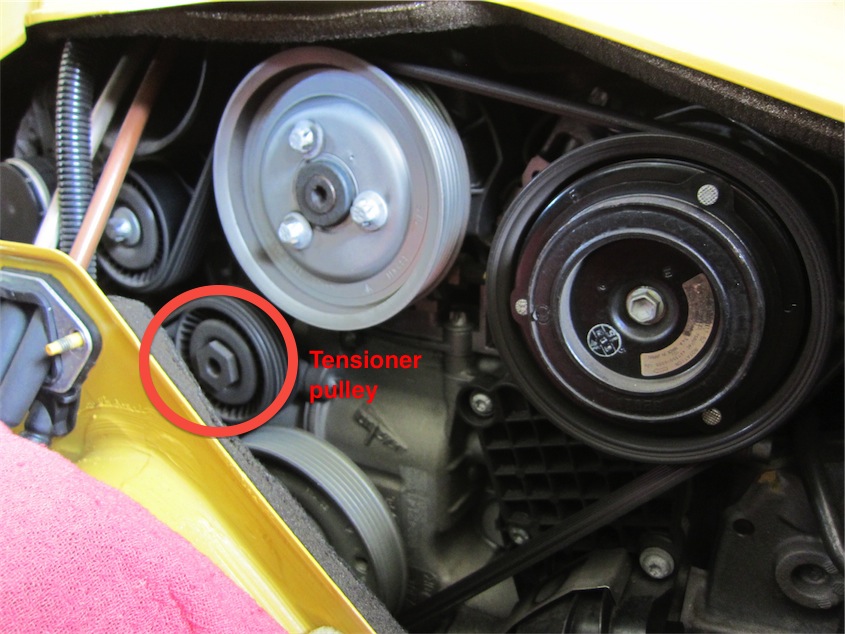
� The belt is tensioned on via a tensioner pulley. Take a crescent wrench to the hex (6-sided) nut of the tensioner and turn (I can�t remember which direction now - sorry). But, essentially the crescent wrench is used as leverage to move/rotate the entire tensioner pulley unit to take tension off the belt and allow the belt to come loose. Note the hex-nut itself should not rotate when you turn the wrench. Read: the wrench turns/moves the entire pulley.
� Remove the old belt, replace with new one. There are different ways to run the belt to get the new belt back on. For me, it was easier to start around the water pump (bottom on passenger side), around the accessory pulleys on top, around the driver side then back to the tensioner pulley.
� This project will try your patience. The new belt will be tighter fit than the one you removed�, so you may likely struggle a bit to the new belt back on. Take a break or two if you need.
� Remember, you do need the crescent wrench again to rotate the tensioner pulley when you put the new belt back on.
� Once you�re done� double check all belts are on correctly as before (fully seated correctly and looped around in the correct paths).
� Before putting the alum cover and carpet back on, you can/should start the car up with cover off to check a 3rd time � make sure everything is working.
� Reinstall the cover, carpet and that�s it for another 60k miles.
For Reference, here are the different moving pieces:
From driver side looking in:

From passenger side looking in:
Questions/comments: PM or email me: lithium_1330@yahoo.com
You can download the PDF here: https://www.box.com/s/32ftofdw935rrizmmfr4
This is a suggestive guide detailing steps one can take to replace the accessories drive belt in the engine bay of the 987 (Boxster/Cayman) cars. It is a relatively simple job that most of us can tackle. For this job, you do not need to put the Boxster top in service position, but opening it up � way will give you more standing room to work with. Like everything else you do on your car� you�re hereby fully responsible for everything.
Per PCNA, the accessories belt should be replaced every 6yrs or 60k miles. Good news is if the accessories belt snaps, you engine will still run..., but it will also cause you a nice detour from whatever you were doing. So, it's wise to get the belt replaced at the recommended service interval. And because it's a relatively easy "job", this is very much a DIY with a couple hours of time.
Here is the link to the PCNA service interval page: http://www.porsche.com/usa/accessori...anceintervals/
Remove the firewall carpeting behind seats.
� Move both seats up to the forward most position so you have room to work.
� Un-latch and move the subwoofer back (no need to remove the unit) so you can access the fasteners on firewall carpeting. If you don�t know how to un-latch the subwoofer, you can find that information � page down in my other DIY article.
� Once the sub is pushed back a few inches, you�ll be able to lift up on the top carpet. Underneath which you�ll find these plastic fasteners - lefty-losey. There should be 4 of them (IIRC).
� After undoing the fasteners, you can lift the firewall carpet from top, up and out. The sides and bottom of the carpet is simply tucked in to the trims.
� This will then expose the aluminum firewall, connect to the car by 9 bolts with 10mm head. 8 of them are circled in picture below, the 9th is right behind the arm-rest. You can�t miss it. The alum trim can be sharp, so wear gloves & also put a towel over the arm rest so nothing gets cut up.
� After you removed the alum cover, you�ll have the engine & belt in front of you.
� Next step is to remove the belt. IMPORTANT: Before you proceed further, take note on how the belt runs around the different pulleys. You can draw a diagram, take pictures, capture in videos, or if your spouse is the type who never forgets a thing, have him or her memorize how the belt runs around the different accessory pulleys before proceeding
� note side that�s ribbed vs. not. You need this information so you can put the new belt back on the same way it came off. � The belt is tensioned on via a tensioner pulley. Take a crescent wrench to the hex (6-sided) nut of the tensioner and turn (I can�t remember which direction now - sorry). But, essentially the crescent wrench is used as leverage to move/rotate the entire tensioner pulley unit to take tension off the belt and allow the belt to come loose. Note the hex-nut itself should not rotate when you turn the wrench. Read: the wrench turns/moves the entire pulley.
� Remove the old belt, replace with new one. There are different ways to run the belt to get the new belt back on. For me, it was easier to start around the water pump (bottom on passenger side), around the accessory pulleys on top, around the driver side then back to the tensioner pulley.
� This project will try your patience. The new belt will be tighter fit than the one you removed�, so you may likely struggle a bit to the new belt back on. Take a break or two if you need.
� Remember, you do need the crescent wrench again to rotate the tensioner pulley when you put the new belt back on.
� Once you�re done� double check all belts are on correctly as before (fully seated correctly and looped around in the correct paths).
� Before putting the alum cover and carpet back on, you can/should start the car up with cover off to check a 3rd time � make sure everything is working.
� Reinstall the cover, carpet and that�s it for another 60k miles.
For Reference, here are the different moving pieces:
From driver side looking in:
From passenger side looking in:

The following 3 users liked this post by lithium1330: