When you click on links to various merchants on this site and make a purchase, this can result in this site earning a commission. Affiliate programs and affiliations include, but are not limited to, the eBay Partner Network.
I am getting moisture inside the driver headlight lens after a good rain. I can't seem to figure out why. I thought maybe its because I am not using the headlight gasket (they fail pretty quick and are expensive to replace). I just removed it last time because it was falling apart. But the passenger side doesn't have one and it has no issue.
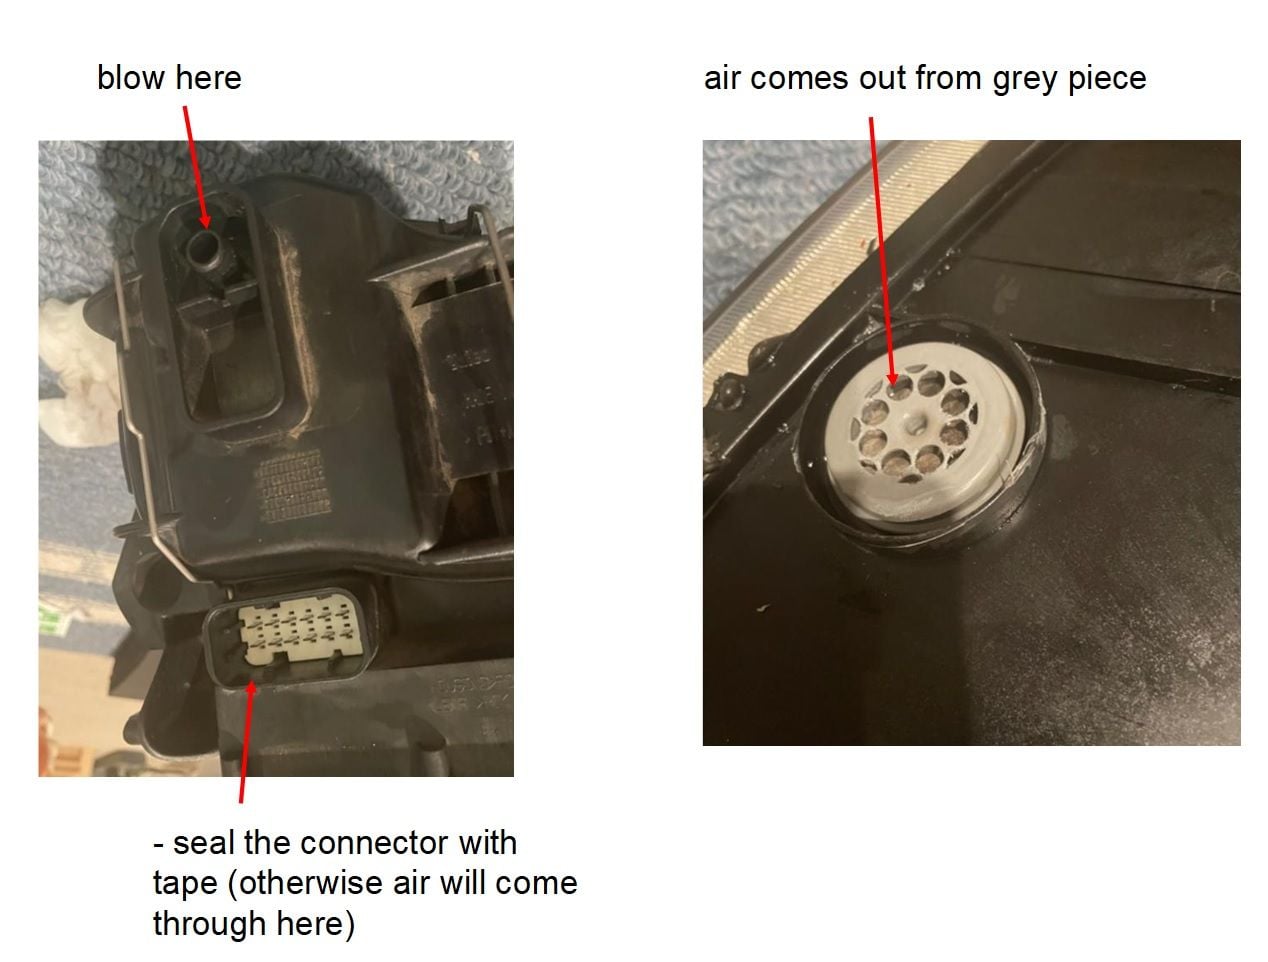
I took the light out and in the back, there is a little rubber U-tube. I removed that and blew air into it. I found air was coming out from two places. First, air was coming from the grey piece at the bottom of the headlight (and shown in the picture). When I stopped that up some silicone tape, it came from the connector. When I stopped that, it wouldn't leak air when blown into it. The connector doesn't show any signs of corrosion (not on the headlight nor the connector on the vehicle). So this leaves me with the grey piece. Is this a designed vent? If so, why is there condensation in the headlight?
That's normal, as long as the moisture goes away on it's own. If you have condensation (droplets forming) and it lingers, it's the seal between the lens and the housing. Search around, bunch of posts on the matter around here. If you have 07+ with PDLS, better hurry up cause you're about to burn up your $1200 light module.
Your "blow here" hole and "air comes out" holes are for ventilation under normal conditions. If the seal is leaking, "normal conditions" don't apply. Sealing those holes will not help your case in any way.
The moisture does go away on its own, but it also lingers. And it responds very different from the passenger (ldoesnt really get moisture from what I can see). I was expecting there to be a crack in the housing or something, but when I did that test, it held the pressure when I blew on it (so I don't see how there can be a bad seal on the housing?) Maybe I will try it again. Hmmmm, not sure then.
I pulled the headlamp assembly out; let the inside dry. Then applied windshield adhesive around the assembly between the clear plastic and the housing; sorted.
I pulled the headlamp assembly out; let the inside dry. Then applied windshield adhesive around the assembly between the clear plastic and the housing; sorted.
Think I will give that a go since it is still collecting extra moisture. The odd thing is that If I seal the grey piece and the connector...then blow into the hole, it holds pressure. So I don't see how the water can get in there..but who knows. That also seems like the most likely issue, regardless of that test.
I had tried to seal the headlight from the outside. It held up great... for about 6 months. YMMV, but I ended up opening the headlight to re-seal it properly in the end. No issues since.
I had tried to seal the headlight from the outside. It held up great... for about 6 months. YMMV, but I ended up opening the headlight to re-seal it properly in the end. No issues since.
How did you open up the headlight? I read on another post that the usual process of heating up the headlight assembly in an oven would not work because the adhesive/sealant between the lens and assembly body used a sealant with a higher melting temperature than the lens/assembly.
I'm a bystander trying to learn from this post as I have the same issue. But I'll answer that you don't try to melt anything in the oven... you set it for Warm or the lowest setting just to dry things out. I have done this in the past.
I've been ignoring the moisture, but I may try the window seal suggestion since lately I haven't been parking in the sun.
Actually, where do you apply the sealant? Didn't want cruiser's question to get lost.
Oh wait, Mr. Merk said "between the clear plastic and the housing." Makes sense.
Yes. I sealed my driver's side about a year ago. I used Permatex Red RTV and just ran a bead down into the gap between the clear lens piece and the gray housing piece. It seems to have worked. I have had no problems with water getting into that headlight. I used denatured alcohol to clean the gap area as best I could before putting the rtv into it. Also before sealing it, I took out the computer and cleaned everything with electronics cleaner and then used dielectric grease on all the contacts. Also used a hair dryer pointed inside the assembly to dry everything out.
How did you open up the headlight? I read on another post that the usual process of heating up the headlight assembly in an oven would not work because the adhesive/sealant between the lens and assembly body used a sealant with a higher melting temperature than the lens/assembly.
I just put a thick bead (squished in with my gloved finger) all around my headlight.
In so doing, I found a crack (more of a small chunk of missing plastic) and filled that in also.
It's worth mentioning that around a half cup of water was inside... reason to not worry so much about any breather being clogged.
I drained it and put it in the oven (above some cast iron skillets and a big baking sheet) for a few hours on the lowest setting (170 F). I periodically measured the temp of the light assembly itself with an infrared thermometer and it never went above 140 or so, so I didn't worry about the temperature being too high.
Wish me luck.

 12-29-2020, 12:18 AM