955/957 Cayenne DIY: Front Rotors and Pads
 08-30-2008, 12:12 AM
#1
Drifting
Thread Starter
DIY FRONT BRAKE JOB
Total elapsed time including jacking, wheel removal and the job itself was 90 minutes for the fronts.
Due to manufacturing differences we have seen, you must determine the size of the rotors on your vehicle prior to ordering. The easiest way to figure out your brake size (other than actually measuring the diameter of your rotors) is to look at the caliper. It should have "17ZR" or "18ZR" cast into the body. 17ZR=330mm (black caliper), 18ZR=350mm (red caliper). You can probably see this with the wheel mounted to the vehicle, but you may have to remove the wheel - but it's much less trouble (and cheaper) than returning a set of incorrect rotors/pads.
(Update: The Cayenne S has 350mm rotors up front and 330mm rotors in the rear)
Currently I am using AutohausAZ for my rotors, Amazon for Hawk Ceramic Pads, and Sunset Parts for Hardware and sensors.
This is the definitive brake pad/ brake rotor DIY page (for boxster) but a great primer to read before you tackle the job.
http://www.bombaydigital.com/boxster/projects/brakes/
Tools you will need:
Jack & Stands
Torque Wrenches 10ft/lbs to 200ft/lbs
19 mm socket for wheel bolts
13mm Socket for the Retaining Bolt
21mm Socket for the front Rotor Bolts
Torx-50 for the Rotors
You will also need 2 Triple Square/XZN Bits for the rear brakes, M5 and M16. I measured w/ a digital caliper and the "M" seems to roughly equate to "mm". (I could not find these locally and the best deal I could find was the "VIM 8-piece XZN set on Amazon for around $30. Your other source would be Snap-on at around $72 for 2 bits)
Brake Parts Cleaner (do not use other cleaners)
Needle Nose Pliers
Punch (for driving the pins out)
Hammer or soft mallet
Caliper Spreader or large Water Pump Pliers
Parts:
Rotors, if needed.
Pads
New warning sensors (fronts and rears are different)
New Caliper hardware (recommended - fronts and rears are different)
New Caliper Bolts (recommended - 2 per caliper - fronts are rears are different)
Note: The brake pads must be replaced (both sets of pads per axle) if the brake pad warning indicator lights up, but no later than when there is a residual pad thickness of 2 mm.
If brake pad wear is indicated by the warning light, the warning contact sensor (sender including wire and plug connection) must also be replaced. ($9.95 per wheel at sunset) Replacing the warning contact sensor can be avoided by replacing the brake pads no later than when the pad thickness is 2.5 mm. Warning contact sensors with a worn wire core must be replaced. However, if only the plastic part of the warning contact is worn, replacement is not necessary. Also, do not disassemble the caliper when changing the vibration dampers (or painting the calipers) as Porsche does not sell inner seal kits.
. Jack up the vehicle at the lift points provided and remove the wheel (you will need to do this for each wheel).
. Link: http://www.renntech.org/forums/index...howtopic=21396
Front Pad Replacement
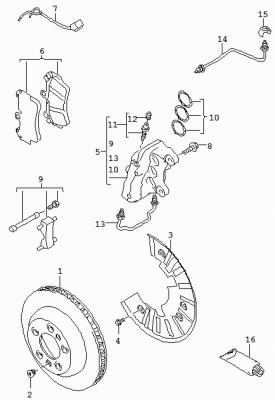
. Remove the retainer with a 13mm socket (arrow) and extract the retainer pin inwards. (#9 in the diagram)
.
.
.
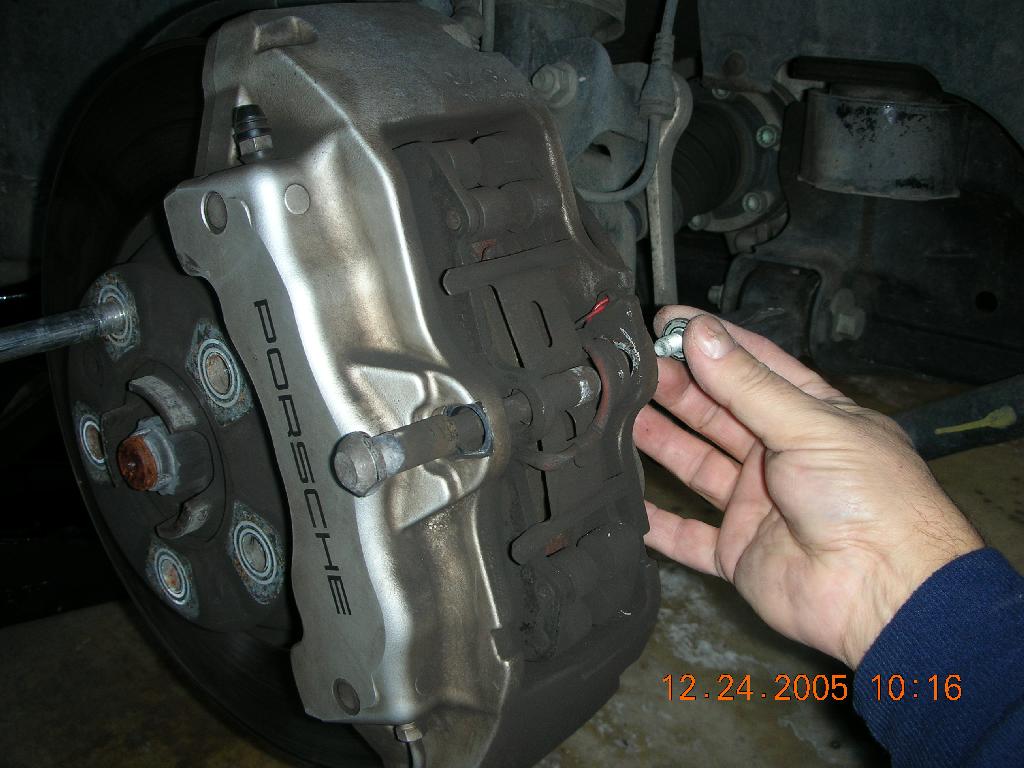
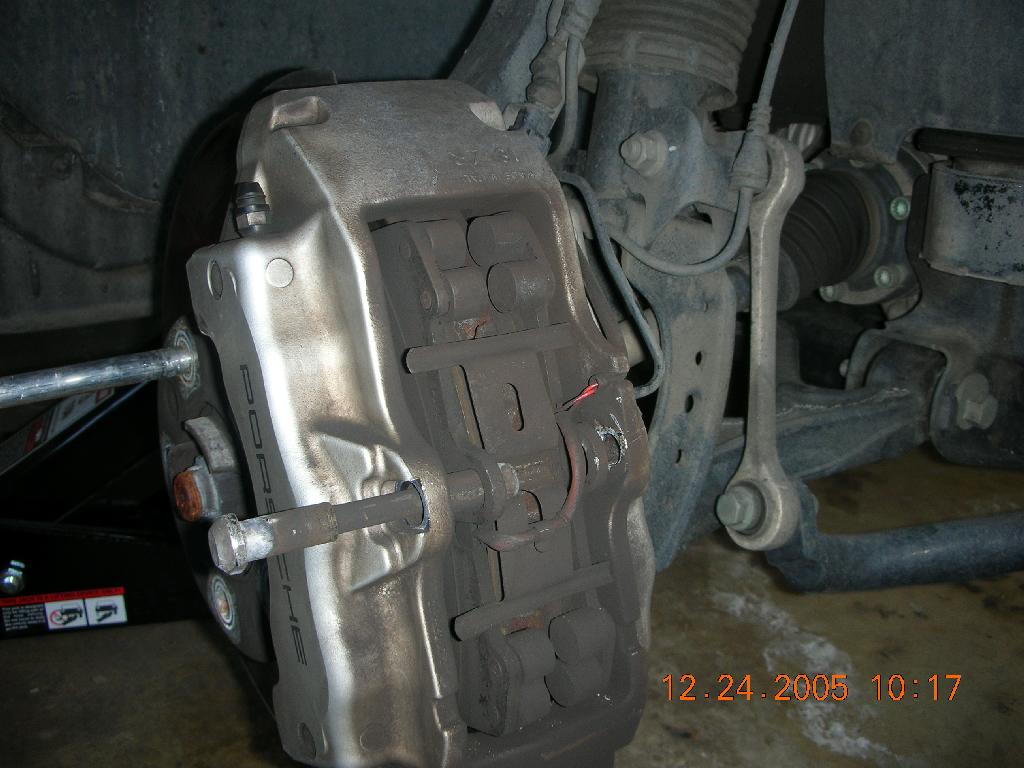
A single bolt hold the pad retaining pin in place, as usual with fluid locked bolts tighten a fraction to break the seal and then remove as normal.
Leave the bolt in couple of turns and tap the end to start the pin on its way through.

.
. Pull out the warning contact wire on the brake caliper and remove the warning contacts from the brake pad plates._
Once the pin is out, break the sensor wires , its easier.
.
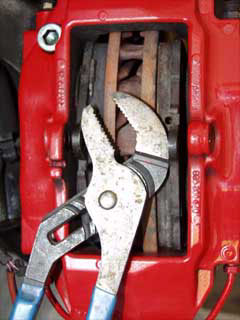
. Remove brake pads with a brake pad puller or use the water pump Pliers to spread the pads.
.
.
. If necessary, carefully push back the piston to its original position.
.
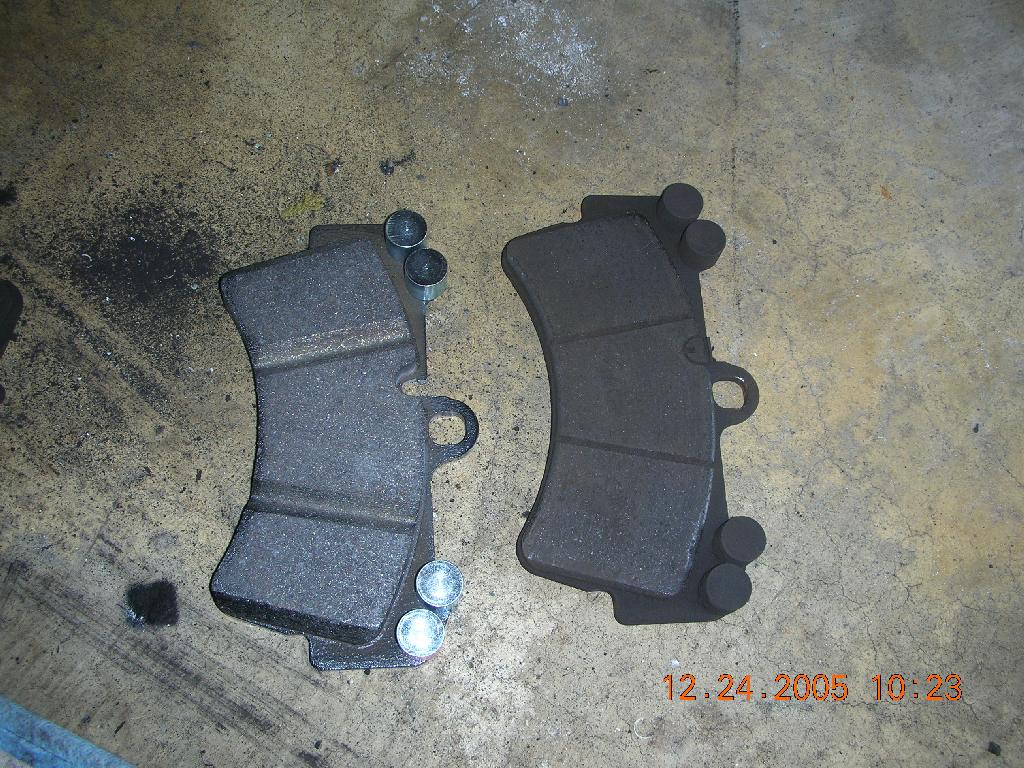
. Insert the brake pads._Caution: The pad backing plates (rear side of the brake pads) must not be greased._Note: If you are using Pagid (or some other 3rd party pads) you will likely have to drill the pad for the wear sensors. Just look at the old pads and drill the sensor holes in the same location._
.
To get the new pads in you will find that depressing one of the pistons is easy, the second ok the third forces out the other 2.
I found the easiest way was to depress the first 2 and then slip the pad in, with the pad blocking the first 2 depress the third and push the pad into place. Its not hard just fiddly.
. Fit new expanding spring, new retaining pin and new retainer (retaining bracket). These parts are available as a repair set and must be 'renewed' each time the pads are changed. $30 for a set
You really need three hands to put the pin back through. The best way is to depress the pad retaining spring and tap the pin through, for the last part you will need to push the pin itself into line.

Dont forget to get blue loctite for the pin bolt and brake grease for the back of the pad.
.
. Insert the warning contact wire and warning contacts.
.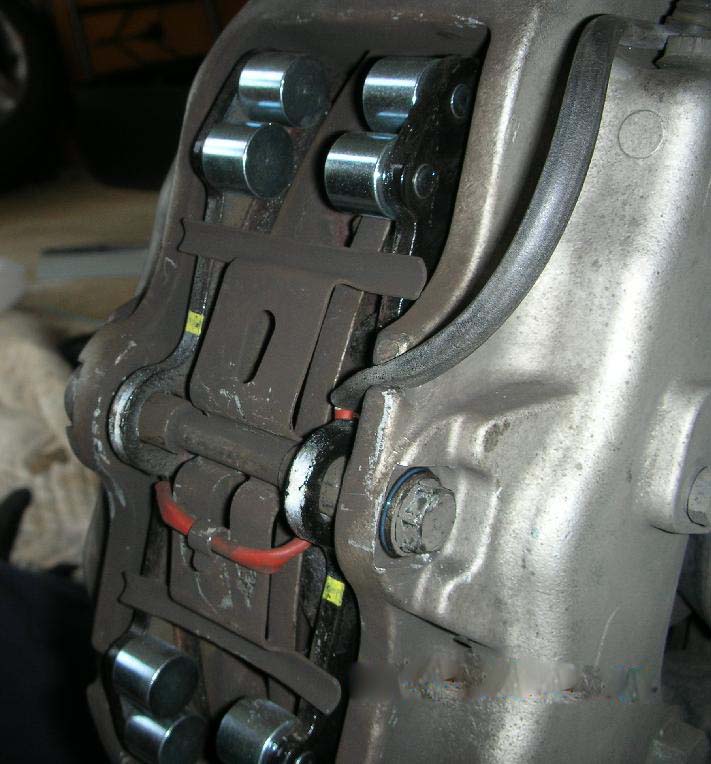
The sensors clip in with the thick part pad side.
.
.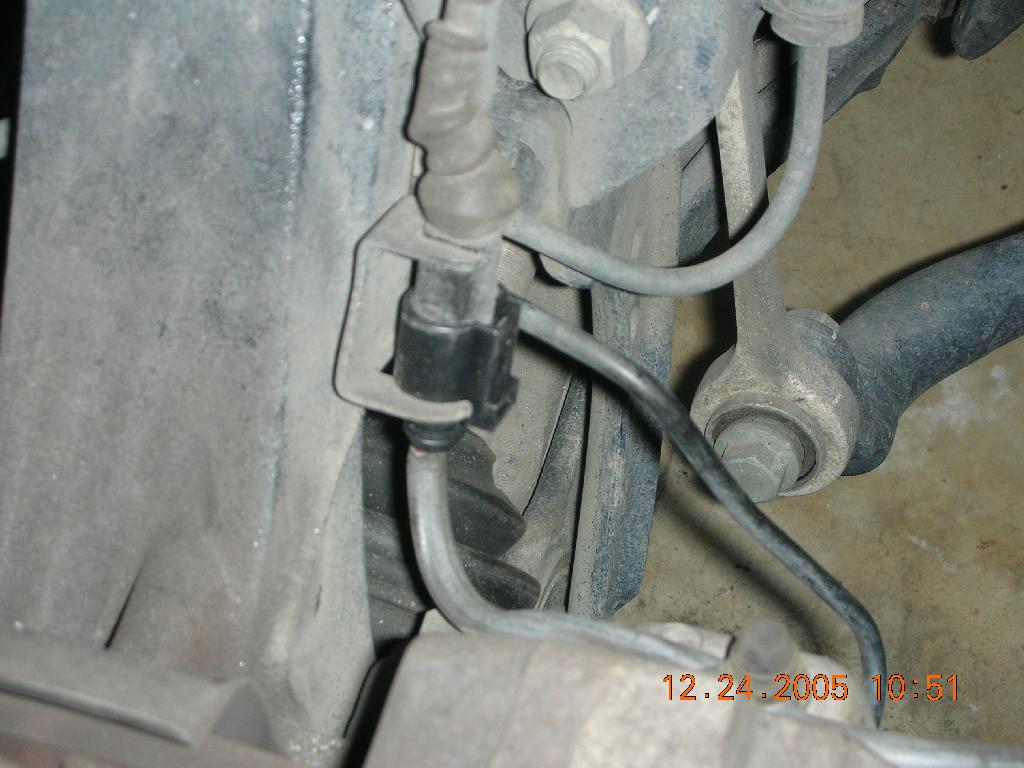
Remove the old sensor connector by inserting a screwdriver into the tab opening in the middle. At the same time pull down on the bottom portion of the connector. The old connector should slide off easily and then just slip the new one on.
.
. Firmly press the brake pedal several times with the vehicle stationary so that the brake pads assume their fit in accordance with the operating state. Next, check and, if necessary, correct the brake fluid level.__Bedding in the brake pads_New brake pads require a bedding-in period of approximately 125 miles. Not until then do they achieve their best friction and wear coefficient. During this period, the brakes should be subjected to full stress only in emergencies when traveling at high speed.
------------------------------------------------------------------------------------------------------------
Torque settings:
FROM LOREN:
Brake caliper to front wheel carrier M16 x 1.5 270 Nm (200 ftlb.)
Brake caliper to rear wheel carrier M14 x 1.5 180 Nm (133 ftlb.)
Brake disc to wheel hub (front and rear axles) M12 x 1.5 14 Nm (10.5 ftlb.)
Plug rear brake disc 14 Nm (10.5 ftlb.)
Brake cover plate to front axle M8 x 12 20 Nm (15 ftlb.)
Brake caliper to rear wheel carrier:
M8 x 16 20 Nm (15 ftlb.)
M6 x 12 8 Nm(6 ftlb.)
Many thanks and props to Loren and Mudman who generated the pics and info. I have compiled them, with their permission, to a somewhat comprehensive DIY for the Cayenne. I am sure I have missed some things which will get covered in the thread. I hope this inspires someone new to try this job, it's not that difficult, and saves a lot of money in stealership labor.
Medtech
Total elapsed time including jacking, wheel removal and the job itself was 90 minutes for the fronts.
Due to manufacturing differences we have seen, you must determine the size of the rotors on your vehicle prior to ordering. The easiest way to figure out your brake size (other than actually measuring the diameter of your rotors) is to look at the caliper. It should have "17ZR" or "18ZR" cast into the body. 17ZR=330mm (black caliper), 18ZR=350mm (red caliper). You can probably see this with the wheel mounted to the vehicle, but you may have to remove the wheel - but it's much less trouble (and cheaper) than returning a set of incorrect rotors/pads.
(Update: The Cayenne S has 350mm rotors up front and 330mm rotors in the rear)
Currently I am using AutohausAZ for my rotors, Amazon for Hawk Ceramic Pads, and Sunset Parts for Hardware and sensors.
This is the definitive brake pad/ brake rotor DIY page (for boxster) but a great primer to read before you tackle the job.
http://www.bombaydigital.com/boxster/projects/brakes/
Tools you will need:
Jack & Stands
Torque Wrenches 10ft/lbs to 200ft/lbs
19 mm socket for wheel bolts
13mm Socket for the Retaining Bolt
21mm Socket for the front Rotor Bolts
Torx-50 for the Rotors
You will also need 2 Triple Square/XZN Bits for the rear brakes, M5 and M16. I measured w/ a digital caliper and the "M" seems to roughly equate to "mm". (I could not find these locally and the best deal I could find was the "VIM 8-piece XZN set on Amazon for around $30. Your other source would be Snap-on at around $72 for 2 bits)
Brake Parts Cleaner (do not use other cleaners)
Needle Nose Pliers
Punch (for driving the pins out)
Hammer or soft mallet
Caliper Spreader or large Water Pump Pliers
Parts:
Rotors, if needed.
Pads
New warning sensors (fronts and rears are different)
New Caliper hardware (recommended - fronts and rears are different)
New Caliper Bolts (recommended - 2 per caliper - fronts are rears are different)
Note: The brake pads must be replaced (both sets of pads per axle) if the brake pad warning indicator lights up, but no later than when there is a residual pad thickness of 2 mm.
If brake pad wear is indicated by the warning light, the warning contact sensor (sender including wire and plug connection) must also be replaced. ($9.95 per wheel at sunset) Replacing the warning contact sensor can be avoided by replacing the brake pads no later than when the pad thickness is 2.5 mm. Warning contact sensors with a worn wire core must be replaced. However, if only the plastic part of the warning contact is worn, replacement is not necessary. Also, do not disassemble the caliper when changing the vibration dampers (or painting the calipers) as Porsche does not sell inner seal kits.
. Jack up the vehicle at the lift points provided and remove the wheel (you will need to do this for each wheel).
. Link: http://www.renntech.org/forums/index...howtopic=21396
Front Pad Replacement
. Remove the retainer with a 13mm socket (arrow) and extract the retainer pin inwards. (#9 in the diagram)
.
.
.
A single bolt hold the pad retaining pin in place, as usual with fluid locked bolts tighten a fraction to break the seal and then remove as normal.
Leave the bolt in couple of turns and tap the end to start the pin on its way through.
.
. Pull out the warning contact wire on the brake caliper and remove the warning contacts from the brake pad plates._
Once the pin is out, break the sensor wires , its easier.
.
. Remove brake pads with a brake pad puller or use the water pump Pliers to spread the pads.
.
.
. If necessary, carefully push back the piston to its original position.
.
. Insert the brake pads._Caution: The pad backing plates (rear side of the brake pads) must not be greased._Note: If you are using Pagid (or some other 3rd party pads) you will likely have to drill the pad for the wear sensors. Just look at the old pads and drill the sensor holes in the same location._
.
To get the new pads in you will find that depressing one of the pistons is easy, the second ok the third forces out the other 2.
I found the easiest way was to depress the first 2 and then slip the pad in, with the pad blocking the first 2 depress the third and push the pad into place. Its not hard just fiddly.
. Fit new expanding spring, new retaining pin and new retainer (retaining bracket). These parts are available as a repair set and must be 'renewed' each time the pads are changed. $30 for a set
You really need three hands to put the pin back through. The best way is to depress the pad retaining spring and tap the pin through, for the last part you will need to push the pin itself into line.
Dont forget to get blue loctite for the pin bolt and brake grease for the back of the pad.
.
. Insert the warning contact wire and warning contacts.
.
The sensors clip in with the thick part pad side.
.
.
Remove the old sensor connector by inserting a screwdriver into the tab opening in the middle. At the same time pull down on the bottom portion of the connector. The old connector should slide off easily and then just slip the new one on.
.
. Firmly press the brake pedal several times with the vehicle stationary so that the brake pads assume their fit in accordance with the operating state. Next, check and, if necessary, correct the brake fluid level.__Bedding in the brake pads_New brake pads require a bedding-in period of approximately 125 miles. Not until then do they achieve their best friction and wear coefficient. During this period, the brakes should be subjected to full stress only in emergencies when traveling at high speed.
------------------------------------------------------------------------------------------------------------
Torque settings:
FROM LOREN:
Brake caliper to front wheel carrier M16 x 1.5 270 Nm (200 ftlb.)
Brake caliper to rear wheel carrier M14 x 1.5 180 Nm (133 ftlb.)
Brake disc to wheel hub (front and rear axles) M12 x 1.5 14 Nm (10.5 ftlb.)
Plug rear brake disc 14 Nm (10.5 ftlb.)
Brake cover plate to front axle M8 x 12 20 Nm (15 ftlb.)
Brake caliper to rear wheel carrier:
M8 x 16 20 Nm (15 ftlb.)
M6 x 12 8 Nm(6 ftlb.)
Many thanks and props to Loren and Mudman who generated the pics and info. I have compiled them, with their permission, to a somewhat comprehensive DIY for the Cayenne. I am sure I have missed some things which will get covered in the thread. I hope this inspires someone new to try this job, it's not that difficult, and saves a lot of money in stealership labor.
Medtech
Last edited by medtech; 04-27-2018 at 02:31 PM. Reason: Updates
 08-30-2008, 01:07 AM
#2

Thanks for the write-up. As I've said before.... Cayenne brakes are the easiest I've ever done.
Don't waste your money paying somebody else to do these.
In the spirit of DIY, I'm doing a 40k mile service this weekend!
Oil, air filters, cabin air filter, inspection and lube all doors, etc.
Grand total spent is $150 for all materials..... I estimate about two hours time on my part (or about two beers).
08-30-2008, 09:59 AM
#3
Rocky Mountain High
Rennlist Member
Rennlist Member
Two beers in two hours? Two hours would most likely equate to four beers, IMHO. This obviously wouldn't apply if you are drinking a heavy beer, but I generally prefer lighter beers for automotive maintenance.
 08-30-2008, 11:21 AM
#5
Moderator !x4
I am replacing the rears with drilled rotors and Hawk dustless, same as I have on the front. Was going to be this weekend but I forgot to get the sensors and the dealer parts dept are closed.
I don't go the beer route, always the Tangaray Tonic way, there is always somewhere in the world that its appropriate.
I don't go the beer route, always the Tangaray Tonic way, there is always somewhere in the world that its appropriate.
08-30-2008, 06:56 PM
#6
Rocky Mountain High
Rennlist Member
Rennlist Member
I've never been much of a gin guy, but I like your logic.
08-30-2008, 07:44 PM
#7
Nice write up, but I would have changed all fasteners/hardware as Porsche recommends. Besides the safety aspect of new hardware, it does make the brake system look like new - well, all most.
I used Zeckhausen Racing for rotors and pads. Hardware was purchased at my local Porsche dealership.
The XZN bit (triple-square) was purchased through Snap-on.com
+1 on the DIY - it was easy and fun.
I used Zeckhausen Racing for rotors and pads. Hardware was purchased at my local Porsche dealership.
The XZN bit (triple-square) was purchased through Snap-on.com
+1 on the DIY - it was easy and fun.
Trending Topics
08-30-2008, 08:20 PM
#8
Drifting
Thread Starter
 01-19-2009, 01:00 PM
#9
DIY FRONT BRAKE JOB
Due to manufacturing differences we have seen, you must determine the size of the rotors on your vehicle prior to ordering. The easiest way to figure out your brake size (other than actually measuring the diameter of your rotors) is to look at the caliper. It should have "17ZR" or "18ZR" cast into the body. 17ZR=330mm (black caliper), 18ZR=350mm (red caliper). You can probably see this with the wheel mounted to the vehicle, but you may have to remove the wheel - but it's much less trouble (and cheaper) than returning a set of incorrect rotors/pads.
Due to manufacturing differences we have seen, you must determine the size of the rotors on your vehicle prior to ordering. The easiest way to figure out your brake size (other than actually measuring the diameter of your rotors) is to look at the caliper. It should have "17ZR" or "18ZR" cast into the body. 17ZR=330mm (black caliper), 18ZR=350mm (red caliper). You can probably see this with the wheel mounted to the vehicle, but you may have to remove the wheel - but it's much less trouble (and cheaper) than returning a set of incorrect rotors/pads.
Thanks a ton!
01-19-2009, 04:03 PM
#12
Drifting
Thread Starter
Great write up...going to try and get on mine in the next couple of weeks. Curious though (and I ask because I'm out of town and want to order the pads...) Above says black or red calipers...mine are silver as are yours in the pics... Which size are your rotors?
Thanks a ton!
Thanks a ton!
Those are Mudman's pics. I believe the silver calipers are 18ZR, but you should check them yourself prior to ordering. It can be found cast in the top of the caliper, facing forward. You can see it in some of the pics. Either remove the wheel or use a dental mirror to see it.
Enjoy!
05-24-2009, 03:40 PM
#13
I am getting ready to do this. I am a little confused where the brake grease goes. Is it between the piston and the brake pad itself, or does the grease go between the backing plate and the brake pad.
05-24-2009, 11:36 PM
#14
Drifting
Thread Starter
On this car, there is no separate backing plate, it is already part of the pad.
You might want to put a little anti seize paste on the bolt threads for the next job.
05-25-2009, 11:21 AM
#15
Grease would go on the back of the pad, next to the piston. Light application only, but probably not needed for this job.
On this car, there is no separate backing plate, it is already part of the pad.
You might want to put a little anti seize paste on the bolt threads for the next job.
On this car, there is no separate backing plate, it is already part of the pad.
You might want to put a little anti seize paste on the bolt threads for the next job.
Anti seize is a good thing to use.
thanks,