955/957 Cayenne DIY: Front Rotors and Pads
 11-28-2009, 06:40 PM
#31
Track Day

Join Date: Nov 2009
Posts: 20
Likes: 0
Received 0 Likes
on
0 Posts
This post was very helpful for changing the front pads and rotors. However, the rears are a bit more challenging for two reasons:
1. The rear rotor has two screws, or a screw and a plug. The first screw is a torx-50, as the same as the front screw that attaches the rotor. But I am not sure what tool I need for the second screw - or is it a plug? Does this have to be removed to take off the rotor? If so, what is the tool - triple square - what size?
2. There are lots of wires that come close to the bolts that keep the rear caliper mounted on. It looks difficult to get at the top bolt with the wire directly in the way. It may be possible to do this pushing the wire away, but I am not sure. Any tips?
Thanks!
Josh
 11-29-2009, 07:32 AM
#33
Those ZXN caliper retaining bolts on the rear are a bear to get out and back in due to the very limited amount of space in which to work.. I suggest getting a sort of flat head or slimline impact wrench for these bolts. The small screws on the front and rear brake disc are TORX alignment/retaining screw (like on the front disc) and the other screw on the rear disc is an inspection cover (short screw). Both have very low torque values. The lines/wires can be moved to the side - carefully. I would also advise that you be very careful inserting new brake wear sensors as the Bakelite ends will chip/crack very easy. And remember, there are distinct sets sensors for the front and the back. 
Last edited by JW3; 10-16-2011 at 01:53 PM.
12-01-2009, 12:34 AM
#34
Track Day

Join Date: Oct 2009
Posts: 18
Likes: 0
Received 0 Likes
on
0 Posts
Going to pick up all the parts tomorrow. A couple questions. I did not see an answer to the question regarding the T-50 12 point socket. Does anyone know where to get one of these or what the Snap-On equivalent size is?
Also, has anyone seen a write up on the rear emergency brake shoes to go with this?
Thanks,
Tom
Also, has anyone seen a write up on the rear emergency brake shoes to go with this?
Thanks,
Tom
12-01-2009, 08:08 PM
#35
On one 12 point bolt (upper) you can use Snap-On 16 Part Number: STSM16E.
On the other 12 point bolt (lower) you may find the Blue-Point BLPXZNM3816 to be very useful (of course available from your local Snap-On dealer).
If you have a flat impact wrench removal of the rear caliper retaining bolts will be much easier. I have no info on the emergency brake replacement (yet).
01-02-2010, 07:47 PM
#36
FYI - Pelican Parts sells the OEM brake sensors, OEM hardware as well as the Zimmerman rotors and pagid pads for this job !!
http://www.pelicanparts.com/catalog/..._pg1.htm#item1
http://www.pelicanparts.com/catalog/..._pg1.htm#item1
 02-26-2010, 09:06 PM
#38
Instructor

Join Date: Feb 2010
Posts: 102
Likes: 0
Received 0 Likes
on
0 Posts
Great write up thanks. Ill be doing the rears in a couple of weeks, Ill try to document it to add it to the post. FYI brave man putting your legs under the vehicle without jack stands  I should post the youtube video of changing the pads on my other ride... about 60 seconds, no tools and the wheel stays on
  Looks like this is a little more involved...
I should post the youtube video of changing the pads on my other ride... about 60 seconds, no tools and the wheel stays on Looks like this is a little more involved...
02-28-2010, 02:44 AM
#39
Drifting
Thread Starter
02-28-2010, 12:03 PM
#40

I just did all four corners last weekend... Pads & rotors. The toughest part was getting the rear calipers removed. You have to get creative with the breaker bar or impact wrench.
All in all a pretty simple job. I scrubbed the calipers with simple green to get them cleaned up. That took longer than anything else.
I move slowly (with many distractions) and got it done in about 3.5 - 4 hours.
All in all a pretty simple job. I scrubbed the calipers with simple green to get them cleaned up. That took longer than anything else.
I move slowly (with many distractions) and got it done in about 3.5 - 4 hours.
03-25-2010, 04:48 PM
#42

Level at the brake pad when the warning light goes on.
In this case, (almost zero waiting after light warning), I felt it was interesting to observe the meat left in the pad.
As you can see: it is quite far to be to the bone, when the light goes on.
It is a kind of double sword message, as one may tend to "let it go for a while", when you see that, but it is also true that the worst that could happen then, ..is to hear a pretty bad noise, ..when the metal base of the pad will start to touch the disk. At that time, the sound warning leaves you with no extra miles, ..and, for sure, the rotors exchange too !
But really, looking at the left over when the light turns on, we have time without stress to think about the right action to take, i.e.: find the supplier over the net that will offer a good price, and let it ship by surface, ..yes, it is heavy stuff !
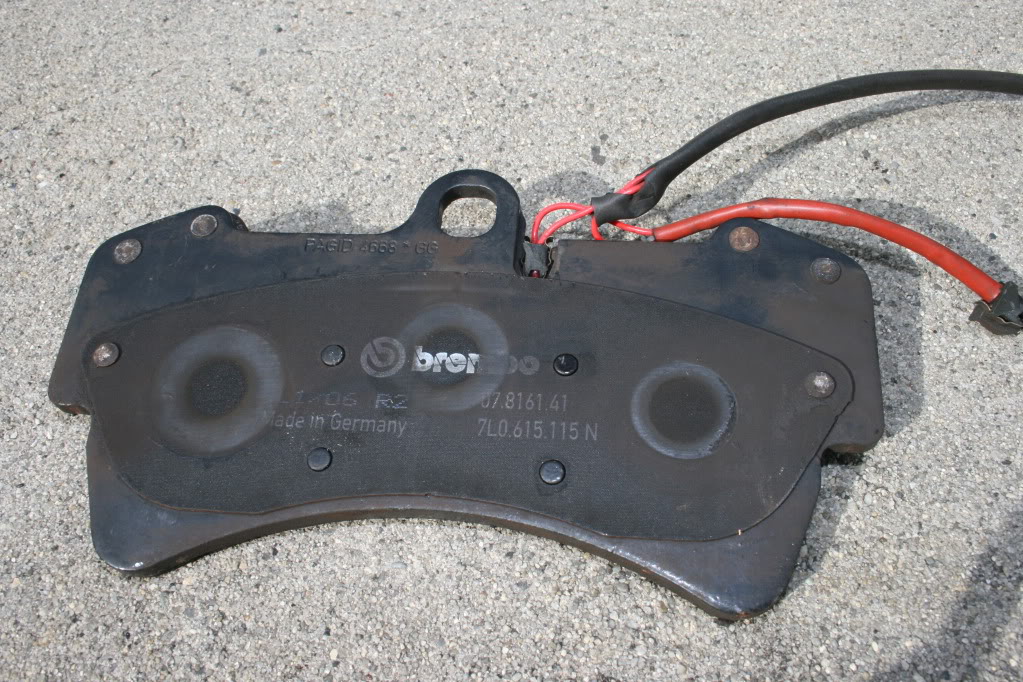
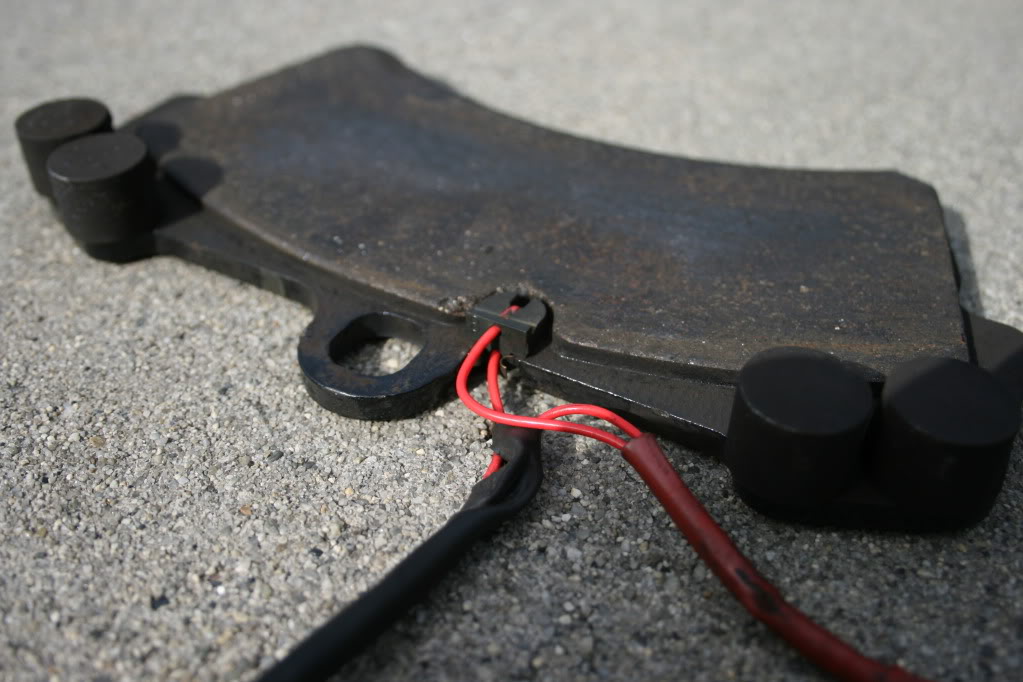
On the other ..Side note : In the metal base of the part, I can read on my OEM pads : Pagid 4688 * GG, and underneath, on the metal contact pad, were the pistons are in contact with base of the pad (see the different "prints" sizes of the 3 pistons according to the rotation direction !), ..I see also "Made in Germany" and for sure : Brembo !
I felt it is interesting to see on such "looking simple" part, that we can read Pagid (A well known German company), together with Brembo, The Italian master for the brakes.
So, the Porsche OEM base are Brembo, and these Brembo pads seems to include friction material from Pagid. The funny thing is that the friction material brand, ..is printed on the metal base !!
Or, ..hard to understand who of these 2 important brake brands manufacture what in that "simple" part ???
According to what I know, Brembo is a Italian publicly listed company and Pagid is a German based company, part of the German group called TMD (Textar Mintex Don), the world leader in brake friction material.
In this case, (almost zero waiting after light warning), I felt it was interesting to observe the meat left in the pad.

As you can see: it is quite far to be to the bone, when the light goes on.
It is a kind of double sword message, as one may tend to "let it go for a while", when you see that, but it is also true that the worst that could happen then, ..is to hear a pretty bad noise, ..when the metal base of the pad will start to touch the disk. At that time, the sound warning leaves you with no extra miles, ..and, for sure, the rotors exchange too !
But really, looking at the left over when the light turns on, we have time without stress to think about the right action to take, i.e.: find the supplier over the net that will offer a good price, and let it ship by surface, ..yes, it is heavy stuff !

On the other ..Side note : In the metal base of the part, I can read on my OEM pads : Pagid 4688 * GG, and underneath, on the metal contact pad, were the pistons are in contact with base of the pad (see the different "prints" sizes of the 3 pistons according to the rotation direction !), ..I see also "Made in Germany" and for sure : Brembo !
I felt it is interesting to see on such "looking simple" part, that we can read Pagid (A well known German company), together with Brembo, The Italian master for the brakes.
So, the Porsche OEM base are Brembo, and these Brembo pads seems to include friction material from Pagid. The funny thing is that the friction material brand, ..is printed on the metal base !!
Or, ..hard to understand who of these 2 important brake brands manufacture what in that "simple" part ???
According to what I know, Brembo is a Italian publicly listed company and Pagid is a German based company, part of the German group called TMD (Textar Mintex Don), the world leader in brake friction material.
05-24-2010, 05:45 PM
#44
1st Gear

Join Date: May 2010
Posts: 1
Likes: 0
Received 0 Likes
on
0 Posts
This post was very helpful for changing the front pads and rotors. However, the rears are a bit more challenging for two reasons:
1. The rear rotor has two screws, or a screw and a plug. The first screw is a torx-50, as the same as the front screw that attaches the rotor. But I am not sure what tool I need for the second screw - or is it a plug? Does this have to be removed to take off the rotor? If so, what is the tool - triple square - what size?
2. There are lots of wires that come close to the bolts that keep the rear caliper mounted on. It looks difficult to get at the top bolt with the wire directly in the way. It may be possible to do this pushing the wire away, but I am not sure. Any tips?
Thanks!
Josh
1. The rear rotor has two screws, or a screw and a plug. The first screw is a torx-50, as the same as the front screw that attaches the rotor. But I am not sure what tool I need for the second screw - or is it a plug? Does this have to be removed to take off the rotor? If so, what is the tool - triple square - what size?
2. There are lots of wires that come close to the bolts that keep the rear caliper mounted on. It looks difficult to get at the top bolt with the wire directly in the way. It may be possible to do this pushing the wire away, but I am not sure. Any tips?
Thanks!
Josh
did you ever find out what size the small plug on the rear rotor is? It's a triple square but is it 4mm, 5mm? I'm ordering the blue point 16mm for caliper removal and the t50 for rotor removal but what size is that little plug? Thanks for any assistance.
Jon
05-29-2010, 11:45 PM
#45
3rd Gear

Join Date: Dec 2007
Posts: 3
Likes: 0
Received 0 Likes
on
0 Posts
On the 2004 Cayenne Turbo 18" rear rotors, one screw is a Torx T47, the other is a M5 Triplesquare XZN. To remove the caliper from the mount, you also need a M15 Triplesquare XZN. The M5 Triplesquare screw on the rotor is also where you adjust the E Brake if needed.
Great write up, guys. Wish I'd seen this before I muddled through it on my own, with 3 trips to the tools store to get, you guessed it, a Metric 5 Triplesquare bit, then a second trip for a T47, since the T50 I had was too big, oh, yeah, then a frickin' 15 mm Triplesquare, because the set I bought on trip #1 had an M14 and an M16....
sigh....
greg