When you click on links to various merchants on this site and make a purchase, this can result in this site earning a commission. Affiliate programs and affiliations include, but are not limited to, the eBay Partner Network.
HVAC stuff - and how do you get the passenger footwell carpet up?
Long story.. you can skip to the end for my question if you want..
I've been experiencing sub-par HVAC - specifically the AC part - performance as it got warmer in NJ the past week or so. So - using my iCarScan, I looked into it.
The iCarScan can do all sorts of nifty things with the HVAC system like sync'ing all the stepper motors, testing that all the flaps move as they should, and measuring temperatures all over the place - and the high-pressure reading of the refrigerant.
I found that my high-pressure was roughly 1/2 what it should be, and saw some error messages indicating the recirculation flap wasn't performing reliably, and the blower-motor current overload protection breaker had been triggered a few times.
Odd. The CTT had it's engine out back in September of last year when the VarioCam adjuster replacement went south - and that requires evacuating the AC system and recharging it. I did recall thinking the performance at the time wasn't quite up to snuff - but since it got cooler by the time the job was done I didn't follow up on it at the time. My thought was that since I have a 4-Zone system, perhaps it wasn't fully filled when they recharged it.
So - I measured things with the iCarScan, and sure enough - pressure was a bit low. I ended up adding 12oz of 134A to the system and the pressure got close to normal. That was a few days ago - I thought all was solved.
Last night the car took it's first extended trip since I did this - and the HVAC still didn't quite have the performance I remembered. So today I hooked up the iCarScan and checked for faults again - same two faults were recorded. The iCarScan has a function where you can activate individual flaps (there are about 12 in total) and monitor their positions. The recirculation flap seemed erratic - sometimes it worked - sometimes - not.
So I decided to see if I could feel the flap on the HVAC box - figured it would be a big door to the cabin that when opened would also block the fresh-air intake. Leaning into the passengers side - I found my hand immediately got wet. That's not good - shades of my 955..
I looked and could see water dripping out of the panel under the glovebox. So I removed that panel and found water dripping out of various spots on the HVAC box - most from around the cabin filter door. I removed the filter door (with a tray under it to catch any water) and found the bottom 2" of the cabin filter was wet. Took out the filter, and set it aside to dry.
I then ended up removing entirely the rubber drain hose. It simply pushes through the firewall with a built-in sort of grommet, and pulls over the drain spigot from the HVAC box. Problem is - the end on the HVAC box is held on with one of those devilish squeeze to release hose clamps. It took a bit of effort to get that side loose. When I did - more water came out (caught in a tray.) Altogether I think I drained roughly a quart from the HVAC box. I cleaned out the rubber drain hose - and made sure the little flap on the end opened - reassembled everything - and checked operation.
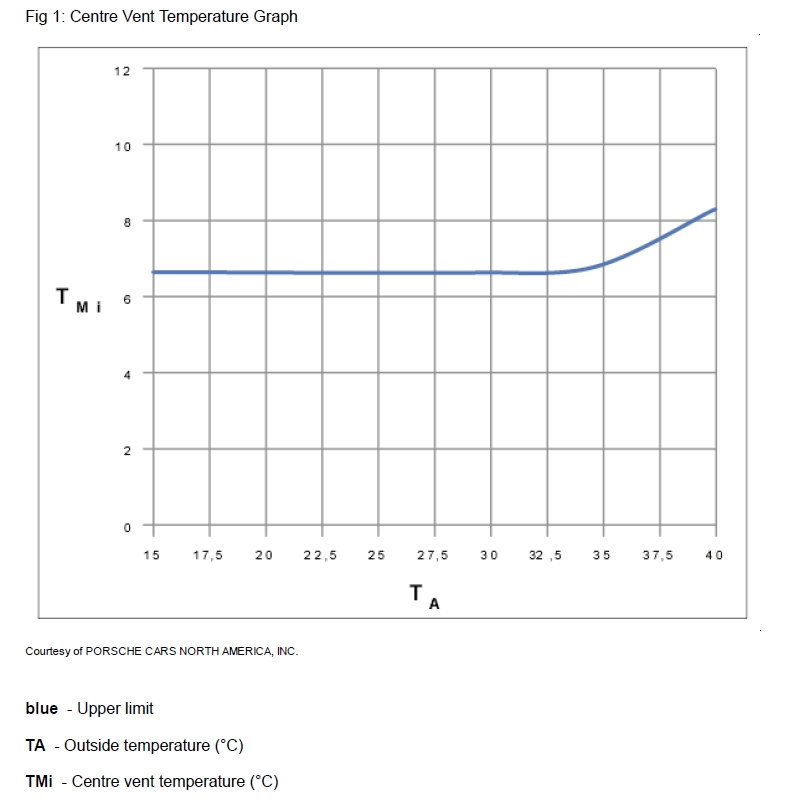
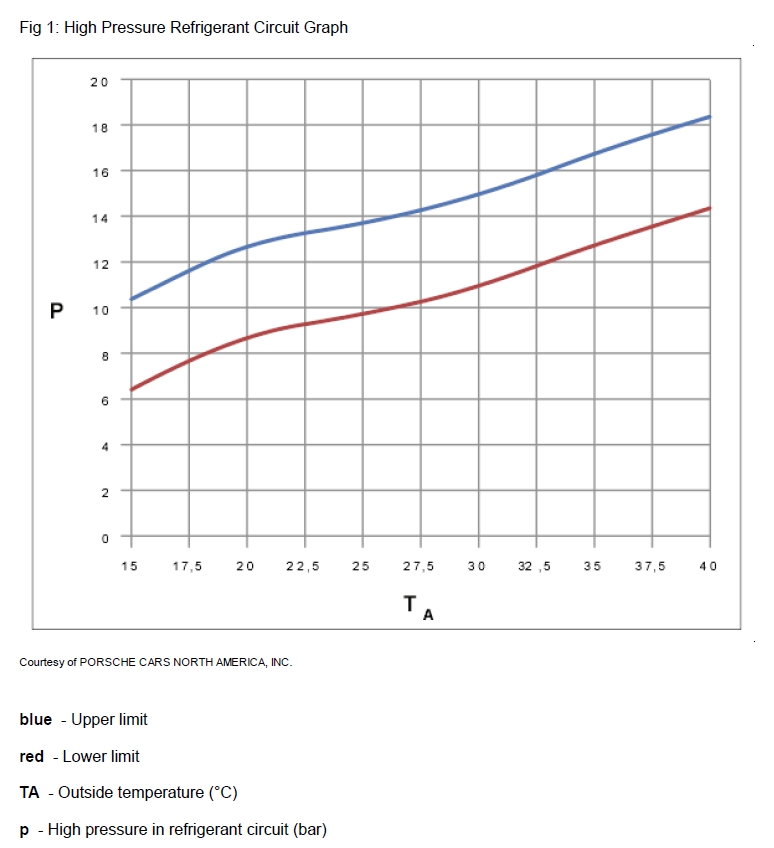
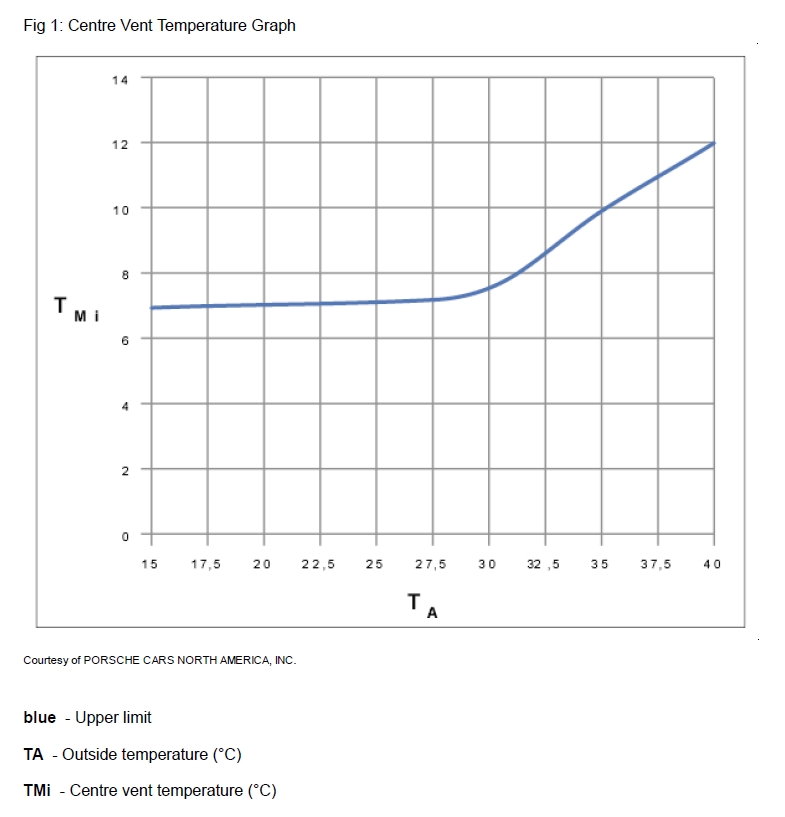
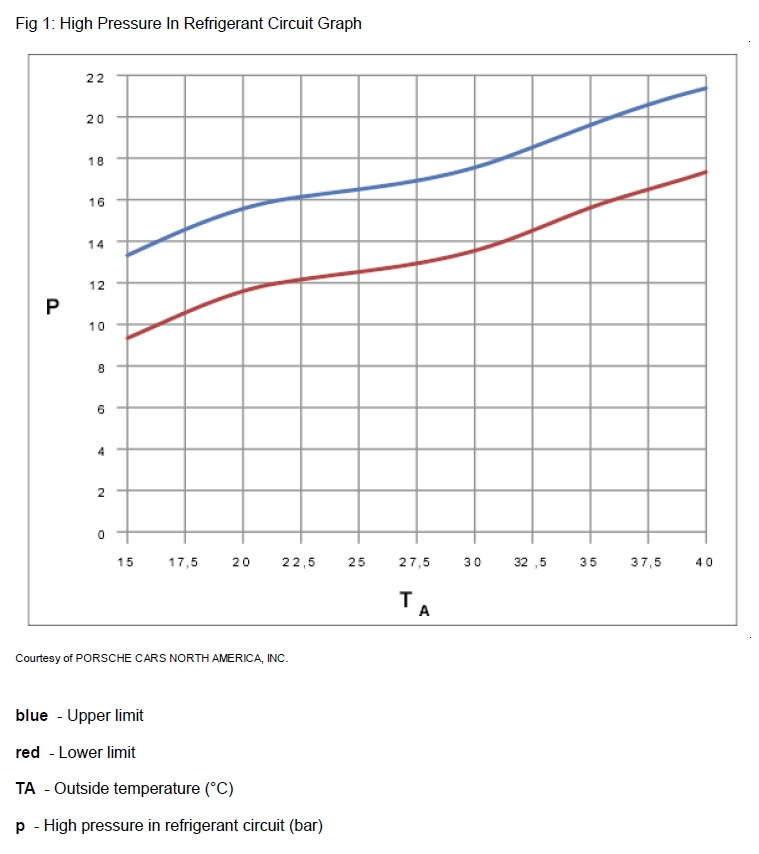
Much better! The recirculation flap now passes all it's tests and responds reliably to the recirc-button. The high-pressure reading is now exactly in the middle of the high/low range noted in the charts below, and the air coming from the vents is almost headache inducing cold (especially at 2K RPM or above - where the system apparently puts out peak output.)
Meanwhile - I mopped up the carpets - soaked several big bath towels squeezing water out of the carpeting, and hung my carpeted mat up to drain - about another quart came out of that.
So my question is (thought I'd never get to it right?). It was fairly easy to pull up the carpeting on my 955 (especially after doing it a dozen or so times due to various floods) - but on the 958 it is one piece from the floor up onto the seat pedestal. I seem to recall a seam there on the 955 that made it easier to get the carpet up high enough to get under all the wet foam rubber and dry it out.
Anyone have any clue how to do it easier? I suspect removal of the footwell side-wall plastic may be necessary, and the sill molding - but hope someone has BTDT and can tell me for sure. I know from my 955 just how much water that foam rubber under there can hold (why they didn't use closed-cell foam is beyond me..)
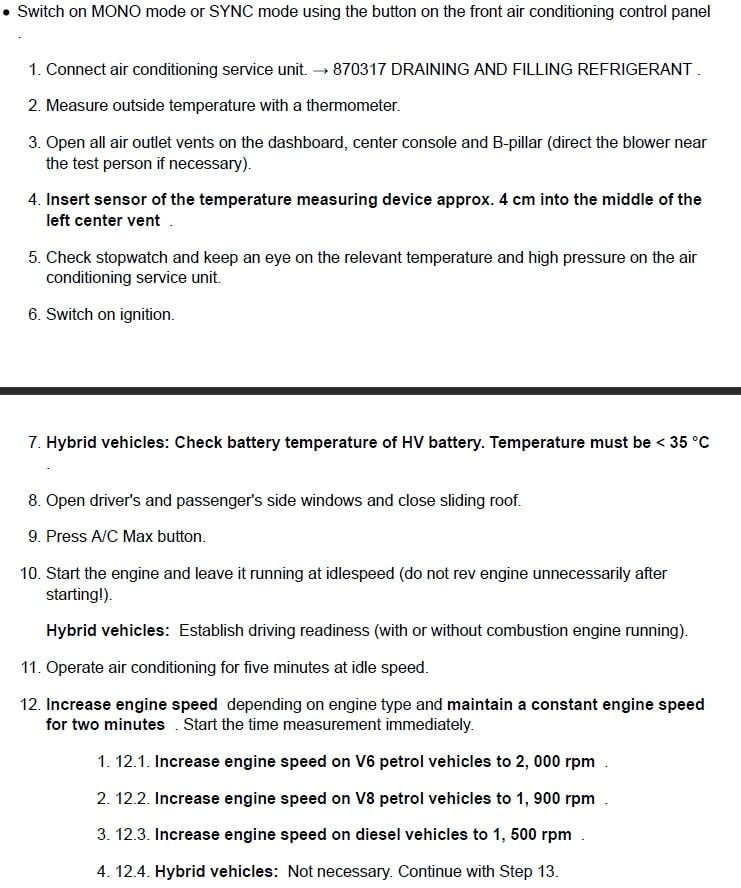
I'm gonna post the charts I found in the service manual - and the instructions for testing the system performance. Those of you who own the iCarScan might have some fun seeing how your system is performing.
2 zone HVAC AC Performance Chart
2 zone HVAC pressure chart
4 zone HVAC AC Performance Chart
4 zone HVAC pressure chart
AC performance test procedure
AC performance test procedure #2
Have fun!
Last edited by deilenberger; 06-30-2017 at 11:09 AM.
Don,
You are not going to like this. From AllDataDIY for my 92A:
WM 704119 Removing and installing carpet
Preliminary work
Preliminary work for carpet on driver's side
Remove driver's seat.
Remove centre console.
Remove front inner door sill trim on driver's side.
Remove cover under dashboard on the driver's side.
Preliminary work for carpet on passenger's side
Remove passenger seat.
Remove centre console.
Remove front inner door sill trim on passenger's side.
Remove cover under dashboard on the passenger's side.
Rob - to remove the full carpeting is a huge chore. On the 955, it was possible to pull the carpeting (and associated foam rubber) up along the door edge. I could get it about 10" above the edge and stuff towels in there to absorb water from the foam bonded to the back of the carpet.
I think I can skip the passenger seat and the center console.. it's the door sill trim and the "cover under dashboard" (ie - kickpanel in passengers footwell) that I think are going to have to come out. On the 955 it was possible to full the carpet out from under both of these. I know I read where someone on some forum (not too helpful..) did this job on a 958.. and was hoping there was some sage wisdom or shortcuts..
Don, so in the end was this all due to a clogged condensation drain? I think that's what I'm hearing from your post?
The wetness was..
I think the low pressure was two things - the system hadn't been completely filled when the dealer reinstalled the engine, and then the drain clogging up meant that water was surrounding part of the evaporator coil (and plugging the cabin filters 2" bottom inches) so the inefficiency of the partly restricted evaporator was also adding to a low pressure condition, which meant the overall capacity of the system was low.
The takeaway lesson from this is - it's not always immediately obvious to those of us with limited experience - that a problem like a system not running up to snuff may have more than one causative factor.
BTW - I'd suggest adding R&R/cleaning of the HVAC drain for every time the cabin filter is changed. It's not that hard to do - just getting that damn clamp off is a PITA (and next time that clamp will be changed to a simple worm/screw one..) I think the clamp is only there to prevent people pushing the drain off if they stick a toe up that far (hard, but possible to imagine.)
Drain line and damn clamp. In real life the clamp is up in the U shaped part of the housing.. just the ears stick sort of out.
Drain hose. The right side sticks through the firewall.
The drain hose ^^ the little flapper valve on the end of it can be seen. I tried to deform it enough so the flapper didn't close real tightly..
This drain hose clean out needs to be added to the cowl drain clean out caper. Porsche does mention cleaning out the cowl drain at the 40K service I believe. No mention of the AC drain hose.
This drain hose clean out needs to be added to the cowl drain clean out caper. Porsche does mention cleaning out the cowl drain at the 40K service I believe. No mention of the AC drain hose.
I'd tend to agree with you. Just finished drying out mine and putting it back together. Testing it with the iCarScan - I found several flaps that aren't responding correctly. Exercising them seemed to help some, especially the recirc flap, which you can see/feel if you stand on your head in the passenger side and look up at the heater. The motor for it hangs off to the left of the blower motor, and the bell-crank on it can be seen to move if it's activated. Finally after spraying some WD40 on the pivots (I know it's not a great lubricant..) it started responding a bit quicker and smoother. The iCarScan lets me move it a percentage open - and hold it there for XX seconds, then returns it to where it's set by the HVAC controls.
Just out of curiosity, I priced new stepper motors. $140/each it appears. The on-line parts listings only list one - so perhaps they're all the same. I'm going to look on some VW parts lists and see what theirs look like. I actually don't think it's the stepper motor - more likely the fuzzy seal around the recirc flap got wet and may have swollen up a bit. Perhaps continued use will coax it into behaving better - or a bit of Teflon lube on the surface the fuzzy seal rubs on.
Don,
You may want to have one of these tools in your kit for dealing with those spring hose clamps:
I used this when upgrading my 987 air oil separator.
Rob
I've been meaning to get one of those. Wonder if Harbor Freight has one (guess I should go look eh?).. of course that might limit the use of the more colorful language I like to use when confronted with a bastard clamp. Hate to fall out of practice..
BTW - the flaps all started behaving except the right side center/dash-top one that is supposed to open if the face-facing vent is closed (only Porsche would make something this complex..) The bell-crank (remember drafting class? I do..) actually broke off the vent. I have no idea why. The vent moves easily by finger (after removing the center panel/clock-holder/speaker-grille/vents thing.) It's driven by a stepper motor of course (and there is one for the left side too.. so $280 of silliness here..)
I left it cracked open just a bit and buttoned it all back up. After spending hours with the factory manual (all 11,000 pages of it) and with AllData, and then parts websites I came to the conclusion that (1) this doesn't actually exist. There is no mention of it anywhere on any of these sources - there is mention of the stepper motors - but none of the vent assembly (2) it probably requires disassembling the entire car to get to the part. It appears they held those vents in space and then built a car around them (sort of like Volvo heater motors in the 140/240/DL series.)
So I'm leaving it cracked slightly open and ignoring it. No one will ever know.
Don,
I believe the spring hose clamp tool came from Amazon.
As a matter of note I have one Volvo 240 heater blower replacement under my belt.....the new motor was a larger diameter and the case had to be opened up.
Yesterday I traded in my 2014 Diesel on a '16 GTS. On the trip home it started leaking on my wifes feet. She is a car person and 'gets it", so she knew what the fix would be.
Today I brought it to the dealer and they pulled the drain and trimmed the front part about 1/2 across the diameter of the drain line. The tech said it is a design flaw on the drain and that by trimming the opening, it should prevent the line from ever clogging up again. I know it is a little off topic, but wanted to share.
Interesting - sounds like they're snipping off the little flapper valve.
Interesting - sounds like they're snipping off the little flapper valve.
That is exactly what they did. The tech said that it did not take much dirt to hit the wet tip and gum the tube up. So they snipped the tip and re installed. Much easier for them to do it than me.

 06-30-2017, 01:17 AM