When you click on links to various merchants on this site and make a purchase, this can result in this site earning a commission. Affiliate programs and affiliations include, but are not limited to, the eBay Partner Network.
Recently the sun shade/privacy screen on my rear passenger side door started to malfunction. The motor would still activate and the shade would come up about a third of the way, get stuck, and move up and down rapidly. As I started to research the issue I found that there are typically two common failures: 1) The gears inside the shade motor fail or 2)The motor itself fails. I would like to thank jayi836 from a different forum for posting about his experience as thats where I drew most of my information for my repair. I wanted to add a DIY here so it could be easily found and easy reference for future owners with this problem.
General Information:
-If you decide to replace the motor it is Porsche PN# 958536318013w4, you may need to specify side when you order. It can be found for $300-400.
-If you need gears they are available from Bross Auto Parts out of Turkey but can also be found on eBay/amazon.
-If you end up replacing the gears I would have some kind of a lubricant available to grease your new gears. I am not an expert but chose to use a silicone paste type lubricant, white lithium paste might be another option as well. Your call.
Steps:
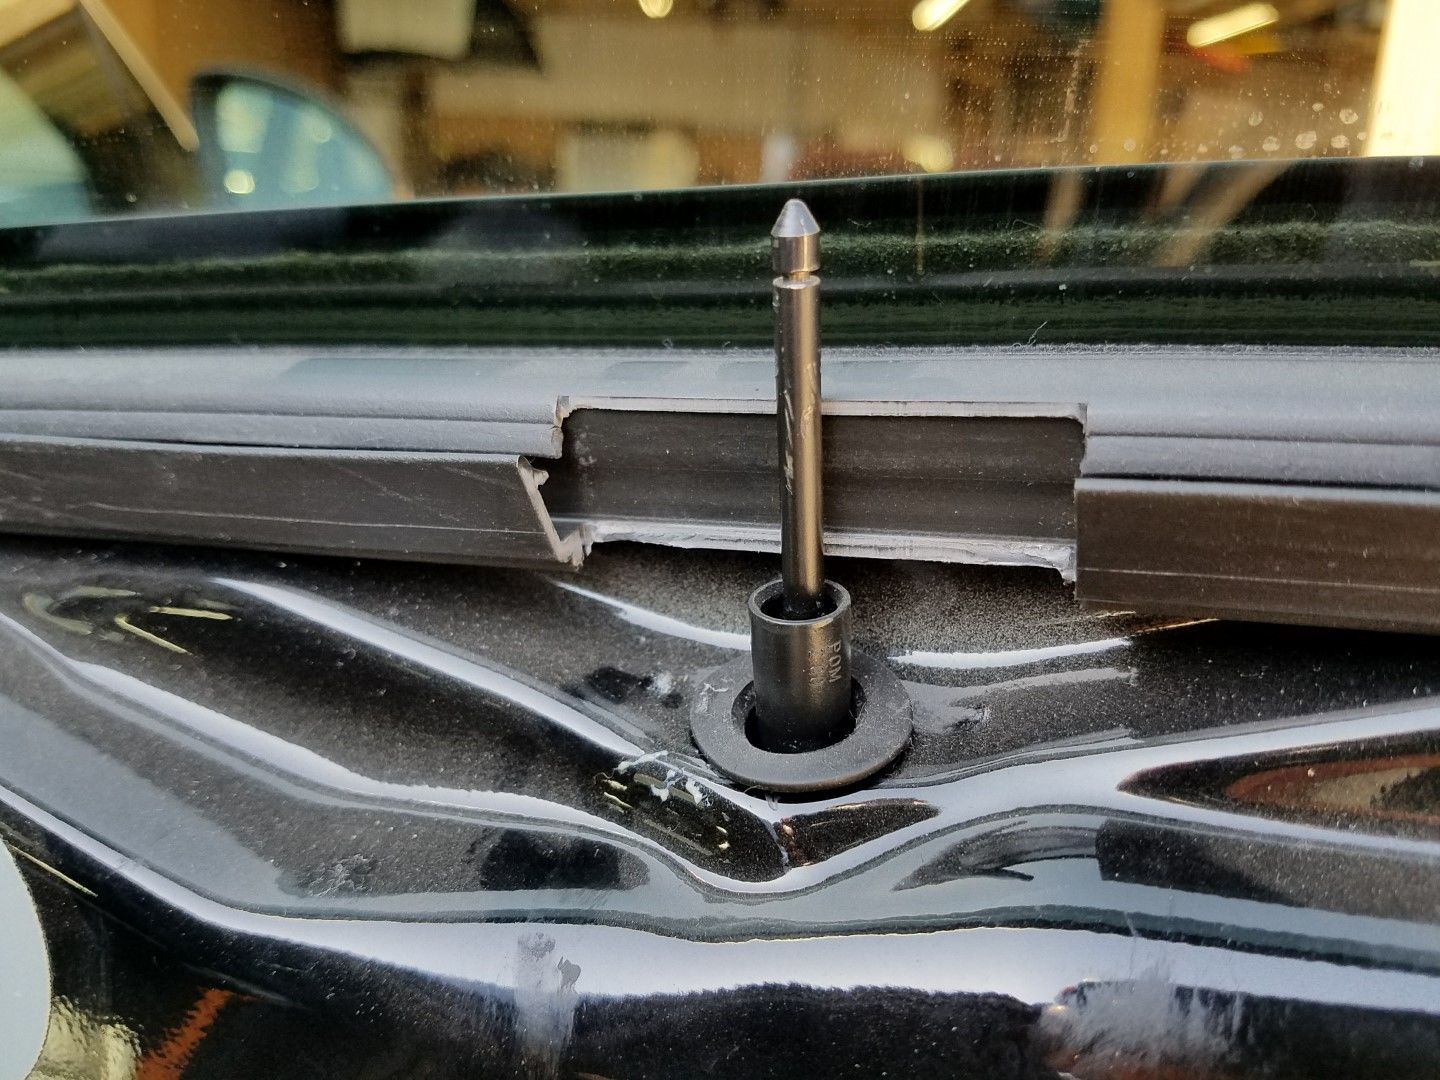
1) Remove the outer door panel. There are several good instructional videos on youtube. This process is very straightforward, just be gentle with your interior pieces so you don't break the plastic tabs or scratch your leather. You may want to have an assistant present when you actually remove the door panel to make it easier to unhook the wires and door latch cable. Having someone there to hold it up while I unhooked everything would have been nice. In addition you will need to unhook the fabric sunshade from the metal rod that moves it up and down. Just open up the flaps and expose the top of shade, in the middle you will see a small rubber piece that I removed with a small needle nose pliers (dont lose it). Once its out simply pull the shade up and it will slip off of the metal rod.
2) Now that you have removed the outer door panel you will see the exposed metal rod and the plastic tube it slides in at the top center of your door. I was able to remove both by simply pulling them upward and out of the door.
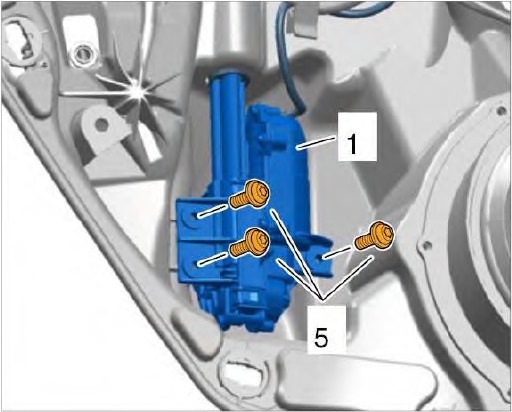
3) Now its time to remove the motor. It is located at the bottom of the door next to the speaker and can be seen in the picture/diagram below. Unhook the motor from the power source and remove the three bolts that hold it in place.
FRONT VIEW
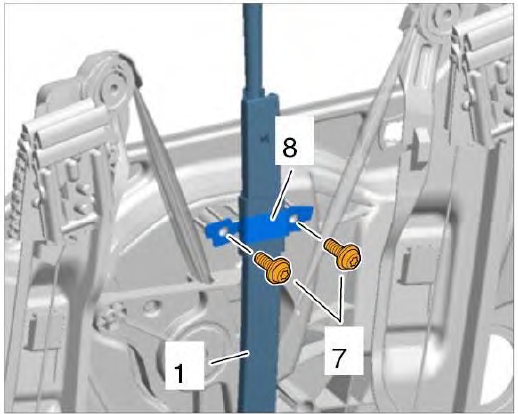
4) The rest of the motor assembly is behind the inner door panel and is held in place with two torx screws and retaining bracket. In order to access them I simply removed the speaker and loosened the white plastic retaining screws that run around the outside of the panel (see picture above). The diagram below shows how the motor assembly is mounted to the back of the panel:
REAR OF PANEL VIEW
5) Once you have the two screws/bracket you should be able to remove the motor by rotating and pulling downward.
6) If you are going to replace the entire motor assembly simply reinstall your new motor and go backwards from here.
7) The last step is to set the shade up limit: Close to retract it, then raise the shade. If it automatically closes, raise it again while keeping finger on switch, then hit the down switch to stop the travel when fully raised. That will set the upper limit. It took me a couple of tries to get it set properly.
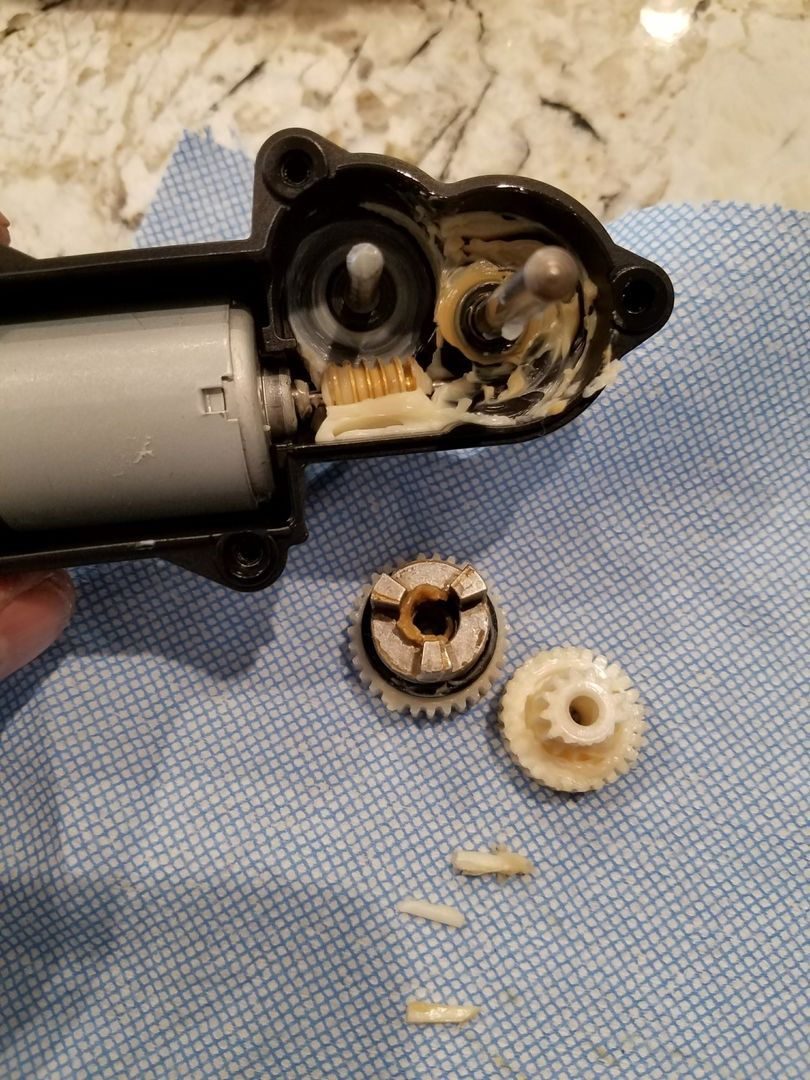
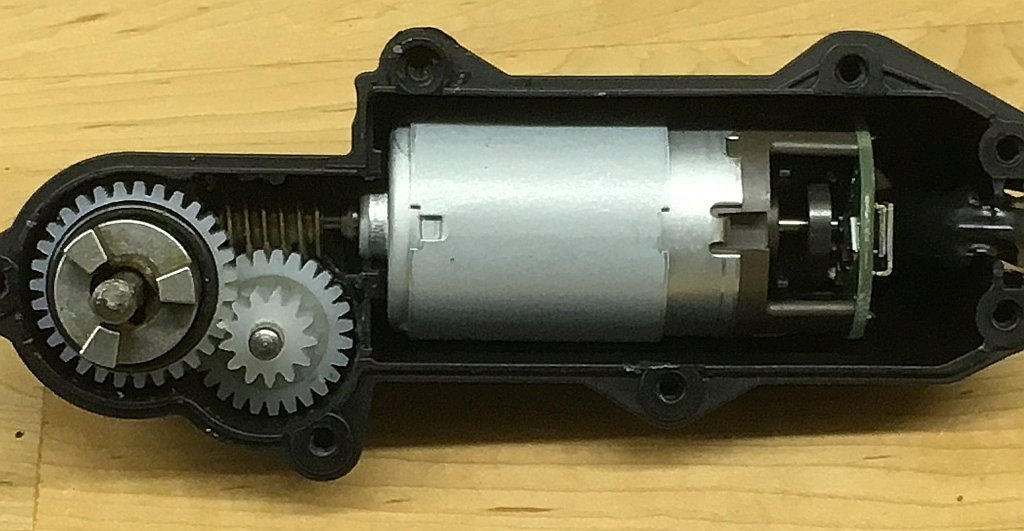
If you decide to try and repair the gears like I did you will need to open up the motor assembly. I removed the torx bolts and the assembly opened into three pieces.
The gears are right there and it will be apparent if they have failed:
I was in luck and hopeful this would save me from the expense of a new motor. I went ahead and ordered new gears and they arrived in roughly 5 days. The only tricky part of the install was removing/installing the plastic gear that mounts on the metal piece as seen above (not sure of the proper name for the metal piece). My old gear was cracked so it was easy to slide it off. I simply pressed the new one using padded jaws in a vice on as seen below:
I put the new gears in, lubricated them, and bolted the motor back together:
From here reassembly is just the reverse, please look at step 7 in the first post on how to adjust the upper travel limit.
- in Russian with English overlay. Fast to watch for short attention span people.
Overall the project took a couple of hours and shouldn't be that difficult if you take your time and are careful. There may be better ways to do this, just sharing my experience.
CarGuyNVA - we've already been discussing this. I'll be doing a tiny bit of formatting and editing - then over it goes to the DIY section. I want to thank KTR6 for his great contributions to the knowledgebase of the forum. It's posts like this that make this forum the valuable Cayenne owner's tool that it is.
My pleasure, I really cant take credit as most of the information was already out there and people were happy to share with me. I just wanted to put this together so its all in one easy reference able DIY place for people who need to fix this on their Cayenne in the future. A big thank you to deilenberger for the editing and maintaining of the DIY forum. I would encourage every rennlister to post anything they do to their Cayenne as Im certain it will benefit all of us at some point during our ownership.
I wanted to thank you guys for this post. I just fixed my sun shade with the two gear motor rebuild. I'm a novice and shocked that I got it to work!
jtakhtalian, on your sticky thread reply, https://rennlist.com/forums/cayenne-...ade-motor.html
my removal and reassembly was exactly as yours was and helped me get everything put back together correctly. I am shocked it worked! Now i can roll my windows up and down.
Key here is to use lots of lube. If not the gears will dry out and strip again. I had this problem with my garage door opener - the gears wore out and wore out in one week because I did not use proper lubricant. I think i used Aero multi-purpose lithium grease from amazon.
I remember when my wife's A8 rear shade got wrinkled...it was still under warranty, but expensive....$1,400. You couldn't just replace the rear screen/shade, because the shade and motor were one piece. That's one thing that concerns me about a pano roof.
hey i did everything except removing those two screws behind the inner door panel..even after removing the speaker i dont' have the reach to get there.. ****...
Thanks for this posting! I realize it was some time ago. I'm working on mine now and could not find anything helpful on the web. I can't get the rod to detatch from the top of the shade (I removed the small rubber wheel and the little axel it is on). Guess I just need to pull or keep working on it.
I have the gears already, so should be and easy fix with the help of this thread.
Yes. Just keep working at it. I had written about my experience in a previous thread that's now a sticky thanks to our moderator Don. In short, I had a very hard time removing that rod. It has a groove cut into either end that gets clipped in with a very tight tolerance. If I recall correctly, I was able to remove the door panel with the rod attached by pulling the panel upwards kind of hard. But putting the door panel back on was impossible with the rod still attached. In short, I eventually got desperate and took a vice grip to it. After attaching the vice grip very very tightly to the rod, I had a friend hold the door while I hit the pliers with a hammer swiftly. The first rod on passengers side came off with a single blow. The driver side rod took much more effort. I'm not sure how the dealer would have done it and I'm not sure I'd want to risk damaging anything again in the future if I had to get back in there but I really saw no other options at the time. I know others have have absolutely no issue removing the rods so go figure... mine is a 2013 GTS. Maybe they changed tolerances over time.
Great write up! As a soon to be Cayenne eHybrid with Premium Plus package this is something that may come up. Reminds me of the speedometer gears in my 964 and 993's.
I’ve completed all the steps up to loosening all the white
fastene on the inner door panel. Bottom is loose, but it’s binding at the top. I have removed rod and plastic tube. What am I missing. I just can’t get to the last two bolts on the shade motor assembly.

 01-30-2018, 11:59 PM