When you click on links to various merchants on this site and make a purchase, this can result in this site earning a commission. Affiliate programs and affiliations include, but are not limited to, the eBay Partner Network.
I originally followed the alldatadiy, service manual and this and this article but ended up doing it differently so I'll write it up. This is a quick and easy job, provided you have the right tools.
Parts needed:
- One M55.02 engine in need of new spark plugs
- Six spark plugs, 958-170-222-90, aka NGK ILZKR8A
Tools needed:
- 16 mm (or 5/8'') magnetic spark plug socket with a 8'' - 10'' extension. The plugs are recessed pretty deep on this car. A magnetic socket makes it pretty easy to deal with them.
-
- Tool to pull the connector from the coil pack. This might be in your trunk. It's easy to make from stiff wire or a coat hanger anyway.
- Ignition coil puller tool T10095A or tongue and groove pliers if you don't have the tool (there are reports of coils crumbling when using the pliers, not recommended any more)
- Torque wrench capable of 15 lbft
- Regular 3/8'' wrench to undo the spark plugs
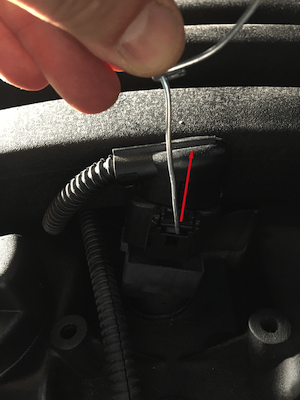
1. Remove the plastic piece at the front by pulling up where the red arrows are. This will give you easy access to the first coil.
2. Unclip and pull up the connector by pulling the tab with the wire tool. Gentle, 0.5 mm lift of the tab is enough.
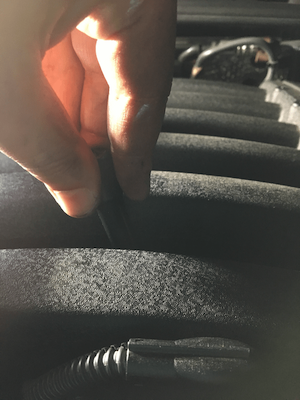
3. The coil packs are stuck pretty hard. Use the T10095A tool to pull them out. If using the pliers, try grab the coil by nipples the bottom of sides, not the top. It helps to wiggle the coil while pulling it. It'll pop out with a little effort. Inspect the coil for damage or cracks. If you see any, consider replacing the coil. As mentioned above, maybe not the best idea to use the pliers as some folks reported damaged coils.
4. Vacuum the hole to remove any debris. You don't want that stuff to fall into the cylinder when you remove the plug.
5. Use the regular wrench with the 16 mm magnetic socket to undo the spark plug. Note that the orientation of the plugs is about 5 degrees off centre, alternating between cylinders. Remember that for the next step.
6. The new plugs should come pre-gapped. The service manual says you shouldn't re-gap them as it might cause the electrode to break later. Check the new plug gap if you want, it should match the original. Insert the plug into the socket and drop it into the head, remember the orientation from step 5. Don't use the wrench yet. To avoid cross-threading, turn the extension in the counter-clockwise direction first. The plug should turn freely, clicking or popping up once per turn as the threads cross over. When you're sure the plug is seated properly, drive the plug all the way with your fingers only, no wrench. Once it won't turn any more, break out the torque wrench and apply 15 lbft of torque. The service manual says not to use any grease on the threads of the spark plug. If you're inclined to use some, pick a high temperature inert grease (ceramic or silicone ceramic) and apply a very small amount (0.5 mm thick or less). Make sure none of it is makes it into the cylinder.
7. Put the coil back on but make sure the orientation is correct for the clip on the connector. A little bit of pushing is needed to fully insert the the coil, make sure it's all the way down. Clip on the connector. You can use a bit of dielectric grease at the base of the coil pack and at the connector, if you want, nothing against that in the service manual. You shouldn't be able to pull up the connector or the coil at this point. Repeat the process for the rest of the plugs. You'll be glad for the magnetic socket with the extension and the wire tool for the back plugs, they're recessed more than the fronts.
Last edited by dbv1; 12-07-2019 at 06:11 PM.
Reason: removed pliers recommendation, more info
Thanks for the write up! Just performed this diy and would say the Ignition coil puller tool T10095A is essential for this. You can find one on amazon for under $25. Tried to get by without it by using pliers but the suction that keeps these boys down is too much that the ignition coil plastic will break.
i used this tutorial to replace the ignition coils and the spark plugs. Used Bremi coils at about $21 each from RM European. These are from Germany and seem to be well constructed.
thanks again!
Originally Posted by dbv1
I originally followed the alldatadiy, service manual and this and this article but ended up doing it differently so I'll write it up. This is a quick and easy job, provided you have the right tools.
Parts needed:
- One M55.02 engine in need of new spark plugs
- Six spark plugs, 958-170-222-90, aka NGK ILZKR8A
Tools needed:
- 16 mm (or 5/8'') magnetic spark plug socket with a 8'' - 10'' extension. The plugs are recessed pretty deep on this car. A magnetic socket makes it pretty easy to deal with them.
-
- Tool to pull the connector from the coil pack. This might be in your trunk. It's easy to make from stiff wire or a coat hanger anyway.
- Ignition coil puller tool T10095A or tongue and groove pliers if you don't have the tool
- Torque wrench capable of 15 lbft
- Regular 3/8'' wrench to undo the spark plugs
1. Remove the plastic piece at the front by pulling up where the red arrows are. This will give you easy access to the first coil.
2. Unclip and pull up the connector by pulling the tab with the wire tool. Gentle, 0.5 mm lift of the tab is enough.
3. The coil packs are stuck pretty hard. Use the T10095A tool or the pliers to pull them out. If using the pliers, try grab the coil by nipples the bottom of sides, not the top. It helps to wiggle the coil while pulling it. It'll pop out with a little effort. Inspect the coil for damage or cracks. If you see any, consider replacing the coil.
4. Vacuum the hole to remove any debris. You don't want that stuff to fall into the cylinder when you remove the plug.
5. Use the regular wrench with the 16 mm magnetic socket to undo the spark plug. Note that the orientation of the plugs is about 5 degrees off centre, alternating between cylinders. Remember that for the next step.
6. The new plugs should come pre-gapped. The service manual says you shouldn't re-gap them as it might cause the electrode to break later. Check the new plug gap if you want, it should match the original. Insert the plug into the socket and drop it into the head, remember the orientation from step 5. Don't use the wrench yet. To avoid cross-threading, turn the extension in the counter-clockwise direction first. The plug should turn freely, clicking or popping up once per turn as the threads cross over. When you're sure the plug is seated properly, drive the plug all the way with your fingers only, no wrench. Once it won't turn any more, break out the torque wrench and apply 15 lbft of torque. The service manual says not to use any grease on the threads of the spark plug. If you're inclined to use some, pick a high temperature inert grease (ceramic or silicone ceramic) and apply a very small amount (0.5 mm thick or less). Make sure none of it is makes it into the cylinder.
7. Put the coil back on but make sure the orientation is correct for the clip on the connector. A little bit of pushing is needed to fully insert the the coil, make sure it's all the way down. Clip on the connector. You can use a bit of dielectric grease at the base of the coil pack and at the connector, if you want, nothing against that in the service manual. You shouldn't be able to pull up the connector or the coil at this point. Repeat the process for the rest of the plugs. You'll be glad for the magnetic socket with the extension and the wire tool for the back plugs, they're recessed more than the fronts.
Here is a handy tip. The easiest way to remove coil packs is to make a loop with some wire with some length after the loop. Sorry- I don�t have a photo, but this is easy to fashion.
After removing the wiring connector to the coil pack, slip the wire loop you made around the top of the coil pack and wiggle it until it gets around to the base. Once it�s more on the circular base, and below the square top, use the excess wire length to pull the coil pack straight up. This will prevent stress on the coil pack laterally and is super easy to quickly wiggle into place and pull out.
Removing Coil packs using pliers can cause cracks and damage it.
T10095A tool is definitely the best way to pull a coil and it’s not too expensive. I didn’t actually have the tool when I did mine (I do now) so I used those pliers and didn’t damage anything. That said, I’ve seen crumbling coils on other cars and I can see how those could be damaged using the pliers.
I updated the DIY to warn that the pliers shouldn't be used.

 07-01-2019, 07:52 PM