When you click on links to various merchants on this site and make a purchase, this can result in this site earning a commission. Affiliate programs and affiliations include, but are not limited to, the eBay Partner Network.
Just to clarify, which coolant pipe typically comes loose? Referring to the bottom photo in post #32 of this thread, I count 3 coolant pipes from left to right. Is one of them more prone to failure?
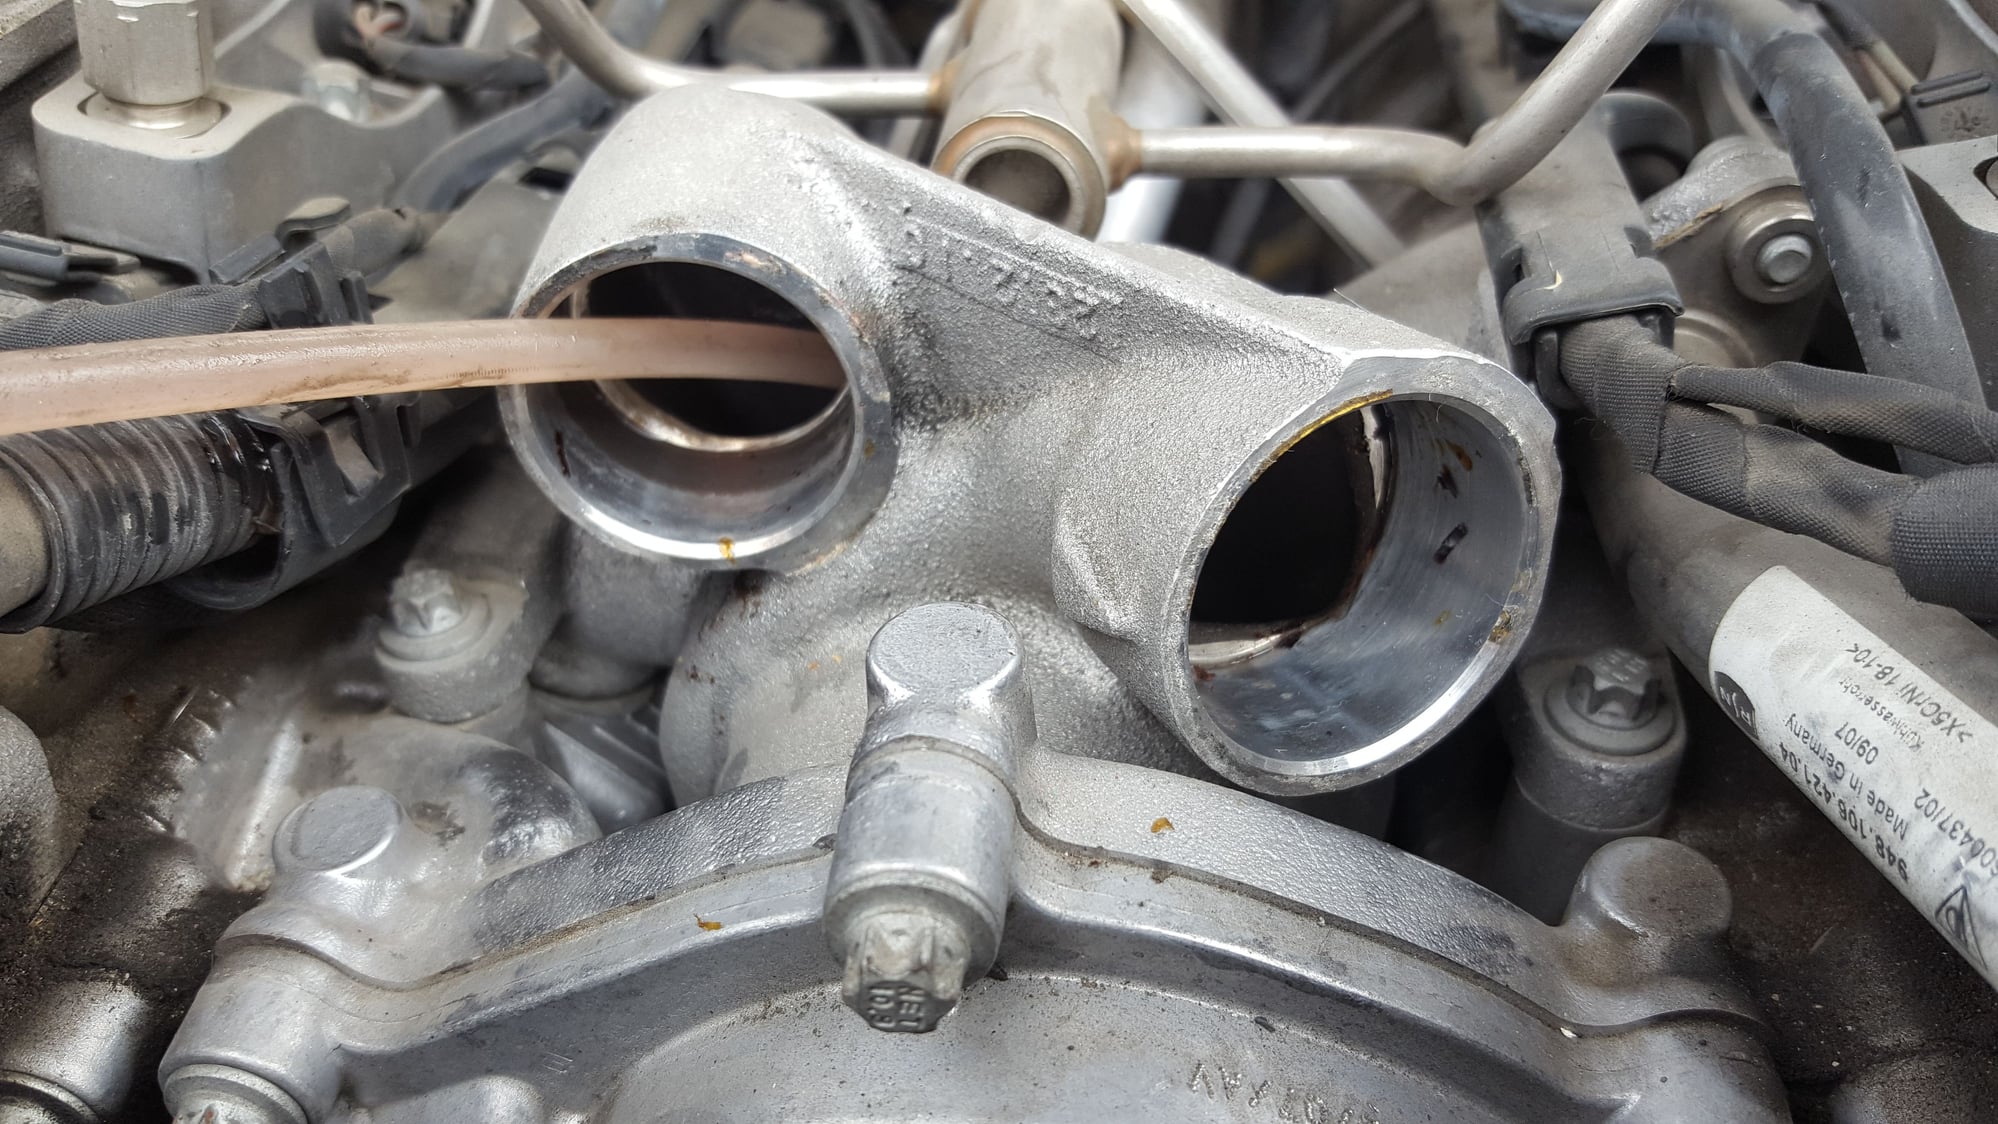
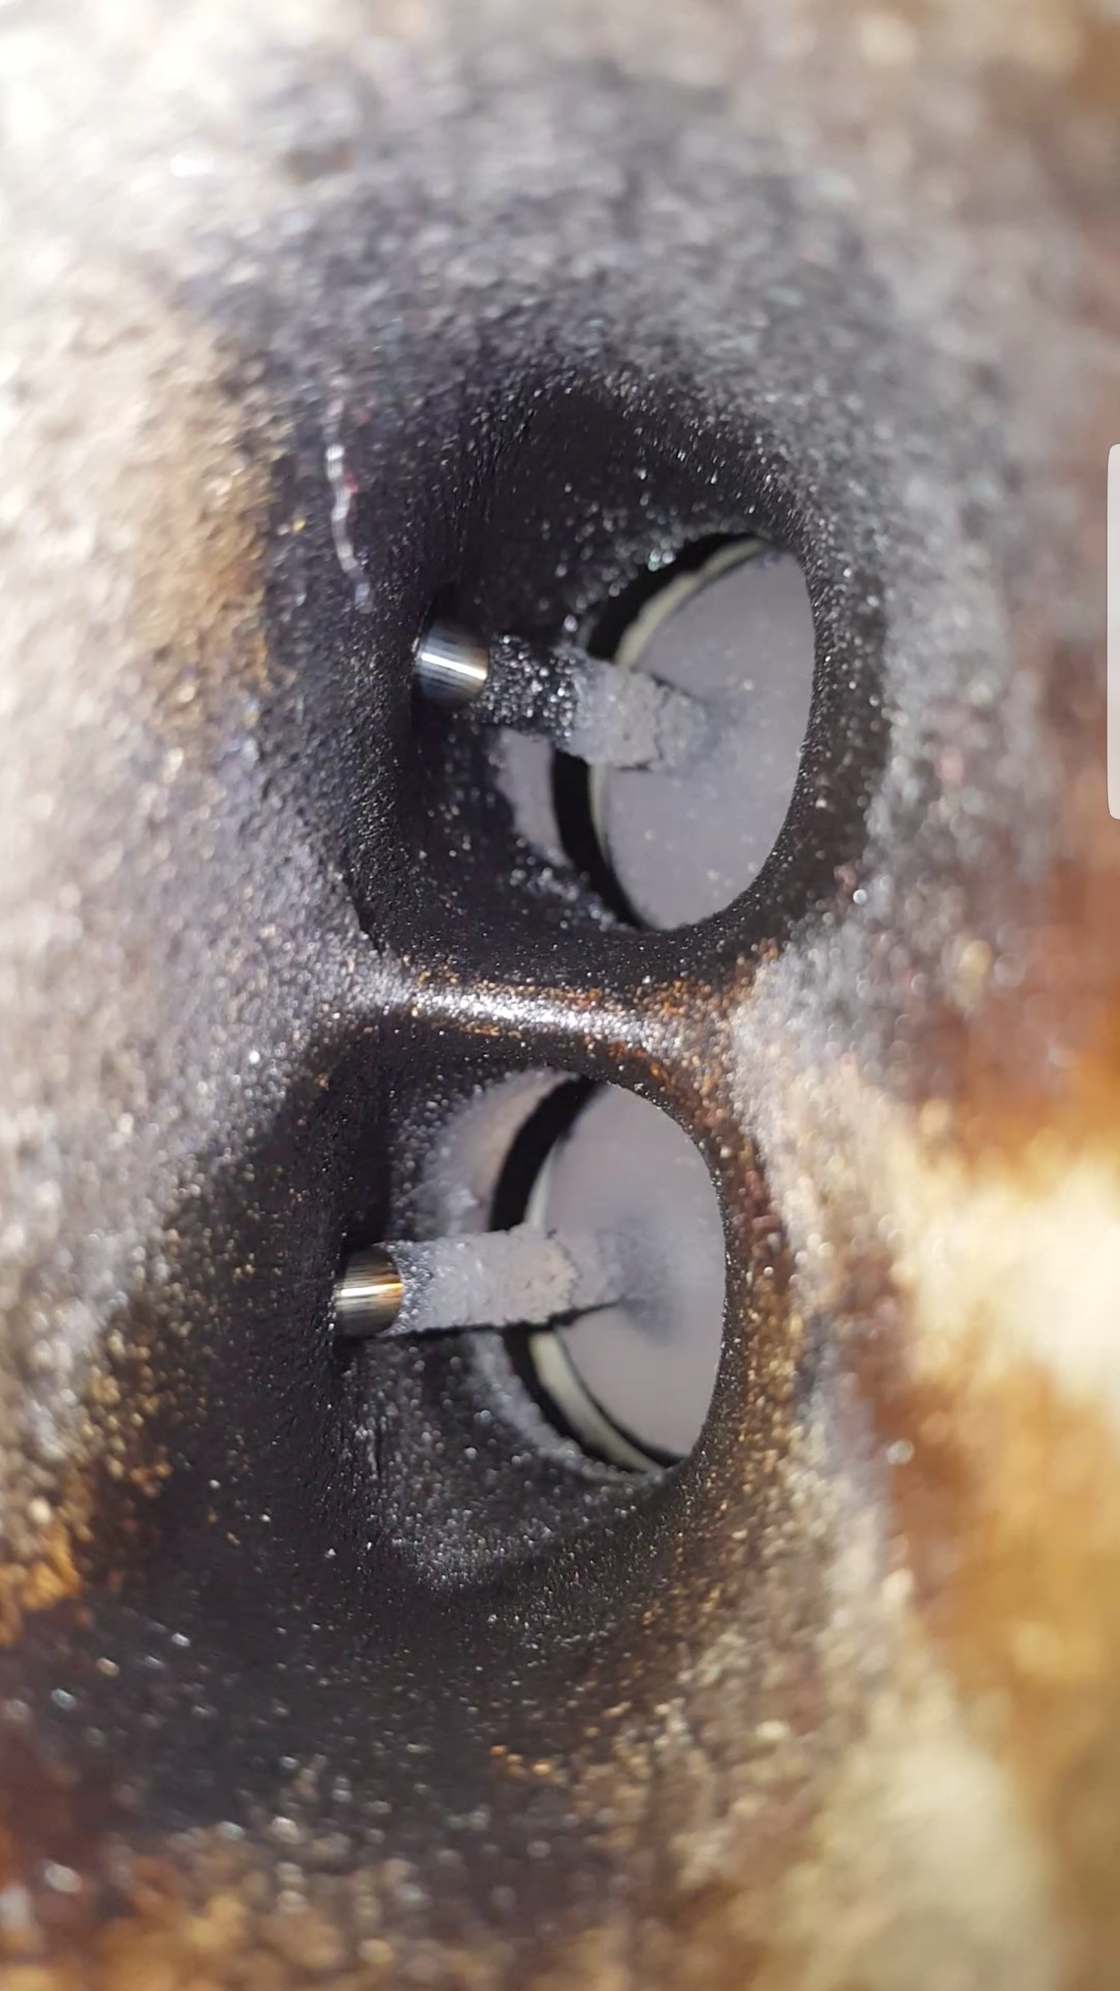
Here's a picture of my 957 when I got the manifold off
Did you have failure on 957 or 958 ... I don't think that this is an issue on 958...
Mine is the 957
I'm not up to date on all the differences between the 955/957/958 ..... the thermostat issue seems to be 957/958 and I guess the driveshaft support seems to be the 955/957...
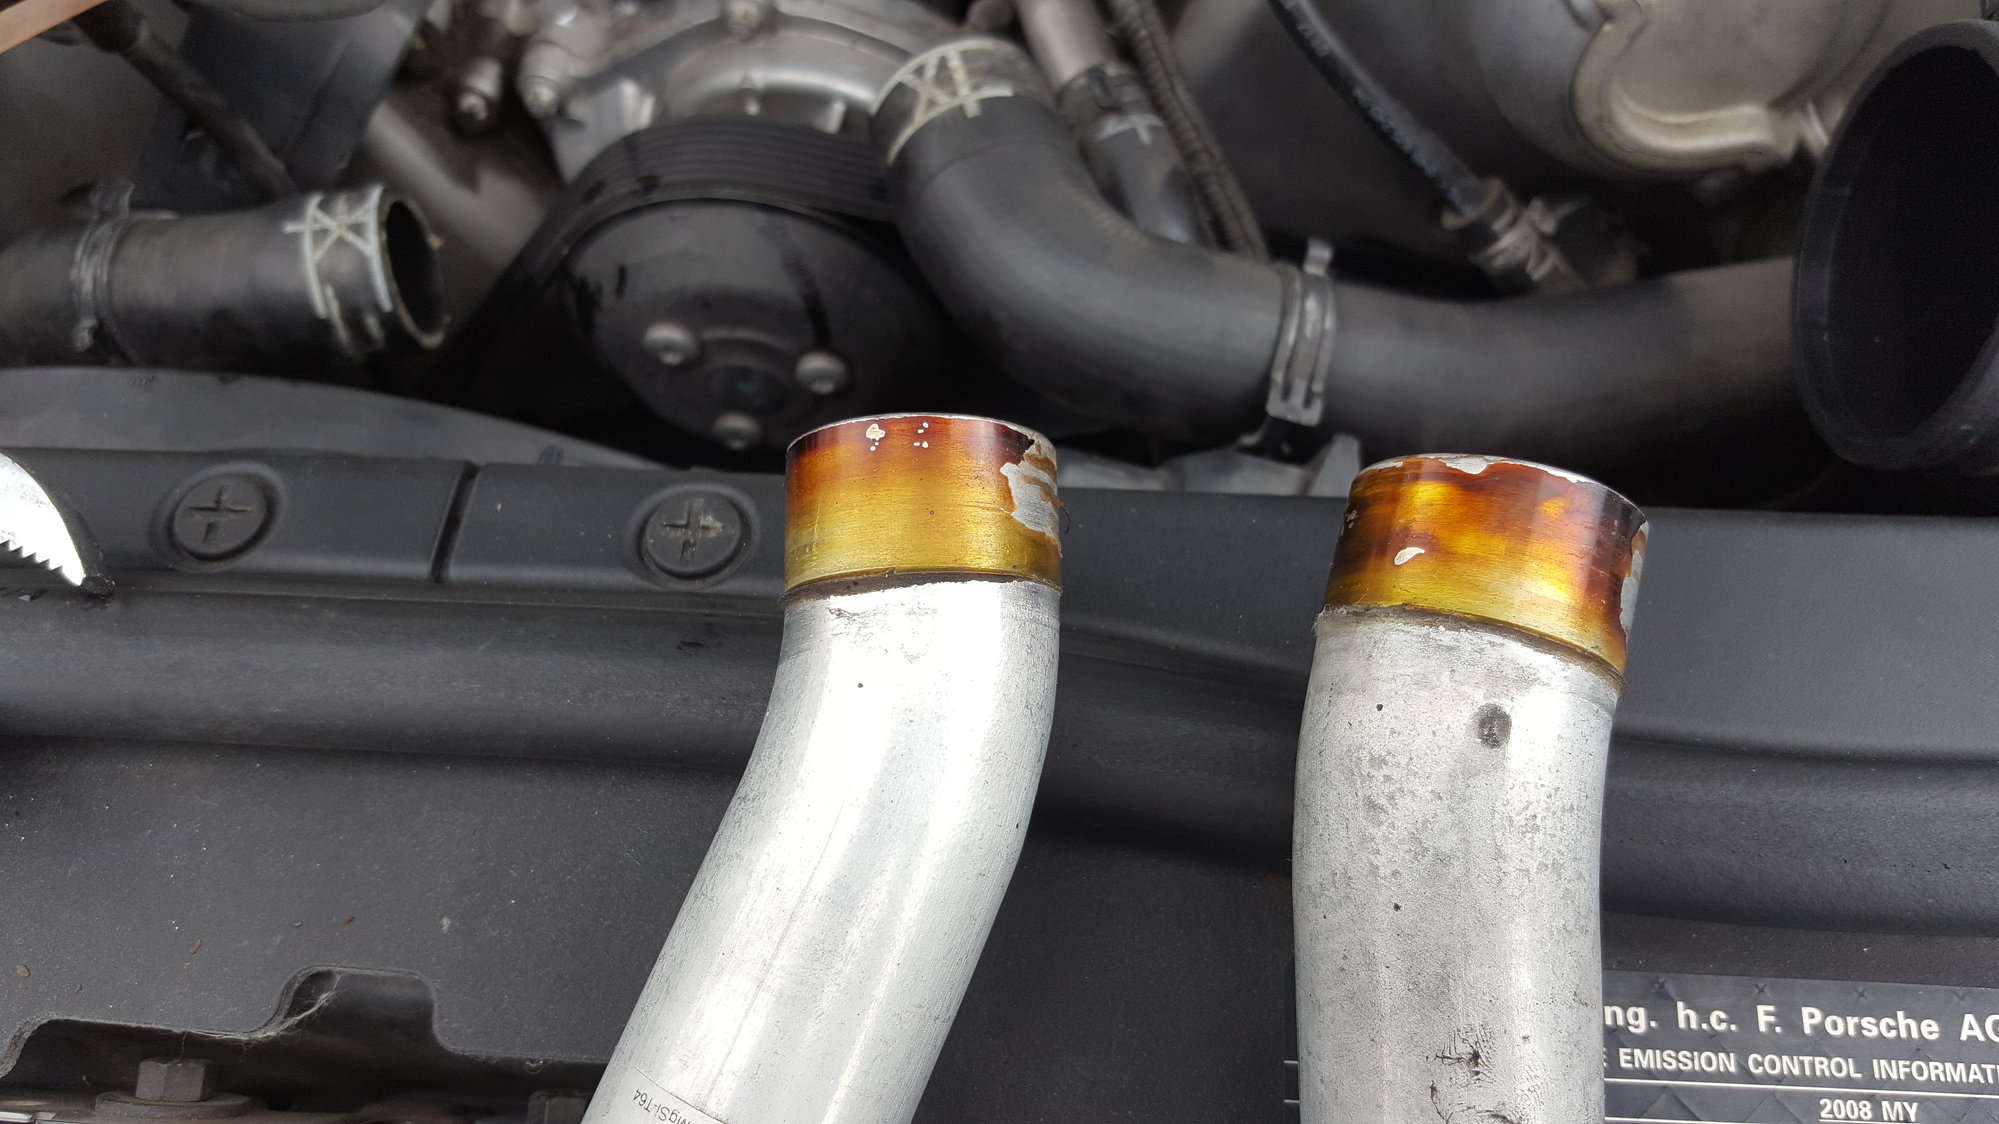
My coolant pipe fix seems to be working. My observation was the housing surface was too smooth of a finish for the glue to adhere, it was really stuck to the pipes.
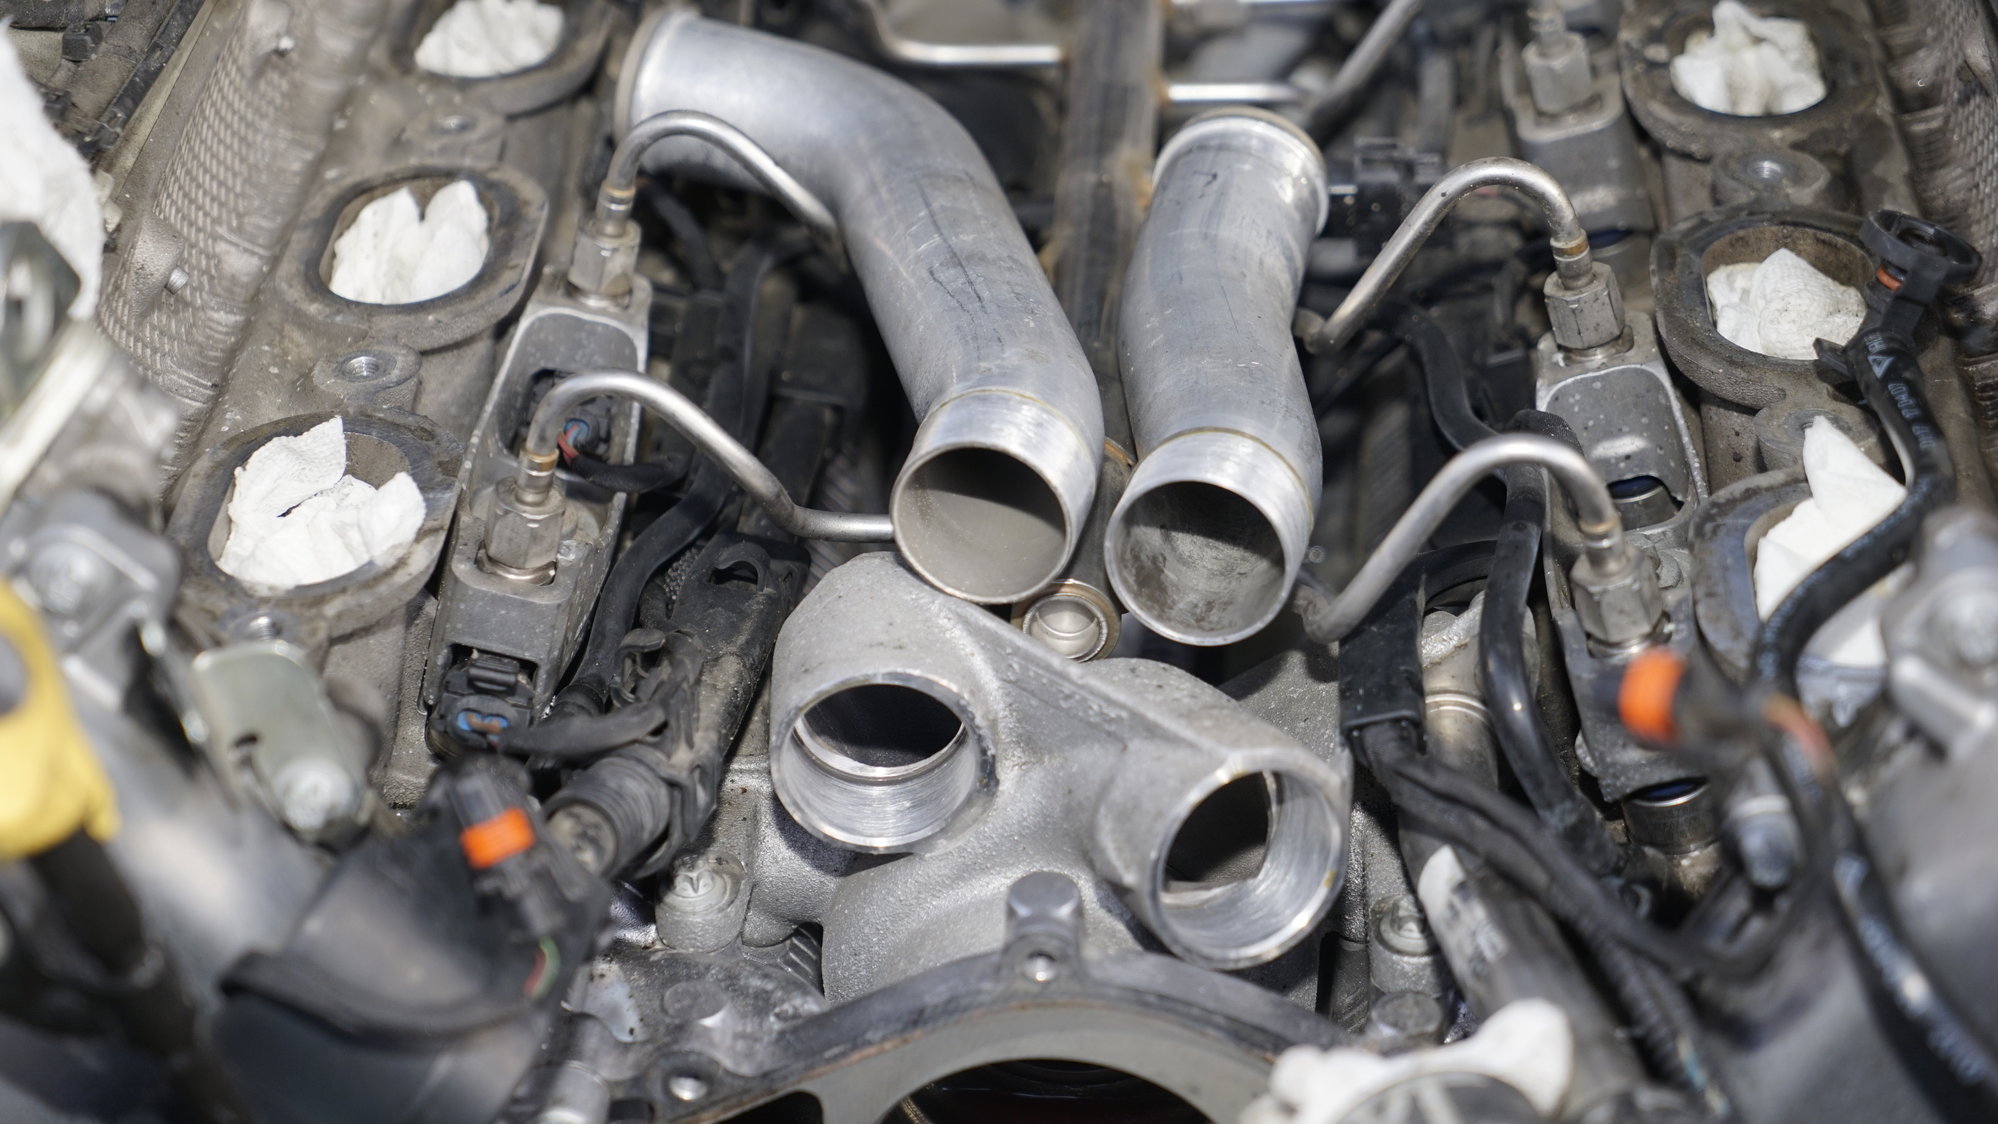
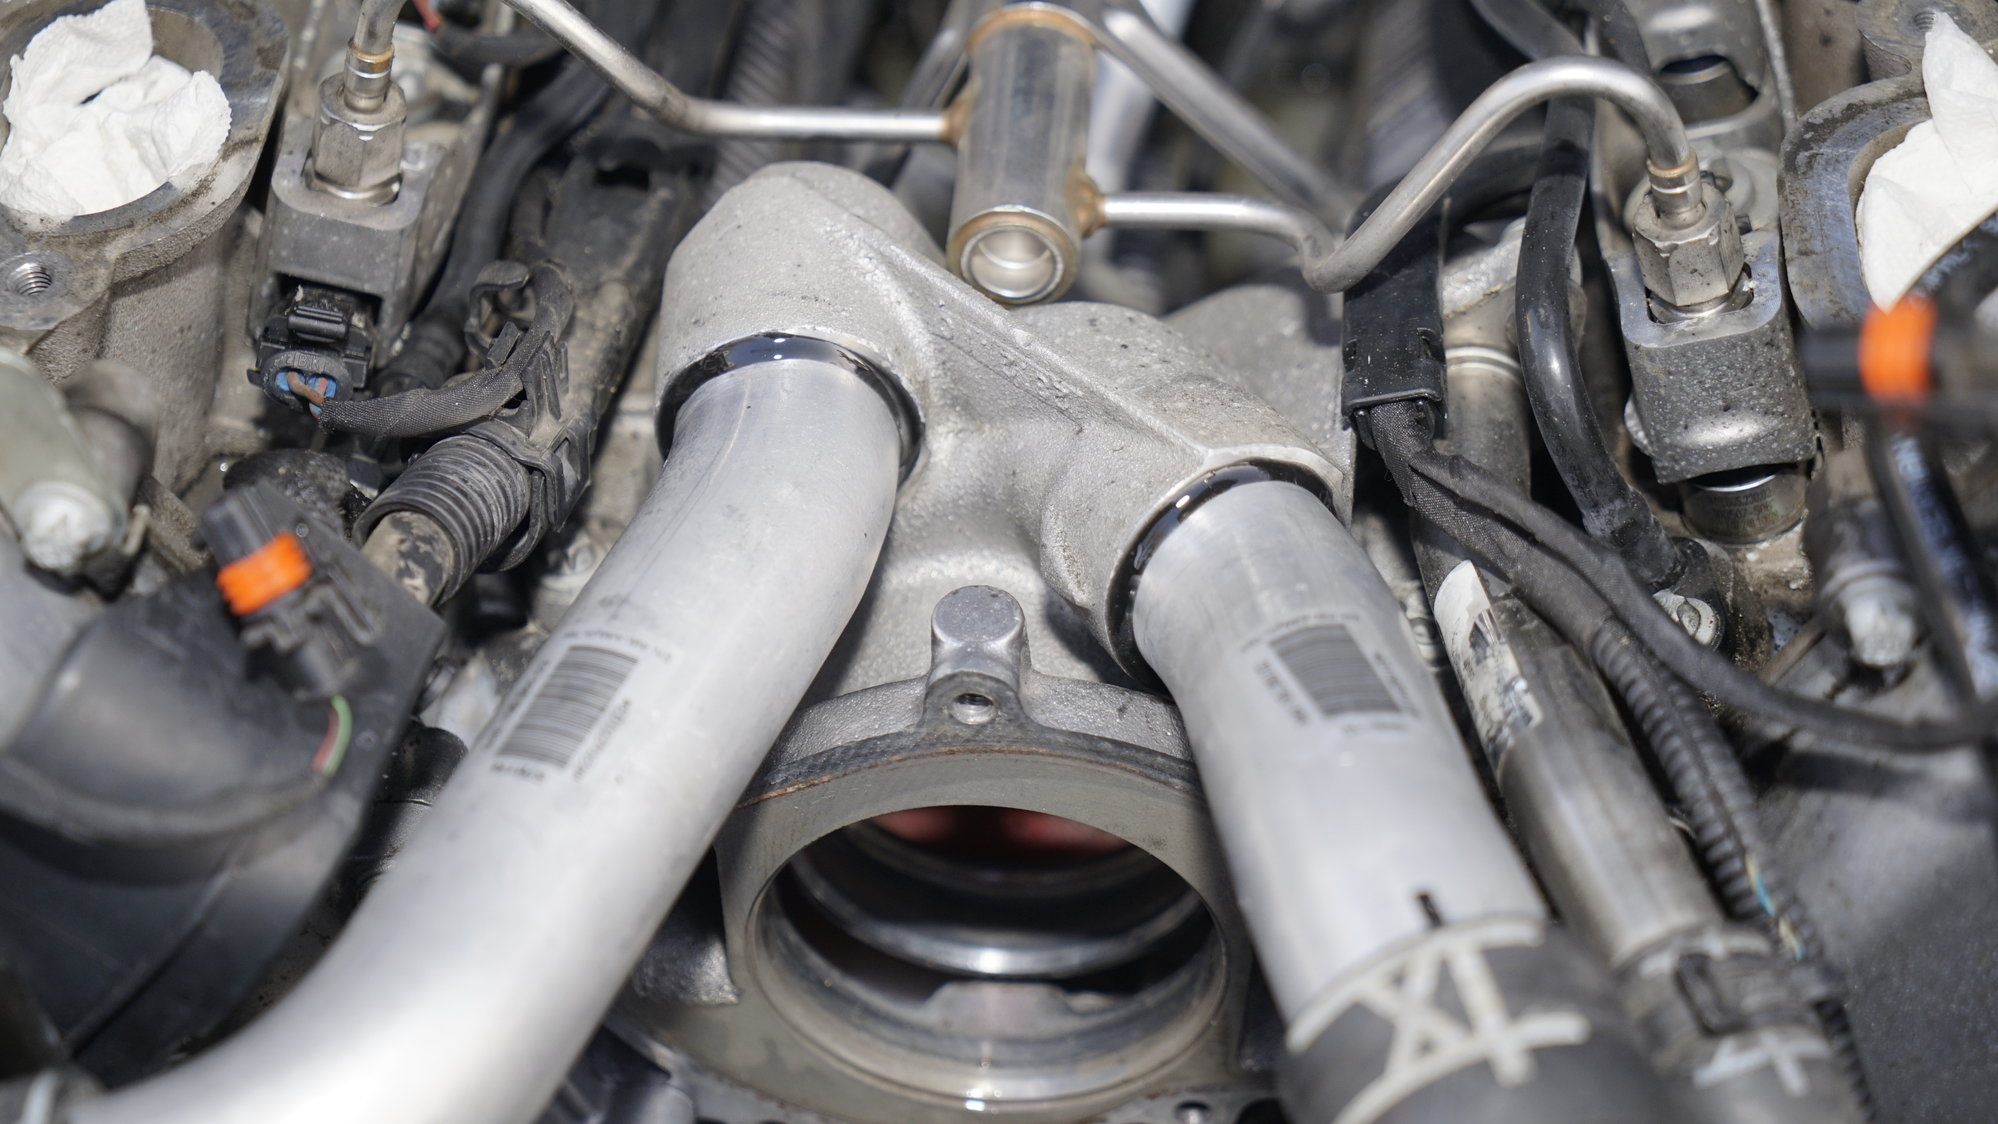
I took off the Y intake and the throttle body. This was a real chore compared to my old '06 4.5 S.. LOTS more of the wacky connectors everything is made with now to try to disconnect (one foiled me.. couldn't get it off.) There is a valve/input sort of thing that goes into the bottom of the Y intake piece - that refused to release from the Y, and the hose going to it (which went up to the right and another valve and some of the crankcase vent plumbing) also refused to release. So best I could do was move the Y forward enough to get the throttle body off.
Throttle body wasn't awful - but for anyone doing this - put grease on those special screws that hold it on before screwing them back in. These are coarse thread plastic self-tap screws.. they will tend to bind going back in dry. They go back in easily greased. Got to clean the throttle body (wasn't awful - some buildup but not bad for 85,000 miles.) And look at where the pipes go into the thermostat housing. There was no sign at all of any leaking at the pipe junction. One (the drivers side one, right facing the engine) had a bead of the epoxy used to hold it in about 1/8" around the junction. Almost looked like it was creeping out - but I tried wiggling it - and no wiggle - plus no sign of leaking. The left side (facing the engine) one didn't have the epoxy showing - and it also had no sign of leaking. There was basically no way to get to them to really clean them and JBWeld them without removing the intake manifold completely - and that was beyond the scope of today's project. So it all went back together.
Took lots of videos and pictures, might do a writeup on how to do this afterwards
Few questions
1.) Took a look inside the intake chamber and do not see the U shaped connector spring, considering it's shape I doubt it made it past the closed valves so probably went flying somewhere else. Thoughts?
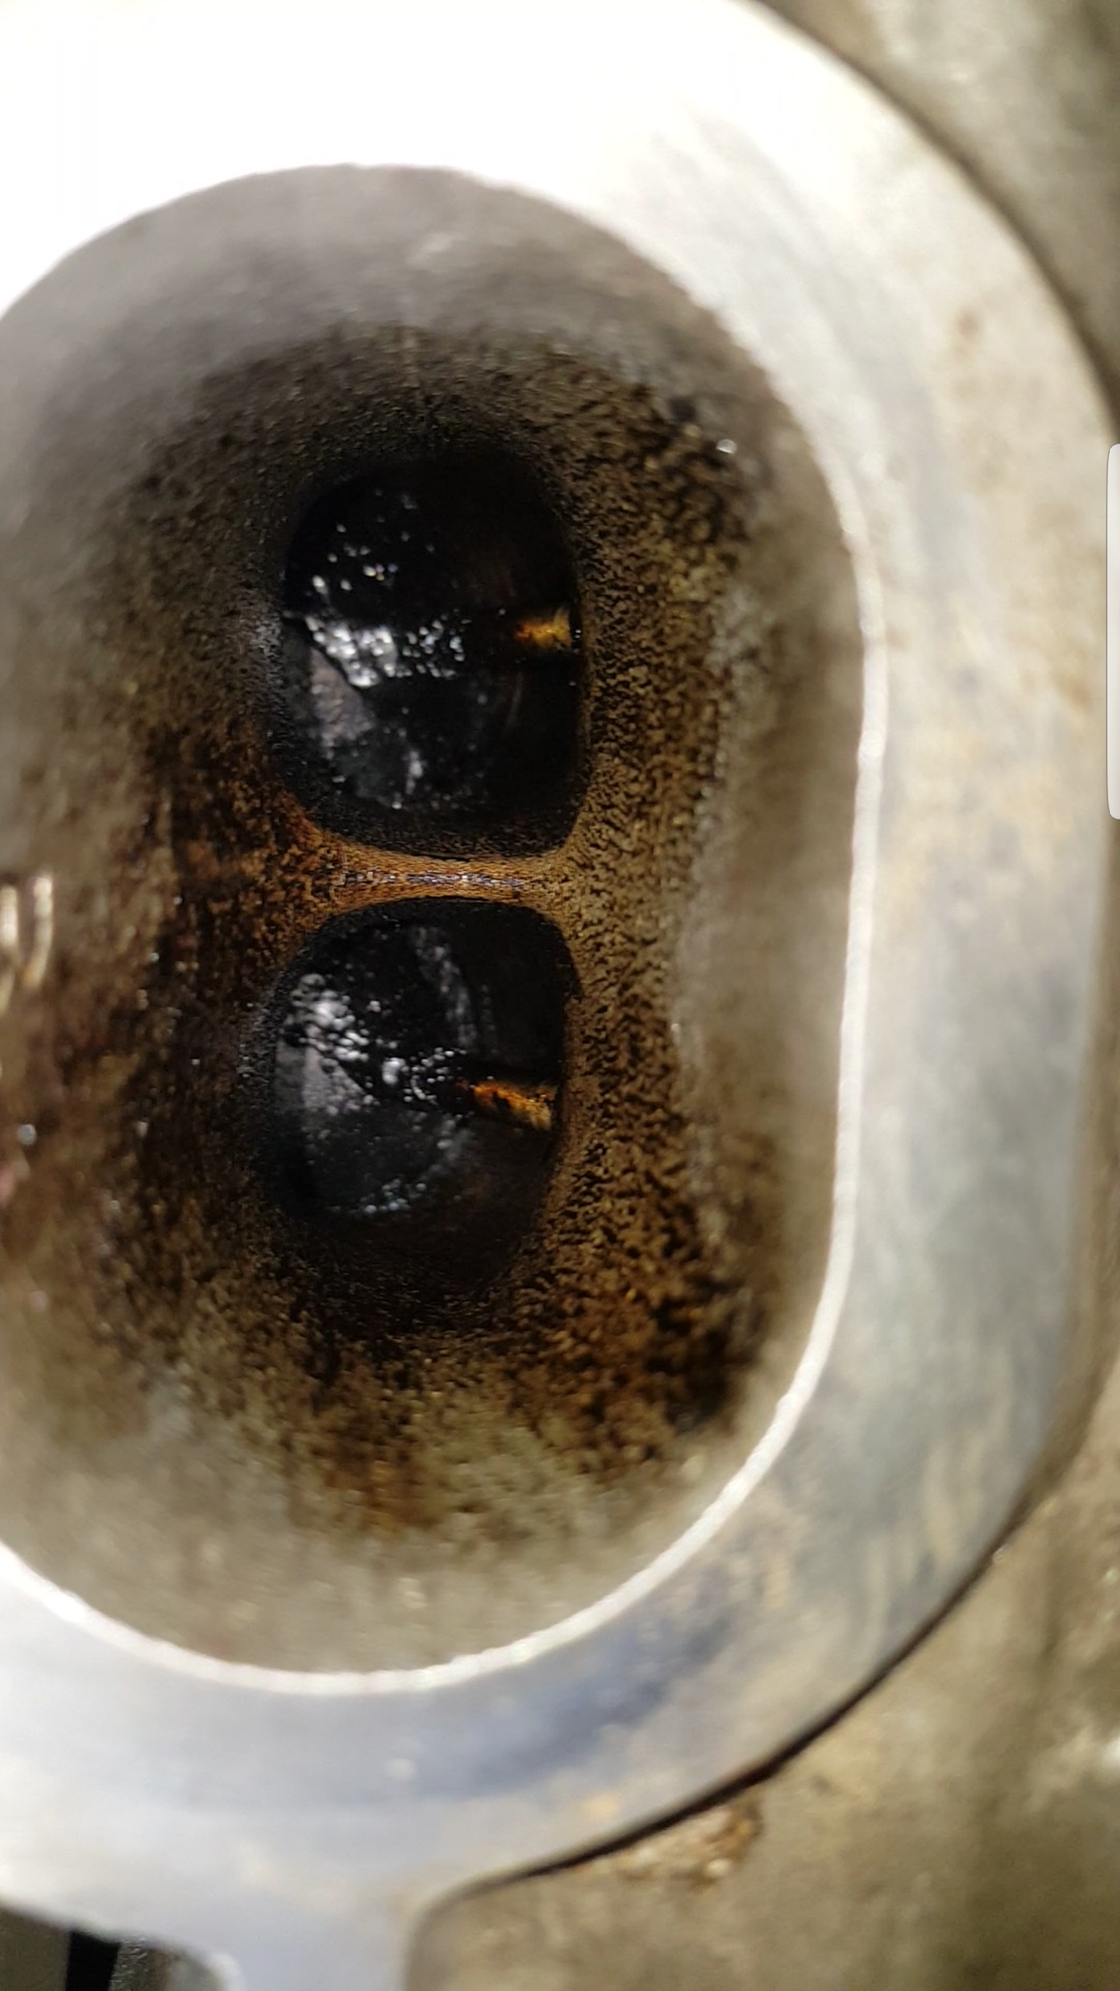
2.) Look at this gunk in my intake chambers, is this what they call carbon build up? Should I be concerned?
3.) When taking off the fuel rail I originally tried to pull the rail with the injectors so I wouldn't have to disconnect the fuel lines to each, almost had it but couldn't get it off that way so I removed the fuel rail the normal way. Any special way to seat the fuel injectors or just pop them back in place?
4.) Is this the other coolant pipe circled in red that comes loose due to the glue that is in the rear of the engine?
Numbered questions with photos.. you really know how to attract me..
1. I rather doubt it made it past the valves. They aren't open far enough for the clip to make it through. No guarantee - but if you have a proctoscope or mechanics scope - you could always look through the spark plug hole and make sure.
2. Yeah - that's it. How to remove it? The best way is walnut blasting - which requires a special machine to do it - it uses ground up walnut shells as the abrasive. BMW did a lot of that back in the 1980's before fuel was very good. Some people do simply scrape at it. I'd be hesitant to do it that way since I don't think it's a good idea to scratch the valve. If you do scrape - use something like a hard plastic probe. Some people also soak the deposits with something like Techron - and then go at them with a scraper.
In all cases - you have to do one cylinder at a time, rotating the engine so the valves are closed to keep the crap out of the cylinder. Then use a vacuum to get the big chunks out and an air-gun to get the rest (making sure all the intake ports are covered..)
3. I believe there is a seal on the injectors that is replaced when they are R&R'd. Just looked at AllData. New injectors are supplied with a protective sleeve over the injecting end. The sleeve not only protects the injector, it also keeps the teflon seal on the injector shaft compressed so it will go into the hole in the head. They make note of only removing the protective sleeve when you're just about to install the injector - apparently the seal expands to seal up the hole it goes in. I think this might be an issues.. maybe a dealer has one of the protective sleeves kicking around from a new injector they installed? If so - you probably can use it to re-compress the seal so it will go into the hole in the head.
From AllData (I assume you have a subscription to AllDataDIY.com right? If not - you should..):
--Teflon sealing rings must always be replaced after removal and before refitting injectors.
--Do not replace Teflon sealing rings until just before fitting the injector.
--Install injector immediately after replacing the Teflon sealing ring.
The instructions then show how to remove the old seal, and how to use a special tool to install the new seal. They make note of not using anything containing silicone near the intake since it WILL damage the O2 sensors. If you didn't actually remove the injectors from the head - the seal may work fine, and you might be able to just reseat them where they belong. You do need a seal against combustion pressures - which are probably thousands of PSI..
4. I don't believe it is. IIRC - the pipe in question is on the crossover coolant bridge - on the other side of the engine. And it's a PITA to get at. Porsche calls for engine R&R to do it - but people have done it with the engine in by removing the high-pressure fuel pump..
For the epoxy to work, I find it necessary to rough up the inside of the housing with sand paper. Without doing that I expect the epoxy will not bond to housing and pipes will come loose quickly.
I reach in and put some pressure on my pipes to see that they haven't come loose, so far all is good and my fix seems to be working....however, I only have about 600 miles on the repair. This weekend, I expect to put about 1000 miles on it.
Just a note, everyone with the 955/957 should check their center driveshaft support.... mine just failed last week
Yeah I think applying to the inside may be the key, I only applied the the external pipe. oh well $300 for the improved housing is worth the investment.
Originally Posted by deilenberger
I would be looking with mechanic's scope.. You should be able to see the valves if you take a look in. Hopefully they're closed and nothing is in the intake port. If they are open - chances are - that clip wouldn't make it through anyway. Thing is - I'm not certain it's magnetic.. there are enough of them in the area so you could test if it is. If it is - the answer is simple - magnetic probe and get it out of there. If it isn't - you need a grabber sort of device to retrieve it.
Chances are - it probably jumped off somewhere and is now buried in the bowels of the engine compartment (you may find it next time you change the oil.. laying in the belly pan..) but - I'd want to check the intake ports on that side and make sure that it didn't jump into one. Might as well check them all since it's apart.
Question on the JBWeld - how did you use it? Curious since today's job is to reinforce mine with a bead of the JBWeld hi-temp putty epoxy, pressed into the junction of the pipe and housing. Mine haven't popped out - yet..
BTW - for anyone contemplating this - that sort of clip is a common Bosch one - and to release the connector you press the clip toward the connector, it's not removed from the connector. Pushing it toward the connector pushes it out of the slots in the other half of the connector that hold it in. If you lose one - they are available - probably even in an auto-parts place like NAPA..
Thanks for your help. I only applied to the external pipe because I was nervous about getting epoxy floating around inside the sealed coolant system. which could lead to hot spots.
Originally Posted by ndx
As Don said I would check all the intake holes for the clip and see if valves are open ...
I pinned my front pipes with stainless screws and red loctite .. while I had intake out to do the glued pipe at the back that came out ( for that I threaded the hole and had new part machined )
I will be re doing thermostat this week so I will check how they are holding up.
GlenC I know that this is off topic but could please share part number that you are talking about.
Thank you
Thank you! can you provide more information where I could locate the coolant pipe that leaks in the rear of the engine. Want to see if I could address this as well while I have everything apart.
Originally Posted by deilenberger
Numbered questions with photos.. you really know how to attract me..
1. I rather doubt it made it past the valves. They aren't open far enough for the clip to make it through. No guarantee - but if you have a proctoscope or mechanics scope - you could always look through the spark plug hole and make sure.
2. Yeah - that's it. How to remove it? The best way is walnut blasting - which requires a special machine to do it - it uses ground up walnut shells as the abrasive. BMW did a lot of that back in the 1980's before fuel was very good. Some people do simply scrape at it. I'd be hesitant to do it that way since I don't think it's a good idea to scratch the valve. If you do scrape - use something like a hard plastic probe. Some people also soak the deposits with something like Techron - and then go at them with a scraper.
In all cases - you have to do one cylinder at a time, rotating the engine so the valves are closed to keep the crap out of the cylinder. Then use a vacuum to get the big chunks out and an air-gun to get the rest (making sure all the intake ports are covered..)
3. I believe there is a seal on the injectors that is replaced when they are R&R'd. Just looked at AllData. New injectors are supplied with a protective sleeve over the injecting end. The sleeve not only protects the injector, it also keeps the teflon seal on the injector shaft compressed so it will go into the hole in the head. They make note of only removing the protective sleeve when you're just about to install the injector - apparently the seal expands to seal up the hole it goes in. I think this might be an issues.. maybe a dealer has one of the protective sleeves kicking around from a new injector they installed? If so - you probably can use it to re-compress the seal so it will go into the hole in the head.
From AllData (I assume you have a subscription to AllDataDIY.com right? If not - you should..):
--Teflon sealing rings must always be replaced after removal and before refitting injectors.
--Do not replace Teflon sealing rings until just before fitting the injector.
--Install injector immediately after replacing the Teflon sealing ring.
The instructions then show how to remove the old seal, and how to use a special tool to install the new seal. They make note of not using anything containing silicone near the intake since it WILL damage the O2 sensors. If you didn't actually remove the injectors from the head - the seal may work fine, and you might be able to just reseat them where they belong. You do need a seal against combustion pressures - which are probably thousands of PSI..
4. I don't believe it is. IIRC - the pipe in question is on the crossover coolant bridge - on the other side of the engine. And it's a PITA to get at. Porsche calls for engine R&R to do it - but people have done it with the engine in by removing the high-pressure fuel pump..
Thanks for your help. After doing some more research I ordered new teflon o rings for the bottom of the injector and regular rubber o rings for the top, will pull all the injectors and replace as I dont want to take any chances. I dont see anything about a special process for install. Just pull clean, replace o rings and install.
Thanks again everyone, sorry for the late replies, my weekdays are pretty hectic so the only time I really get to work on her is the weekend. Plan is to have her back on the road this weekend...hopefully lol Also I ordered some of that special thermostat grease from SunCoast, is this just for the o rings that connect to the thermostat housing? What is this grease exactly used for? Also my understanding is it is mixed with distilled water 50/50? I will be replacing the water pump, and the thermostat unit with new ones because at this point why not hahaha
So I talked with marky522 and my pipe failure was actually at the manifold that connects the two banks, not at the thermostat. Since the cooling system is coming apart he is going to update the thermostat housing. I'm at 75k miles so that thermostat housing was also due to go any time.
I will say this- I never noticed any leaks or any drops in coolant level. I *may* have noticed the slightest whiff of coolant maybe once. And I *really* drove the car hard a few times and it was fine. Scary but it seems like there are basically no warning signs aside from being north of 70k miles.
Let us know if the rear one can be done without engine removal. If so - please document it somehow (service receipt?) - I'd love to get mine done, but am not about to pay for engine R&R..
Let us know if the rear one can be done without engine removal. If so - please document it somehow (service receipt?) - I'd love to get mine done, but am not about to pay for engine R&R..
Hi Don,
There 3 ways to do it ...
1) Thread the pipe and screw in new fitting ( Link to great DIY was posted here before ), Intake Manifold and HP pump has to be removed. ) maybe you could leave manifold in ... but HPFP has to come out ... but that's pretty easy
2) Drop Engine - Dealer Way
3) Remove Intake, HP Pump, I would say maybe AIR pump .. and you should be able to replace the whole part without dropping engine... it will not be easy but it was done for sure .... I still think that number 1 is way to go .. fastest, cheapest and permanent
86K miles when my failed, at the same time I threaded screws the front thermostat housing pipes with screws ... so I know that I will not have catastrophic failure and pipes will not pop out ...
Hi, ummm, err... ??
1. I loved that way - but would never be able to get a Porsche mechanic to do it that way. This requires someone more agile than I am (I'm in my 7th decade.. I don't bend as easily as I used to..) to lay on top of the engine to do the job. Wonder if a new drive coupling and O ring would be needed for the HPFP - probably - at least good practice to replace them when disturbing them.. the other problem was - the fitting he used was one he made to some very specific dimensions. I did some calculations on using a standard pipe-thread barbed fitting - and there is one where the side of the drill tap for the tap for the female hole was about exactly the size of the existing hole - but the author of the thread (who obviously has way more experience than I do in doing it) didn't think it would work that well due to the thinness of the casting.
2. Dealer way - immediately makes it a several thousand $$ job. I forget what the time allocated was when mine was R&R'd - but I suspect a good part of a day is involved there for removal and another day for reinstallation.
3. Yup - the same part on my '06 S **** had a problem with a small crack in the same casting. Manuals showed R&R of the engine to do it - but the dealer mechanic did it without R&R, so it was doable.
I think I'll ask about #3 next time I'm at the dealership.. I'm waiting for my Variocam $$ to come back to have Porsche do the thermostat housing. Damn sorry I didn't know of this issue when the engine was out. I had them replace the water pumps just because, and labor was free (simple 4 bolt job), even if I had to pay for an hour of labor to have it done at the same time - that would have been a great bargain.
Ahh yeah ... Mine happened very recently so I couldn't give you heads up.
I have a trusted Indy in IL that has done multiple of those without removing engine ... Replace and install upgraded part
I would help you out if you were closer ... I could tap that for you ... I still have tap kicking around.
Yes I replaced all gaskets and orings during R and I and yes I did replace that plastic holder plug for HPFP as the old one was bad and extremly brittle

 03-27-2018, 02:48 PM


 I know that this is off topic but could please share part number that you are talking about.

