When you click on links to various merchants on this site and make a purchase, this can result in this site earning a commission. Affiliate programs and affiliations include, but are not limited to, the eBay Partner Network.
DIY 958 Differential Fluid Service (Front and Rear)
"How To" Change your differential fluid in a 958 Cayenne. From my understanding, this process should be the same for all 958 models.
There may be differences in fluids between them, or for personal preference.
What You Will Need:
- Your 958 (Freshly polished to get dirty hand prints on yields most authentic DIY experience)
Tools
- 3/8" Ratchet (Lowest profile head you can get)
- 10mm socket and/or T30 Torx bit
- ~6" extension
- 8mm Stubby hex bit (a carefully chopped 8mm allen wrench will suffice, but won't allow you to use a torque wrench)
- 3/8" Torque wrench that allows up to 26 ft/lb (35Nm)
- Fluid transfer pump
- Drain Pan (I'd recommend using 2)
Fluid:
- 3 Liters of required or preferred gear oil. (Shouldn't need more than 2, but order 3 to be safe)
Other:
- New drain and fill plugs (all 4 are the same part, takes the same part as 955/957, total of four to do both differentials. I'd hold on to the old ones just in case)
- Good Music (to individual taste)
*A means of lifting the car while keeping it level is highly recommended. Many have mentioned raising the air suspension to it's highest level for servicing. Mine has standard suspension and I was able to do this all on the ground.
*Performing service when cold is recommended. Sticking your hands and face in the hot underbelly of the beast is not pleasant. Gear oil is bad enough, hot gear oil is miserable. Additionally, aluminum housings and steel bolts have different expansion rates when hot, taking that variable away allows this to go more smoothly.
What to do:
1. Remove Belly Pans (No photos of process or under car. Sorry)
From the front, use your 10mm socket (or T30 Torx) and remove the bolts holding in the belly pan. There's two further up the sides of the front pan. *I'd recommend removing the two higher ones first, then do the rear "row", then do the front "row" to prevent belly pan falling on your face.*
For the rear pan section, go at it from the side and loosen the two bolts on the rear. No need to remove them, or the brackety piece they go to. Remove the two located around the middle of the pan and slip it out frontwards to remove. Be mindful of how the rear attaches into the bracket.
The plastic in my left hand is the "brackety" piece from the rear of the pan that holds the pan to the crossmember that doesn't actually need to be removed:
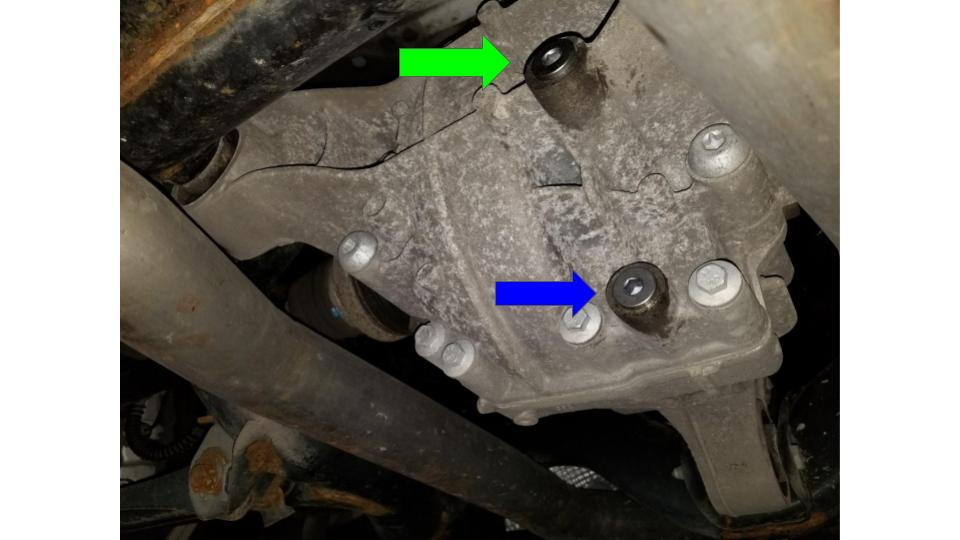
2. Front Differential
Front Differential, underneath, facing rear of the vehicle. GREEN = FILL / BLUE = DRAIN
The front differential is towards the right-hand side of the vehicle.
Remove the Fill plug first. It will allow fluid to drain easier, and in case you can't get the fill to break free, you definitely DO NOT want to drain it.
The fill plug on the front differential is the only tricky part in this whole process. This is why you need the stubby hex and the lowest profile ratchet possible. Finagle it up in there. I had the best luck getting in from the inboard side, ratchet sideways, go above it, then rotate and come down and into it. Silly process, I know, but finagle around in there and do what works for you.
It'll take some umph to break free. Go about one or two full rotations, then pop the tool out and pull the bit off, at this point you'll want to just remove it by hand with the hex bit.
At this point, you'll suddenly be reminded how bad gear oil smells and go throw rubber gloves on so the terrible stank doesn't get stuck in your hands again.
Remove the drain plug with the pan underneath the vehicle. While that's draining, go ahead and remove the fill plug first, then remove the drain plug from the rear differential and let that drain if you have the 2nd pan. If not, just do this one at a time.
Once empty, install a new drain plug and make sure you use a properly calibrated torque wrench set to the correct torque spec. (26 ft/lb or 35Nm)
Once you get that in, use the transfer pump to get the new oil into the differential. It's fill-to-overflow, so keep going slowly until fluid starts coming out of the fill hole. Let that do it's thing, and when no more is oozing out of there, install a new fill plug. You may not be able to get a torque wrench in there. If you can't, do your best to calibrate your arm from installing the drain plug and use your best judgement. (for filling mine, the hose on the pump barely fit in the hole, I pumped the whole liter in, and when I pulled the hose out all the excess that was stuck came pouring out. I don't know the exact capacity, but I know it's less than one liter. Anything it can't hold will just flow out)
Get some carb cleaner or brake cleaner on a rag and clean up as much of the mess on the housing as you can. Any exterior residue will really stink when you're driving and the differential gets up to temp. This applies to the rear procedure as well.
Rear Differential
Same process as the front, but with MUCH easier access. As always, remove the fill plug first.
Photo of rear differential, taken from rear of vehicle facing forwards: GREEN = FILL / BLUE = DRAIN
Standard DIY Disclaimer: (borrowed from deilenberger) You may be an ape with a wrench. It's possible you should never be in the same garage as a car when you're holding a wrench. Therefore - what I just described is what I would do - not what I'm suggesting that you do. If you break it, bend it, pork it up, kill yourself doing it - I never told you to do it. I just told you how I'd do it. You're a big boy - man up if you screw up.
It's late, I'm very tired, and sure I forgot something. I'll edit/refine/add to this tomorrow. (posting now in case my computer decided not to save it)
Thank you for this write-up with pics! One question for clarification, is this the PTV+ diffs or standard? Presuming standard as you mentioned being on steelies? The other question would be, is there a significant difference in this procedure between standard and PTV+?
Thank you for this write-up with pics! One question for clarification, is this the PTV+ diffs or standard? Presuming standard as you mentioned being on steelies? The other question would be, is there a significant difference in this procedure between standard and PTV+?
Thank you! First time doing one and it got late, I'll be refining it later today. This was for the standard differentials, as far as I've seen, PTV+ should be pretty much the same process but with different fluids. Don't remember being on steelies... my wheels aren't that basic lol.
I'll do some more digging and try to find the exact differences between standard and PTV+ for future reference.
Don't remember being on steelies... my wheels aren't that basic lol.
Haha, not what I meant. I was referring to the steel springs, vs PASM.
My understanding is the PTV+ diffs are the ones commonly having issues, but a crunching symptom vs whine. I'll get under mine this weekend and have a look, see if pics look like mine.
THANKS MUCH for the excellent DIY (and the quoted disclaimer!) I've copied it to the Cayenne DIY forum - which can be found on the main level menu, or in a link in the stickies up top.
For what it's worth, I'm still getting the same noise out of the front end. Rotating my tires tomorrow to see if that's a factor in this (doubtful, but worth a try)
I'm going to do some more research, and possibly try something with a friction modifier for the front and see if that helps. Will report back with results.
Originally Posted by AGARubberDuck
Haha, not what I meant. I was referring to the steel springs, vs PASM.
My understanding is the PTV+ diffs are the ones commonly having issues, but a crunching symptom vs whine. I'll get under mine this weekend and have a look, see if pics look like mine.
Ahhh gotcha. From what I've read you are correct on the PTV+ diffs being problematic. I can't find MUCH online, but from what I can tell, and what my "experience" tells me is that it will be very similar on the outside. Probably use the same plugs. I'm sure there's a different fluid required for the PTV+ than the fairly standard mine uses. My guess would be something with a friction modifier.
Originally Posted by deilenberger
THANKS MUCH for the excellent DIY (and the quoted disclaimer!) I've copied it to the Cayenne DIY forum - which can be found on the main level menu, or in a link in the stickies up top.
Awesome, thank you! Glad I could contribute! Now that I know it's there, I'll post any future DIY write-ups in there.
Originally Posted by chsu74
I have typically reused fill and drain plugs with a new copper crush washer. We have to buy new diff plugs? If so, can the part numbers be posted?
TIA
I normally do as well, but in this case I decided to just go for new ones. Part number is: 955-332-057-00
Originally Posted by r553
I reused the differential plugs. The plugs have a silver colored rubber o rings.
I don't see any harm in that. The seal on the old ones looked to be perfectly fine when I pulled mine off. I'm probably going to clean up the corrosion and but some rubber restorer on the seals and keep them around as spares.
Awesome, thank you! Glad I could contribute! Now that I know it's there, I'll post any future DIY write-ups in there.
Actually - please do post them here - they'll get more visibility - and send me a PM to remind me to copy and sticky them in the DIY forum. That should give them maximum visibility.
Actually - please do post them here - they'll get more visibility - and send me a PM to remind me to copy and sticky them in the DIY forum. That should give them maximum visibility.
Thanks again!
Got it, will do it that way going forward. I already posted the transfer case one in there, may want to copy it over here?
Great DIY write-up as usual. I'm assembling the tools/kits to do this next week. Did I miss the preferred gear oil?
Did you chew up your plugs breaking them free? If not I don't see spending $15 x 4 on new plugs (p/n 955-332-057-00). Maybe I'll get one as a spare in case.
For those who reused the plugs, what crush washers did you use? Thanks!
Gear oil choice can depend on vehicle. In this case I used Castrol syntrax long life. There's a lot of other great Gear oil option out there. The Castrol had no impact on my main symptom of occasional diff noise from the front, do with that information what you want.
the plugs didn't get torn up at all, but I figured if it's worth doing, it's worth doing everything, and I didn't know how torn up they may or may not get going into this. The washers seemed fine to be reused after, but I decided to get all 4 new and keep the old ones as spares.
Was a part number for the plugs ever posted? My search shows 955-332-057-00 although a cross reference doesnt attribute this part number to a 958. Guessing this is because these were never meant to be opened in the first place.
My 958 is a ptv+ model, which gear oil is being recommended? I have 000-043-205-30 Differential Fluid - SAE 75W-90 Synthetic picked out at the moment.

 08-17-2017, 02:28 AM