
Pictorial. HP Pump Removal to access Water distributor leak.
 06-22-2014, 09:25 PM
#1
Instructor
Thread Starter

Join Date: Jun 2014
Posts: 109
Likes: 0
Received 0 Likes
on
0 Posts
Decided I really had not much choice and did not want to drive a ticking timebomb so I dove into removing a pump today.
A word of warning if you have fat hands you migh want to reconsider this procedure:0
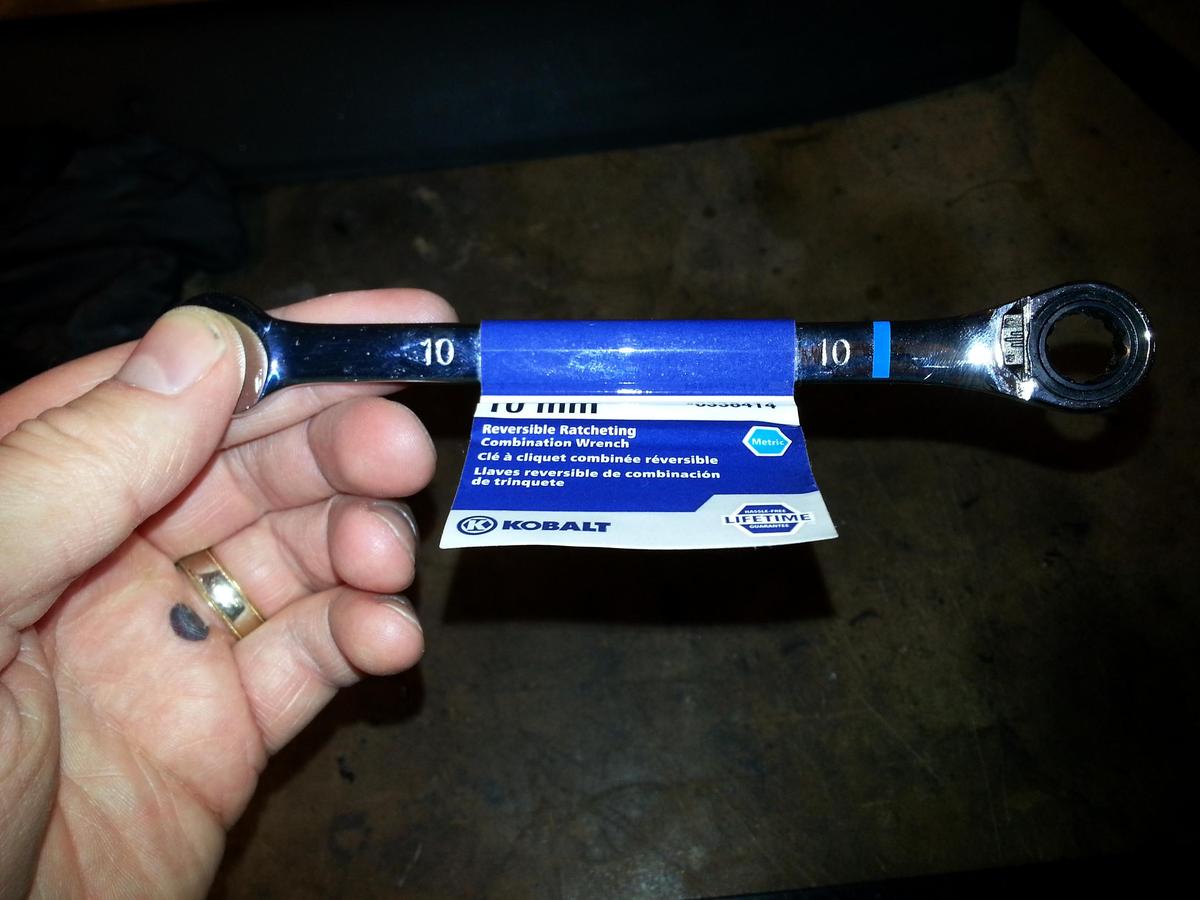
Most importantly a 10mm and 13mm wrench is needed with locking mechanizm as pictured, forget about using a standard wrench you will kill yourself:
First 10mm bolt out, this was fairly easy but gets harder when you go down to lower bolts, work bolts from top one to bottom.
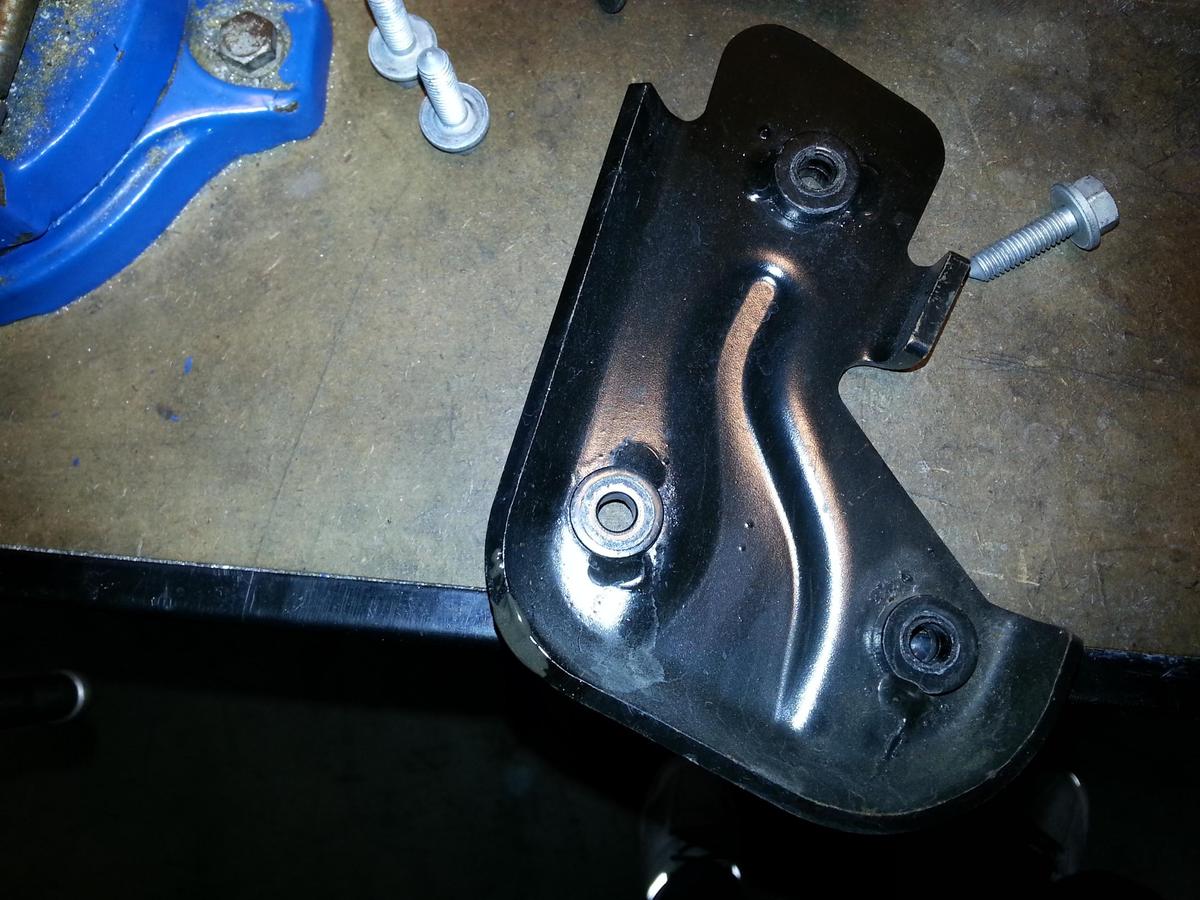
This is the plate holding the pump down, you will have to also remove studs that the bolts were attached to.
Attachment 846455
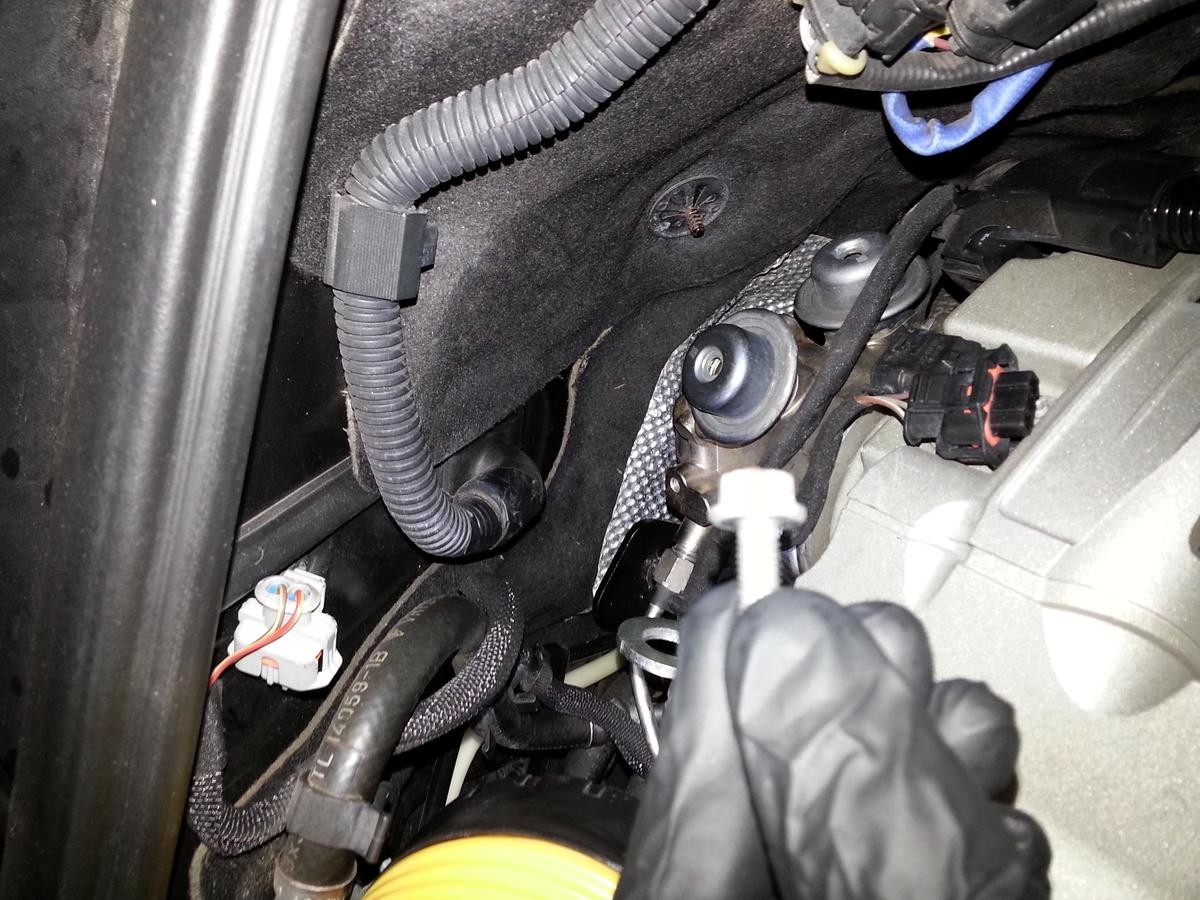
Disconnect 2 fuel lines, do not open the doors, fuel will spray. Use rag to collect minimal amount of fuel coming out.

Pump has an electrical connector on the bottom, disconnect before pulling pump out. Here is the deal, you will brake the plastic part in the center of the pump, its so freaking btittle, it crumbles on contact, the big portion of this part will be left inside the engine, I used a wire hanger to fish it all out, it came out in pieces. The rubber ring also needs to be replaced. Black piece in the center of the pump is the part that broke

Finally the aluminum hose, it's basically half way out, you can see I put JB weld earlier to prevent it from coming out firther, when I grabbed it it literally wiggled, it was just a matter of time when it would have came out. Plus the coolant smell was strong!

I can not believe this is not a recall with Porsche, blows my mind! My 2008 turbo has only 70k miles. I would not be surprised alot of people are driving like this and don't even know it!
As usual, disclaimer: repair above is just a documentation of my own work on a vehicle, I am not responsible for any damages you may incure while following this repair. Proceed at your own risk
A word of warning if you have fat hands you migh want to reconsider this procedure:0
Most importantly a 10mm and 13mm wrench is needed with locking mechanizm as pictured, forget about using a standard wrench you will kill yourself:
First 10mm bolt out, this was fairly easy but gets harder when you go down to lower bolts, work bolts from top one to bottom.
This is the plate holding the pump down, you will have to also remove studs that the bolts were attached to.
Attachment 846455
Disconnect 2 fuel lines, do not open the doors, fuel will spray. Use rag to collect minimal amount of fuel coming out.
Pump has an electrical connector on the bottom, disconnect before pulling pump out. Here is the deal, you will brake the plastic part in the center of the pump, its so freaking btittle, it crumbles on contact, the big portion of this part will be left inside the engine, I used a wire hanger to fish it all out, it came out in pieces. The rubber ring also needs to be replaced. Black piece in the center of the pump is the part that broke
Finally the aluminum hose, it's basically half way out, you can see I put JB weld earlier to prevent it from coming out firther, when I grabbed it it literally wiggled, it was just a matter of time when it would have came out. Plus the coolant smell was strong!
I can not believe this is not a recall with Porsche, blows my mind! My 2008 turbo has only 70k miles. I would not be surprised alot of people are driving like this and don't even know it!
As usual, disclaimer: repair above is just a documentation of my own work on a vehicle, I am not responsible for any damages you may incure while following this repair. Proceed at your own risk
Last edited by 957Turbo; 07-06-2014 at 05:52 PM.

 06-23-2014, 11:43 AM
#5
RL Community Team
Rennlist Member
Rennlist Member
Great write-up! Thanks for doing this. For the first timer, (but a very serious DIYer) how long should I allow to get this done?
Thanks,
TomF
Thanks,
TomF
06-23-2014, 02:37 PM
#6
Rennlist Member
I think I'm heading down this road too. Coolant smell, no obvious leaks.
I've searched and found threads where folks use JB Weld to glue this back in. Has anyone tried to tap the housing and thread aluminum pipe or an aluminum fitting in? Seems a threaded solution is best. Gluing it seems like another disaster waiting to happen.
Porsche engineers have been underwhelming these last couple decades; IMS, RMS, cylinder scoring, slipped sleeves, porous blocks, plastic coolant pipes, GT3 motor explosions, etc, etc, etc, so on and so forth. Embarrassing for a company previously known for their engineering.
06-23-2014, 03:24 PM
#7
Instructor
Thread Starter
Join Date: Jun 2014
Posts: 109
Likes: 0
Received 0 Likes
on
0 Posts
Cleaning the pipe and distributor, JB welding it, along with putting the pump back in will probably take another 5-6h. not a fun project for sure, but hey it beats 3.5k Porsche wants to do the job!

Trending Topics
06-23-2014, 03:29 PM
#8
Instructor
Thread Starter
Join Date: Jun 2014
Posts: 109
Likes: 0
Received 0 Likes
on
0 Posts
I think I'm heading down this road too. Coolant smell, no obvious leaks.
I've searched and found threads where folks use JB Weld to glue this back in. Has anyone tried to tap the housing and thread aluminum pipe or an aluminum fitting in? Seems a threaded solution is best. Gluing it seems like another disaster waiting to happen.
Porsche engineers have been underwhelming these last couple decades; IMS, RMS, cylinder scoring, slipped sleeves, porous blocks, plastic coolant pipes, GT3 motor explosions, etc, etc, etc, so on and so forth. Embarrassing for a company previously known for their engineering.
I've searched and found threads where folks use JB Weld to glue this back in. Has anyone tried to tap the housing and thread aluminum pipe or an aluminum fitting in? Seems a threaded solution is best. Gluing it seems like another disaster waiting to happen.
Porsche engineers have been underwhelming these last couple decades; IMS, RMS, cylinder scoring, slipped sleeves, porous blocks, plastic coolant pipes, GT3 motor explosions, etc, etc, etc, so on and so forth. Embarrassing for a company previously known for their engineering.
threaded option is a great, but it's not an option here, you will understand what I am talking about once you get in there..no space for that unless you are dropping an engine! I decided to go the JB weld route, another member had success with it...basically 6 months later still held tight!
I am just beside myself as to why this is not a recall, safety issue clear as day!
06-23-2014, 08:53 PM
#9
RL Community Team
Rennlist Member
Rennlist Member
 06-25-2014, 01:34 PM
#11
Instructor
Thread Starter
Join Date: Jun 2014
Posts: 109
Likes: 0
Received 0 Likes
on
0 Posts
 Let the coolant out through the pipe..it's gonna make a mess but that's allright.
Quick update, you DO NOT need 13mm flat wrench after all, you DO NOT need to remove the bottom left 13mm stud it actually does not hold the HP pump down so leave it alone and when the pump is out unclip wire harness and remove it with a regular 13mm socket wrench to get better access to water distributor.
I will post the rest of the pictorial when we are finished with the repair!
06-28-2014, 02:44 AM
#12
Instructor
Thread Starter
Join Date: Jun 2014
Posts: 109
Likes: 0
Received 0 Likes
on
0 Posts
OK, project done! Everything is back together and the car is running fine as far as I can tell, lots of boost and coolant temp dead center! Question, I have not paid close attention to the engine noises before so I cannot tell if the noise I am now hearing was there before. I can hear slight clacking coming from the HP pump area, is this clacking normal? Maybe it's due to the new plastic stopper I installed between the pump and the camshaft... maybe it's the pump itself.. From my understanding there is a recall on the 08-10 V8 Cayennes HP pumps? Can someone chip in on this one?
I will post all the pics and procedure description within next couple of days.. I also did a coolant temperature sensor replacement, I will make a new thread for that!
I will post all the pics and procedure description within next couple of days.. I also did a coolant temperature sensor replacement, I will make a new thread for that!
07-06-2014, 03:22 PM
#13
Instructor
Thread Starter
Join Date: Jun 2014
Posts: 109
Likes: 0
Received 0 Likes
on
0 Posts
1)Clean the pipe and the hole it goes into with some industrial strength de-greaser several times and make sure it's 100% dry. Take some very coarse sand paper and scuff both surfaces well.
2) Mix and apply JB Weld, make sure the pipe is inserted all the way in, I actually put a piece of wood against it to keep the pipe from sliding out slightly while JB weld cures. Do not fill back with antifreeze before 48H.
3) As far as antifreeze concern you do not need to spend $50 on OEM. I purchased this Prestone AF2000 Extended Life Antifreeze from Amazon for $12.47 you just need to make sure it's extended life: borate and sulfate free. Purchase a gallon on distilled water from Safeway. Mix 50/50. Refill over just over MAX line and drive around for a bit, let the car cool down add some more antifreeze. You will need to do this several times till the coolant amount stabilizes.
4) I also had a problem with coolant temperature gage working intermittently and dropping back down to 100 degrees along with fans coming on for no reason. I figured it's my coolant temperature sensor.
Now from what I read on line you need to remove intake manifold to get to the temp sensor. Not true, with some patients you can do the job without intake removal. Coolant temp. sensor is located on the top of the same water distributor we just JB welded the pipe to. Its next to passenger side firewall.
First you need a mirror to locate where the sensor is, move the small coolant pipe out of the way. Using the needle nose pliers GENTLY press on the electrical connector so it releases and pull up. Now that you have the connector off go et a 22mm long socket from Lowes. You will need couple extensions just like in the pic to reach the sensor. I recommend spraying down the connector with some WD40 a day prior, it can be a bit caked in..
I have purchase new temp sensor P#99760642000 from Amazon fro $26.77 free shipping! As you can see in the picture it's definitely updated part.
Gently thread in the new coolant sensor, making sure it goes in smooth, I used some anti sieze on it. DO NOT OVER TIGHTEN, you can stip the threads and have a very bad time..
Temp gage is now working perfect!!
The part# you need for re installing the pump back:
1) 94810511400 (camshaft plug) Stopper, this is the part that breaks hen you take the pump out. It holds the clutch to the camshaft.
Put the clutch in first then insert this plug behind it, it should go in till it stops and you cant push it in anymore, then install the pump back.
2)94811061500 is the seal around the pump, this seal was quite flat so I decided to replace it. Make sure you apply some lithium grease around it before installing the pump.
The repair seemed to work, I will keep an eye on the JB weld and the pipe and will be waiting for Porsche to come up with the recall.
I Hope this helps someone in the same boat, truly a nightmare for the 957 V8 owners..
2) Mix and apply JB Weld, make sure the pipe is inserted all the way in, I actually put a piece of wood against it to keep the pipe from sliding out slightly while JB weld cures. Do not fill back with antifreeze before 48H.
3) As far as antifreeze concern you do not need to spend $50 on OEM. I purchased this Prestone AF2000 Extended Life Antifreeze from Amazon for $12.47
you just need to make sure it's extended life: borate and sulfate free. Purchase a gallon on distilled water from Safeway. Mix 50/50. Refill over just over MAX line and drive around for a bit, let the car cool down add some more antifreeze. You will need to do this several times till the coolant amount stabilizes.4) I also had a problem with coolant temperature gage working intermittently and dropping back down to 100 degrees along with fans coming on for no reason. I figured it's my coolant temperature sensor.
Now from what I read on line you need to remove intake manifold to get to the temp sensor. Not true, with some patients you can do the job without intake removal. Coolant temp. sensor is located on the top of the same water distributor we just JB welded the pipe to. Its next to passenger side firewall.
First you need a mirror to locate where the sensor is, move the small coolant pipe out of the way. Using the needle nose pliers GENTLY press on the electrical connector so it releases and pull up. Now that you have the connector off go et a 22mm long socket from Lowes. You will need couple extensions just like in the pic to reach the sensor. I recommend spraying down the connector with some WD40 a day prior, it can be a bit caked in..
I have purchase new temp sensor P#99760642000 from Amazon fro $26.77 free shipping! As you can see in the picture it's definitely updated part.
Gently thread in the new coolant sensor, making sure it goes in smooth, I used some anti sieze on it. DO NOT OVER TIGHTEN, you can stip the threads and have a very bad time..
Temp gage is now working perfect!!
The part# you need for re installing the pump back:
1) 94810511400 (camshaft plug) Stopper, this is the part that breaks hen you take the pump out. It holds the clutch to the camshaft.
Put the clutch in first then insert this plug behind it, it should go in till it stops and you cant push it in anymore, then install the pump back.
2)94811061500 is the seal around the pump, this seal was quite flat so I decided to replace it. Make sure you apply some lithium grease around it before installing the pump.
The repair seemed to work, I will keep an eye on the JB weld and the pipe and will be waiting for Porsche to come up with the recall.
I Hope this helps someone in the same boat, truly a nightmare for the 957 V8 owners..
Last edited by 957Turbo; 07-06-2014 at 04:16 PM.
07-06-2014, 04:51 PM
#14
Instructor
Thread Starter
Join Date: Jun 2014
Posts: 109
Likes: 0
Received 0 Likes
on
0 Posts
I would strongly suggest that anyone with the same problem file a formal NHTSA report!
http://www-odi.nhtsa.dot.gov/owners/...rod_ids=421772
This needs to be a recall!
I submitted my report today, it's being reviewed by nhtsa before they post it.
http://www-odi.nhtsa.dot.gov/owners/...rod_ids=421772
This needs to be a recall!
I submitted my report today, it's being reviewed by nhtsa before they post it.
08-27-2015, 02:25 AM
#15
Instructor

Join Date: Apr 2015
Location: SF Bay Area, CA & Charleston, SC
Posts: 231
Likes: 0
Received 0 Likes
on
0 Posts
hey 957Turbo,
I know this is a bit old, but I'm thinking about doing this preventatively and had a few questions for you...
1. When you reattached the fuel fittings back onto the HPFP, did you have to wrap the threads with teflon tape or some kind of thread sealant to prevent the fuel from leaking?
2. When you say JB weld, are you removing the barb, scoring it, applying the JB weld inside the water distributor and on the outside of the barb and then sticking it back in and wiping off the excess from the inside?
Or are you inserting the barb back to the distributor and only applying a dab of JB weld on the outside like your original temporary fix?
Thanks in advance!