
Headlight cleaning gone bad - very bad.
 04-17-2014, 09:41 PM
#1
Burning Brakes
Thread Starter

So without a proper introduction - since I don't have any nice pictures yet - I'm already in trouble and can use some advice.
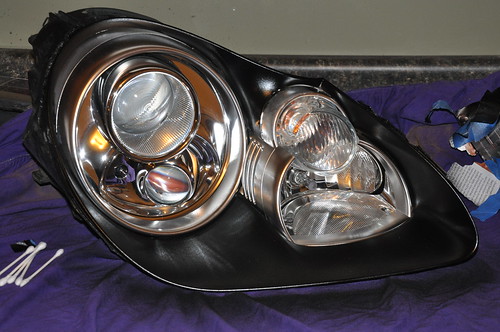
So I purchased a used Cayenne S for my wife. Nice car, great options, but the headlights were foggy. Some of it is due to the outside pitting but mostly due to the inside of the lens being dirty.
So I had the great idea of cleaning the inside up.
Took them out of the car, opened them up... and I could even get my hand inside.
Tried to clean in a small spot: no problem and great results.
Then when I did the whole headlight and admired my work... I noticed what you can see in the last picture. At first I couldn't believe it... the result was great... except for that.
The cleaner I used was 30% methyl spirits and 70% distilled water. Works great on windows.


So now I'm thinking of taking the whole thing apart and having it chrome painted on the inside.
Proper intro with a nice picture will follow. I've got three weeks to prep this car before she comes back from her trip... and I don't want to use the car before she gets to use it. After all it's her car.
So for any attempting this: DON'T USE METHYL SPIRITS TO CLEAN THE INSIDE OF THE LENS!
And here I thought I just saved myself a little fortune.
So I purchased a used Cayenne S for my wife. Nice car, great options, but the headlights were foggy. Some of it is due to the outside pitting but mostly due to the inside of the lens being dirty.
So I had the great idea of cleaning the inside up.
Took them out of the car, opened them up... and I could even get my hand inside.
Tried to clean in a small spot: no problem and great results.
Then when I did the whole headlight and admired my work... I noticed what you can see in the last picture. At first I couldn't believe it... the result was great... except for that.
The cleaner I used was 30% methyl spirits and 70% distilled water. Works great on windows.
So now I'm thinking of taking the whole thing apart and having it chrome painted on the inside.
Proper intro with a nice picture will follow. I've got three weeks to prep this car before she comes back from her trip... and I don't want to use the car before she gets to use it. After all it's her car.
So for any attempting this: DON'T USE METHYL SPIRITS TO CLEAN THE INSIDE OF THE LENS!
And here I thought I just saved myself a little fortune.
 04-18-2014, 12:31 AM
#2
Rennlist Member
Ok. Rule #34
Never ever ever work on your wife's car.
I put air in my wife's tires and she thinks I broke her seat heaters.
I change my wife's oil and she complains I messed up her brakes.
You will never win. Just buy her diamonds.
Never ever ever work on your wife's car.
I put air in my wife's tires and she thinks I broke her seat heaters.
I change my wife's oil and she complains I messed up her brakes.
You will never win. Just buy her diamonds.
 04-18-2014, 07:25 AM
#5
Burning Brakes
Thread Starter
Ydlee... it's dark blue (Lapis Blue I think it's called)... with silver accents all over the place.
I had a bit of a better look today... it's as if the chrome didn't get stripped off it (I can't feel any difference in material), but it looks all black.
Perhaps I found a way to color them black without effort... great for everybody who wants them black... unfortunately I don't
Rule #34... yeah I haven't read far enough clearly
Now I'm trying to find if there is a way to turn around the tarnishing.
04-18-2014, 11:14 AM
#6
The chrome stuff on the inside of the headlights is insanely fragile. I lost some of it when I masked off mine to paint the surrounds black. Had to go back and touch up the chrome spots with "chrome paint" isn't "perfect" but it so unnoticable that its good enough.
Toning down the fried egg chrome headlights does wonders for the look of the 955.
 DSC_0039 by Mōtum Magazine, on Flickr
Toning down the fried egg chrome headlights does wonders for the look of the 955.
DSC_0039 by Mōtum Magazine, on Flickr
04-18-2014, 11:55 AM
#7
Got instructions on this? Looks fantastic!!!
Pics installed? Im thinking plasti-dip here...
Pics installed? Im thinking plasti-dip here...
The chrome stuff on the inside of the headlights is insanely fragile. I lost some of it when I masked off mine to paint the surrounds black. Had to go back and touch up the chrome spots with "chrome paint" isn't "perfect" but it so unnoticable that its good enough.
Toning down the fried egg chrome headlights does wonders for the look of the 955.
DSC_0039 by Mōtum Magazine, on Flickr
Toning down the fried egg chrome headlights does wonders for the look of the 955.
DSC_0039 by Mōtum Magazine, on FlickrTrending Topics
04-18-2014, 12:03 PM
#8
Three Wheelin'

I had the same issue with the rears on my Range Rover, they fogged up and drove me mad, so I pulled them apart and washed them with warm water and a drop of bleach. Of course some of the same thing happened and some of the colouring came off.
It does notice unless you look directly into the light, so I can live with it.
After they eventually dried out, I sealed them with silicone and no more problems.
Good luck finding a solution and in time.
Rule #34. It's amazing how changing the oil or what ever can effect a completely different un related function in the car according to a women.
04-18-2014, 01:10 PM
#9
Yeap. Bad idea.
You got it wrong mate, but Navaros911 got it right. Buy her a Porsche
If it's just tarnished (I doubt it) try some lemon juice on a rag to rub it with. I'd start with a 50/50 mix with water and raise the juice content from there until it does something.
Given where it is you can probably rig a brush up and use some brush on chrome paint to fix it. That area shouldn't have any impact on the light dispersal so you just need it to look acceptable.
You will never win. Just buy her diamonds.
Given where it is you can probably rig a brush up and use some brush on chrome paint to fix it. That area shouldn't have any impact on the light dispersal so you just need it to look acceptable.
04-18-2014, 02:00 PM
#10
Burning Brakes
Thread Starter
Cole... yeah, I used your thread here http://www.6speedonline.com/forums/c...dlights-3.html as a basis for the work.
04-18-2014, 02:32 PM
#11
Cole... yeah, I used your thread here http://www.6speedonline.com/forums/c...dlights-3.html as a basis for the work.
You can obviously check the link he provided above. Not sure Plastidip would offer any advantages here. The process is so much work I'd use the most durable stuff possible.
I don't take that many pictures of my CTT, but here is probably the most recent.
[IMG]
 20130107_171459.jpg by Mōtum Magazine, on Flickr[/IMG]
08-01-2014, 09:31 AM
20130107_171459.jpg by Mōtum Magazine, on Flickr[/IMG]
08-01-2014, 09:31 AM
#12
Burning Brakes
Thread Starter
So time for an update:
What I did next was take the dremel tool to the housing to cut off the lip that goes over the clear lens. There was no way to separate the lens from the housing without cutting. Forget the oven and heating it up... won't work.
With that lip in place, I couldn't separate the lens from the housing.
I took the lip off from the back.. this means putting the dremel at a 90 degree angle to the housing. I don't think that was a great idea and I would encourage everyone to put the dremel along side of the housing. This means you will cut off only 1 side the lip that goes over the housing. Looking at the first picture, you can see the lip over the lens and how I cut it off -> again, I would not advise this and suggest you cut it off differently.
This will allow the lens to fit better when you are trying to seal it again. On mine, I can now press hard on the lenses and you will actually push the lens deeper into to body after mounting the lenses.
Below some pictures of the lip cut off.


After removing the lens and cleaning only the inside, they looked like this:


What I did next was take the dremel tool to the housing to cut off the lip that goes over the clear lens. There was no way to separate the lens from the housing without cutting. Forget the oven and heating it up... won't work.
With that lip in place, I couldn't separate the lens from the housing.
I took the lip off from the back.. this means putting the dremel at a 90 degree angle to the housing. I don't think that was a great idea and I would encourage everyone to put the dremel along side of the housing. This means you will cut off only 1 side the lip that goes over the housing. Looking at the first picture, you can see the lip over the lens and how I cut it off -> again, I would not advise this and suggest you cut it off differently.
This will allow the lens to fit better when you are trying to seal it again. On mine, I can now press hard on the lenses and you will actually push the lens deeper into to body after mounting the lenses.
Below some pictures of the lip cut off.
After removing the lens and cleaning only the inside, they looked like this:
Last edited by Navaros911; 08-01-2014 at 09:37 AM. Reason: Clarify my own writing... I think faster than I can type.
08-01-2014, 09:51 AM
#13
Burning Brakes
Thread Starter
Then I proceeded with taking out the silver painted body inside of the housing.
This piece is just held in place between the lens and the body. Some residual glue/sealant probably keeps it in place.
Just gently pulling works (perhaps work it a bit with a knife if it binds) and gives you this:


Now you can see the reflector that sits around your main beam. It is held in place with a few screws. After removing you just slide it out from the housing. Be gentle not to break anything as it hooks in the housing on the opposite side from the screws.
You should have something like this:


This piece is just held in place between the lens and the body. Some residual glue/sealant probably keeps it in place.
Just gently pulling works (perhaps work it a bit with a knife if it binds) and gives you this:
Now you can see the reflector that sits around your main beam. It is held in place with a few screws. After removing you just slide it out from the housing. Be gentle not to break anything as it hooks in the housing on the opposite side from the screws.
You should have something like this:
08-01-2014, 10:03 AM
#14
Burning Brakes
Thread Starter
As you can see in the previous picture, my reflector had an area melted due to the heat of the bulb.
With ambient temps very frequently over 100F at night, think about the heat of these in sunlight, with a running engine in traffic AND a hot bulb.
A lot of 995s have this issue here.
My solution: get rid of the bulb and plug the hole like this:

And now all the silver painted bits and the chromed bits can go off to the paint shop.
This is the outcome:


The first piece was painted, the second piece was sprayed with liquid chrome.
It's an interesting process that liquid chrome... it can be applied to pretty much anything. It's like spraying some liquids over the piece and ultimately it looks chromed.
It must be a chemical process. It is heat resistant... but still more fragile than paint. Don't rub it too much.
I tried the chrome paint before this... it didn't work. Looks terrible after it dries and you couldn't get it to blend with the chrome. It also doesn't stick to the chrome. Enough reasons to have it done professionally.
With ambient temps very frequently over 100F at night, think about the heat of these in sunlight, with a running engine in traffic AND a hot bulb.
A lot of 995s have this issue here.
My solution: get rid of the bulb and plug the hole like this:
And now all the silver painted bits and the chromed bits can go off to the paint shop.
This is the outcome:
The first piece was painted, the second piece was sprayed with liquid chrome.
It's an interesting process that liquid chrome... it can be applied to pretty much anything. It's like spraying some liquids over the piece and ultimately it looks chromed.
It must be a chemical process. It is heat resistant... but still more fragile than paint. Don't rub it too much.
I tried the chrome paint before this... it didn't work. Looks terrible after it dries and you couldn't get it to blend with the chrome. It also doesn't stick to the chrome. Enough reasons to have it done professionally.
08-01-2014, 10:26 AM
#15
Burning Brakes
Thread Starter
Before you put it all back together: clean your projectors inside and outside. It made an incredible difference on our car.
While taking it all apart, I noticed the wiring's insulation was falling apart... and it is almost impossible to not have a short.
So now, replace the units... $$$$ or replace the wiring. I think the latter is the more economical option.
On we go with it... if it doesn't work, I'm getting new units anyway... so may as well try.
It looked like this for most of the cabling... so all of the bad wiring was replaced:

For some reason the wiring seems cheap around the headlights. Valeo, made in Spain... whoever made that choice should reevaluate their decision... and where was Porsche's Quality Assurance team... out to lunch? Either way, let's move on.
Cut the existing wiring out and replaced it with correct gauge wire. All same color though... need to work with what you got. Parts are hard enough to get your hands on over here.


I created a wiring diagram. Both left and right are the same BTW. The wiring took come concentration to not get confused. I suggest doing one cable at a time rather than doing it the way I did it -> all in one go.
All I used were some standard car electrical connectors, electrical tape and the pieces to connect two cables together (some blue ones, some red ones in the pictures).
Ready for re-assembly.
While taking it all apart, I noticed the wiring's insulation was falling apart... and it is almost impossible to not have a short.
So now, replace the units... $$$$ or replace the wiring. I think the latter is the more economical option.
On we go with it... if it doesn't work, I'm getting new units anyway... so may as well try.
It looked like this for most of the cabling... so all of the bad wiring was replaced:
For some reason the wiring seems cheap around the headlights. Valeo, made in Spain... whoever made that choice should reevaluate their decision... and where was Porsche's Quality Assurance team... out to lunch? Either way, let's move on.
Cut the existing wiring out and replaced it with correct gauge wire. All same color though... need to work with what you got. Parts are hard enough to get your hands on over here.
I created a wiring diagram. Both left and right are the same BTW. The wiring took come concentration to not get confused. I suggest doing one cable at a time rather than doing it the way I did it -> all in one go.
All I used were some standard car electrical connectors, electrical tape and the pieces to connect two cables together (some blue ones, some red ones in the pictures).
Ready for re-assembly.