When you click on links to various merchants on this site and make a purchase, this can result in this site earning a commission. Affiliate programs and affiliations include, but are not limited to, the eBay Partner Network.
05 CTT
Planned to do winch install and water pump/cooling hoses all at once to save doubling up on work. Winch is done but unfortunately my cooling system parts never shipped (despite receiving a shipping notification) so now I need to put the car back together for a trip.
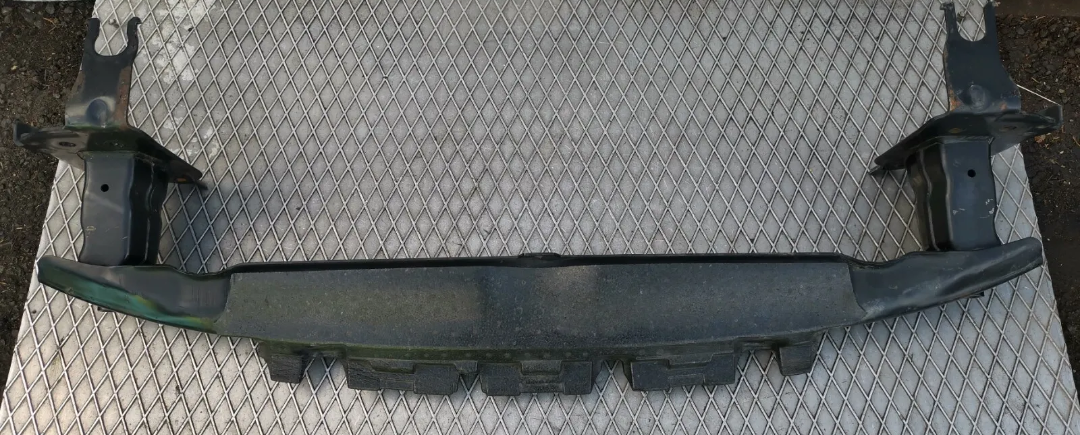
I managed to remove the 2 clips at the back of the crash bar (just) without pulling apart anything in the engine bay but looks like a real pain to reinstall them. The left side especially.
Any pointers or do I just start removing all the pipework?
05 CTT
Planned to do winch install and water pump/cooling hoses all at once to save doubling up on work. Winch is done but unfortunately my cooling system parts never shipped (despite receiving a shipping notification) so now I need to put the car back together for a trip.
I managed to remove the 2 clips at the back of the crash bar (just) without pulling apart anything in the engine bay but looks like a real pain to reinstall them. The left side especially.
Any pointers or do I just start removing all the pipework?
I went through this recently as had inadvertently remove the crash bar to get to the power steering cooler, the post in your thread ...............
Loosen the intercoolers some and move out of the way. The left side was easier for me to get to as the AC piping was not in the way. Be patient and go slow. What worked for me is that I'd hook the innermost end first, and work towards the outside. When I installed the crash bar I had it on two tall buckets, and slid it equally on both sides to make sure they engage the clips equally and not be on any pressure at the same time. I also use a pic for pulling the clips outwards. It took a few tries. Now the washer below those clips is a royal PIA.
Also on the left side I was able to keep and eye on the clip from on top as I'd remove the charge pipe.
OP - I recall the left side causing a swear jar overfill. What I remember is initially not pushing the left side back far enough to get a grip on the clip to lock the bar. So make sure that side is pushed backwards far enough before you try and seat the clip. If I had a length of rebar that might have helped for a thin lever. I think I reached back there with some long handle, long nose pliers and my longest flat head.
Whoever designed those clips should have their knuckles slapped with a ruler.
The driver's side clip has to mostly in place before sliding the bumper bar in, because there is not enough room to put it in after - the A/C pipes are in the way. The passenger side clip is downright easy by comparison. Getting enough leverage behind the driver's side clip was really tricky. I think I used a flat piece of metal with the end bent down.
Getting the rubber washers and radiator clips on was also difficult. There is no room to side the driver's side radiator clip the way it is designed to go, sliding on from the back. I modified the driver's side radiator clip to allow it slide in from the front. I don't seem to have taken a picture of this.
Thanks fellas, sounds like a fun one. I had another look today and moving the intercooler does seem like it would give a better shot. It also looks like removing the ductwork into the airboxes would give loads of room, but not sure how easy they will come out.
Luckily I haven't touched the clips underneath on the radiator itself or the rubber washer things.
The left engages nicely all the way home into the rubber but the other side just tries to push the radiator backwards. That side the opening in the crash bar is actually slightly smaller/closed off. I guess it needs a good shove to go over the rubber.
The radiator package has dropped about an inch while sitting so I have to hold it up with one hand trying to line everything up while trying to slide the crash bar in with the other. Fun times.
Like I mentioned, use buckets+ to keep the bar level, have someone push the left side while you push the right side with one hand and holding the radiator with your free hand. You want to engage both sides simultaneously. The bar is resting on the buckets so you don't have to focus on lifting it. Once the right side lines up, (it should as u held the radiator in place), put that clip on first.
For the clips/washers underneath, painters tape comes in real handy engineer needs to be shot. There has to be an easier way.
Thanks mate that makes sense.
I'm planning to make a quick jig for my trolley jack to keep it all aligned/mobile and at an adjustable height. The newly reinforced crash bar + winch is damn heavy.
Do I need to do anything with the rubbers and lower clips or can I leave them undisturbed?
Looking at the "closed in" side, I think you're right about both sides having to engage simultaneously. So far I've been pushing the easy side all the way home first, which means the slot on the other side is now at a bit of angle and won't want to engage.
(Random ebay pic)
Should be much easier once I have it on the rolling jig/jack thing.
Thanks mate that makes sense.
I'm planning to make a quick jig for my trolley jack to keep it all aligned/mobile and at an adjustable height. The newly reinforced crash bar + winch is damn heavy.
Do I need to do anything with the rubbers and lower clips or can I leave them undisturbed?
Mine were already off, but I would leave them alone if the bar clips engage without issue.
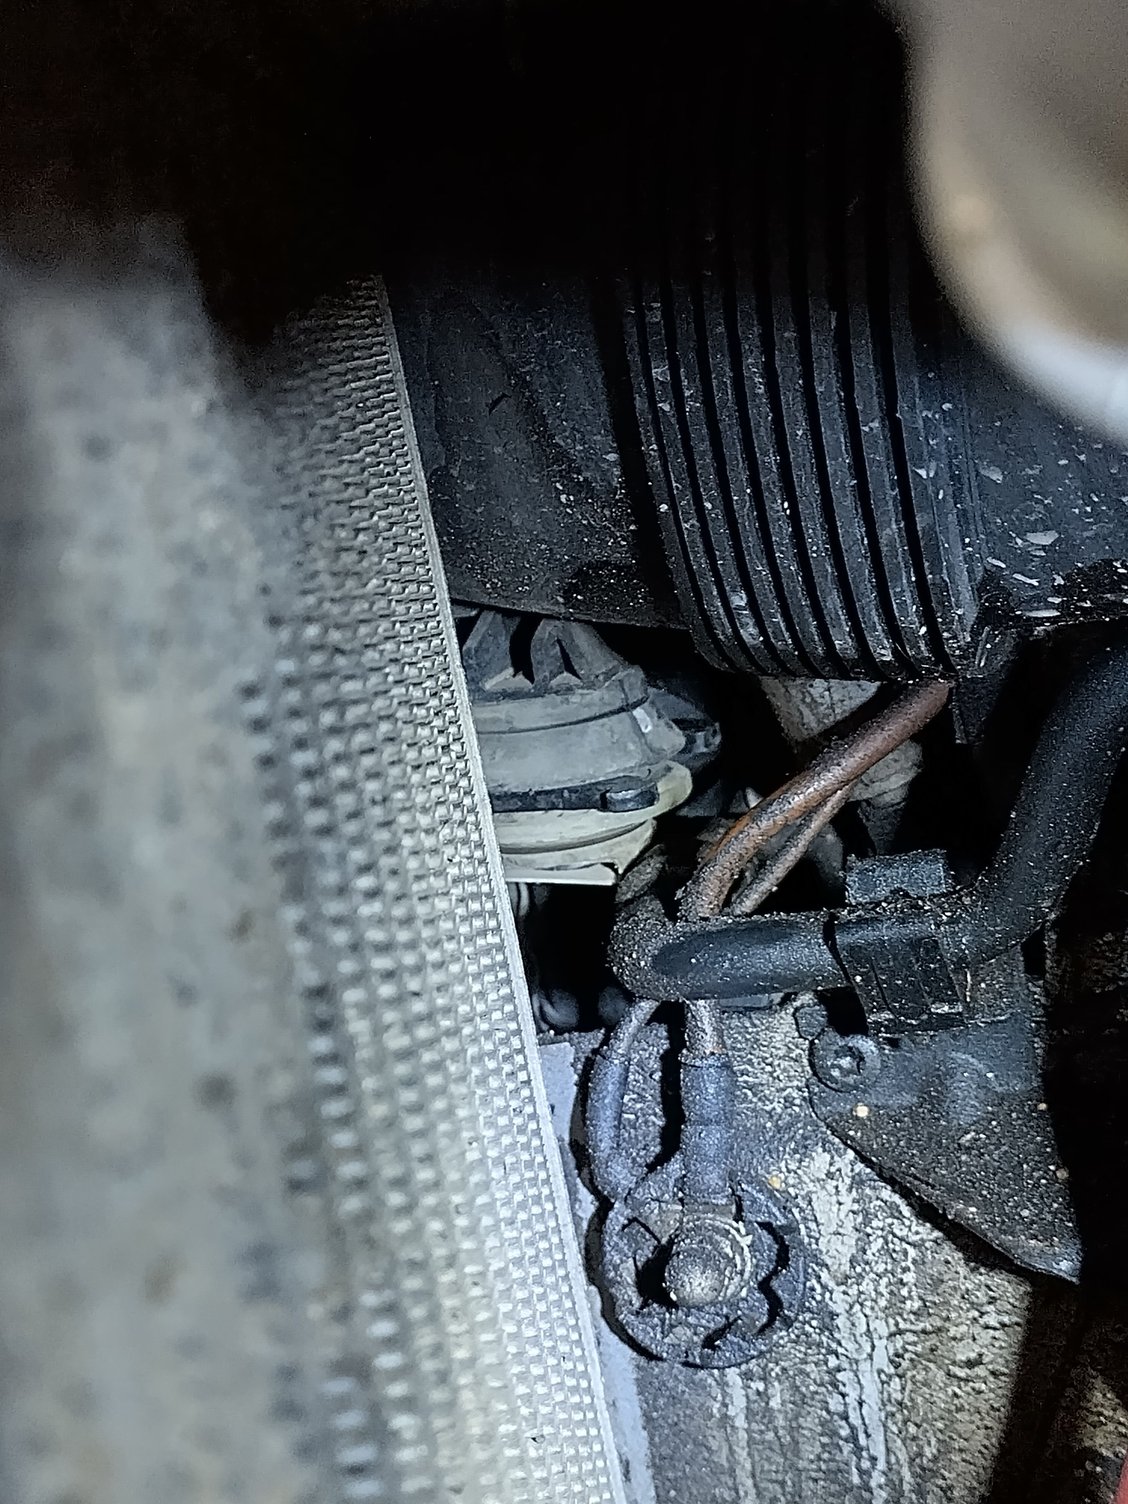
Haven't tried to fit the clip yet but looks like decent access with the fender liner pulled down and intercooler duct removed. Enough to get a hand in.
Might even get away without moving the I/C
Ah, yes, it looks so easy to get to.
I failed completely getting this bumper bar clip on until I unclipped the radiator and lifted it up. You see, the bumper bar clip needs to go under the rubber radiator vibration damper and I could not get enough force on it to jam it in there.
Then I found that I could not put the radiator clip back on because the bumper bar clip was in the way. The radiator clip has to go on from the back as shown in your picture. There is a finger on the radiator that aligns the radiator clip and prevents the radiator clip from being installed in any other direction.
Since it was impossible to install the radiator clip in the "proper" orientation I enlarged the slot in the radiator clip so it could slide on from the front. With that done it was on in a few seconds.
Are the parts in the correct order in this photo? Or does the white plastic spacer go on top of the crash bar?
Still having trouble getting both sides of the bar fully home. Haven't even got to the clips yet. What a great way to mount a radiator!
Looks fine to me. Here's pics of mine
After you slide the crash bar in, look from on top and you MUST see the ends exposed like in the below photo, else the clip won't have anything to grab on to.
You could put the clips on crash bar before inserting to see how it should look when installed. When I installed mine, the washer rubber clip that's below was off. Now if that happens to be in the way you may have to remove them, but getting back on is also tricky.
I think I added some silicone to the bar clips ends to allow to slide easily in all the way.


 11-25-2022, 04:35 PM


 engineer needs to be shot. There has to be an easier way.