When you click on links to various merchants on this site and make a purchase, this can result in this site earning a commission. Affiliate programs and affiliations include, but are not limited to, the eBay Partner Network.
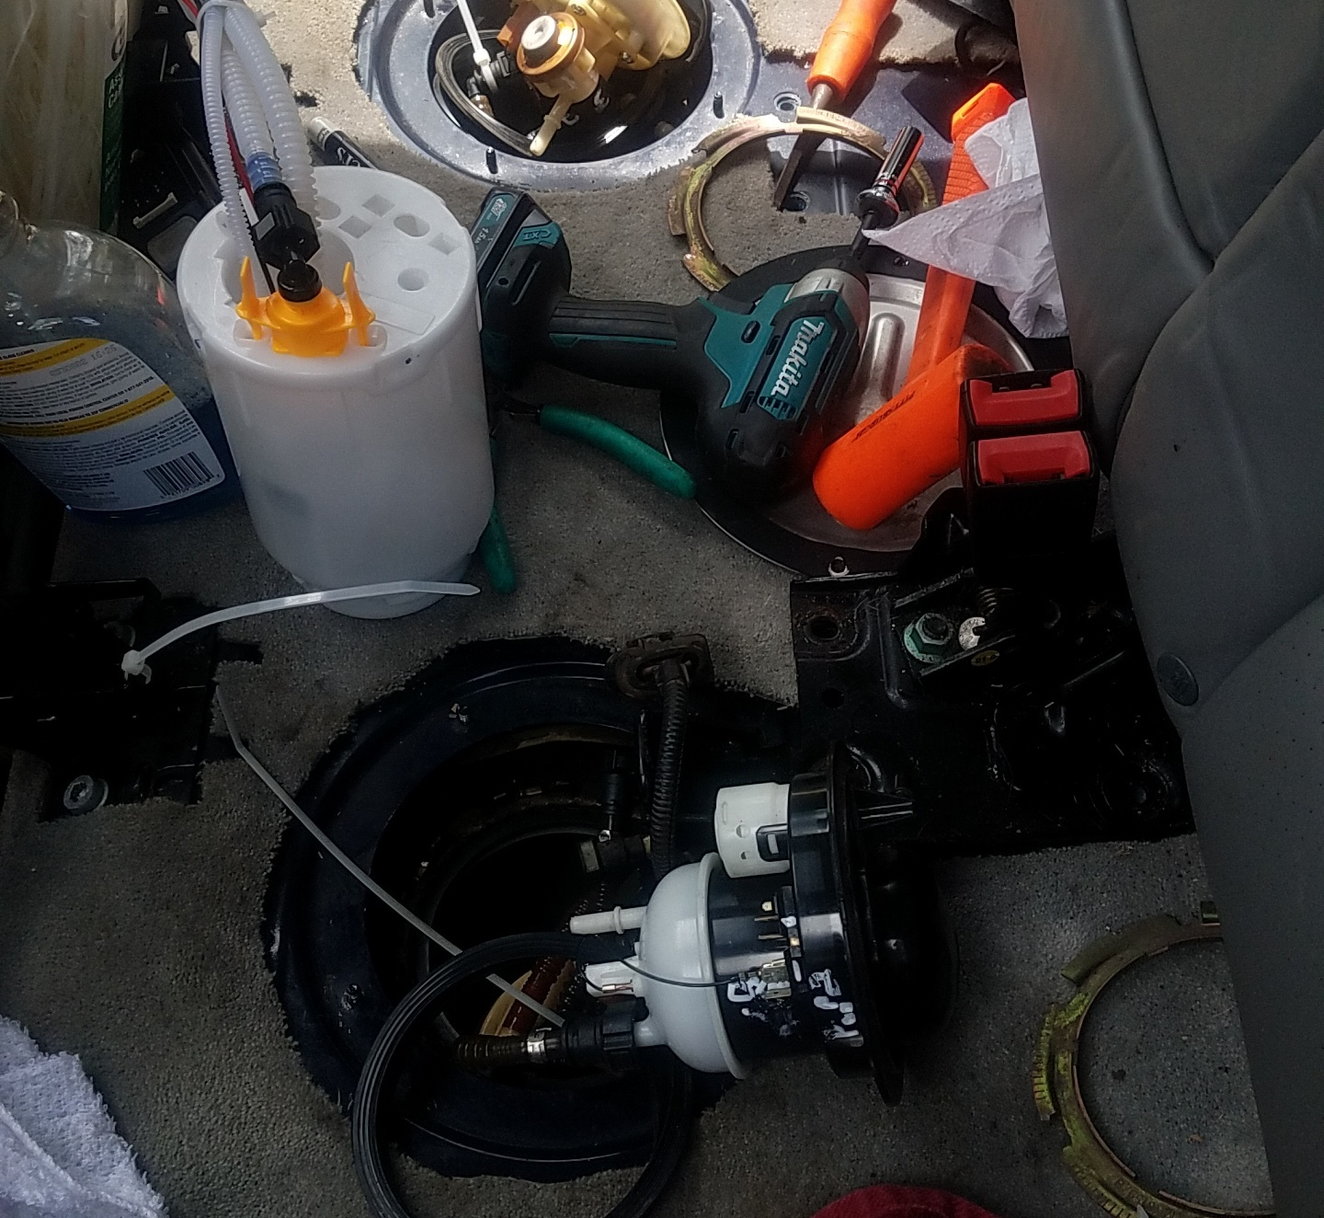
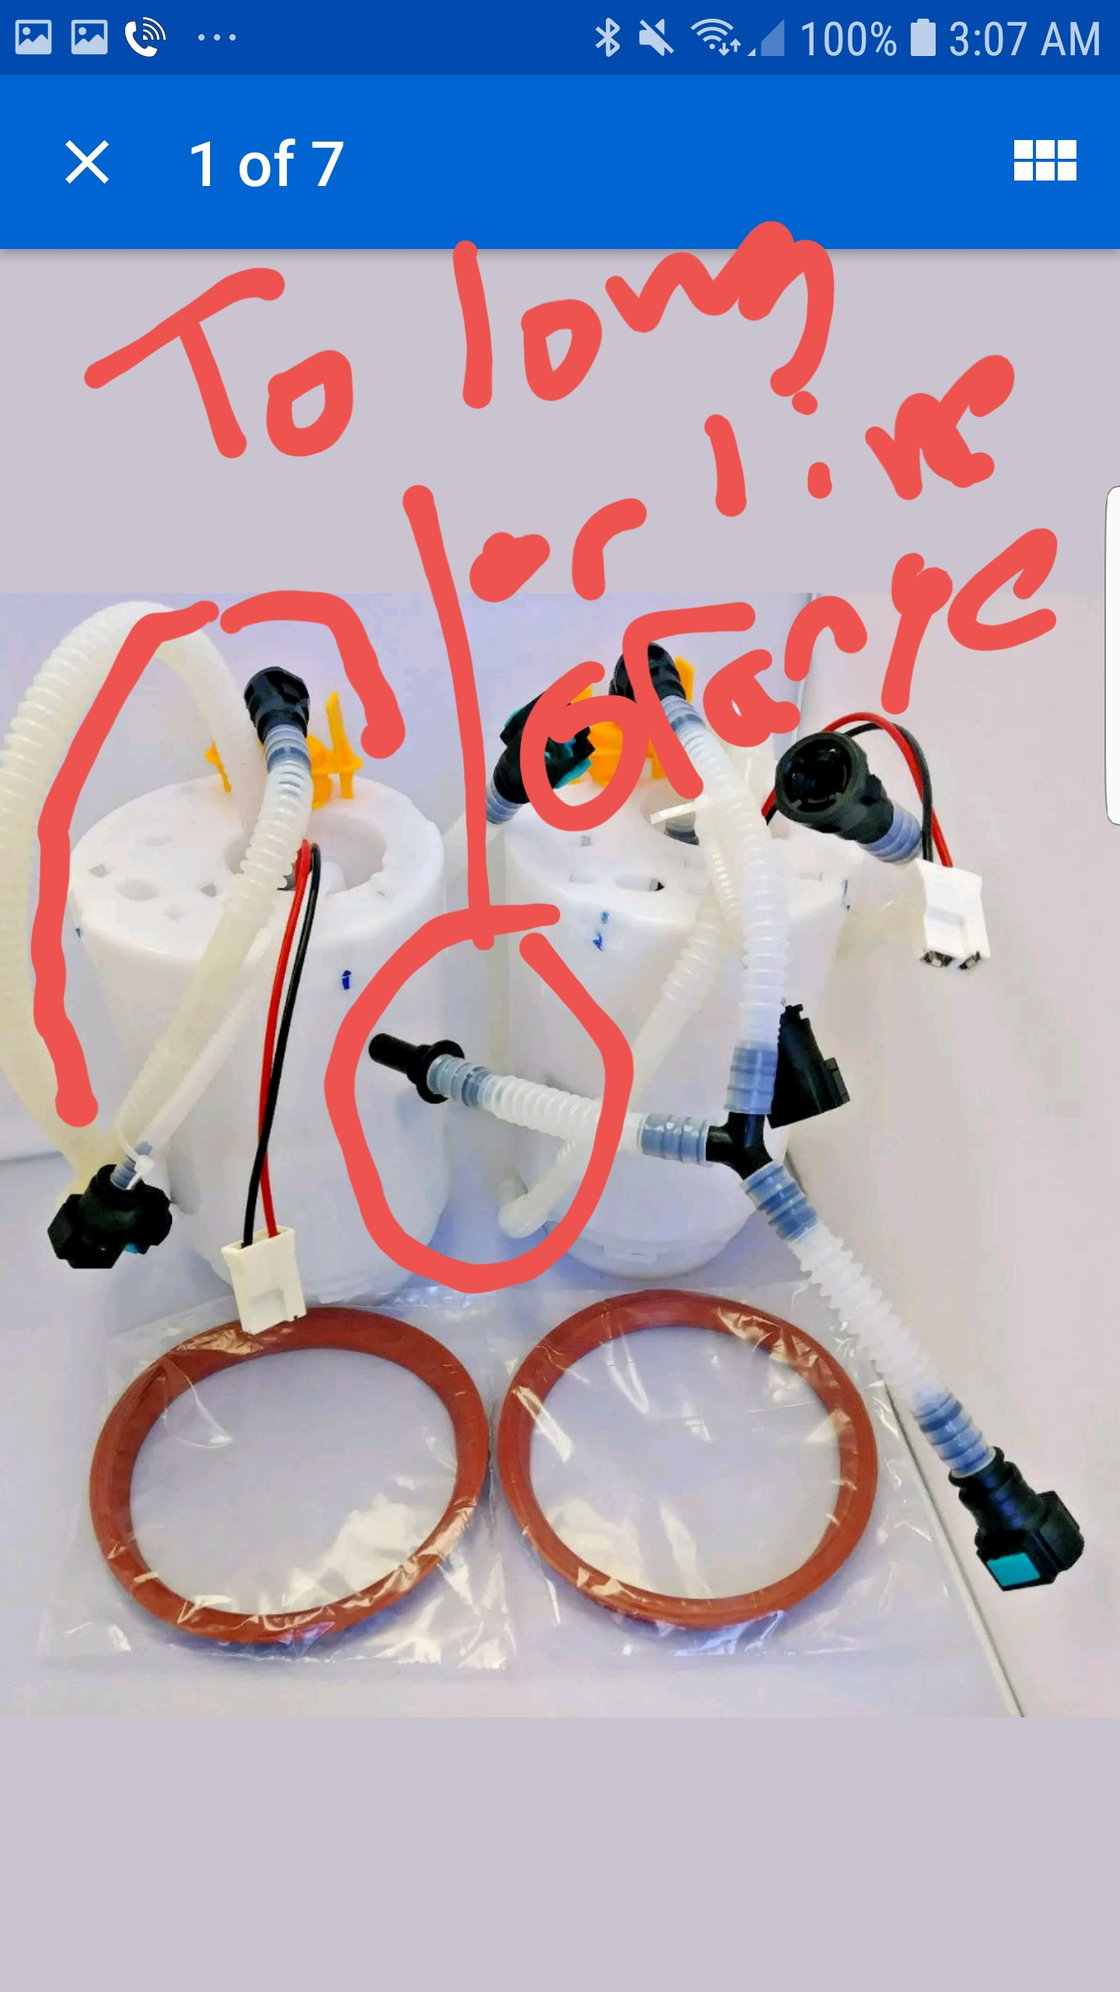
I need help identifying what lines go where since the new pumps i bought have a clip in orange fitting and a smaller hose that is supposed to to the tank jet suck hose whatever that is..im assuming those are the stationary hoses in tank.
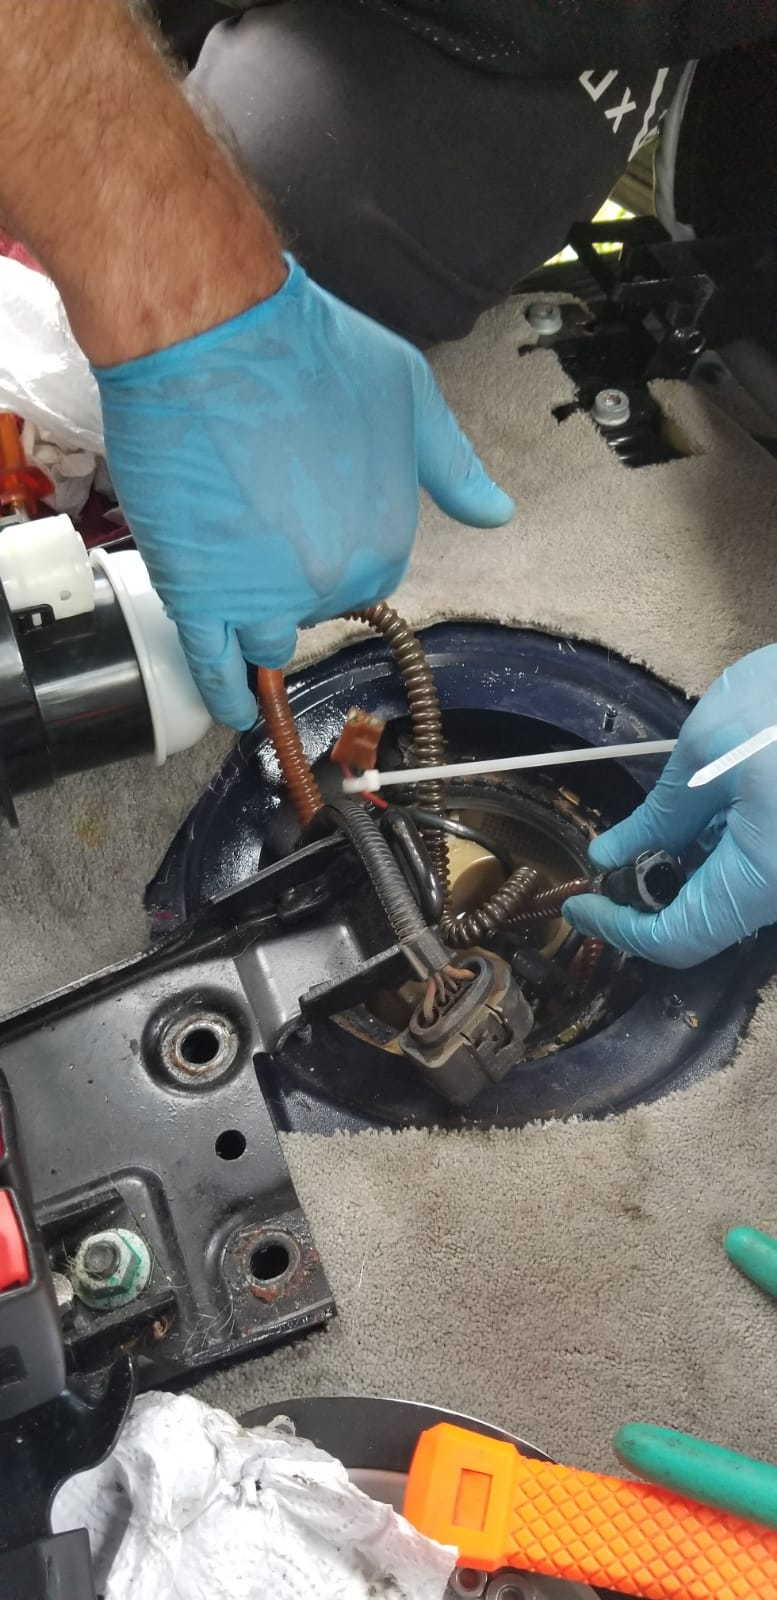
Does anyone have ALLDATA and a step by step of how to do this..i got them in and installed a line wrong. Its difficult to feed fuel line over hump in tank and pumps need to be clocked into base and i seem to lose track of what goes where when you cant see it clearly like when it is out of vehicle.
Does anyone have a full video or alldata break down of how to do this step by step.
June 3rd 2019
My 2004 cayenne S is down until someone can guide me through this.
I already read the prior posts but its just not enough info for me regarding the two small hoses onnthe newer style pumps and what those orange clips om top are for its open and just looks to feed back.
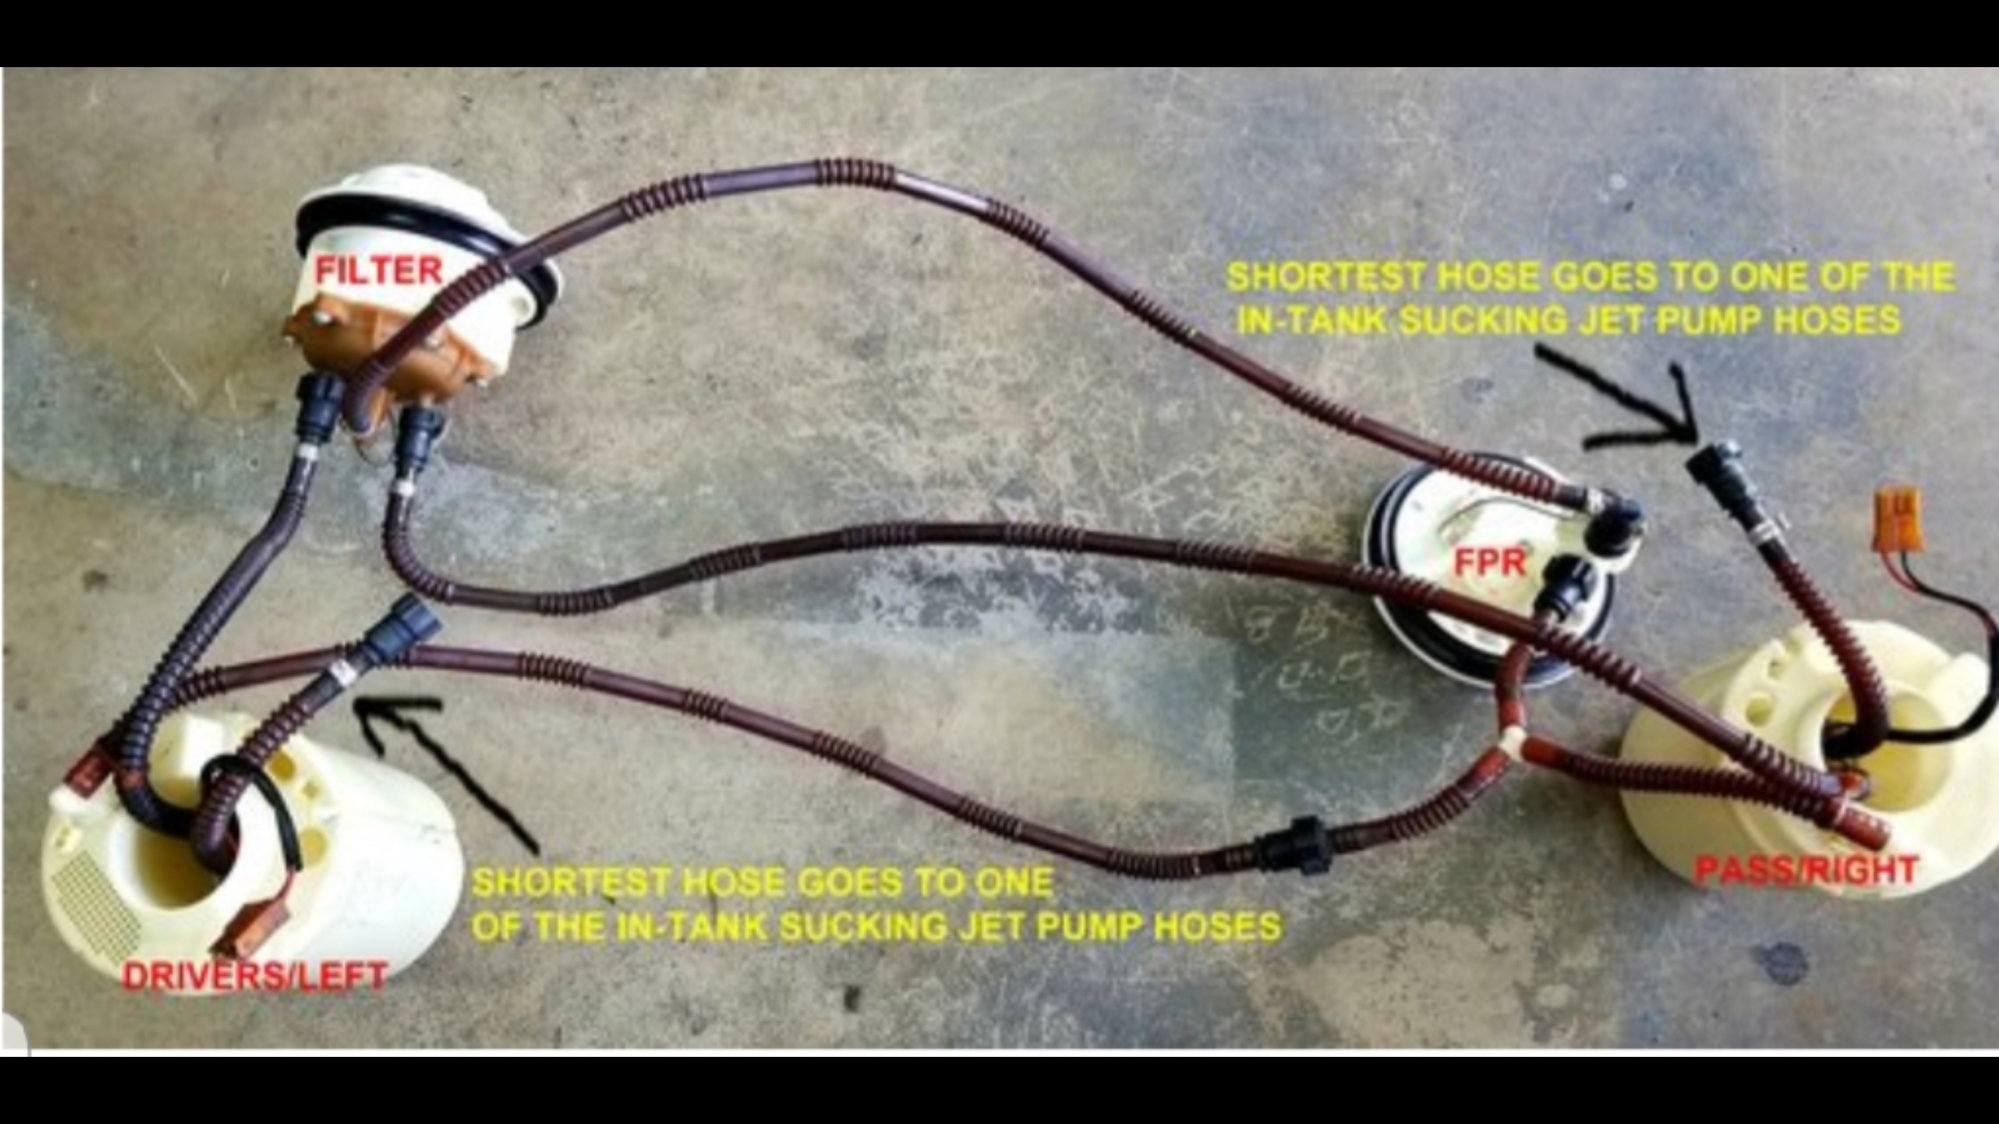
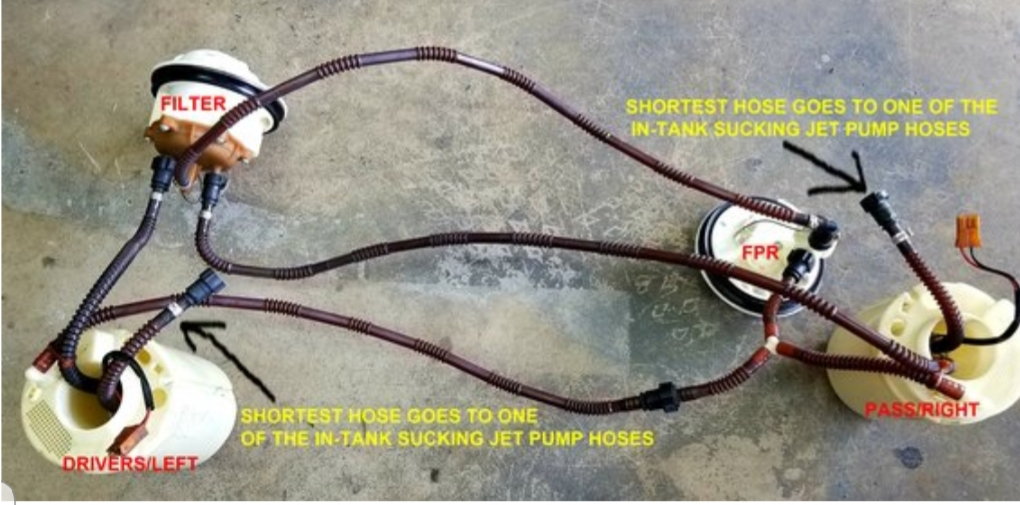
I wrote up my experience replacing these pumps a few weeks ago, there a thread here somewhere. I also had trouble sorting out which tube went where, but I found a picture in a Pelican article that was helpful. The hoses have specific sized connectors, so they really can't be hooked up wrong as long as you get them in the right area. The other thing is that seating the connectors requires a surprising amount of force.
I already read the prior posts but its just not enough info for me regarding the two small hoses onnthe newer style pumps and
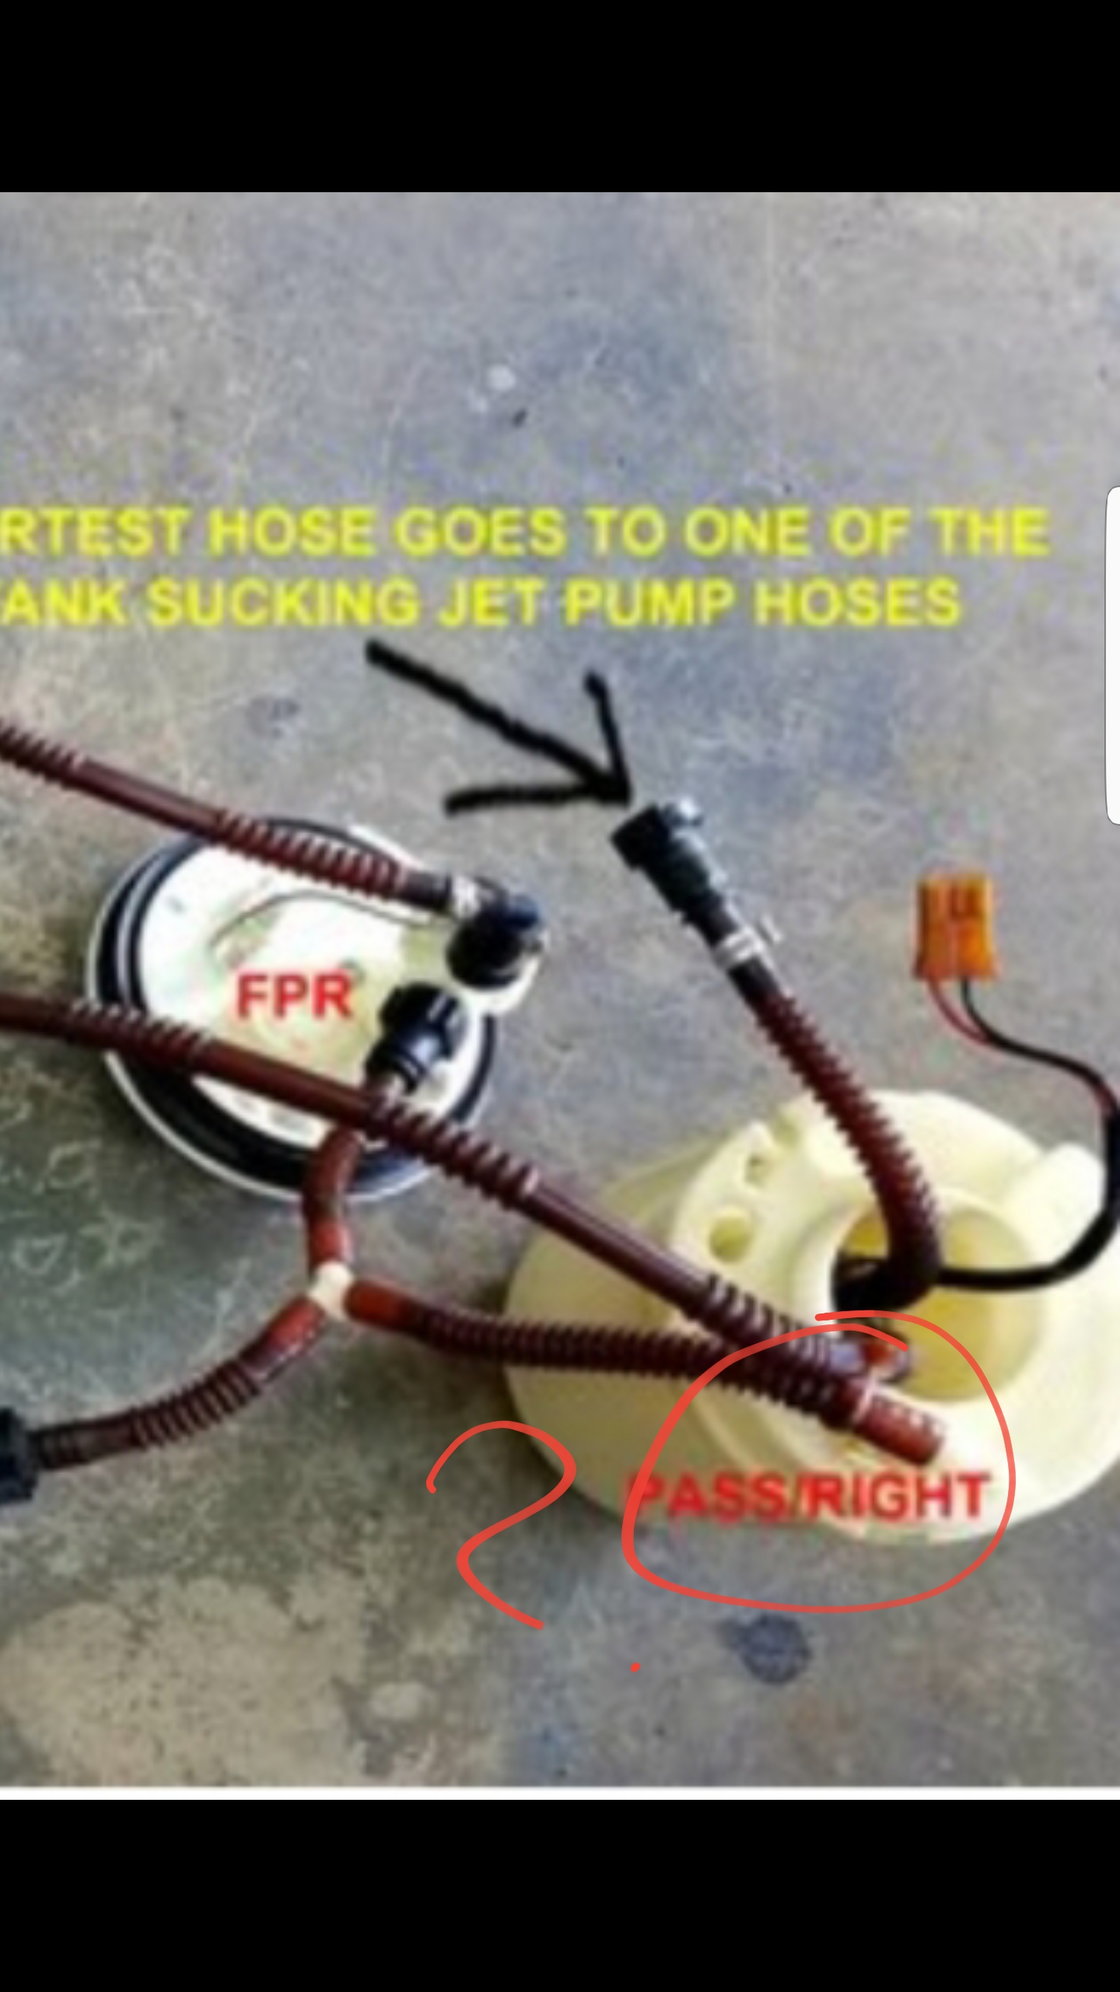
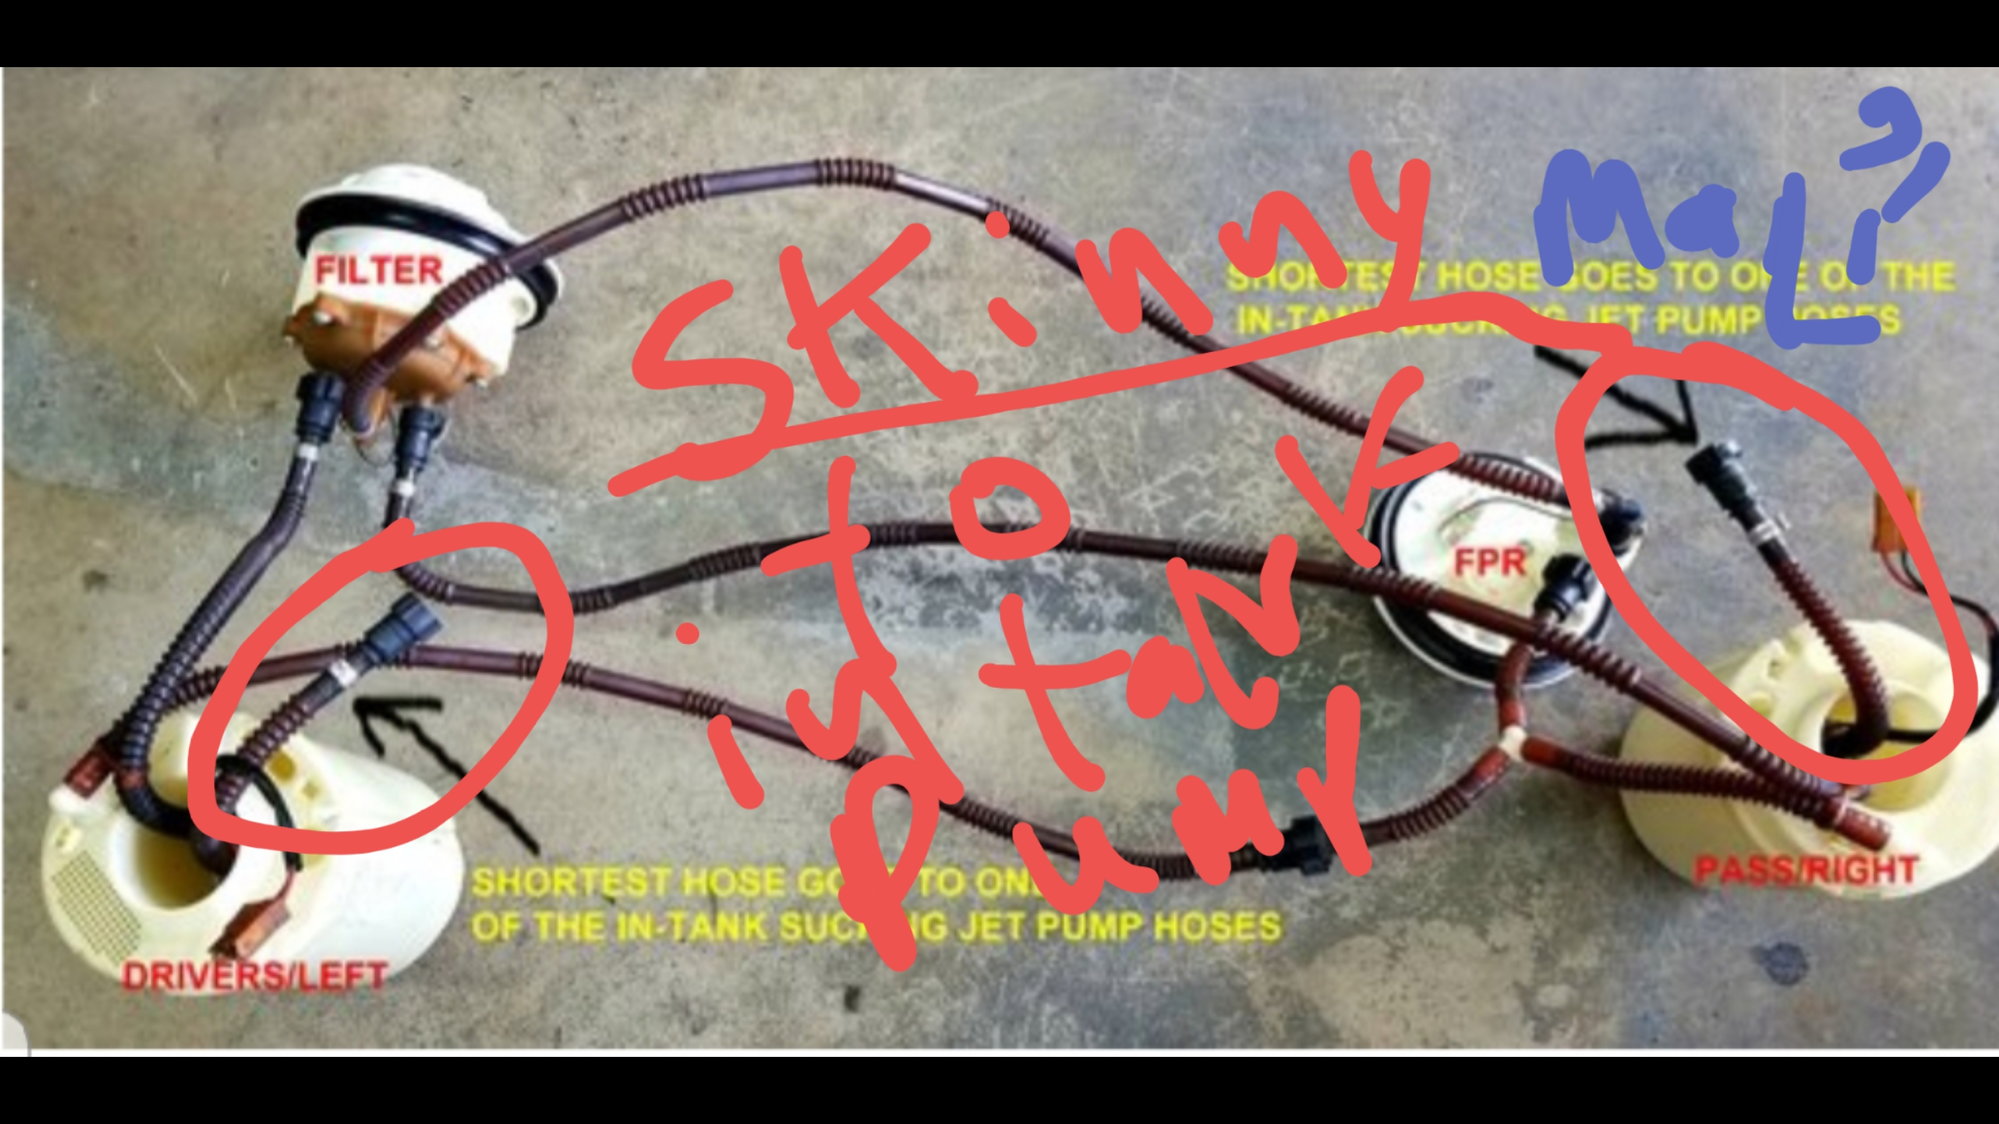
If you look at the diagram I used, I think the two 'small' hoses you're talking about are #3 going to #10 on the left, and #6 going to #9 on the right. I recall that these are the fuel return lines. The pressurized line is coming out of the FPR, which is in the cover of the right side.
what those orange clips om top are for its open and just looks to feed back.
As I recall, the hoses in the orange clips do pretty much just dump the fuel back in. Remember that these fuel systems are a complete loop, and there is fuel coming back from the front of the vehicle.
I need step by step please
I might try to do a step-by-step on reconnecting everything in the near future, since I have to go back in there to straighten out the fuel gauge sender. It's still erratic until it gets to the bottom 1/8.
The new pumps have smaller hoses that are femsle that connect to the only 2 male end that are from tank. I got it all together and works.
I would like to add to keep new gasket in place i used dabs of permatex (the right stuff) to hold gasket in place..also i used a dead blow and chisel to loosen that positive clocking ring..BUT i used a paint pen from walmart to mark where it was from factory and just hammered back to those marks for those who cant wait to order the snapon tool but want to get correct torque on it.
Also it should be added that pumps need to be in tank before you connect anything or you will not be able to fit pumps back in hole due to hoses in way.
I found using nitrile gloves and feeding the longer hoses over the tank hump pretty easy and do those 1st..the small female hoses which go to jet tank hoses last..they ARE SMALLER diameter for some reason on the newer pumps..also the older pumps have molded in lines on top the new ones have a pinch top style connector ,mine were orange.
Everything works and i did it pulling the 2- 15amp fuses in engine bay i didnt disconnect battery for fear of losing stereo info,engine data etc.
The wires zip tie them out of the way so they dont fall into tank.
It should take about an hour to do this job once you understand the routing and do the little things i mention..my gasket was getting pinched hence why i used permatex to hold it in place and zip tie wires out of the hole so you can plug in when done. New pump has orange pinch style top hose not like factory molded in..also thr smallest lines female from pump go to the only 2 male tank(jet) lines this is critical..they are much smaller in diameter than the factory ones but dont worry they work..my cayenne feels better with these pumps..i got on ebay $200 for both..and 10spline bit from lowes kobalt section to remove seatbelt 12point spline bolts. Old pump has molded line Paint pen from walmart to mark the locking ring from factory postion..dead blow and chisel to hammer ring loose Nitrile gloves are great
I'm glad you got it all figured out. Getting the connectors straight was the longest part of the process for me, as well. If I ever have to do it again, I think I'll tag the hose ends somehow as I disconnect them - maybe multi-colored elastic bands or something, and then transfer the marks to the new pumps before I put in so that I can keep track of which hoses go where.
How did you go about depressurizing the fuel system?
Shawn I'm not him, but it's easy. Remove fuses, start engine, it will stop when the fuel rail is depressurized.
I did, and I had to keep restarting and running it down. Many, many times. Seriously. It took forever for the system to depressurize. Even after the truck wouldn't start, I'd still have a good amount of fuel to wipe up when I disconnected the fitting. It was frustrating as hell.
I'm getting odd readings from the fuel gauge now, so I think I need to go back in and make sure that the hoses are laid in such a way that they won't interfere with the float. But I'm putting it off because I don't want to deal with depressurizing the fuel system.
Just a thought ... could it be vapor pressure in the gas tank that was driving fuel through the lines even after fuses were pulled? Removing the gas cap and leaving it loose is something I usually do when opening up the fuel system.
Of course the vapor pressue in the tank varies depending on previous temperature variation, so sometimes you'll have that issue, sometimes not.
Pretty good idea but I found what works best is to unscrew the cap on one of the schrader valves on the fuel rail and use a rag and screwdriver to depress the valve and bleed off/catch the excess fuel.
The gaskets can be a pain if you let them. Put a ridiculously small film of silicone /dielectric grease on the inner ring of gasket, drop the flange in position, stretch the gasket over the flange and put it into position like that. The flange will drop right into the gasket without pushing it out.
Another thought about what might be creating the residual annoying pressure ... when pressurized, the rubber fuel hoses will expand. Once pressure is removed, they will very slowly contract, raising some pressure by doing that. And a check valve may not let fuel flow back to the tank to reduce pressure. Releasing at the Schrader valve like J says will take care of it in a controlled way if this is the cause.
BTW if you want to see this effect in a different setting, take a car tire, off the car, and release all the pressure down to zero, by holding in the pin of the valve. Completely down to zero. No more air coming out. Silent. Then let it sit for a while and press the valve pin - you'll hear the air escaping, and it's due to this effect - the rubber tire is gradually shrinking and it takes a while. Next day it will still be shrinking, building pressure, etc. It's because the rubber is viscoelastic. Steel lines, on the other hand, will respond basically instantaneously.
Not sure what mechanism is driving the pressure in this case, but here are two ideas now.

 06-03-2019, 01:46 AM