When you click on links to various merchants on this site and make a purchase, this can result in this site earning a commission. Affiliate programs and affiliations include, but are not limited to, the eBay Partner Network.
Air suspension rear pressure holding valve replacement question
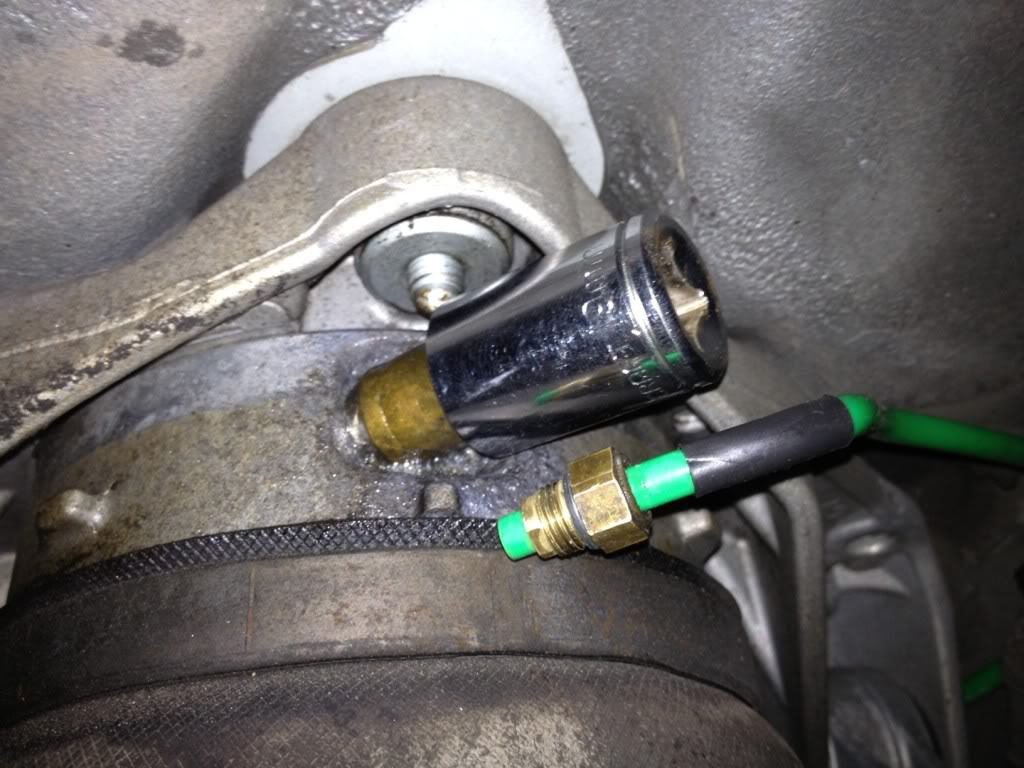
One of my rear pressure holding valves has failed on my 2008 Cayenne Turbo, as the back end of the car is at its highest point and will not lower. I ordered what I thought was the correction part (955-358-730-02) and got the old ones off (I'm replacing the part on both rear shocks), but have a question about the attachment of the air hose. When I compare the new part vs the old, you can see the extra element at the top, which looks like the piece that's attached to the existing plastic air hose.
This next shot isn't mine, but you can see the piece I'm talking about that's attached to the air hose.
First off, did I buy the correct part number? If so, what's the protocol to reconnect the air hose? Do I remove the element from the end of the new pressure holding valve, or do I leave it and shove in the existing plastic tube (after removing the current threaded element attached to the hose)? Or do I remove the element/coupling from the new pressure holding valve and screw in the old one that's attached to the hose?
It is a compression fitting and the ferrule is going to be extremely tight on the plastic line. Leave the old fitting on the plastic line and screw into the new valve. Swap the o rings if it makes you feel better. They dont give any extra length on those lines to work with.
It is a compression fitting and the ferrule is going to be extremely tight on the plastic line. Leave the old fitting on the plastic line and screw into the new valve. Swap the o rings if it makes you feel better. They dont give any extra length on those lines to work with.
This is precisely what I did when swapping mine. Make sure not to over tighten the valve to the shock and/or the line to the valve otherwise damage to the O-ring may result.
I just had the same Chassis Warning and valve failure as the OP. For reference, I went with an German supplier that was recommended on the Audi forum. The OEM units are $200+ and $130 (discounted) and the units from this supplier with a two-year guarantee are $79 each or $99 for a pair shipped from Germany. It is a no-brainer to replace both rears at the same time for and extra 20 bucks.
There appear to be a ton of cheap knockoffs of the valves out there and I for one am not willing to take a chance on them as there are no references that I can find.
An update on the installation. It can be done on the ground if you a bit of a contortionist. Raise the rig to the top level and then disable the PSM by pushing the rocker switch all the way forward until you have confirmation on the display.
The vehicle must be supported on jack stands on the frame in multiple places. It goes without staying, but I'm going to say it anyway, when you release the air the suspension will drop fairly rapidly. Unsupported, you are seriously a pancake if you don't use proper jack stands to support the vehicle.
It took me less than an hour, start to finish to do the passenger side rear. Fortunately, this solved my issues. I can probably do the other side in about 30 mins. As mentioned above, don't attempt to replace the compression fitting that is on the air line. Remove and replace the old o ring and leave the compression end on the line. The factory tool is worth every penny at $36 bucks.
If anyone has questions, feel free to PM me or post here.
I'm getting ready to do all four pressure holding valves, main air distribution block, and rebuild compressor (with kit) on my 2004 Cayenne S. Couple quick questions:
1) To replace valves on the rear, do you need to remove wheel liners (it seems so)? The valve looks to be pretty far back, but from what everyone is saying should be reachable without removing entire shock assembly.
2) To access the compressor unit, can the side plastic underbody cover be removed by itself, or does larger center plastic cover also need to be removed?
Thanks!
To reach the rear valves, raise the vehicle to special terrain mode and turn of the PASM system and then support it on jackstands. The wheel liners don't need to be removed, but you need to be very flexible to reach the valves. Be very careful when you remove the lines, you don't want to get hurt when the suspension changes angle with the air released. If you have a service lift, all the better. Be patient- it is a bit if a frustrating, arm-scraping experience. I suspect that is why Indys and Porsche remove the whole unit.
I haven't gotten around to rebuilding my compressor yet, and it is working fine, so I'll let someone else speak to your question about that.
Thanks Tom! I'm glad I probably don't have to remove the wheel liner. I'll loosen the valve and let out the air slowly, so I don't get my arm pinched when doing the rears.
Question: Do all the wheel positions drop when air is let out of one shock, or only the position that is being worked on? Just trying to figure out if I need to support the entire car or just the position I'm working on.
Its been a while since I last did it - I supported the entire car on jack stands but I believe only the corner that you open up drops. HOWEVER - I would strongly recommend putting the entire car on jack stands. Think about the worst case scenario here - you have an air suspension which has a fault and you're going to trust your life to a faulty air suspension. IF for some reason the entire air suspension starts leaking out and the whole car shifts on you, it will drop off the single or probably even two jackstands (if you supported the front/rear end). Its your life on the line and maybe only one valve has failed right now but I recall when I did the job, I ended up replacing all my valves because while only one outright failed, all of them were badly corroded and looked close to failure anyways.
Few suggestions:
Get the specialty socket for removing the valves. Its not terribly expensive and it makes the job a lot easier.
Get a 16mm ujoint socket. I recall the hardest part of the whole thing was the bolts that attach the shock to the subframe. If I recall correctly 2 or 3 of them are pretty easily but one of them is just at an awkward angle without much room to fit a regular socket + u-joint adapter. Get yourself a 16mm (I'm 99% sure its 16mm) u-joint socket (not the adapter, the actual socket thats built into the swivel thing). It'll fit nicely and makes the whole job painless. A nano socket might also work but I think those are even harder to find than a 16mm u-joint socket. A crowsfoot may also work but its been a while and I don't recall the area exactly. Either way - just be prepared for some frustration without something to help you. It is possible to do it without anything special and I did get one shock done without it but it took me a couple hours of frustration. With the socket, I got the other side done in minutes.
Look up the screws and speed nuts used for the fender liner, and pick up a few extra. There's bound to be a few of them that you're better off replacing rather than trying to reuse.
Some decent options for universal socket sets in case you don't have them already (pretty much a necessity in my opinion to work on modern cars):
Thanks for the advice! I ordered the valves from Germany (recommended previously in thread). They got here crazy fast, like a few days. I got these parts from Germany before I got anything else from U.S. I also ordered the specialty socket.
Just finished replacing all 4 of my air suspension pressure valves. Previous posts on the topic are accurate (thanks all!). A few notes from my replacement:
** I noticed that cheaper valves were available, but I have no idea of quality. Also, all the cheaper valves don't distinguish between front and rear valves, even though Porsche gives them different part numbers. Front and rear valves I bought look exactly the same, and I couldn't find any distinguishing numbers stamped in them. Maybe they have different pressure release ratings? The valves from Germany weren't terribly expensive and I received them only a few days after ordering.
Tools Used:
- 12 mm stubby open-end wrench to loosen hose connection. Easier to get stubby wrench in area to loosen/tighten hose connection.
- Volkswagen tool mentioned in post above (T10158/1 Air Suspension Pressure Valve Socket) and 1/4" ratchet. This tool is a must-have. You may be able to get the front valves off with some kind of pliers, but will be almost impossible in the rear. https://www.ebay.com/itm/Volkswagen-...72.m2749.l2649
- Small pick to remove old O-ring on hose connections to replace with new ones.
Process:
1) As mentioned previously, raise car to Special Terrain level and turn off automatic level control.
2) I was lazy/dangerous and only supported the frame at the wheel I was working on. Placed a jack at the frame support point closest to wheel being worked on. When valve is loosened and pressure released, that shock will shorten and jack will keep car supported. When pressure was released only the shock being worked on was effected, all others stayed raised. Recommend secondary support using jack stand for rear wheels, since you will be under the car.
3) Front valves are easy. Can be done without wheel being removed.
4) Rear valves require removal of the wheel. Easiest access to valve is from UNDERNEATH the car. On my first one I worked facing the wheel well, wrapping my arms around both sides of shock to reach the valve in back. Very difficult, even if you have long thin arms. About half-way through, I tried from underneath and realized that this is much easier way to access.
5) I left on the old hose connectors, since it was too difficult in rear to try and replace them, but did replace the O-rings. I was going to put a bit of lube on new O-rings, but they seemed to already be slick. Not sure if they were already prepped with something or just the rubber material. As such, I didn't use any lube on new O-rings.
6) After finishing each valve I lowered the jack a few inches from original position (when shock was full of air), but not enough for wheel to touch ground. Started the car and turned back on the level control. When shock filled back up with air, it raised car up enough to clear the jack. I figured this was a good way to make sure each shock is not damaged when empty (lowering wheel all the way to ground) or during refill (confusing level control because car is still jacked-up). Make sure all doors, hood, etc., are closed or level control will fault and not operate. You may have to wait 30 seconds-or-so for system to activate and fill the empty shock.
Replacing the valves seems to have fixed the problems I was having and air suspension faults. Next project is to restore the air compressor with BAGPIPINGANDY'S repair kit, new air dryer media, new metal fitting for air line that supplies on-board tire inflator (in case it's damaged), and replace air supply valve block. All parts purchased from eBay.


 06-15-2018, 07:03 PM