
PIWIS reading, R1 and R2, then what ??
 01-12-2016, 12:29 AM
#46
Rennlist Member
Thread Starter

Before starting the IPD winter project, I had a small one, that is done now.
Still trying to shoot on "extra" weight, I decided that the rails of the passenger seat was simply “too much of steel” !
Also, I used to have my extinguisher mounted vertically on front of the center console in the passenger side, and this was quite “rough & ugly” !
(I used to remove it for the "fun rides", being quite uncomfy, or even dangerous for my passenger. It is also true, that I could have a passenger on these "fun rides", but, on track, I simply hate to share the risks, so, my passenger seat is normally always empty !)
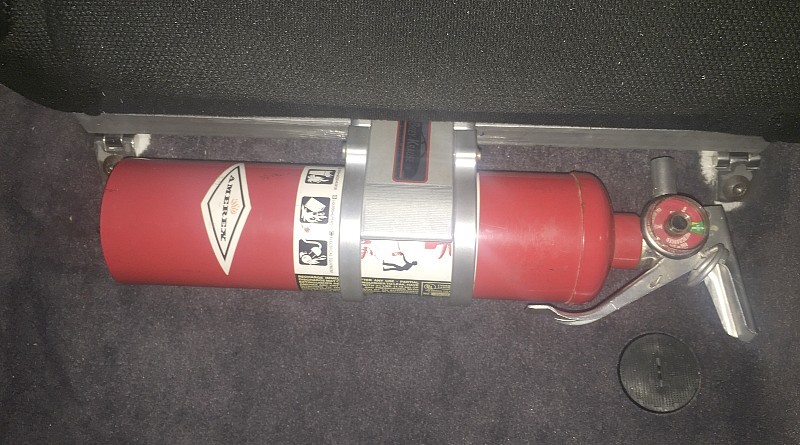
I decided to build a “fixed” aluminum frame, on dimension of the rails (but, a lot less weight !) and, also doing this mod, I went for stainless steel heavy duty hinges (marine type) in order to simplify (by "1/2" !) the occasional access to the engine firewall (removal), located on the back of the fronts seats (you can see these hinges on the photo).
Removing the original 2 rear “rail” screw enable now the (passenger) seat to pivot.
Doing so, a very elegant “Brey-Krause” extinguisher fast fixation system is now in place, attached in the front of my new seat fixation frame.
A good result of this mod, is now, the extinguisher is always mounted in the car.
All done :
Next, about the seat, I want to add an “anti sub” bar, (in the driver seat), in order to put two more points in action with the harness, but, I think, I will do that ..after the intake mod !!
Still trying to shoot on "extra" weight, I decided that the rails of the passenger seat was simply “too much of steel” !
Also, I used to have my extinguisher mounted vertically on front of the center console in the passenger side, and this was quite “rough & ugly” !
(I used to remove it for the "fun rides", being quite uncomfy, or even dangerous for my passenger. It is also true, that I could have a passenger on these "fun rides", but, on track, I simply hate to share the risks, so, my passenger seat is normally always empty !)
I decided to build a “fixed” aluminum frame, on dimension of the rails (but, a lot less weight !) and, also doing this mod, I went for stainless steel heavy duty hinges (marine type) in order to simplify (by "1/2" !) the occasional access to the engine firewall (removal), located on the back of the fronts seats (you can see these hinges on the photo).
Removing the original 2 rear “rail” screw enable now the (passenger) seat to pivot.
Doing so, a very elegant “Brey-Krause” extinguisher fast fixation system is now in place, attached in the front of my new seat fixation frame.
A good result of this mod, is now, the extinguisher is always mounted in the car.
All done :
Next, about the seat, I want to add an “anti sub” bar, (in the driver seat), in order to put two more points in action with the harness, but, I think, I will do that ..after the intake mod !!
Last edited by GVA-SFO; 01-18-2016 at 06:18 PM.
 01-18-2016, 06:03 PM
#47
Rennlist Member
Thread Starter
Another little improvement now in place :
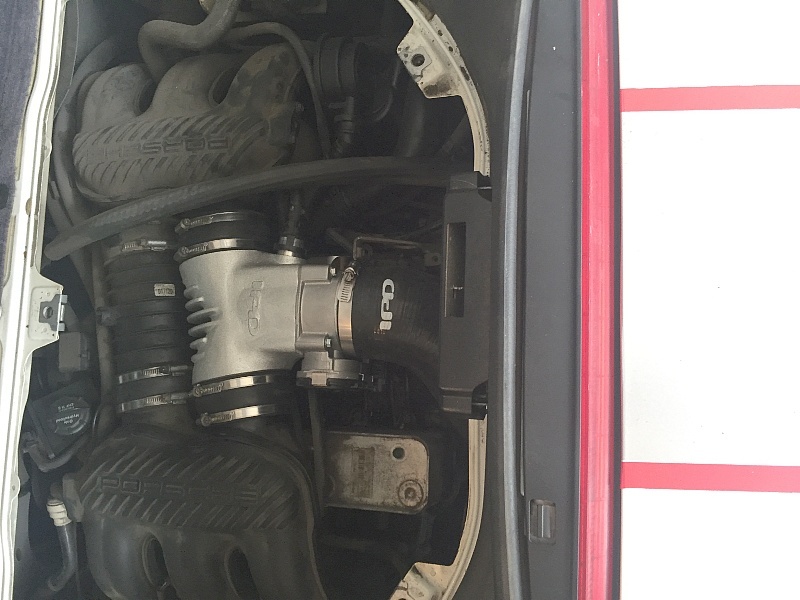
The stock 68mm intake line, (with a 68mm throttle box), is out, and a new complete line, from air filter (I had already an AFe “performance filter”) up to the plenum via the throttle box is now offering a section that have 18% more surface (all at 74mm).
I guess, next, I will have to work on the exhaust, i.e.: thinking about a solution with 200 cell cats (I want to keep cats, to be still road legal).
Well, too early to really say anything about the “butt control” difference, anyway, the real thing to take as reference, should be Laguna Seca lap time !
I can also mention that the installation was pretty much a piece of cake.
I was close to change my starter (that sometime makes a crazy noise !!) so, I do have one on my bench ready to go) when the stock plenum was out, as it is just down there, but, while the top screw is just easy to remove, the bottom one look like a big dive down ! I read that to remove the bottom one, you have to remove the firewall behind the seats, and then use a very long socket extension to catch it !
I did not had the envy to do it this time !
Last edited by GVA-SFO; 02-13-2016 at 01:44 PM.
02-12-2016, 08:33 PM
#48
Rennlist Member
Thread Starter
Found on eBay a cheap engine top cover, and, then, decided, for the fun, to make a hole on it, and put a piece of Perspex, to make a "see through" cover.
So, for the fun, ..it looks now like that :
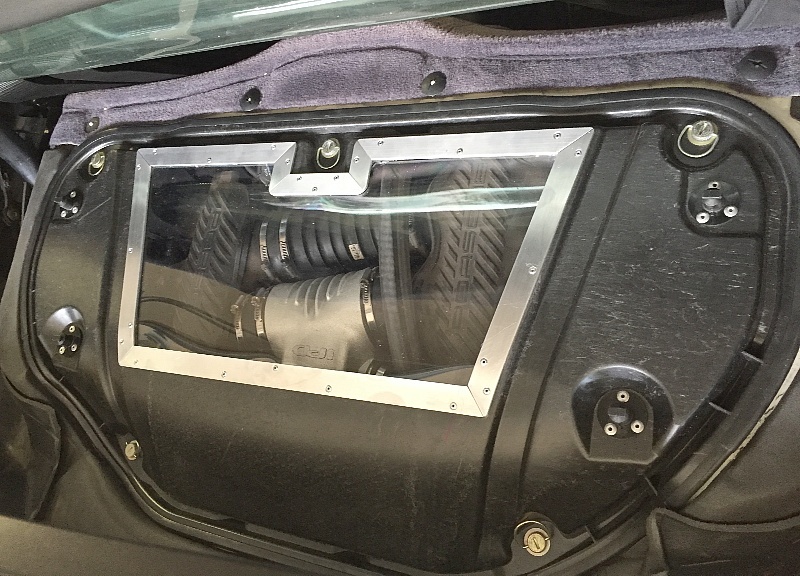
..But, as soon as you put back the "carpeting", ..it is useless !
Well, this until my plan for a more serious modification goes through !
But for the moment, it is only a concept that I'm thinking about !
(My roof will go, this is clear, I want to get rid of this weight.)
02-16-2016, 12:03 AM
#49
Rennlist Member
Thread Starter
Getting prepared for the season, I did a complete brake flush, this time with Motul 600, over the ATE typ200, that was in since my last flush !
While removing the wheels to access the brake flush valves, I took this “opportunity to remove the original front “Air Scoop” for the brake, and replace them with “GT3” Porsche OEM scoop, that I got directly from a Porsche dealer (this is an inexpensive pair of plastic shape), this was very easy to replace (i.e.: 3 minutes, when the wheel is not in place)
Here are two photos, “before” and “after”, to let you see the difference of the shape.
(Yes, in today’s service, I also did blow air in the rotor holes, but, after the photos !!
I love brakes, ..as much as I love engine power, so, for me, any brake improvements, ..are good improvements.
While removing the wheels to access the brake flush valves, I took this “opportunity to remove the original front “Air Scoop” for the brake, and replace them with “GT3” Porsche OEM scoop, that I got directly from a Porsche dealer (this is an inexpensive pair of plastic shape), this was very easy to replace (i.e.: 3 minutes, when the wheel is not in place)
Here are two photos, “before” and “after”, to let you see the difference of the shape.
(Yes, in today’s service, I also did blow air in the rotor holes, but, after the photos !!


I love brakes, ..as much as I love engine power, so, for me, any brake improvements, ..are good improvements.
Last edited by GVA-SFO; 02-21-2016 at 01:47 AM.
02-21-2016, 12:58 AM
#50
Rennlist Member
Thread Starter
Working hard to loose weight, ..and then, finally looking at the scale, to measure the results !!!
OK, so far, I changed :
. the Lead battery against a Li-ion one, gain : 16 kg or 35 lbs
. I removed the roof, ..and the scale said : 18 kg, or 39 lbs
(Note : these two "heavy weight" were located pretty high up in the car, so, VERY good also for lowering the center of gravity !)
I changed the OEM manual seats, to Sparco Sport buckets :
. passenger, fixed, with an aluminum frame/side plates, gain : 13.7 kg or 30 lbs
. driver, still with OEM (sliding) rails, gain : 10.7 kg or 24 lbs
About the wheels : OZ Alleggerita against OEM Turbo look Twist :
Front gain x2 (2 wheels) : 7.76 kg, or 17.1 lbs
Rear gain x2 (2 wheels) : 10.64 kg, or 23.5 lbs
. wheels gain of the set : 18 kg, or 40.6 lbs (…of unsprung mass = yes, a kind of very good hot gain !!!!!)
or, a current total "gain" (lost) of 79 kg, or 169 lbs !!!!
Basically, I should be currently pretty close to the weight of a Boxster Spyder, that is, if my info is correct, they are 176 lbs lighter than a Boxster !
. When I’m on track, I do always remove the spare tire and the tool box : 10 kg, or 22 lbs
or, a total gain on track of : 89 kg or, 191 lbs !
Yes, a lot of work, but, over the OEM curb weight (1’295 kg or 2’855 lbs), I can see, that all my effort are worse about 6.7% !
Or, ..a bit more than myself !!!
I'm not quite sure if I will go deeper than that. Or may be side glasses in Perspex, and this is pretty much it !
After this "slim fast" session, I will have to go for better brakes and more power. Will see !!
Last edited by GVA-SFO; 09-10-2016 at 04:04 PM.
02-21-2016, 01:27 AM
#51
Rennlist Member
Thread Starter
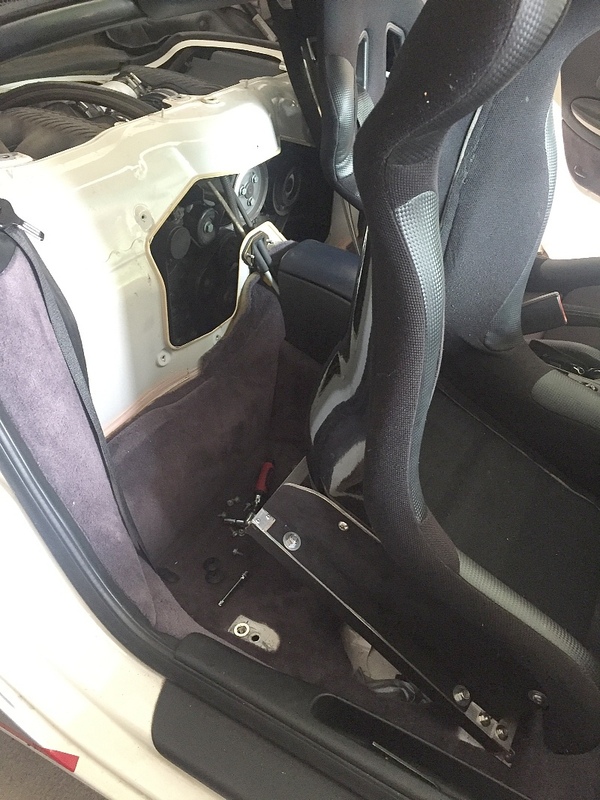
I decided to also cover the side mounting plate (aluminum) of the pax side, with Alcantara, ..just to make it looking as the driver side !
Now, it looks like that :

A better look of the Brey-Krause very nice extinguisher fast fixation (..and a view of the hinge, that enable pivoting seat after two bold removal ) :

And, if you have a doubt, about using marine heavy duty Stainless Steel hinge, that makes now an easy two bold (the rear ones) release, to pivot the pax seat, i.e.: to give a faster access into the firewall hole access, here is a shot to visualize it :
(..Yes, when the roof is no longer here, it is much "cleaner" back there !!)
Now, it looks like that :
A better look of the Brey-Krause very nice extinguisher fast fixation (..and a view of the hinge, that enable pivoting seat after two bold removal ) :
And, if you have a doubt, about using marine heavy duty Stainless Steel hinge, that makes now an easy two bold (the rear ones) release, to pivot the pax seat, i.e.: to give a faster access into the firewall hole access, here is a shot to visualize it :
(..Yes, when the roof is no longer here, it is much "cleaner" back there !!)
Last edited by GVA-SFO; 05-13-2016 at 09:13 PM.
02-23-2016, 12:17 AM
#52
Rennlist Member
Thread Starter
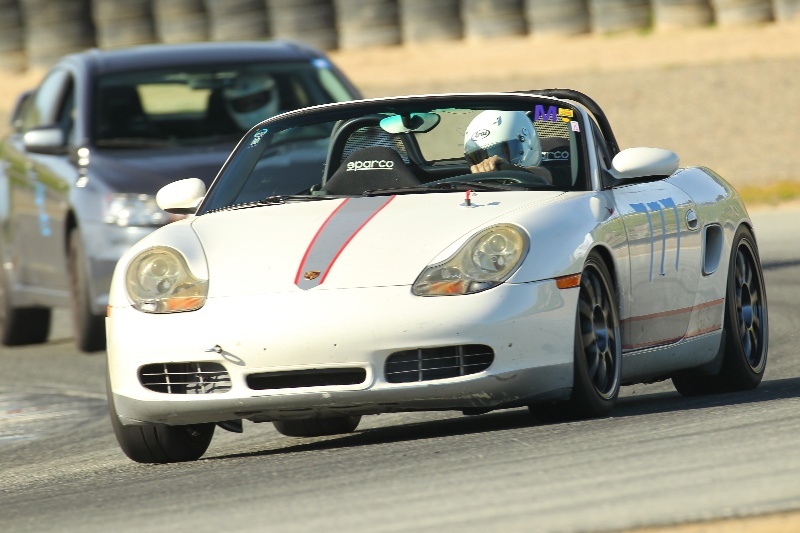
After that work on the car, having the real fun, ..i.e.: back to Laguna Seca.
(This time, again with the great guys of the Lotus Golden Gate Club. Always a great pleasure to be with them, and beside the humans, I love the Lotus too: Light is simply so Right !)
Here we can see the new “air scoops” of the front brakes in action :
Yes, BK bar = success on broomstick test
Another one, ..down the Cork Screw, always with a lot of pleasure :

Photos copyright Dito Milian @gotbluemilk.com
Some technical “results” analysis :
I would say that the 74mm IPD + the 74mm throttle box gave me at least two sec. per lap. ..Good to be now below the 1:50 with this config.
The difference, between my last laps, end of last year, is about 3 secs, so this can be only the IPD ..and no roof (less 18kg !)
Still, the NT01 are the biggest gain in this business, i.e.: around 6 sec easy !
(This time, again with the great guys of the Lotus Golden Gate Club. Always a great pleasure to be with them, and beside the humans, I love the Lotus too: Light is simply so Right !)
Here we can see the new “air scoops” of the front brakes in action :
Yes, BK bar = success on broomstick test
Another one, ..down the Cork Screw, always with a lot of pleasure :
Photos copyright Dito Milian @gotbluemilk.com
Some technical “results” analysis :
I would say that the 74mm IPD + the 74mm throttle box gave me at least two sec. per lap. ..Good to be now below the 1:50 with this config.
The difference, between my last laps, end of last year, is about 3 secs, so this can be only the IPD ..and no roof (less 18kg !)
Still, the NT01 are the biggest gain in this business, i.e.: around 6 sec easy !
Last edited by GVA-SFO; 03-03-2016 at 10:53 PM.
03-02-2016, 12:02 AM
#53
Rennlist Member
Thread Starter
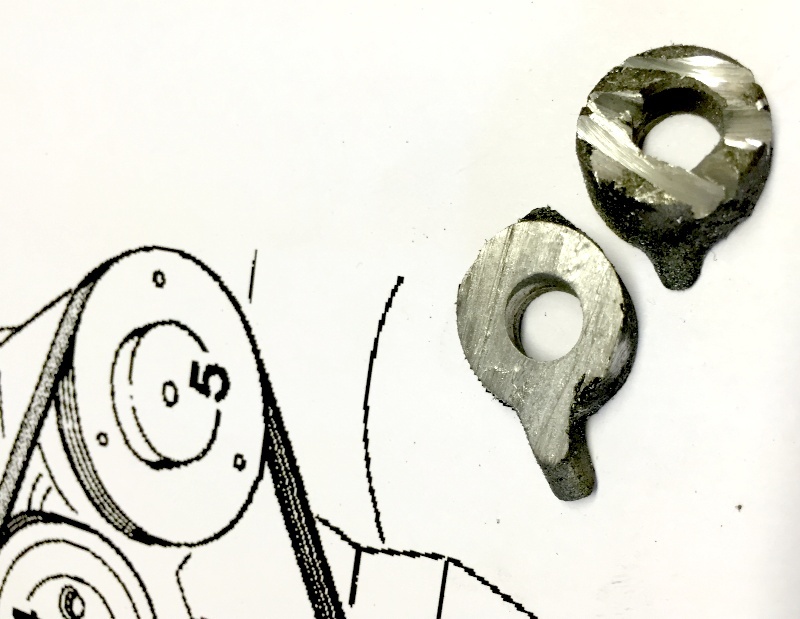
It was the time to change the serpentine belt, so, I decided, ..after having problem with my power steering pump (now, it leaks !  ), to install a 4” underdrive main pulley.
All done by now, but I can say, that it was not so much fun to do.
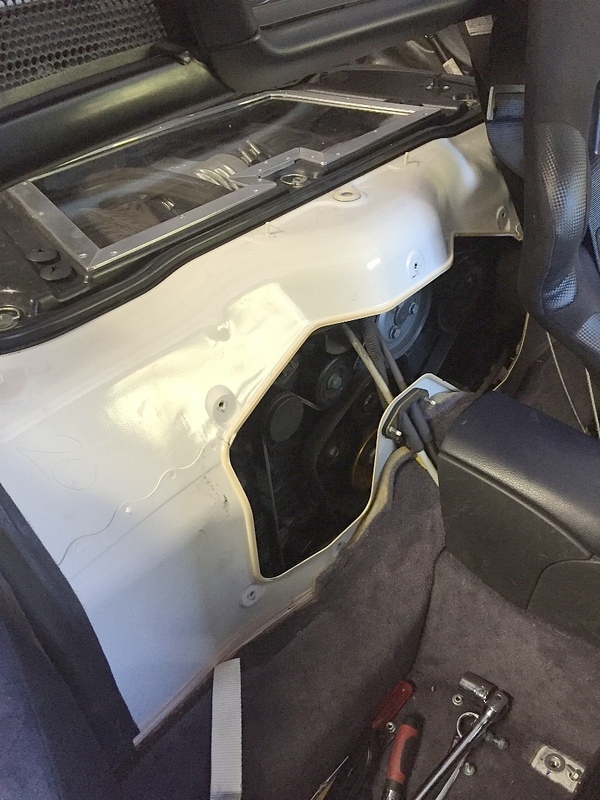
Sure, thanks to my pivoting pax bucket seat and no more roof : it is a piece of cake to gain the access. (For me, no need to move out the driver seat.)
Removing the current belt : also piece of cake, ..if you have a 24mm wrench (to release the tensioner).
(Yes, 24mm ..it is a “big” one ! I think you can train a baseball swing with that !)
Then, removing the OEM main pulley: also pretty easy, (it is again a 24mm nut !)
(locking it, using a piece of metal through one of the holes of the pulley).
At this point, IMO, you reach the end of the fun.
You have then, to take out the bossage, that is on the back of the OEM pulley, ..otherwise, no 4” underdrive pulley is going to fit !
I tried first with my Dremel, but, no way to have a good angle, so, pretty much “no way Jose”, ..or, you can spend a nite down there, it looks like trying to do gold mining with a tea spoon !
I decided to go with a mini wireless reciprocating saw with a very short (metal) blade, (nothing is better than a Milwaukee !) and that was not that bad.
The cut is not “straight”, but, after two slices, it shaved the bossage enough to fit the 4” underdrive pulley.
Then, Loctite (I was quite generous with it, as I felt that I will not come back here !!!) and 40 lbs-ft torque in a new screw (it is strongly advise to put a new one). I used a “plumber” locking tool, i.e.: a nylon belt fixed on an aluminum breaker bar (Home depot, plumbing dept. !).
Not so easy, no real fun, ..but doable !
To finish with ..putting a new (shorter serpentine belt) on, around the all the ancillaries, using one or two hands to maintain the belt on his way, another to hold the light and one more to bind the tensioner (24mm nut) in order to put the belt on place.
Not fun as the belt act like a snake, i.e.: you knock the head, he tries to hit you with the tail, and if you hit the tail, he tries to byte you. So, the best would be to have 6 hands, ..but there is only the place for one person in the front of the "small" firewall hole !
All to say that I think that if I’m going to buy another Boxster, I will for sure put an underdrive pulley very quickly, (not waiting to have problem with the power steering this time !), but, I think that for sure, I will have a garage doing it !
Some photos :
No roof : access is easy:
Shaving the bossage : one attempt with the Dremel, no big action (see the tiny "cuts" on the top slice !), and then two slices, the first was too shy, the second was fine. (Here are the cutted pieces !)
Doing all that from the pax side, after pivoting the bucket seat. Anyway, this firewall hole ..is not that large !!
OK, all runs good, then, time to put everything back in place is going to be easy again !
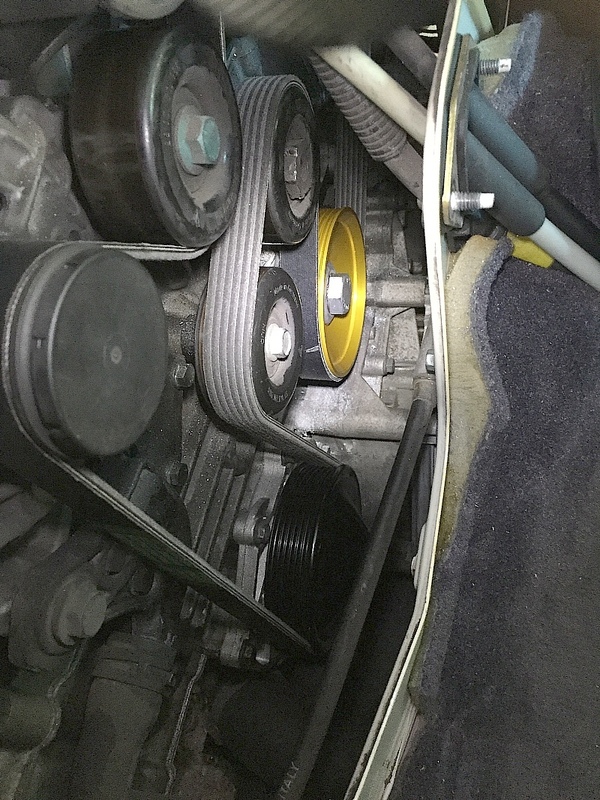
..Yes, it is a gold plated (joke) underdrive pulley. With all this work, good to have a nice looking one !
), to install a 4” underdrive main pulley.All done by now, but I can say, that it was not so much fun to do.
Sure, thanks to my pivoting pax bucket seat and no more roof : it is a piece of cake to gain the access. (For me, no need to move out the driver seat.)
Removing the current belt : also piece of cake, ..if you have a 24mm wrench (to release the tensioner).
(Yes, 24mm ..it is a “big” one ! I think you can train a baseball swing with that !)
Then, removing the OEM main pulley: also pretty easy, (it is again a 24mm nut !)
(locking it, using a piece of metal through one of the holes of the pulley).
At this point, IMO, you reach the end of the fun.
You have then, to take out the bossage, that is on the back of the OEM pulley, ..otherwise, no 4” underdrive pulley is going to fit !
I tried first with my Dremel, but, no way to have a good angle, so, pretty much “no way Jose”, ..or, you can spend a nite down there, it looks like trying to do gold mining with a tea spoon !
I decided to go with a mini wireless reciprocating saw with a very short (metal) blade, (nothing is better than a Milwaukee !) and that was not that bad.
The cut is not “straight”, but, after two slices, it shaved the bossage enough to fit the 4” underdrive pulley.
Then, Loctite (I was quite generous with it, as I felt that I will not come back here !!!) and 40 lbs-ft torque in a new screw (it is strongly advise to put a new one). I used a “plumber” locking tool, i.e.: a nylon belt fixed on an aluminum breaker bar (Home depot, plumbing dept. !).
Not so easy, no real fun, ..but doable !
To finish with ..putting a new (shorter serpentine belt) on, around the all the ancillaries, using one or two hands to maintain the belt on his way, another to hold the light and one more to bind the tensioner (24mm nut) in order to put the belt on place.
Not fun as the belt act like a snake, i.e.: you knock the head, he tries to hit you with the tail, and if you hit the tail, he tries to byte you. So, the best would be to have 6 hands, ..but there is only the place for one person in the front of the "small" firewall hole !
All to say that I think that if I’m going to buy another Boxster, I will for sure put an underdrive pulley very quickly, (not waiting to have problem with the power steering this time !), but, I think that for sure, I will have a garage doing it !
Some photos :
No roof : access is easy:
Shaving the bossage : one attempt with the Dremel, no big action (see the tiny "cuts" on the top slice !), and then two slices, the first was too shy, the second was fine. (Here are the cutted pieces !)
Doing all that from the pax side, after pivoting the bucket seat. Anyway, this firewall hole ..is not that large !!
OK, all runs good, then, time to put everything back in place is going to be easy again !
..Yes, it is a gold plated (joke) underdrive pulley. With all this work, good to have a nice looking one !
Last edited by GVA-SFO; 07-22-2019 at 03:27 PM.
03-02-2016, 12:32 AM
#54
Rennlist Member
Thread Starter
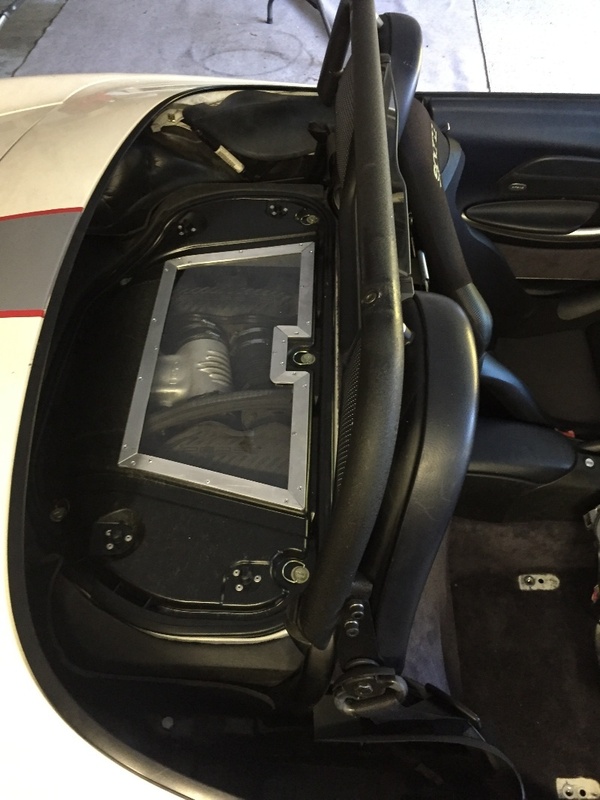
By the way, a Boxster with no roof in action, it looks like that :
(When the "glove box" and the carpeting is in place".
Yes, I will do some work later on this "place" !
(When the "glove box" and the carpeting is in place".
Yes, I will do some work later on this "place" !
03-03-2016, 04:38 PM
#55
Rennlist Member
Thread Starter
Another problem is arriving : I have to do the Smog Test
Well, the Li-Ion battery, that is a great weight saver for me, ..request a switch off while the car is not in use, as draining a Li-Ion just kills these !
..And, switching it off makes the ECU being "reset" and the sensors are deactivated !
and no way to do any Smog Test. (Or : how to throw 60 bucks out of bound !)
To "re-activate" the sensors, you have to go through what is called a "drive cycle", that is not that easy !
Well, it looks like this simple operation (for a car that have all OEM cats, primary and secondary, and original ECU firmware with no reflash) i.e.: passing a smog test, is going to be quite problematic !!
Last edited by GVA-SFO; 03-03-2016 at 11:03 PM.
03-04-2016, 11:28 AM
#56
Race Director

Another problem is arriving : I have to do the Smog Test
Well, the Li-Ion battery, that is a great weight saver for me, ..request a switch off while the car is not in use, as draining a Li-Ion just kills these !
..And, switching it off makes the ECU being "reset" and the sensors are deactivated !
and no way to do any Smog Test. (Or : how to throw 60 bucks out of bound !)
To "re-activate" the sensors, you have to go through what is called a "drive cycle", that is not that easy !
Well, it looks like this simple operation (for a car that have all OEM cats, primary and secondary, and original ECU firmware with no reflash) i.e.: passing a smog test, is going to be quite problematic !!
Well, the Li-Ion battery, that is a great weight saver for me, ..request a switch off while the car is not in use, as draining a Li-Ion just kills these !
..And, switching it off makes the ECU being "reset" and the sensors are deactivated !
and no way to do any Smog Test. (Or : how to throw 60 bucks out of bound !)
To "re-activate" the sensors, you have to go through what is called a "drive cycle", that is not that easy !
Well, it looks like this simple operation (for a car that have all OEM cats, primary and secondary, and original ECU firmware with no reflash) i.e.: passing a smog test, is going to be quite problematic !!
Nothing really special about the drive. A minute or two of idling after cold start, a mile or less of surface street driving. 28 miles of freeway driving, with a mile or so of surface street driving and I'm at work.
The "trick" is to avoid hammering on the engine. Just "normal" driving is all that is needed to get the readiness monitors set to complete.
You can use an OBD2 code reader to periodically check the status and when they are complete just run the car in and get it smog checked/tested.
03-05-2016, 04:08 PM
#57
Rennlist Member
Thread Starter
Thanks Macster,
I did some searches, and found that, to �restart the sensors, the car need to go through what is called a �drive cycle�, or :
� Start engine from cold, let idle for approx. 2 min, 10 secs.
� Accelerate to 20-30 MPH, Maintain steady speed for approx 3 min, 15 secs.
� Accelerate to 40-60 MPH, Maintain steady speed for approx 15 mins.
� Decelerate and come to a stop. Then:
� Idle in Neutral for 5 mins. (manual trans.)
� Idle in Drive for 5 mins. (Tiptronic trans.)
During the drive cycle, do not exceed 3,000 rpm or 60 mph.
Such drive should put in the sensors �back to work�, after a battery disconnection.
Otherwise, it looks like another solution is to have an appointment with a County �Referee�, that would analyze the situation and then take the appropriate decisions for the smog test of such cars !
I will see what I can do to make it.
03-05-2016, 05:07 PM
#58
Rennlist Member
Thread Starter
By the way, about “Piwis reading”, I should be a pretty bad driver, as, now, the “R1”, are up to the roof, ..or, into the max of what a 16bit computer can count !! (65'535), the "last" been recorded about 4 hours ago, ..or in Laguna Seca last week !!!
(Hopefully, the "R2" are still at the same number, as when I bought the car.)
Interesting also to observe that in about 3 years, I used it ..for 100 hours !
(This still with about 1/3 of that time of use on tracks.)

(Hopefully, the "R2" are still at the same number, as when I bought the car.)
Interesting also to observe that in about 3 years, I used it ..for 100 hours !
(This still with about 1/3 of that time of use on tracks.)
Last edited by GVA-SFO; 08-09-2016 at 12:39 AM.
03-06-2016, 02:14 PM
#59
Race Director
Thanks Macster,
I did some searches, and found that, to �restart the sensors, the car need to go through what is called a �drive cycle�, or :
� Start engine from cold, let idle for approx. 2 min, 10 secs.
� Accelerate to 20-30 MPH, Maintain steady speed for approx 3 min, 15 secs.
� Accelerate to 40-60 MPH, Maintain steady speed for approx 15 mins.
� Decelerate and come to a stop. Then:
� Idle in Neutral for 5 mins. (manual trans.)
� Idle in Drive for 5 mins. (Tiptronic trans.)
During the drive cycle, do not exceed 3,000 rpm or 60 mph.
Such drive should put in the sensors �back to work�, after a battery disconnection.
Otherwise, it looks like another solution is to have an appointment with a County �Referee�, that would analyze the situation and then take the appropriate decisions for the smog test of such cars !
I will see what I can do to make it.
I did some searches, and found that, to �restart the sensors, the car need to go through what is called a �drive cycle�, or :
� Start engine from cold, let idle for approx. 2 min, 10 secs.
� Accelerate to 20-30 MPH, Maintain steady speed for approx 3 min, 15 secs.
� Accelerate to 40-60 MPH, Maintain steady speed for approx 15 mins.
� Decelerate and come to a stop. Then:
� Idle in Neutral for 5 mins. (manual trans.)
� Idle in Drive for 5 mins. (Tiptronic trans.)
During the drive cycle, do not exceed 3,000 rpm or 60 mph.
Such drive should put in the sensors �back to work�, after a battery disconnection.
Otherwise, it looks like another solution is to have an appointment with a County �Referee�, that would analyze the situation and then take the appropriate decisions for the smog test of such cars !
I will see what I can do to make it.
The important thing is to get all the readiness monitors set to complete and get the car checked and it passed and be done with this.
03-06-2016, 06:09 PM
#60
Rennlist Member
Thread Starter
Thanks Macster,
I will try to make it this week.
The first thing I need to do, is to temporarily replace my Li-Ion battery by the original piece of Lead ! Like that, I will not have to shut off the battery.
By the way, I have another problem to solve : My power steering pump leaks, and after some basic observations, it is not the O rings (3 of them) that are in the joints between the tank and the bottom of the pump. (I removed the tank to see that all the O rings were "fine".
So, the problem is most probably at the return of the circuit (it is in the low (no) pressure side), but I did not understood yet how this pipe (aluminum material) connect into the lower part of the tank ! It looks like a kind of plastic red joint, is between the aluminum (circuit return) and the black plastic of the lower part of the power steering tank. Anybody knows how this connection works ?
Well, at least, it tend to make me understand that my power steering leak problem is not related to "too much pressure" and the late setup of a 4" underdrive pulley, as, if it would have been the case, the leak would have been in the high pressure side !!
Last edited by GVA-SFO; 03-06-2016 at 09:07 PM.