When you click on links to various merchants on this site and make a purchase, this can result in this site earning a commission. Affiliate programs and affiliations include, but are not limited to, the eBay Partner Network.
Well I have the infamous oil leak between the tiptronic and transfer case on my 2008 Targa 4S with 65000 miles and may need some help. I had my fingers crossed that it was a leak from my transmission pan gasket, had it replaced a couple of weeks ago but as half expected leak was still there and now it was beginning to taunt me each morning as I looked at it pooling on my garage floor. I put the car into a transmission specialist last week in the Dallas area and ouch the quote was $3600 to have the seals/gaskets replaced. Since I've already had a bunch of work done on the car the past year and cant really explain this cost to my wife, i've decided to go ahead with the fix myself. I've searched the forums and even though there is a lot of info on this problem there's no clear diy steps that I can find.
So I started the job on Monday. I jacked the car up and put the car on stands, removed the plastic under pan. I removed the metal guard that attaches to the transmission mount. I removed the drive shaft by taking out the three bolts that attach the shaft to the flange on the front of the transmission. With each bolt I put the car in neutral and then turned the drive shaft so the next bolt was positioned facing down which made it easier to remove. Once they were removed I pulled the drive shaft down and then then back, since the shaft is attached in the front by a splined shaft it simply pulls out.
I then loosened the two nuts that attach the transmission mount to the top mount. This had the impact on lowering the transmission about 1 inch. At this point I placed a jack under the transmission to support it. I started removing the two 16mm horizontal bolts that attach the trans mount to the transmission. This is where I ran into my first big problem. The bolts are in tight as blue locktite is used on these bolts. The first one came out without too many problems using a breaker bar and socket but the second was stuck in fast. I forced this so much I was afraid of breaking the bolt, I used a tapping technique, I used pb blaster let it soak in and started again with no luck. I gave it a break and came back the next day with the same result. I used my map gas torch to heat the bolt but again no luck, this time I unded up rounding the edges of the bolt so the socket started slipping. After three days of trying I was thinking about using my angle grinder to cut off the #$% mount when as a last resort I bought a set of bolt grip sockets from Lowes which bite down on the bolt head and it finally it came loose. The problem was the bolt had corroded and bonded to the aluminum.
I removed the two 3 inch rubber water hoses that run along side the transfer case. These come off pretty easy, remove the 4 circle clips and then pull apart, I used a flat screwdriver to help pull them apart and held a bucket under to catch the radiator fluid.
After the trans mount came off I removed the two bolts that attach the mount (which the transmission mount attaches to) to the floor of the car. Once the two bolts came out the mount was loose, however there was not enough room to take it out. The problem was the flange at the front of the transfer case (that attaches to the drive shaft) was in the way and no matter how I maneuvered I couldn't get this out. I don't think I have to take off of the flange to remove the transfer case so I would rather not touch this as it looks like I need a special socket which I don't have to get at the funny looking nut that holds the flange in place. So instead I think I have to lower the front of the transmission some more to get this out. I've stopped for tonight and will tackle this problem tomorrow. Any advice on this would be appreciated.
So I did this operation on a 996 4S, manual. So I don't know if this helps or is the same, but if its the mount setup shown in the photo, it must come down. It does take some wiggling. Just think, it is easier to take it out than put it in! I had a hard time getting it to line up and sit on the studs. I had also heard that Auto trans, engine must come out to get the transaxle out, but that is just something I remember.
Thanks ChicagoSpeed, today I was able to drop the nose of the tip by dropping the large cross mount that runs under the engine by an inch. This gave me enough room to wiggle the top trans mount out. The engine cross mount can be dropped by removing the two lower bolts and then loosening the top two bolts. I was able to do this without removing the two cross bars that run from this mount to the suspension wishbone even though I understand most people remove these as well.
I also forgot to mention in my last post that I also drained the ATF which I saved and will reuse since i only replaced this when I changed my tip sump gasket a week or two ago. I also removed the aluminum cross bar that runs under the transmission.
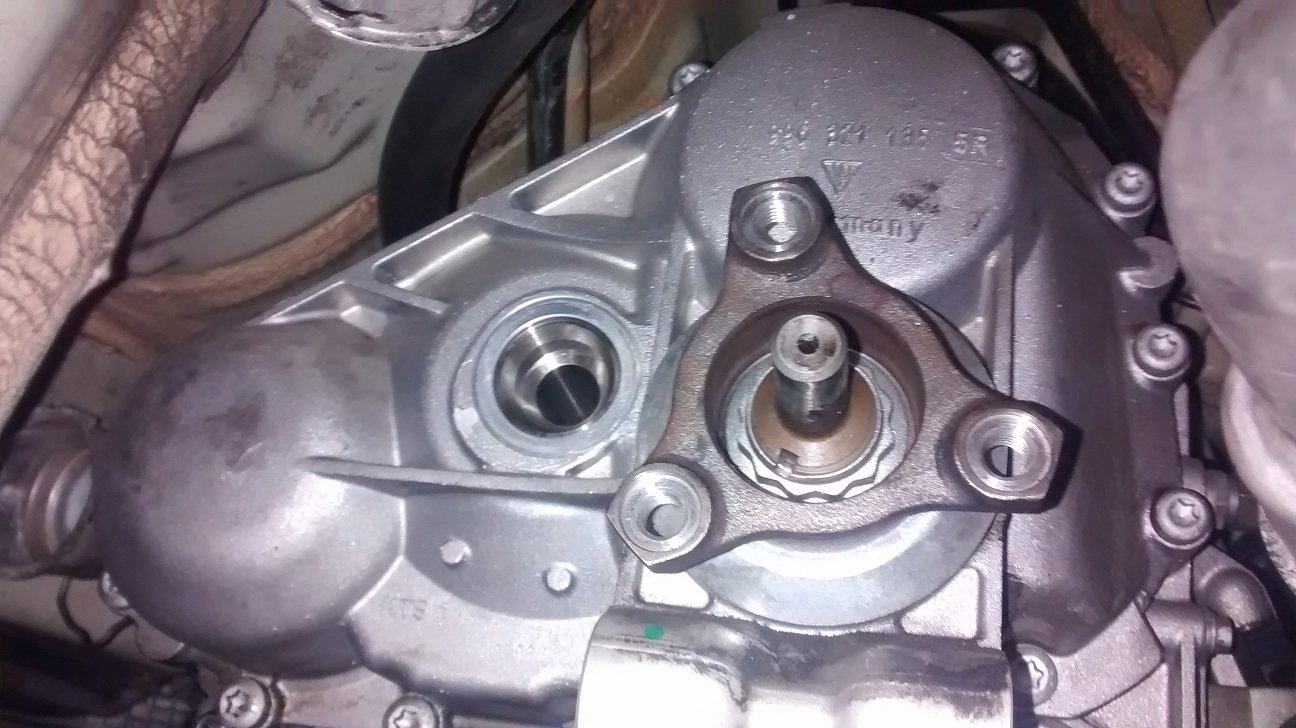
I found out today that I do need to remove the flange (yolk) that exits the transmission and attaches to the drive shaft. I need a deep 30mm socket which I don't have so I'll make another trip to the auto store tomorrow. I also removed the hex key bolt next to the yolk. A cone shaped washer and bolt came out. Once I get the yolk off I should be able to start to pull the transfer case housing off. I'll take a photo before I take it off and will post. I also ordered the gasket kit from IPT transmissions which will get here in a few days.
I now have the 12 point 30mm deep socket to remove the yoke. I've realized there is a small notch on the nut that needs to be released before you can remove the nut. I've been using a small punch to try and hit the notch out which is on the edge of the nut with no success. I may need to drill the notch out but will keep trying today. The good news I guess is i'm in no hurry so will take this slowly to avoid doing any damage.
Breakthrough today. I was able to take the first main casing off. I ended up wasting a lot of time getting the yoke off which I discovered was not necessary when removing the casing. I had to drill out the notch on the 30mm 12 point nut so I'll need to find a replacement nut when it's time to re assemble.
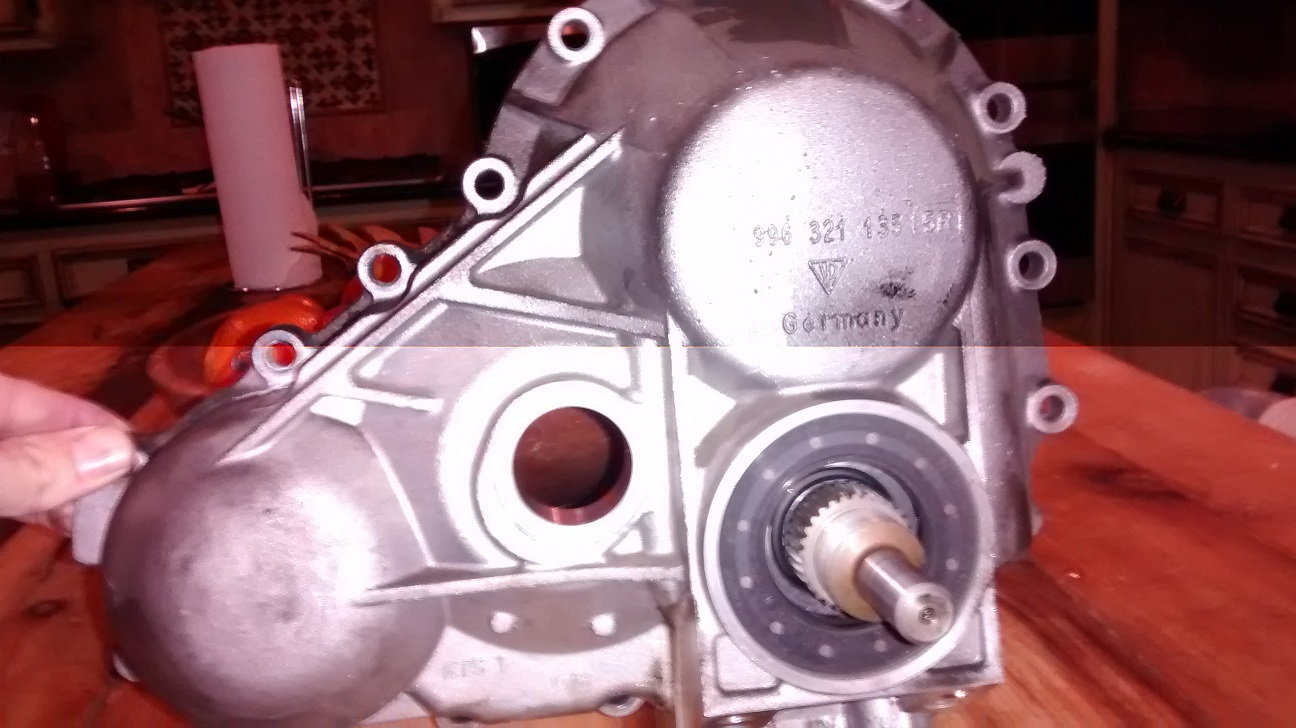
Removing the 16 torx casing bots was pretty easy as they are only torqued to 19lbsft. The only tricky part of removing the casing bots is that one is hidden under the foot of trans mount. The foot comes off with another 4 torx bolts, once this is off you can easily access the hidden casing bolt. With all the 16 bolts removes I gently rocked the casing off with a large flat screwdriver. I've attached photos of the job so far.
this is transfer case casing, I ended up removing the yolk which was unnecessary.
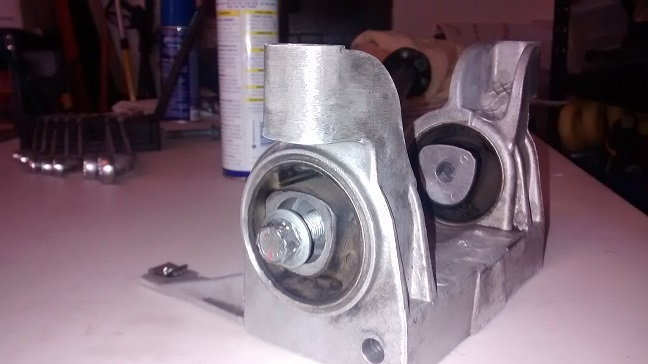
This was the stuck bolt on the transmission mount, you can see that i butchered the bolt getting it out.
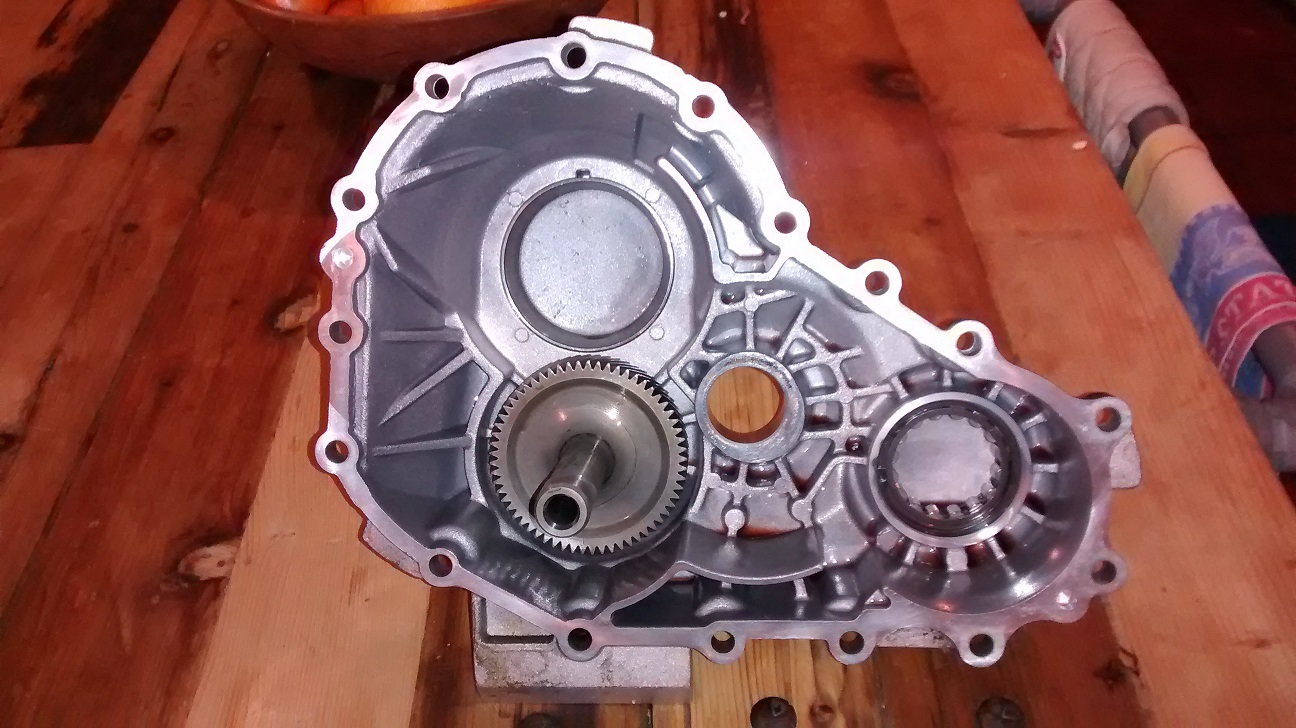
finally I was able to take the first casing off.
this is the other side of the casing.
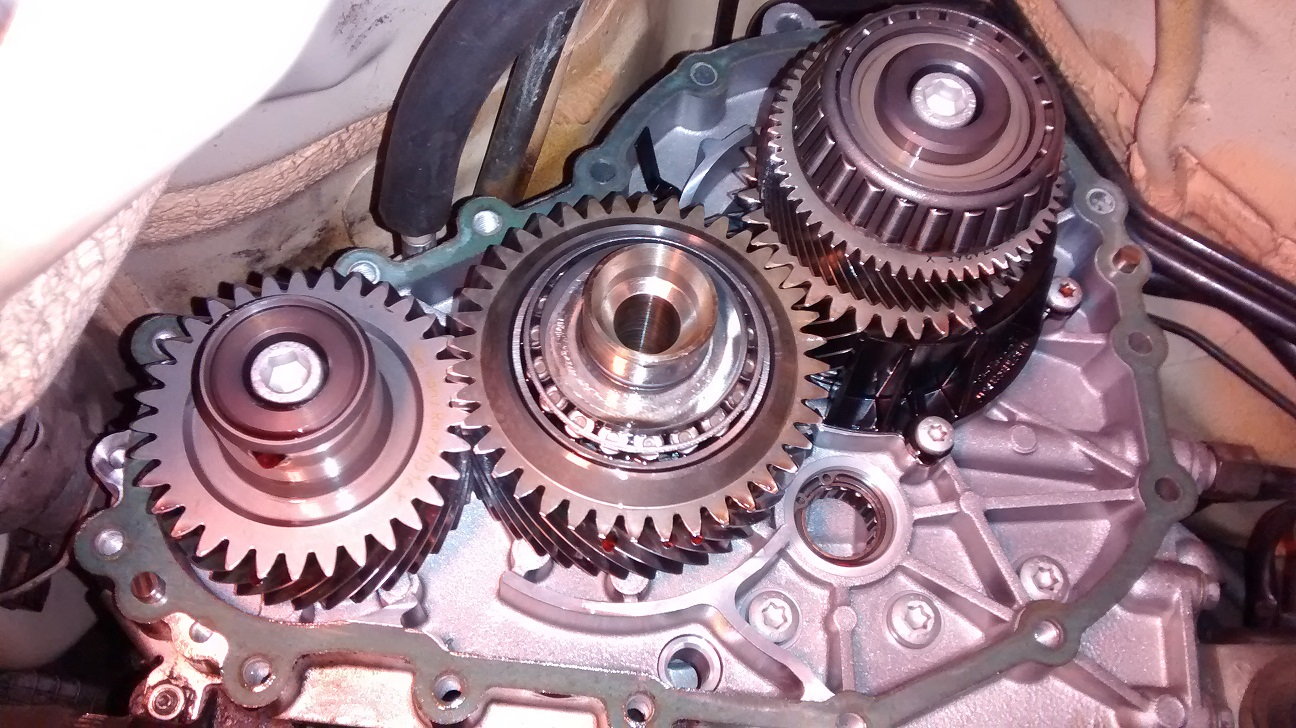
this is the remaining gears and 2nd casing that still needs to come off. Note the gasket on this looks fine.
I forgot to mention in my last post that its important to shift the transmission into neutral before taking off the first casing as the gears need to move slightly.
Success today, I was able to remove the second casing. First a 10mm hex tool is needed to remove the two bolts from two of the gears, these are torqued on pretty tight so I needed to use a breaker bar. The plastic surround also needs to be removed around the main gear. Once these are removed the gears were able to be removed pretty easily by pulling with my hands starting with the left gear. Again the transmission needs to be in neutral as the gears need to turn some. Be careful to to ensure you know how to replace them in what order as there are shims and bearings that come off. The middle gear also has a rubber o-ring on the shaft that also need to be removed to take off the last bearing.
Once the three gears are removed you have access to all the torx bolts that hold the 2nd casing on. Mine were way to loose which makes me think this is the reason for my leak (I was able to remove a few of them with my fingers only!). I later plan to re-tighten these on to the same torque as the the first casing boltss which is 19 lbsft. I removed the oil line that attaches to the right of the casing. I also removed the bolts holding the pipes at the bottom of the casing, I also removed a small electrical fitting as well as the mount high up that holds the transmission gear lever. These all removed easily. I also removed the plastic casing that surrounds the drive shaft that goes back to the transmission on the left side even though I think you can do the job without removing this.
Once this is done, the casing pulls away easily. Looking at the 2nd gasket there are two places where it looks like the gasket had torn. I've included photos here of the 2nd casing after it was removed.
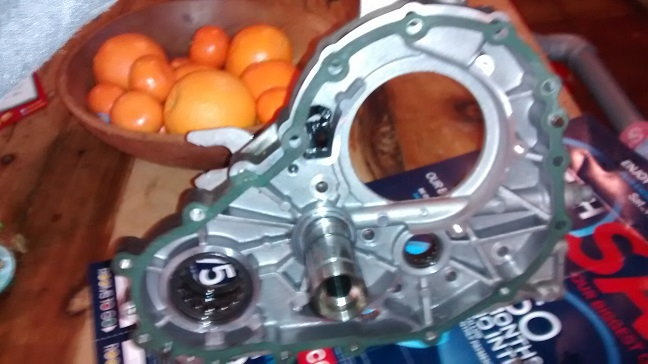
this is the back of the 2nd casing.
this is the 2nd casing from the front after I removed it.
yep, she's an understanding woman. Of course the picture was taken when she was out the house.
Good timing the gaskets arrived today so I was able to put it all back together tonight. It was definitely easier to put it back together than taking it apart. I replaced the two small rubber o-rings that go around the small pipe that fits between the 2nd casing and the transmission. This is the pipe that returns oil to the pan. It's about 1.5 inches long and actually pulls completely out. There are two o-rings on each side of the pipe. This is one of the common places for leaks so I used some silicon as well as replaced the o-rings when I put it back together. I put it back together in the reverse order as above. Tomorrow I'll replace the fluids and take it for a drive. I'll give an update in a week to tell if the fix was successful.
I torqued the casing bolts at 19 ftlbs, the gear hex bolts at 38 ftlbs and the main yoke nut at 120 ftlbs. I'm not 100% sure if these are the right numbers but were the best I could figure out.
Overall this is a manageable DIY, I'd rate it 7 out of 10 in complexity. The main thing is to take your time and enjoy the process. Take lots of pictures to ensure you know how it goes back together.
keep on driving,
Rob
thanks for the great write-up. Porsche caused mine. 3 of the inner case bolts could be turned with my fingers, and one was literally backing out.
Just finished mine(2002 996tt), great reference, thanks. Same situation, although main cause was bad transmission mounts, could see silver (aluminum) on gasket from case movement where both gaskets tore. Inner case has 6 bolts, again like above, 3 were finger tight. Guy (importperformancetrans.com, call, as web page not working for gaskets) I bought gaskets from instructed me to loctite bolts and torque to 22 lbs, which I did. He rebuilds these and adds performance mods as well. Now just waiting on front shaft donut, which is hard and cracked. Check your mounts!!!
Thanks for your article, I unfortunately I have the same issue with my 996 Turbo with only about 50k miles.The leak is from the front gasket (the one closest to the trannsmission). From reading your article it appears that you did the job in more than day. Do you have an estimate as to how .many actual hours that it took you to complete the job? Also, by a ny chance did you get any quotes for the job either from an independant Porsche shop, or from a local dealer?
Thanks for your article and for any reply that you could mske.
Jim
Everyone (dealer and indi) I called acted confused when I mentioned what I needed done. I would guess at most 10hours. The engine doesn't need to come out. I did it taking my time in 8.
I would recommend getting the gaskets, and then take it to a Mercedes transmission repair shop for replacement. Also, you should replace the plug on the top, and filter while they are there. The plug is available at Mercedes for $20.
Sorry for the late response, i've been away on a family vacation and only catching up now. I would guess 12-16 hours of actual work over a week for me taking my time. Most most of the work was figuring out what to do next as well as a stuck transmission mount bolt that took some time. I originally took my car into an indi transmission specialist in Dallas, the quote was around $3500 if I remember correctly which was the primary reason I took on the job myself. Most dealerships wont take on this job without charging big $ so I avoided even getting a quote from them. It ended up being a pretty rewarding job though and I got to know the car well, I think the job all up only cost me around $200 in parts. The key is having the time to work on the car and taking lots of breaks when it starts to get frustrating. Photos at each step are also a big help. If you decide to do it, good luck. This is a great forum if you need help or get stuck. -Rob

 02-19-2016, 02:01 AM