
DIY: Updating the mounting pins on a 996 hardtop for a 997
 10-20-2013, 02:14 AM
#1
I found great posts on updating the hardtop mounts in the car but not much on updating the hardware on the hardtop itself. So, I took a few pictures during the process and recorded my notes below. Note, I worked on the hardtop while it was sitting on
. I suppose you could also work on it while the top was on the ground, but, I found the vertical orientation of the cart helpful for this project. On to the steps...
Step 1: Remove some trim
The pin mounts are covered on either side of the hardtop by a black plastic trim piece which sort of resembles a speaker grill. Each piece has three posts. Two of the posts are just snapped in but the one in the "front" (furthest from the window) is held in with a metal clip below the deck of the hardtop (upper left in the photo below). Put some pressure on the clip and then remove the front post. Be careful not to loose the clip or the thin metal washer on the post (the clip has a tendency to pop off so just be careful).

Step 2: Remove the passenger side mount
Each mount is secured with three bolts. Start with the passenger side as it's less complicated.
Step 3: Unplug the defroster connection
The driver side mount is connected to the rear window defroster. When the top is on the car, this pin forms a circuit with the corresponding mount on car. This is how power gets to the defroster. So, to remove the driver side mount, you need to first remove the defroster connection. This step would be easier if you could remove the trim piece that runs the length of the inside of the top. However, I wasn't sure how to do this. There are many posts that hold the trim to the hardtop and each is held in with a plastic clip. I was worried about breaking the clips so, I didn't try to take the piece off. Instead, I worked around it which is a bit of a PITA. Here's how I did it.
Step 3a: Remove the foam from the bottom of the driver side of the hardtop
This will give you access to the space behind the trim piece. The defroster power and ground connections are back there. The foam is just stuck in there so you can simply pull it out. Just be gentle because the foam has two cut-outs in it to fit it around the metal panels of the top. If you pull too hard it might separate the foam.

Step 3b: Remove the tape holding down the defroster wires
There are two pieces of grey electrical tape holding down the power and ground wires to the hardtop behind the trim. I used a trim removal tool to pry the tape off of the inside wall of the top. After the tape was off I used a second trim tool to hold it down while I separated the wire from the tape. It's slow going but you can do it.

Step 3c: Disconnect the defroster ground
This is the brown wire. The ground is plugged into a port behind the first trim post. You should be able to reach your hand in and unplug it - it's a tight fit.

Step 3d: Disconnect the defroster power
This is the other wire. The power cord is short. Really short. The way I did this was to pull the trim piece away from the hardtop down by where it meets the window. Then I reached my fingers behind the trim and held onto the power while I pulled the wire connected to the mount. This is the biggest PITA part of the project. Leave the power cable sticking out to make it easier to re-connect later on.

Step 4: Remove the driver side mount
With the defroster disconnected you can now remove the driver side mount from the hardtop.
Step 5: Install the passenger side mount
This is straight forward - three bolts.
Step 6: Install the driver side mount
I found it easiest to install the mount on the top before I tried to connect the defroster. Again, straight forward - three bolts.
Step 7: Connect the defroster power
The power plug clicks in so you need to apply some pressure and therefore need a good hold on both pieces. The way I did this was to feed the wire from the mount behind the trim piece and up and over just like the power cable. With both cables now popping over the trim piece I was able to get enough of a hold on them to re-connect them. I then fed the connected cables back behind the trim.

Step 8: Connect the defroster ground
The ground is pretty simple to install if you can fit your and in there. The plug is right behind the first trim piece. I used a trim removal tool to position the wire just above the plug and then I squeezed my hand behind the trim and pushed it in.
At this point, you are ready to put the top onto the car and adjust the mounting pins. According to the workshop manual, the adjustments need to made on the car, so, do not tighten the pins themselves. Again, if you can figure out how to remove the trim along the driver side of the hardtop the whole process becomes super simple: remove passenger side mount, unplug defroster, remove driver side mount, replace mounts and hook-up defrost. The PITA is working around the trim. Anyways, I hope this saves someone some time.
Jason
PS - I got the hardtop kit from Suncoast. Here's what comes in the kit in case anyone is curious:

Step 1: Remove some trim
The pin mounts are covered on either side of the hardtop by a black plastic trim piece which sort of resembles a speaker grill. Each piece has three posts. Two of the posts are just snapped in but the one in the "front" (furthest from the window) is held in with a metal clip below the deck of the hardtop (upper left in the photo below). Put some pressure on the clip and then remove the front post. Be careful not to loose the clip or the thin metal washer on the post (the clip has a tendency to pop off so just be careful).
Step 2: Remove the passenger side mount
Each mount is secured with three bolts. Start with the passenger side as it's less complicated.
Step 3: Unplug the defroster connection
The driver side mount is connected to the rear window defroster. When the top is on the car, this pin forms a circuit with the corresponding mount on car. This is how power gets to the defroster. So, to remove the driver side mount, you need to first remove the defroster connection. This step would be easier if you could remove the trim piece that runs the length of the inside of the top. However, I wasn't sure how to do this. There are many posts that hold the trim to the hardtop and each is held in with a plastic clip. I was worried about breaking the clips so, I didn't try to take the piece off. Instead, I worked around it which is a bit of a PITA. Here's how I did it.
Step 3a: Remove the foam from the bottom of the driver side of the hardtop
This will give you access to the space behind the trim piece. The defroster power and ground connections are back there. The foam is just stuck in there so you can simply pull it out. Just be gentle because the foam has two cut-outs in it to fit it around the metal panels of the top. If you pull too hard it might separate the foam.
Step 3b: Remove the tape holding down the defroster wires
There are two pieces of grey electrical tape holding down the power and ground wires to the hardtop behind the trim. I used a trim removal tool to pry the tape off of the inside wall of the top. After the tape was off I used a second trim tool to hold it down while I separated the wire from the tape. It's slow going but you can do it.
Step 3c: Disconnect the defroster ground
This is the brown wire. The ground is plugged into a port behind the first trim post. You should be able to reach your hand in and unplug it - it's a tight fit.
Step 3d: Disconnect the defroster power
This is the other wire. The power cord is short. Really short. The way I did this was to pull the trim piece away from the hardtop down by where it meets the window. Then I reached my fingers behind the trim and held onto the power while I pulled the wire connected to the mount. This is the biggest PITA part of the project. Leave the power cable sticking out to make it easier to re-connect later on.
Step 4: Remove the driver side mount
With the defroster disconnected you can now remove the driver side mount from the hardtop.
Step 5: Install the passenger side mount
This is straight forward - three bolts.
Step 6: Install the driver side mount
I found it easiest to install the mount on the top before I tried to connect the defroster. Again, straight forward - three bolts.
Step 7: Connect the defroster power
The power plug clicks in so you need to apply some pressure and therefore need a good hold on both pieces. The way I did this was to feed the wire from the mount behind the trim piece and up and over just like the power cable. With both cables now popping over the trim piece I was able to get enough of a hold on them to re-connect them. I then fed the connected cables back behind the trim.
Step 8: Connect the defroster ground
The ground is pretty simple to install if you can fit your and in there. The plug is right behind the first trim piece. I used a trim removal tool to position the wire just above the plug and then I squeezed my hand behind the trim and pushed it in.
At this point, you are ready to put the top onto the car and adjust the mounting pins. According to the workshop manual, the adjustments need to made on the car, so, do not tighten the pins themselves. Again, if you can figure out how to remove the trim along the driver side of the hardtop the whole process becomes super simple: remove passenger side mount, unplug defroster, remove driver side mount, replace mounts and hook-up defrost. The PITA is working around the trim. Anyways, I hope this saves someone some time.
Jason
PS - I got the hardtop kit from Suncoast. Here's what comes in the kit in case anyone is curious:
 05-02-2014, 11:26 AM
#3
Thanks! Check out this thread: https://rennlist.com/forums/997-foru...a-997-a-4.html Edgy01 posted some great pics showing proper adjustment of the pins. DO NOT SKIP THIS STEP. I skipped the adjustment and ended up scratching the clear coat on the convertible top cover. :\
05-03-2014, 06:16 PM
#5
AutoX

Join Date: Feb 2014
Posts: 14
Likes: 0
Received 0 Likes
on
0 Posts
Ok fixed it. Somehow the bolt and mount got cross-threaded really bad. So I rethreaded with a 10mm x1.5 pitch tap and die. Thank you for the previous link. I set the bolt length to spec and if fits perfectly.
02-10-2015, 01:51 AM
#6
4th Gear

Join Date: Jun 2011
Posts: 4
Likes: 0
Received 0 Likes
on
0 Posts
Hi,
I have been reading a lot here about 996 hardtop conversion to 997 and appreciated the helpful information there.
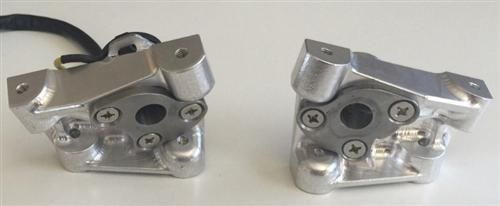
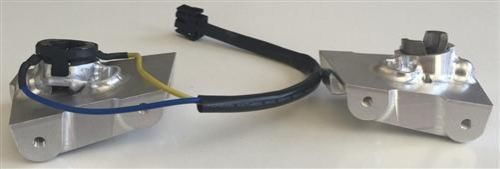
From what I have learned the easiest / most cost efficient way to mount an older style 996 (twist pin type) hardtop would be to just install the matching twist pin-type mounts.
Some people claim that Porsche changed them to the screw type because of problems but I had this type of mounts on my 996 C4 convertible and never any problems with them which makes my rather suspect that the true reason for changing the mount and locks is to make it impossible to fit 996 hardtop on 997 convertibles and buying expensive new hardtops instead or at least have to convert them with a lot of effort to the newer screw type pins�. 
The problem is now that the old twisted pin type mounts (part numbers 996.561.653.03 and 996.561.654.03) seem to be discontinued and not available from Porsche dealers anymore. The reason again would probably be that Porsche has not interested in people just buying the old type mounts and easily putting 996 hardtops on 997 convertibles that way�")
Recently when I was trying to found some used old type mounts in the internet I couldn�t find any but I looks that these mounts have been remanufactured by some company called �Daytona� in a claimed improved version from mil-grade alu alloy and are now sold at a similar price like the discontinued cast iron original mounts.
This looks kind of interesting to me and could be a much cheaper solution and less effort than to convert the hardtop itself and later to have to readjust it completely.
Has anyone tried this part yet / any experiences?
You can find them here:
http://www.ebay.com/itm/PORSCHE-996-...e=STRK:MESE:IT
or look for item No. �2717610954672� or �996 hardtop retrofit� on ebay
I have been reading a lot here about 996 hardtop conversion to 997 and appreciated the helpful information there.
From what I have learned the easiest / most cost efficient way to mount an older style 996 (twist pin type) hardtop would be to just install the matching twist pin-type mounts.
Some people claim that Porsche changed them to the screw type because of problems but I had this type of mounts on my 996 C4 convertible and never any problems with them which makes my rather suspect that the true reason for changing the mount and locks is to make it impossible to fit 996 hardtop on 997 convertibles and buying expensive new hardtops instead or at least have to convert them with a lot of effort to the newer screw type pins�.
The problem is now that the old twisted pin type mounts (part numbers 996.561.653.03 and 996.561.654.03) seem to be discontinued and not available from Porsche dealers anymore. The reason again would probably be that Porsche has not interested in people just buying the old type mounts and easily putting 996 hardtops on 997 convertibles that way�
Recently when I was trying to found some used old type mounts in the internet I couldn�t find any but I looks that these mounts have been remanufactured by some company called �Daytona� in a claimed improved version from mil-grade alu alloy and are now sold at a similar price like the discontinued cast iron original mounts.
This looks kind of interesting to me and could be a much cheaper solution and less effort than to convert the hardtop itself and later to have to readjust it completely.
Has anyone tried this part yet / any experiences?
You can find them here:
http://www.ebay.com/itm/PORSCHE-996-...e=STRK:MESE:IT
or look for item No. �2717610954672� or �996 hardtop retrofit� on ebay
Trending Topics
09-03-2015, 07:31 PM
#9
Track Day
Join Date: Sep 2015
Location: NJ
Posts: 23
Likes: 0
Received 0 Likes
on
0 Posts

