
997.2 Spark Plug DIY
 01-28-2013, 02:10 PM
#1
Note: I obtained torque values from the following DIY:
http://www.renntech.org/forums/tutor...k-plug-change/ ( free to join and view )
The above DIY requires disconnecting the exhaust manifolds and not the mufflers. For my (lower) skill level I found it simpler and easier do a little more work and remove the two outer mufflers and not mess with the exhaust manifolds.
Tools used:
19 mm socket with breaker bar for wheel bolts
Spark plug wrench ( socket )
Swivel
8” inch extension
Breaker bar
Torque wrench(es) for 96 ft-lbs, 22 ft-lbs, 7.5 ft-lbs
13 mm deep socket
13mm Elbow Ratcheting Wrench
E10 socket
T30 driver
10 mm socket
narrow flat bladed screw driver
penetrating oil
Hydraulic Jack
2 jack stands
wheel chocks
Safely jack up the rear of the car and place on jack stands. Remove rear wheels and outer mufflers. See my following post for the details as this is routine for some.
Once the mufflers are removed you get clear access to the side of the engine. Remove the two upper shield bolts using an E10 socket or wrench. ( the configuration on the left and right sides of the car are slightly different. Right side shown ) To remove the shield it helps to unclip the front oxygen sensor wire just forward and above the front coil pack.
Move shield upward and then out. Carefully move the shield forward and out of the way. I did this by going outside of ground strap and inside the O2 sensor wire per photo below.
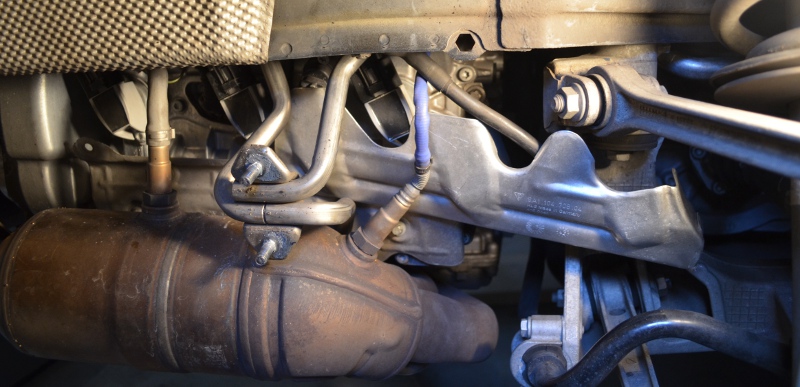
From the photo below you can see that there is clear access to all three coil packs. ( the catalytic converter/exhaust manifold has not been moved). I was able to replace all the spark plugs using just an 8” extension with swivel and spark plug socket. I was also able to very easily use a torque wrench on all of the plugs.
Remove the one screw per each coil pack. ( using a T30 driver ) Be careful not to drop it inside the lower shield or you will have a job fishing in out. Disconnect the coil pack electrical connection using a narrow flat bladed screw driver to lifting up the locking tab per the below photo. ( a longer screw driver might be better )
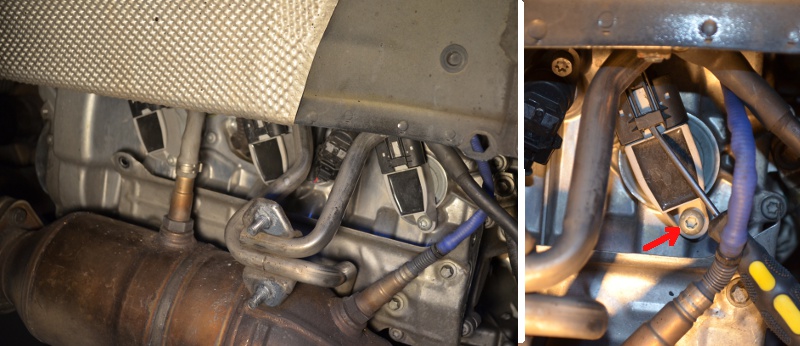
Pull out the coil pack. It helps to rotate it slightly back and forth while extracting it.
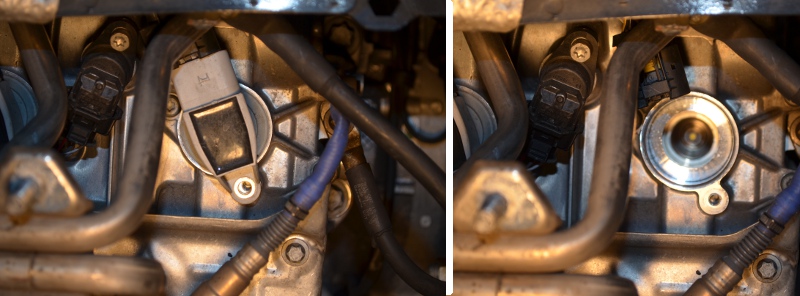
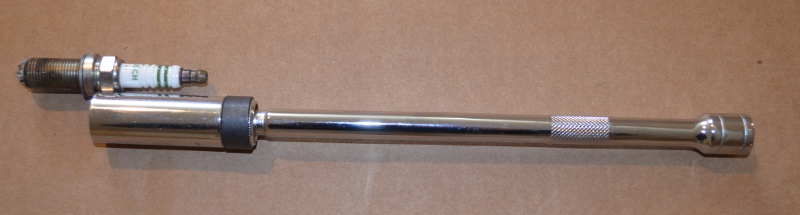
Remove the spark plug with a spark plug wrench and breaker bar. ( note – the photo below shows an integrated spark plug socket, swivel and 8”extension )
I read somewhere on Rennlist that it is best to not touch the new sparkplugs. Perhaps the oils from our fingers are detrimental. Porsche OEM plug threads are wrapped with cardboard so you can handle the plugs from there. Do not use anti-sieze compound on the threads. ( edit - see discussion of why below )
Insert the plug into your spark plug wrench and remove the cardboard. Insert into spark plug tube and hand tighten only to prevent cross threading. Once the plug is threaded in all the way by hand, torque to 22 ft-lbs.
Insert coil pack back into the spark plug hole rotating back and forth slightly to help get it seated properly. Replace the T30 screw and torque to 7.5 ft-lbs. Connect the wiring harness to the coil pack, making sure it clicks in securely. Repeat the above for the 5 remaining plugs.
Replace the upper shields the opposite of how they were removed and secure with the two bolts each side. Do not forget to snap in the front oxygen sensor wires into their respective clips.
Replace the outer mufflers, mount the wheels and torque the wheel studs to 96 ft-lbs in a criss-cross pattern. Lower the car off the jack stands and you are done.
Enjoy the satisfaction of doing this job yourself!
http://www.renntech.org/forums/tutor...k-plug-change/ ( free to join and view )
The above DIY requires disconnecting the exhaust manifolds and not the mufflers. For my (lower) skill level I found it simpler and easier do a little more work and remove the two outer mufflers and not mess with the exhaust manifolds.
Tools used:
19 mm socket with breaker bar for wheel bolts
Spark plug wrench ( socket )
Swivel
8” inch extension
Breaker bar
Torque wrench(es) for 96 ft-lbs, 22 ft-lbs, 7.5 ft-lbs
13 mm deep socket
13mm Elbow Ratcheting Wrench
E10 socket
T30 driver
10 mm socket
narrow flat bladed screw driver
penetrating oil
Hydraulic Jack
2 jack stands
wheel chocks
Safely jack up the rear of the car and place on jack stands. Remove rear wheels and outer mufflers. See my following post for the details as this is routine for some.
Once the mufflers are removed you get clear access to the side of the engine. Remove the two upper shield bolts using an E10 socket or wrench. ( the configuration on the left and right sides of the car are slightly different. Right side shown ) To remove the shield it helps to unclip the front oxygen sensor wire just forward and above the front coil pack.
Move shield upward and then out. Carefully move the shield forward and out of the way. I did this by going outside of ground strap and inside the O2 sensor wire per photo below.
From the photo below you can see that there is clear access to all three coil packs. ( the catalytic converter/exhaust manifold has not been moved). I was able to replace all the spark plugs using just an 8” extension with swivel and spark plug socket. I was also able to very easily use a torque wrench on all of the plugs.
Remove the one screw per each coil pack. ( using a T30 driver ) Be careful not to drop it inside the lower shield or you will have a job fishing in out. Disconnect the coil pack electrical connection using a narrow flat bladed screw driver to lifting up the locking tab per the below photo. ( a longer screw driver might be better )
Pull out the coil pack. It helps to rotate it slightly back and forth while extracting it.
Remove the spark plug with a spark plug wrench and breaker bar. ( note – the photo below shows an integrated spark plug socket, swivel and 8”extension )
I read somewhere on Rennlist that it is best to not touch the new sparkplugs. Perhaps the oils from our fingers are detrimental. Porsche OEM plug threads are wrapped with cardboard so you can handle the plugs from there. Do not use anti-sieze compound on the threads. ( edit - see discussion of why below )
Insert the plug into your spark plug wrench and remove the cardboard. Insert into spark plug tube and hand tighten only to prevent cross threading. Once the plug is threaded in all the way by hand, torque to 22 ft-lbs.
Insert coil pack back into the spark plug hole rotating back and forth slightly to help get it seated properly. Replace the T30 screw and torque to 7.5 ft-lbs. Connect the wiring harness to the coil pack, making sure it clicks in securely. Repeat the above for the 5 remaining plugs.
Replace the upper shields the opposite of how they were removed and secure with the two bolts each side. Do not forget to snap in the front oxygen sensor wires into their respective clips.
Replace the outer mufflers, mount the wheels and torque the wheel studs to 96 ft-lbs in a criss-cross pattern. Lower the car off the jack stands and you are done.
Enjoy the satisfaction of doing this job yourself!
Last edited by DGrayling; 02-01-2013 at 06:36 PM. Reason: .
 01-28-2013, 02:17 PM
#2
Steps to remove the outer mufflers. This is actually quite simple once you get the hang of it.
Safely raise the rear of the car. Chock the opposite front wheel to prevent the car from rolling. Place the rear of car and place on jack stands. Here is a great DIY on this by Edgy01: https://rennlist.com/forums/997-foru...-securely.html I use JackPoint jack stands myself as it makes this step very simple.
Remove the rear wheels using a 19 mm socket wrench and breaker bar.
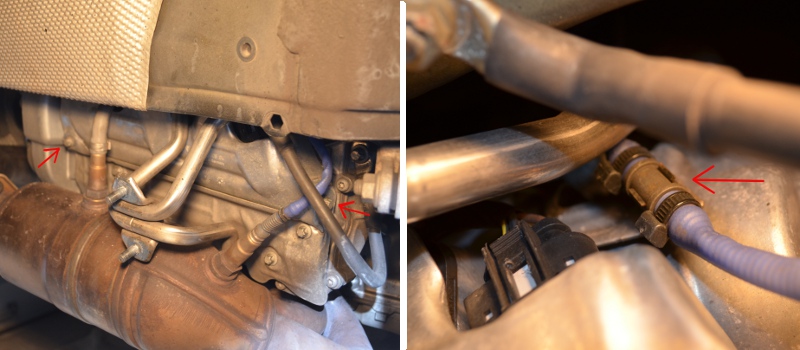
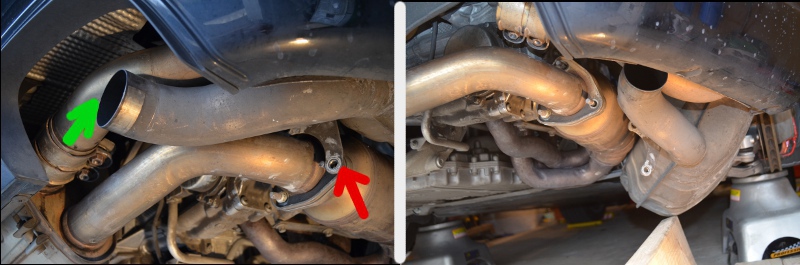
Remove both side mufflers. First soak the screws and nuts with penetrating oil and wait awhile prior to undoing the fasteners. I used Kano Aerokroil and let them soak overnight.
Remove exhaust tip using an E12 socket. Loosen center muffler to side muffler sleeve nuts. (13 mm deep socket )
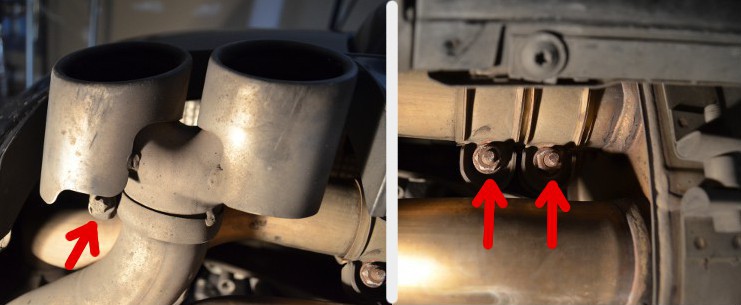
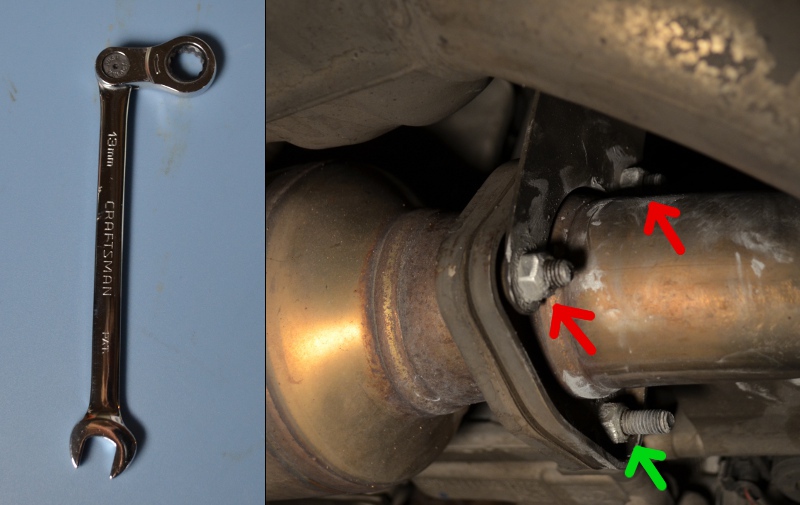
Remove the nuts connecting the muffler to the catalytic converter/center muffler. ( 13mm socket or wrench ) The upper two nuts need to be removed . . . the lower nut only needs to be loosened some. The topmost nut is rather difficult to get to. More so on the left side of the car. This caused me to buy a 13mm Elbow Ratcheting Wrench shown below. A 13 mm S shaped box wrench might work and would less expensive.
The below pics show the opposite side of the car.
Remove the two nuts at the front of side mufflers accessed from the wheel well. ( 13 mm deep socket ) Also remove the rear bumper cover support bar . . . undo one screw using a T30 driver and one bolt using a 10 mm socket.
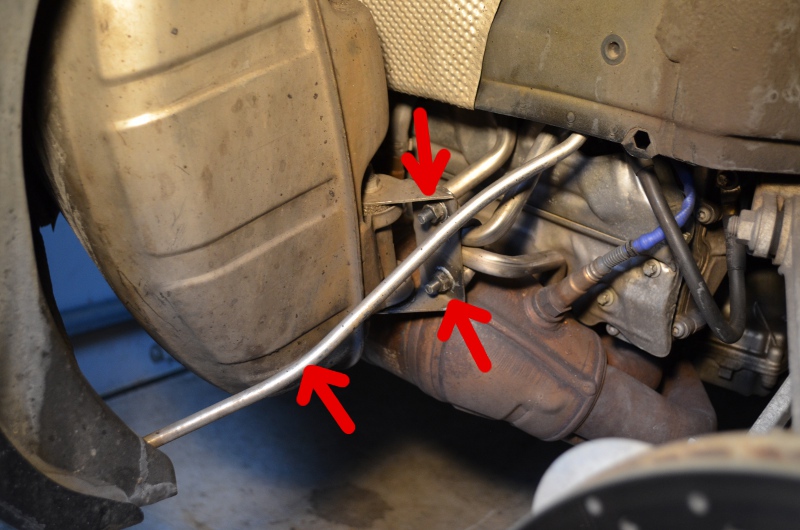
Move the muffler support bracket out off the 2 studs from the catalytic converter.
Pull side muffler away from center muffler by sliding them apart at the sleeve clamp.
Lower the muffler via the wheel well and remove.
Safely raise the rear of the car. Chock the opposite front wheel to prevent the car from rolling. Place the rear of car and place on jack stands. Here is a great DIY on this by Edgy01: https://rennlist.com/forums/997-foru...-securely.html I use JackPoint jack stands myself as it makes this step very simple.
Remove the rear wheels using a 19 mm socket wrench and breaker bar.
Remove both side mufflers. First soak the screws and nuts with penetrating oil and wait awhile prior to undoing the fasteners. I used Kano Aerokroil and let them soak overnight.
Remove exhaust tip using an E12 socket. Loosen center muffler to side muffler sleeve nuts. (13 mm deep socket )
Remove the nuts connecting the muffler to the catalytic converter/center muffler. ( 13mm socket or wrench ) The upper two nuts need to be removed . . . the lower nut only needs to be loosened some. The topmost nut is rather difficult to get to. More so on the left side of the car. This caused me to buy a 13mm Elbow Ratcheting Wrench shown below. A 13 mm S shaped box wrench might work and would less expensive.
The below pics show the opposite side of the car.
Remove the two nuts at the front of side mufflers accessed from the wheel well. ( 13 mm deep socket ) Also remove the rear bumper cover support bar . . . undo one screw using a T30 driver and one bolt using a 10 mm socket.
Move the muffler support bracket out off the 2 studs from the catalytic converter.
Pull side muffler away from center muffler by sliding them apart at the sleeve clamp.
Lower the muffler via the wheel well and remove.
Last edited by DGrayling; 01-28-2013 at 02:46 PM. Reason: .
01-28-2013, 06:18 PM
#4
Rennlist Member

Great write-up - thanks for the detailed pictures. Where did you get the info on not using anti-sieze? I've not heard before that the use affects any electrical connection.
01-28-2013, 07:20 PM
#5
Where did you get the info on not using anti-sieze? I've not heard before that the use affects any electrical connection.
https://rennlist.com/forums/showthre...d=90274http://
Mine had a little oil on them, which ran about halfway up the threads, and was brown, found no seepage. BTW Porsche says no antisieze because the are concerned it will interfere with grounding (and possible overtorqueing?).
Last edited by DGrayling; 01-28-2013 at 07:21 PM. Reason: .
01-28-2013, 07:33 PM
#6
Rennlist Member
Below is one thread that mentions this, but perhaps it is not such an important issue. Maybe others will chime in on this.
https://rennlist.com/forums/showthre...d=90274http://
https://rennlist.com/forums/showthre...d=90274http://
01-28-2013, 08:37 PM
#7

did you not experience any difficulty in removing any particular spark plug? it seems that the engineers really got the 997.2 right as the maintenance procedures have been addressed and made simpler.
Trending Topics
01-28-2013, 09:15 PM
#8
All six plugs were quite easy with the mufflers removed. Some would have been tough in the DIY referenced at the top where the mufflers were left in place. That is why I removed them to make it easier for me.
01-29-2013, 01:20 PM
#9
Drifting
The instructions I leveraged from Renntech specify not to use anti-seize grease on the plugs as well. http://www.renntech.org/forums/tutor...-instructions/ In the past I've always used anti-seize for my other vehicles but decided against it when I did the plugs on my '08 C2S. BTW, there are specific grease(moly's) available which conduct current. As I'm very paranoid about old plugs seizing(happened with my son's old 4Runner) I've decided to swap plugs out more frequently on the C2S... Also these torque values(22 ft-lbs) are for plugs w/o anti-seize compound.. use of grease would require a lower torque value. Using the proper torques value is essential for proper seating depth of the plugs. Great write-up DGrayling and thanks for taking the time to share this with us... I'll post it on our DIY Index.
01-29-2013, 04:14 PM
#11
Drifting
Did you measure and have to adjust the plug gaps before installing them in the engine?
Is that even still a thing with modern plugs or do they come out of the box with proper gaps set?
Is that even still a thing with modern plugs or do they come out of the box with proper gaps set?
01-29-2013, 05:00 PM
#13
Did you measure and have to adjust the plug gaps before installing them in the engine?
Last edited by DGrayling; 01-29-2013 at 05:33 PM. Reason: .
01-29-2013, 05:20 PM
#14
Nordschleife Master
Did these come stock with the 997.2?
I've installed them in my AMG and been told they're not good for older cars and I should stick with stock Single Electrode.
I believe my 996TT has Single Electrode,but haven't taken them out yet to check...
Can anyone offer some insight on the difference between Single and Multi Electrode plugs?
Great DIY BTW!
Good job!


