

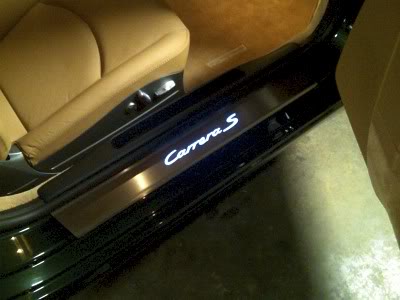
Illuminated Door Sills Installed!
 06-30-2010, 11:57 PM
#1
Instructor
Thread Starter
After finding a "how-to" on removing the door panels, I decided to take on this task this early evening. After struggling to get the door panel off, I realized that tapping into the door courtesy lights was going to be a major feat to accomplish. There was a protective steel covering that needed to be removed also for me to be able to snake the electrical wirings for the door sill. After much thought, I decided to go another route for a power source...the foot well lights! 
I removed both door sill plastic moulds. They were easy to remove. The driver's side just had snaps, while the passenger side had one screw underneath the rubber liner which lifts out.
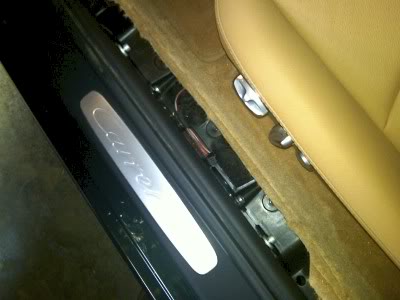
I then removed the fuse box cover and 3 screws that held the surround in place. I then peeled off the carpet liner away just a bit so that I can route the door sill wiring towards the foot well light. Once done, I tapped to both wires of the courtesy light, making sure which one was HOT and which one of them was the ground.
The hardest part of the whole project was removing the old sill plates. I didn't care to ruin the old ones so I just forced it off after grabbing on to one corner. Applying adhesive remover to the adhesive that was left onto the car body took a lot of elbow grease but once done, I was able to put the new sills without any problems. Well worth it!
Vince
I removed both door sill plastic moulds. They were easy to remove. The driver's side just had snaps, while the passenger side had one screw underneath the rubber liner which lifts out.
I then removed the fuse box cover and 3 screws that held the surround in place. I then peeled off the carpet liner away just a bit so that I can route the door sill wiring towards the foot well light. Once done, I tapped to both wires of the courtesy light, making sure which one was HOT and which one of them was the ground.
The hardest part of the whole project was removing the old sill plates. I didn't care to ruin the old ones so I just forced it off after grabbing on to one corner. Applying adhesive remover to the adhesive that was left onto the car body took a lot of elbow grease but once done, I was able to put the new sills without any problems. Well worth it!
Vince

The following users liked this post:
alaris (04-17-2024)
 07-01-2010, 12:25 PM
#6
Three Wheelin'
Nice - you are on a tear with the mods there! - looks good.
07-01-2010, 12:36 PM
#7
Racer
Vince, looks great. Curious, where did the instructions for the lighted sills kit suggest you tap for the electrical connection? Were they wanting you to tap off of the door light...that's a LOT of work, I used this source once on another car and it was a bear running the wires through the A Pillar door jamb rubber grommet...better idea to use the footwell lighting!! Nice job!
Trending Topics
07-01-2010, 05:10 PM
#8
Instructor
Thread Starter
Vince, looks great. Curious, where did the instructions for the lighted sills kit suggest you tap for the electrical connection? Were they wanting you to tap off of the door light...that's a LOT of work, I used this source once on another car and it was a bear running the wires through the A Pillar door jamb rubber grommet...better idea to use the footwell lighting!! Nice job!
Now, I received instructions from Suncoast from Porsche today and OMG, it is sooooo involved! It requires that you tap into the door light, requiring one to take the wiring harness off from the a pilars and door itself, and splicing into the connectors on both doors. No wonder Porsche technicians charge an arm and a leg on installation!
Vince

 07-02-2010, 02:04 AM
#13
Instructor
Thread Starter
 07-02-2010, 02:13 AM
#14
Instructor
Thread Starter
Ok, I was pretty obsessed on redoing my wiring after I read and read and read over the installation instructions that was given to me by Ryan from Suncoast...that I decided to RE-DO my wiring and do it according to the Porsche instructions. I just finished now. Took me about 5 hours. LOL. Yup, I'm pretty **** on doing a good job!
The hardest part of the job, besides replacing the sill plates and getting the 3M adhesive off like I said previously, was getting the door wire harness snaked out of the car, through the pillars and out through the door! The rubber boot was surprisingly pliable and soft and didn't crack or anything, as other rubber boots do such as those in American cars from previous experience. These cars are WELL built! Quality all through out I found out!
The next hard task was snaking the sill light wiring into the rubber boot. I just simply got a stiff wire and used that as a guide. Once I got it through, I attached the wire harness with some electrical tape and slowly, but surely pulled it through. Worked like a charm!
Nice thing about it now is, I can turn off the main courtesy lights and the sills will light up with just the door lights. Nice touch at night!
Vince.