When you click on links to various merchants on this site and make a purchase, this can result in this site earning a commission. Affiliate programs and affiliations include, but are not limited to, the eBay Partner Network.
I spent about 10 hours searching up all the details and how to install an aftermarket steering wheel into my just acquired 997.1 C2S.
I ran into many questions, such as air bag resistors, horn wiring, alignment, etc, etc. Here is what I did and I really just want to help other members make this experience more pleasant and easy.
disclaimer: I�m not a professional and this is a complication of what I did and what I referenced from others. Some photos will be from other threads, I�ll try to post credit if I could find it�s source as credits are all to the rightful owners.
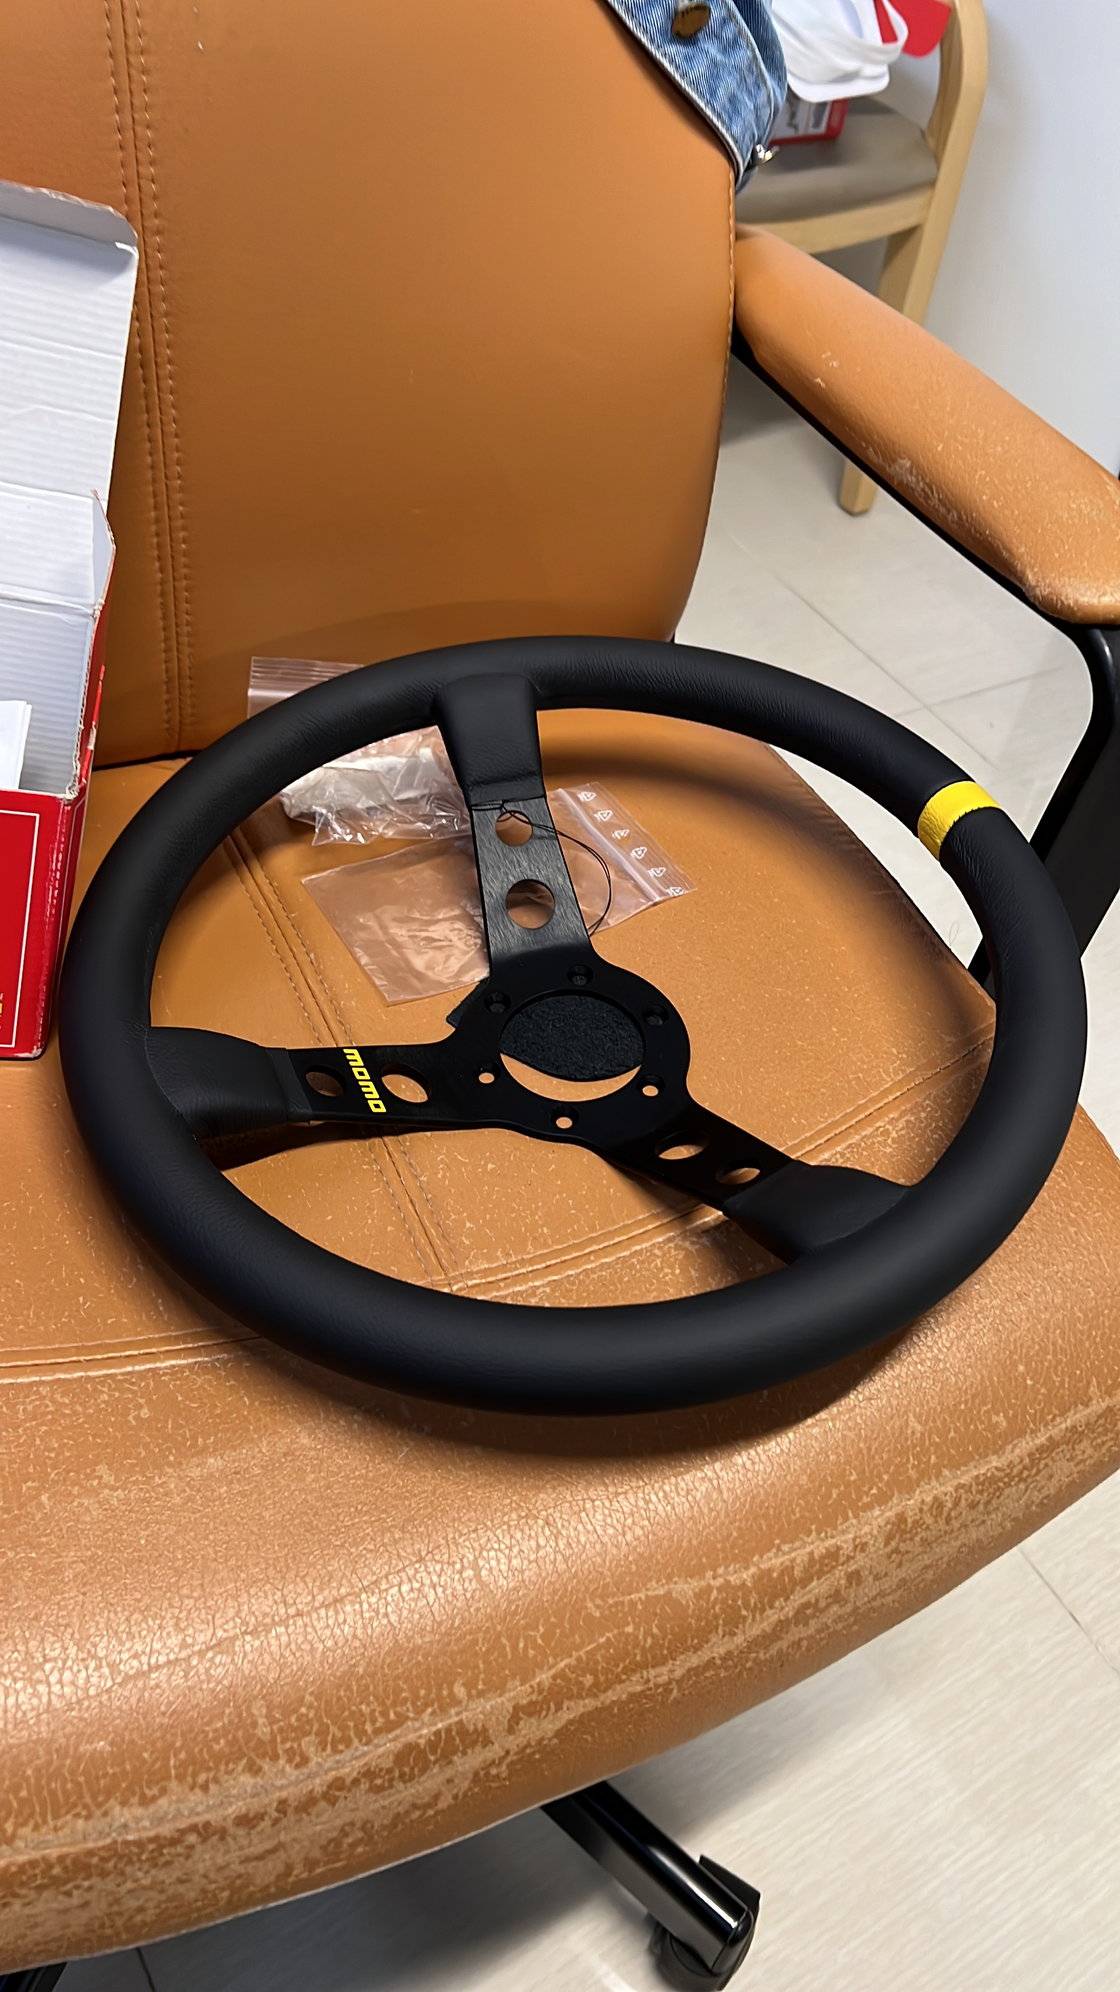
This was the wheel I chose. Momo 07. It�s the same as the cup wheel I�ve had in my 1994 993 3.8 car as before but without the Porsche engraving.
I ordered the hub boss kit from Design911 UK. Great place to order just about everything.
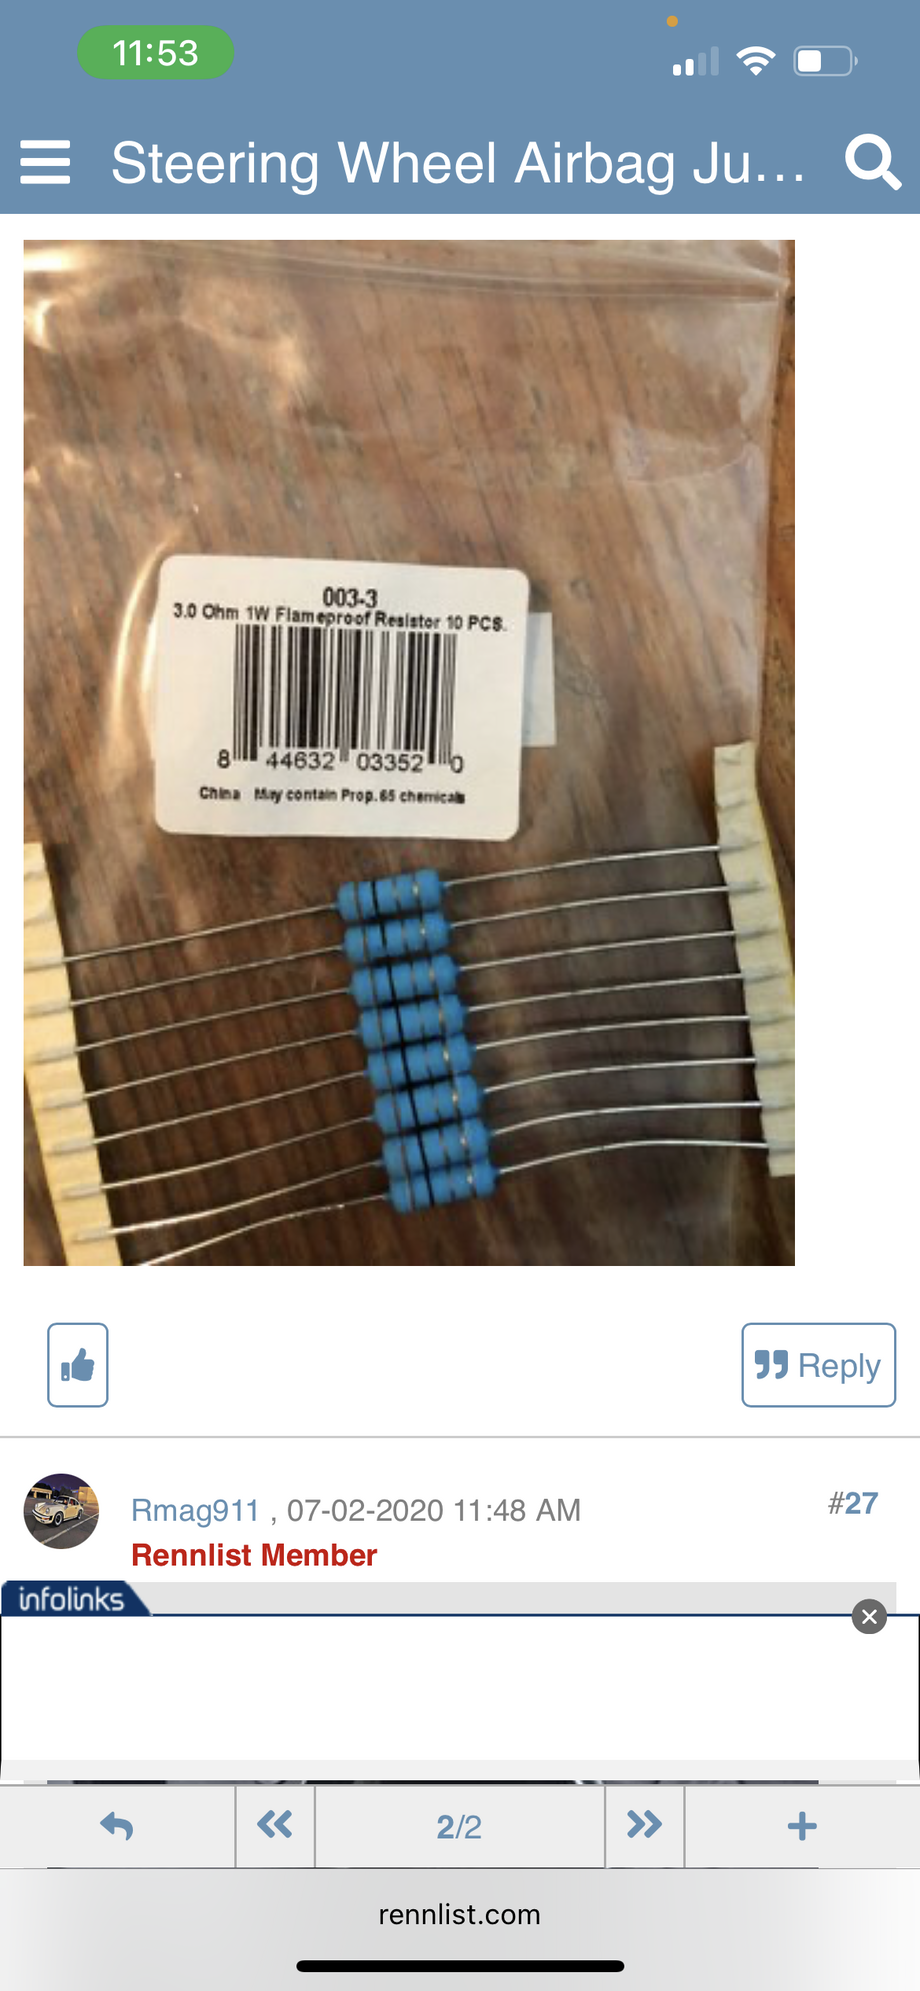
Referenced here, you will need 2x 3 ohm resistors. Be sure to measure and make sure it is registering close to 3.0 ohm.
Parts list:
1) Momo wheel of your choice
2) Momo boss hub kit
3) 2 x 3 ohm resistors
tools:
1) electrical tape
2) m12 triple square bit
3) 3/8 or 1/2 wrench and extension
4) torque wrench (37 ft lbs)
5) solder or some connectors
6) small flat head screw driver that�s long or a 4mm Allen key with some leverage
7) t25/t30 torx bit
8) something to poke the pins from connectors
9) 10 Mm bit to remove the battery terminals
Steps:
1) insert the key into the ignition
2) turn to accessories on , leave engine off
3) disconnect battery (positive side) with your 10mm socket wrench, wait 10 minutes at least. Make sure you insulate the terminal so it won�t have a chance of contacting at some point. I used a couple dry microfiber towels.
4) Release the airbag from the steering wheel. To do this, you need to put a thin, long object at the bottom (6 o�clock position) of the steering wheel. Reach under, you�ll feel a hole. You can use either an Allen key (4mm) or a flat head screw driver.
advice: use an Allen key with a �flat� end. Some Allen keys have ridges or tapered edges, you need to use this surface to �push� a metal wire that releases 4 plastic hooks that hold in the airbag. Or use a flat head. If using a flat head, position it so you are looking at the �thin� edge of the screwdriver.
angle and strength necessary. You want to point the Allen key or flat head slightly towards your chest rather than towards the instrument cluster. I actually turned the steering wheel off to the side so I can see the hole clearly with the door open and I pushed from outside the car. It was a HUGE PITA. But it came off.
5) remove the airbag harness (orange) from the column. Just a regular clip type. Once airbag is removed, I moved the steering wheel back to its original position (wheelsstraight) .
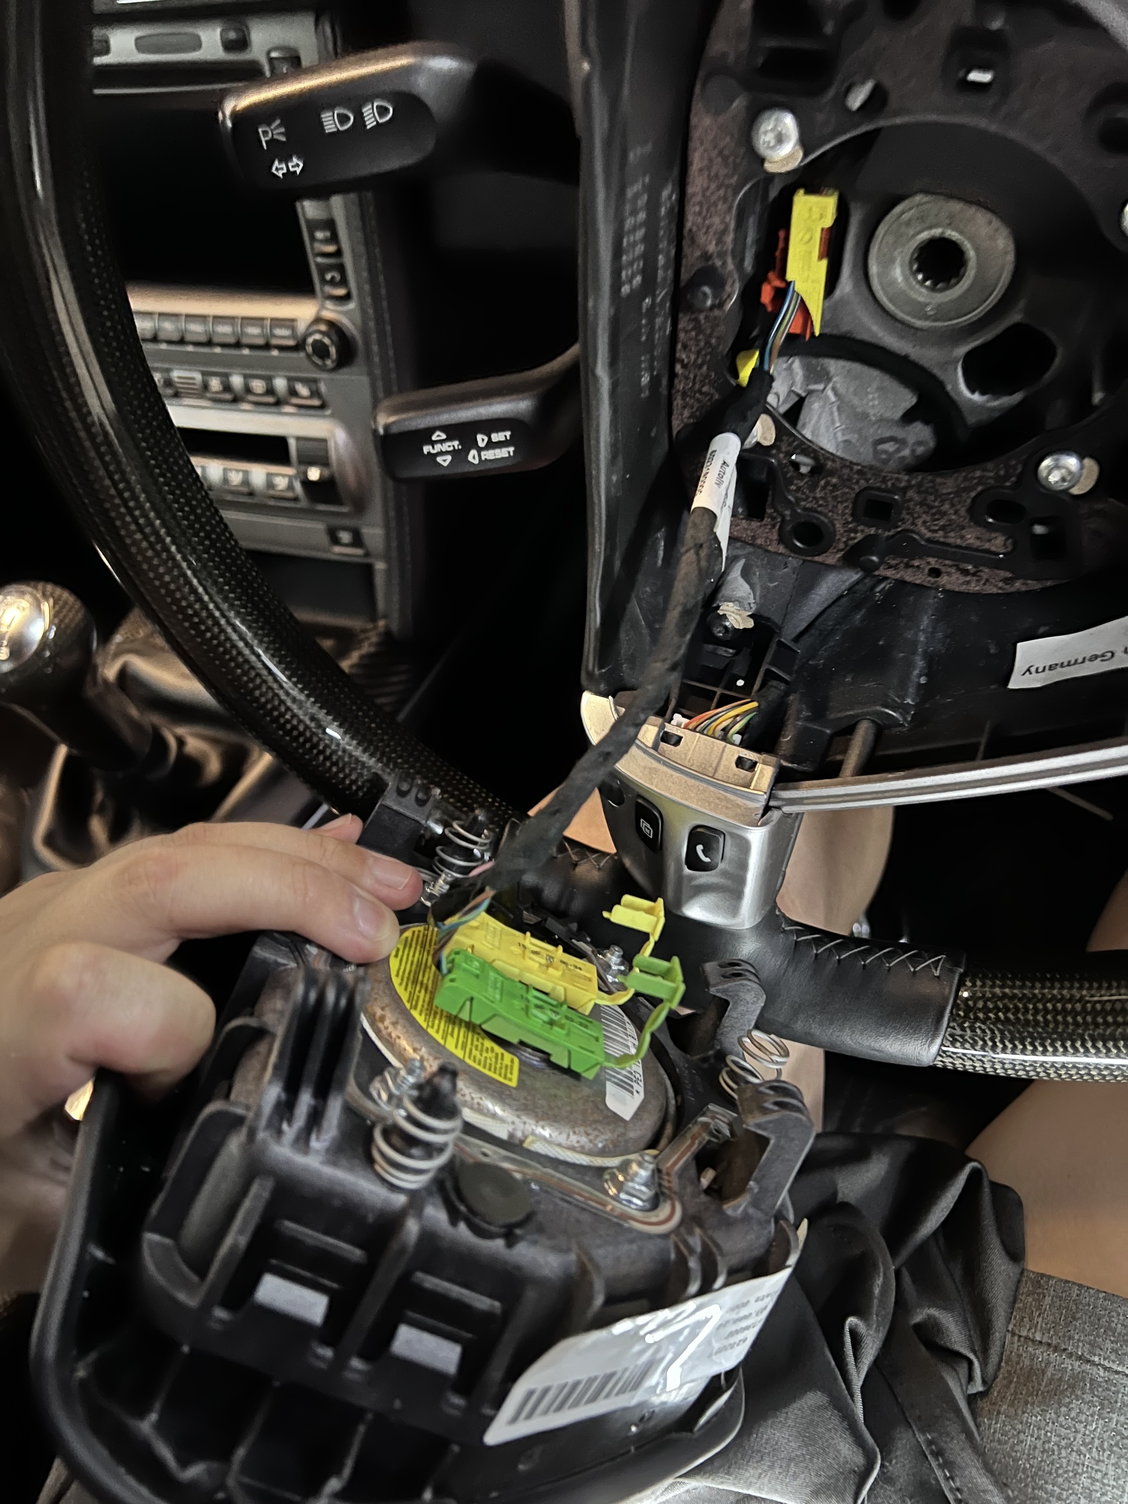
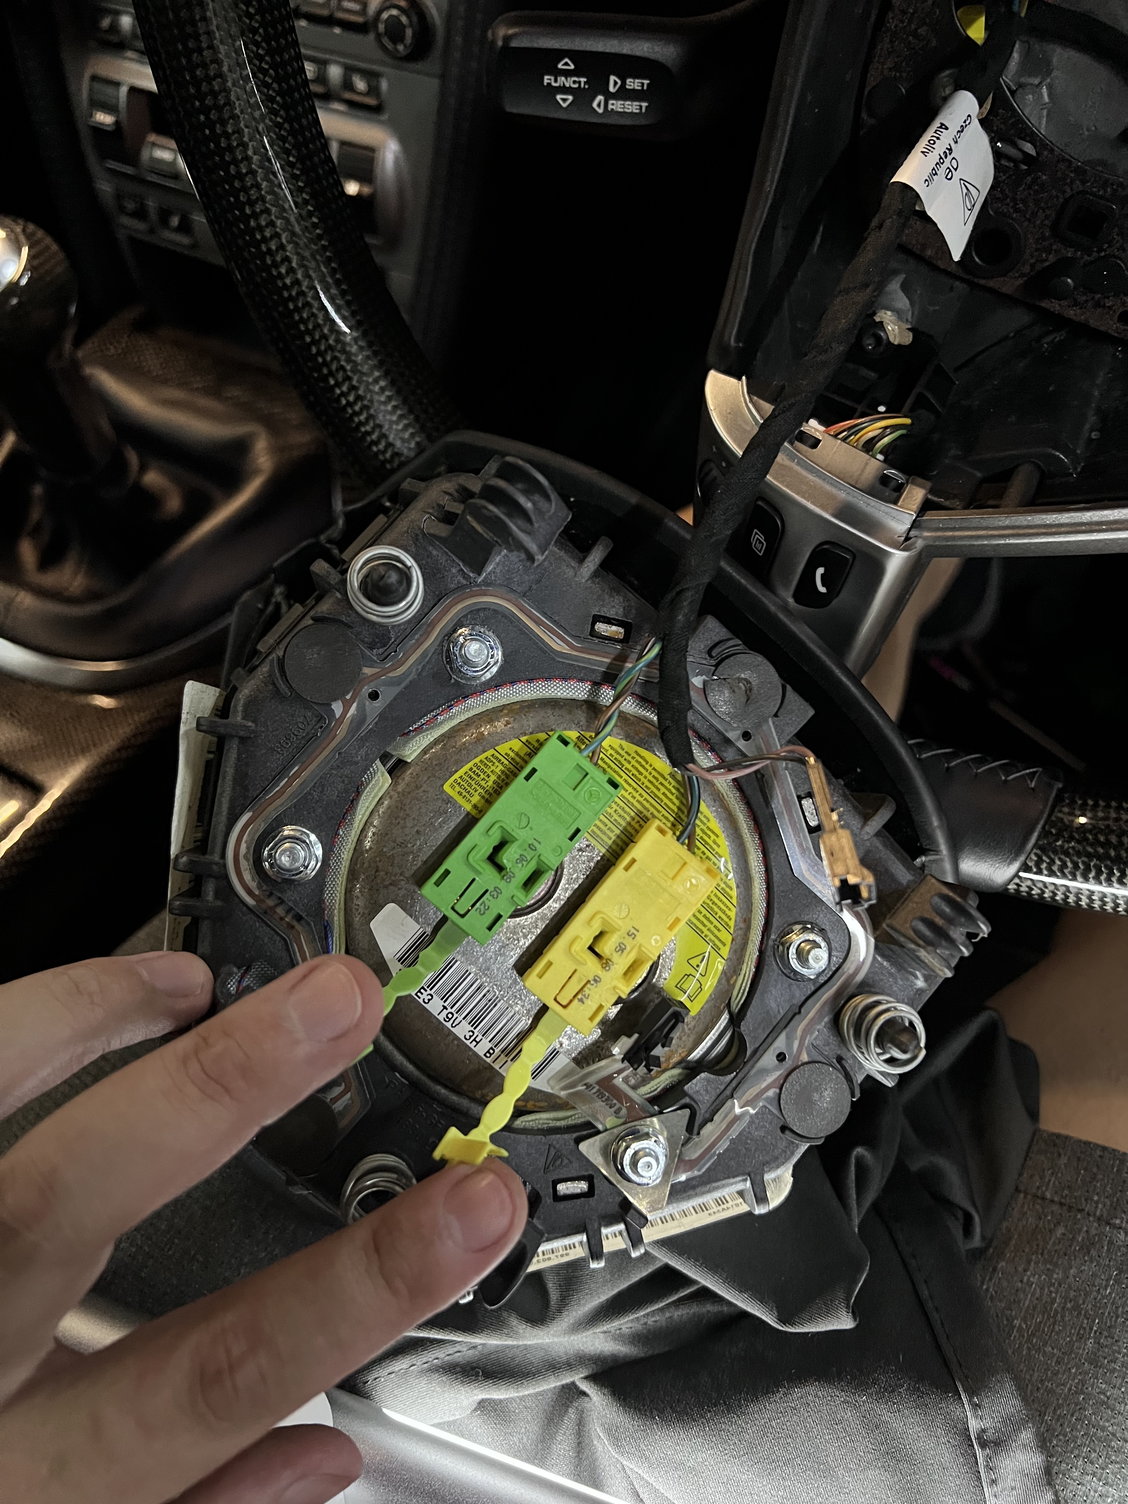
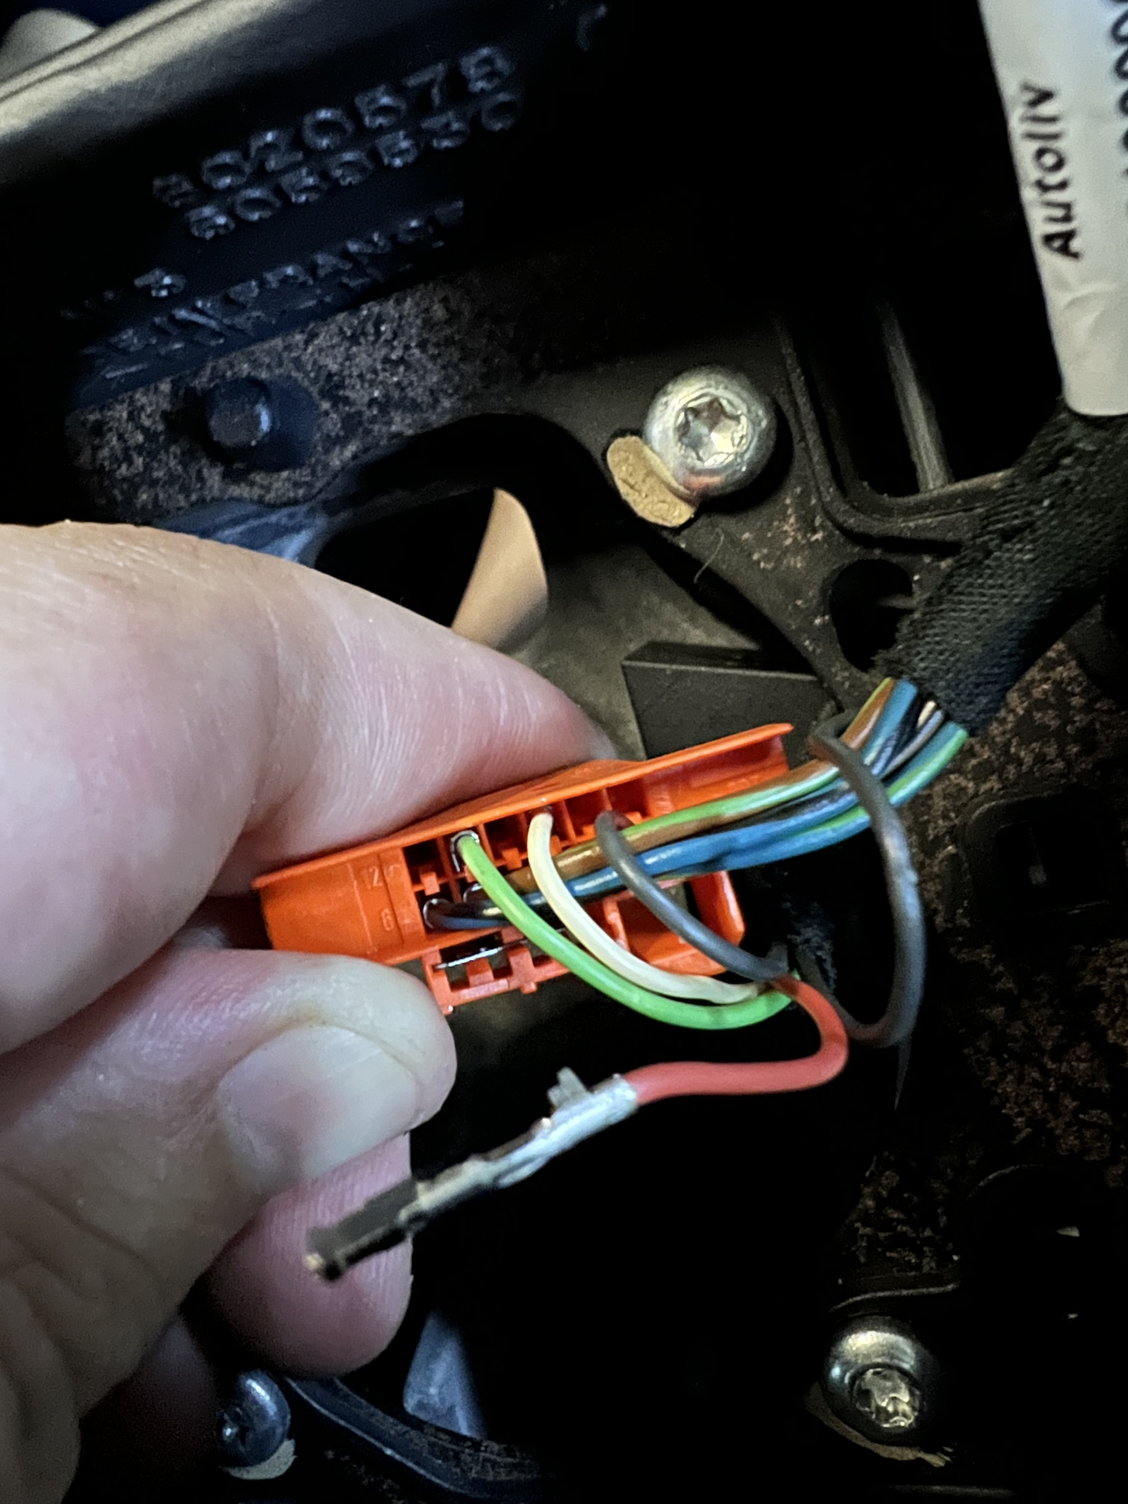
6) now that the air bag is off the wheel (but stuck connected by the harness), I wondered for a long time how to wire the electrical side of this for the airbag resistors and the horn. I decided to tackle it using the original harness that the car came with. So first I need to remove the two parts attached to the airbag (yellow and green). Simply undo the two little connector like pieces with a small flat head. Then just pull them off the airbag. There is one more plug that just pulls off. This is for the horn. Its attached to this clear film, be sure not to damage it. At this point, your airbag can be removed. Placed your airbag in the side.
7) my original wheel has multifunction buttons, so the orange harness has two rows. The top row is ground, horn, air bag, air bag, airbag , air bags so 6 pins on top. This top row we will reuse. The bottom row is for the controls on the wheel. I don�t need it. This needs to be unpinned before I could remove the harness from the car.
8) using some small, needle like object (I used the little piece that came with the Momo hub kit), poke out the pins from the bottom row. Should be the red, green, beige and black wire. Annoyingly, one ground wire is still connected through through the loom with electrical tape. That is the grounding wire. Undo the tape and you need to remove the ground wire so you can take the harness off the car. I ended up snipping one of them as I won�t be reusing any of the multifunctional. You could always solder it again down the road. Now we can remove the harness from the car.
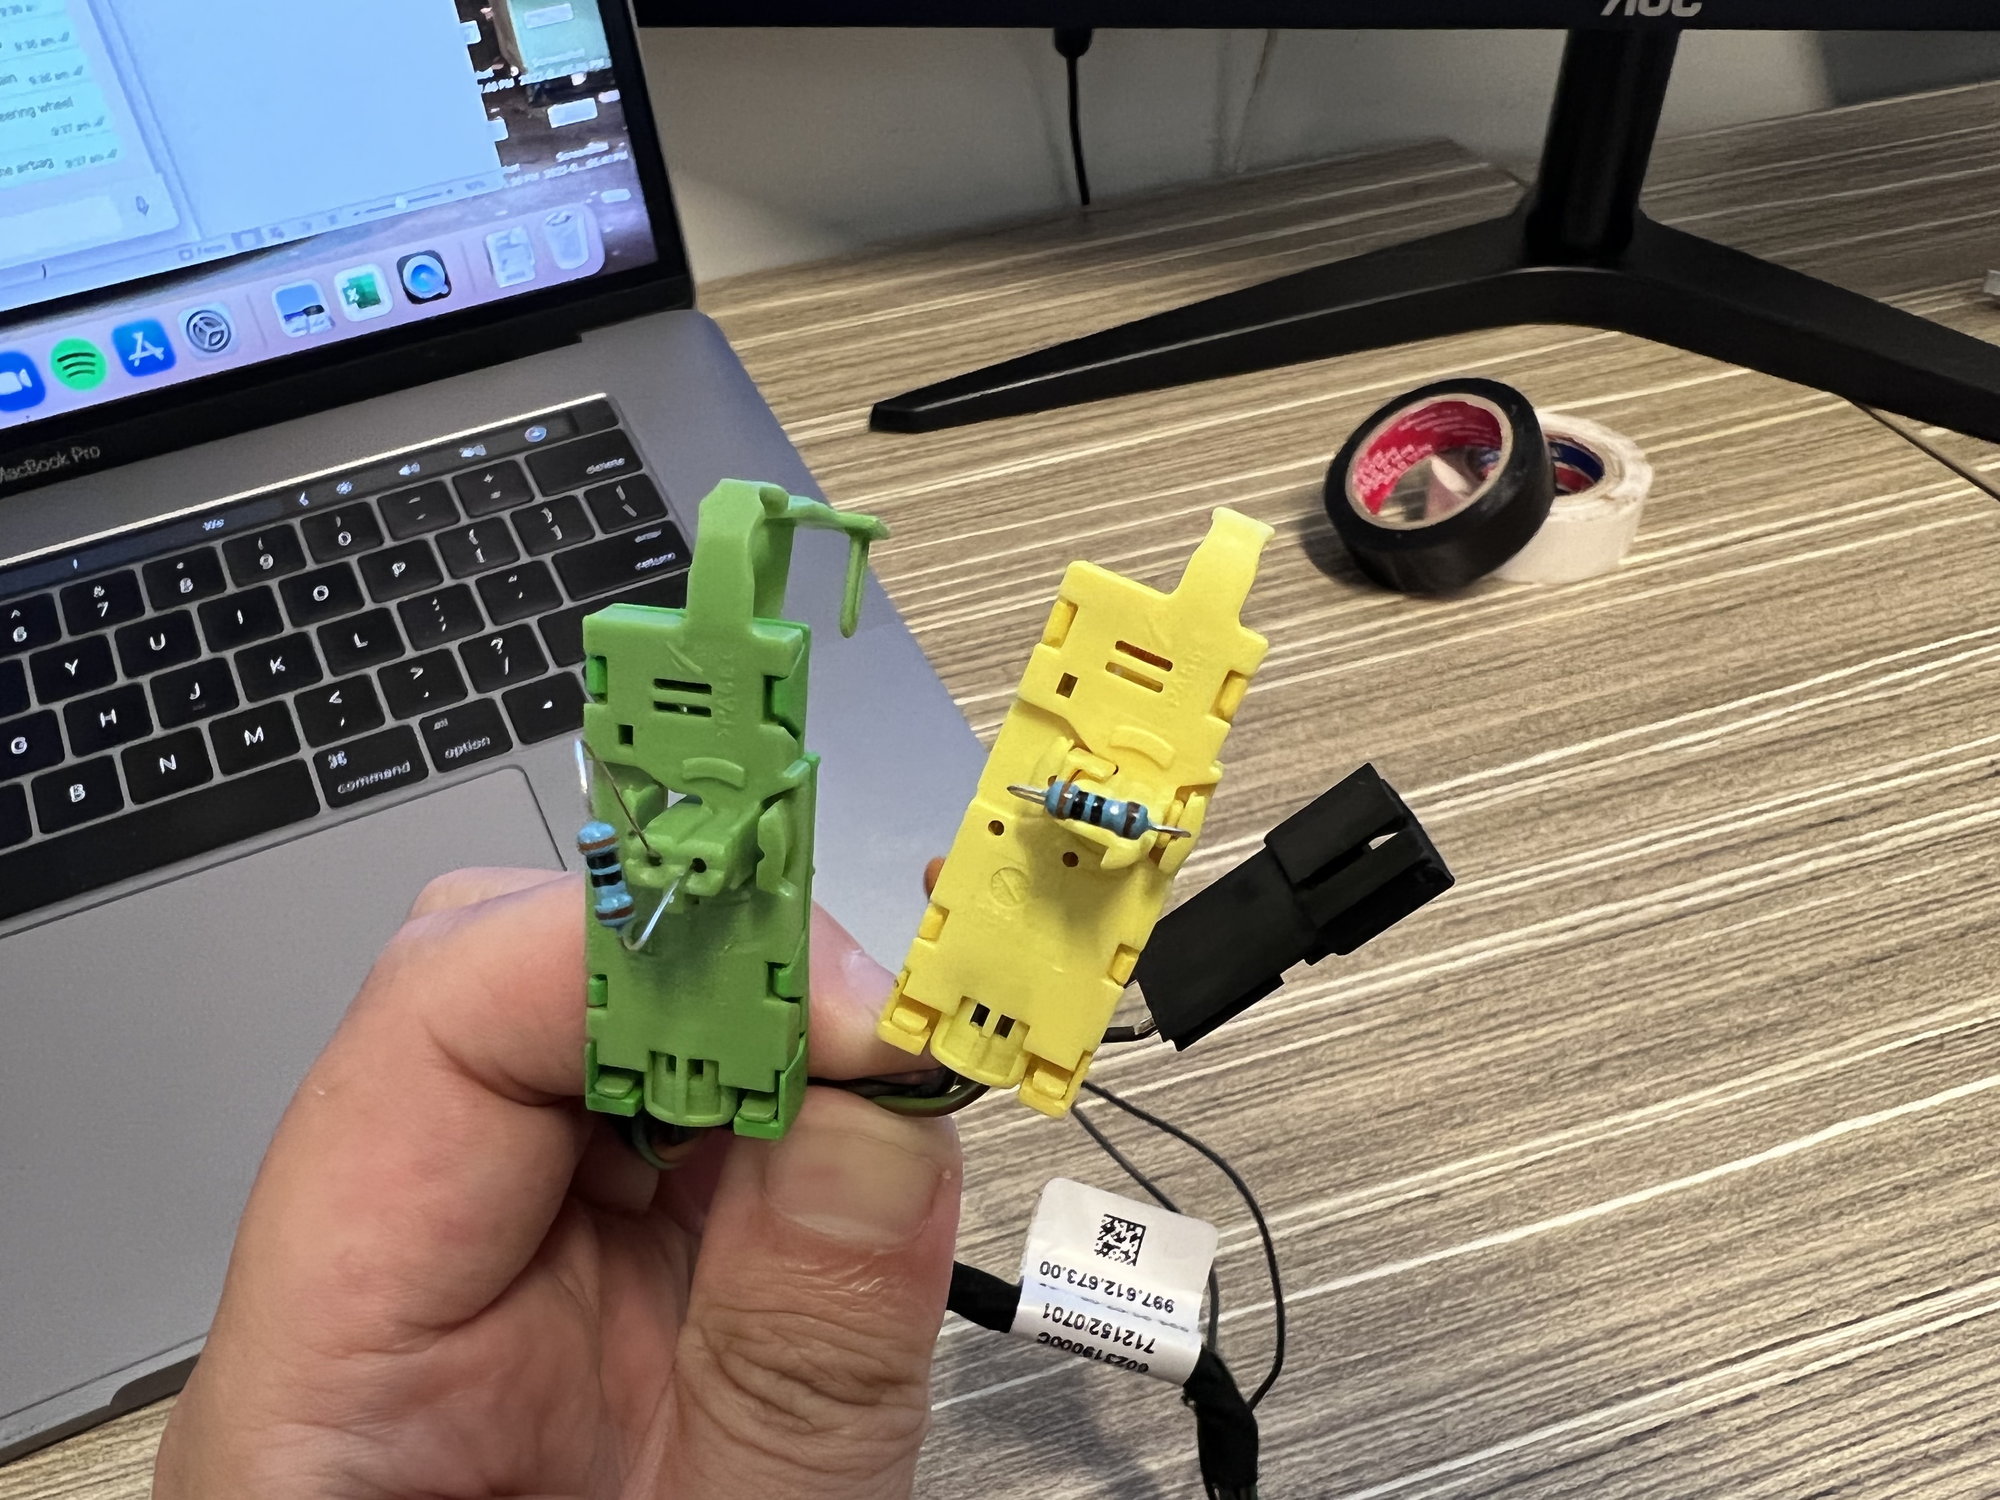
9) now the questionable part that took a long time for me. To kill the airbag, simply put 1 resister in a bridge through the orange connector, and 1 resister to the green connector. To make them stay in there, you could either solder an end that can �insert� into the holes securely. I just added some solder to the ends to make it stay put in the holes. Tape it up with some heat shrink or electrical tape. Make sure the two ends of the resistor don�t touch, or it will lose its function.
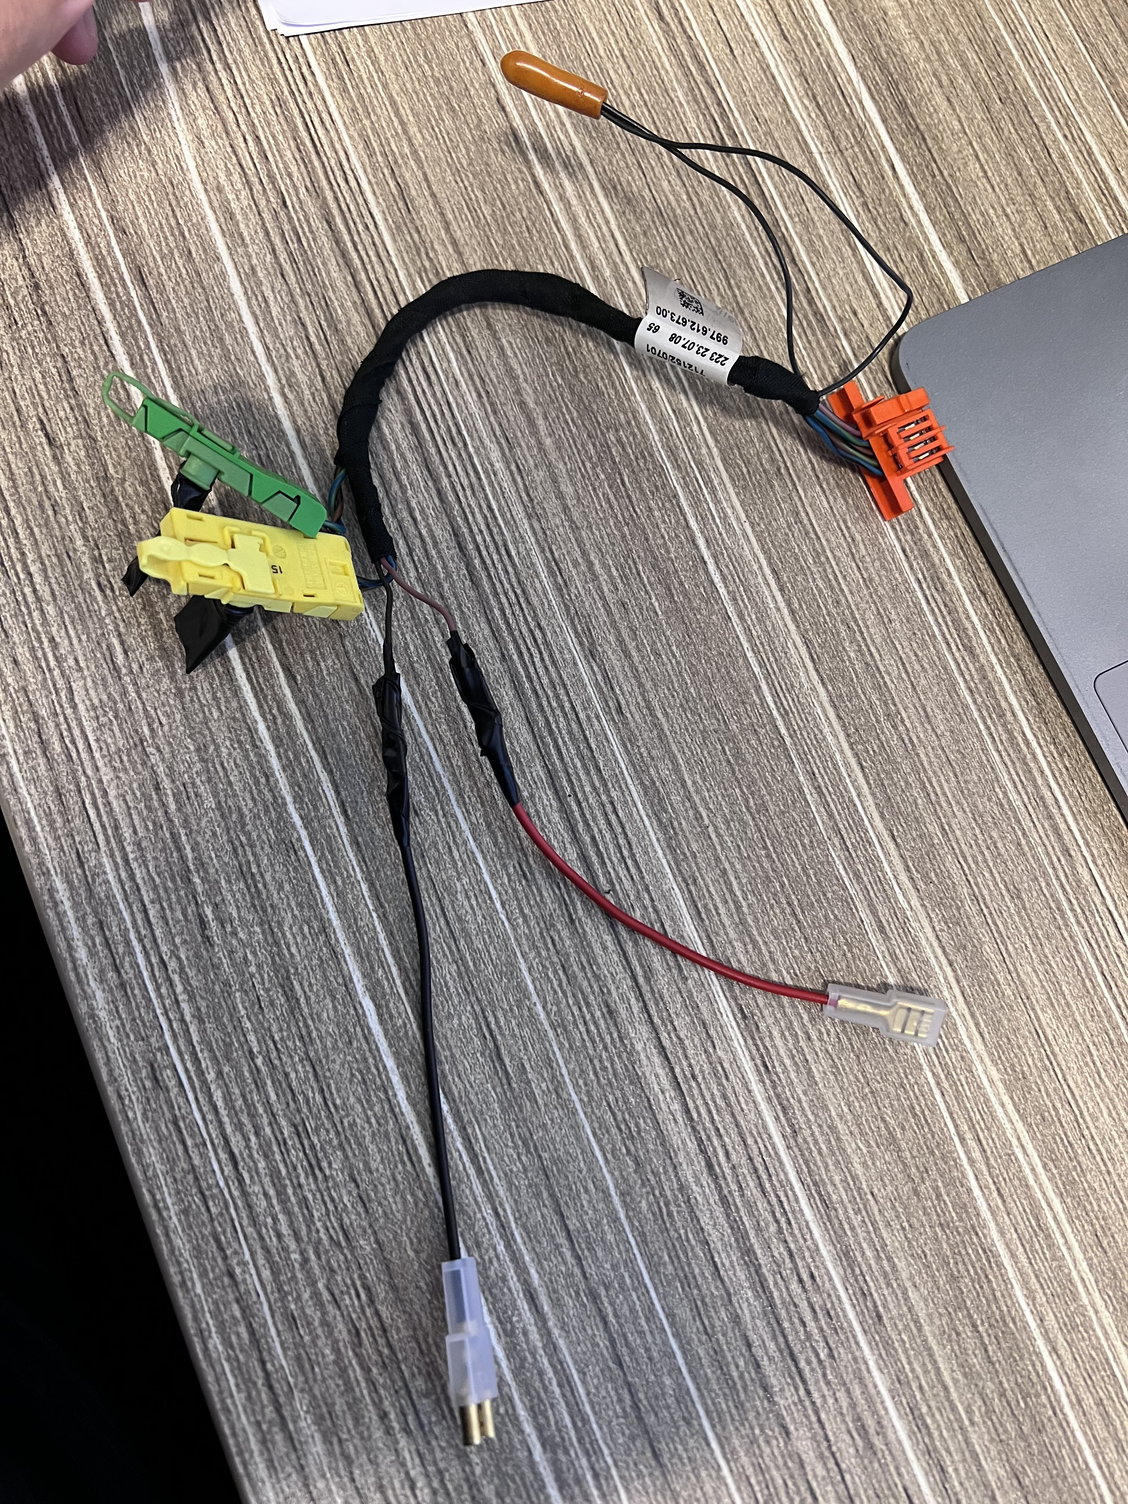
10) as for the horn, you need to establish a ground and a power to the button. So to do this, I removed the two pins from the black connector shown above. Black is ground, brown is power. Remember the ground that we removed from the multifunction button loom earlier? You need to push that �pin� into the orange connector on the top row. Don�t worry! There�s only ONE empty slot on the top row left because the other pins are occupied already. Should be in the first position as the other pins in that row are horn, air bag, air bag, air bag, air bag. Take a look at this guide.
11) To connect these two wires from the harness to the aftermarket horn, I took one red and one black wire from the Momo hub kit. I soldered the end of the pins to the red and black wire with a spade to connect to the aftermarket horn.
12) The wiring loom is now completed and plugging this into the car works. At least for me. So try it for yourselves if this works for you!
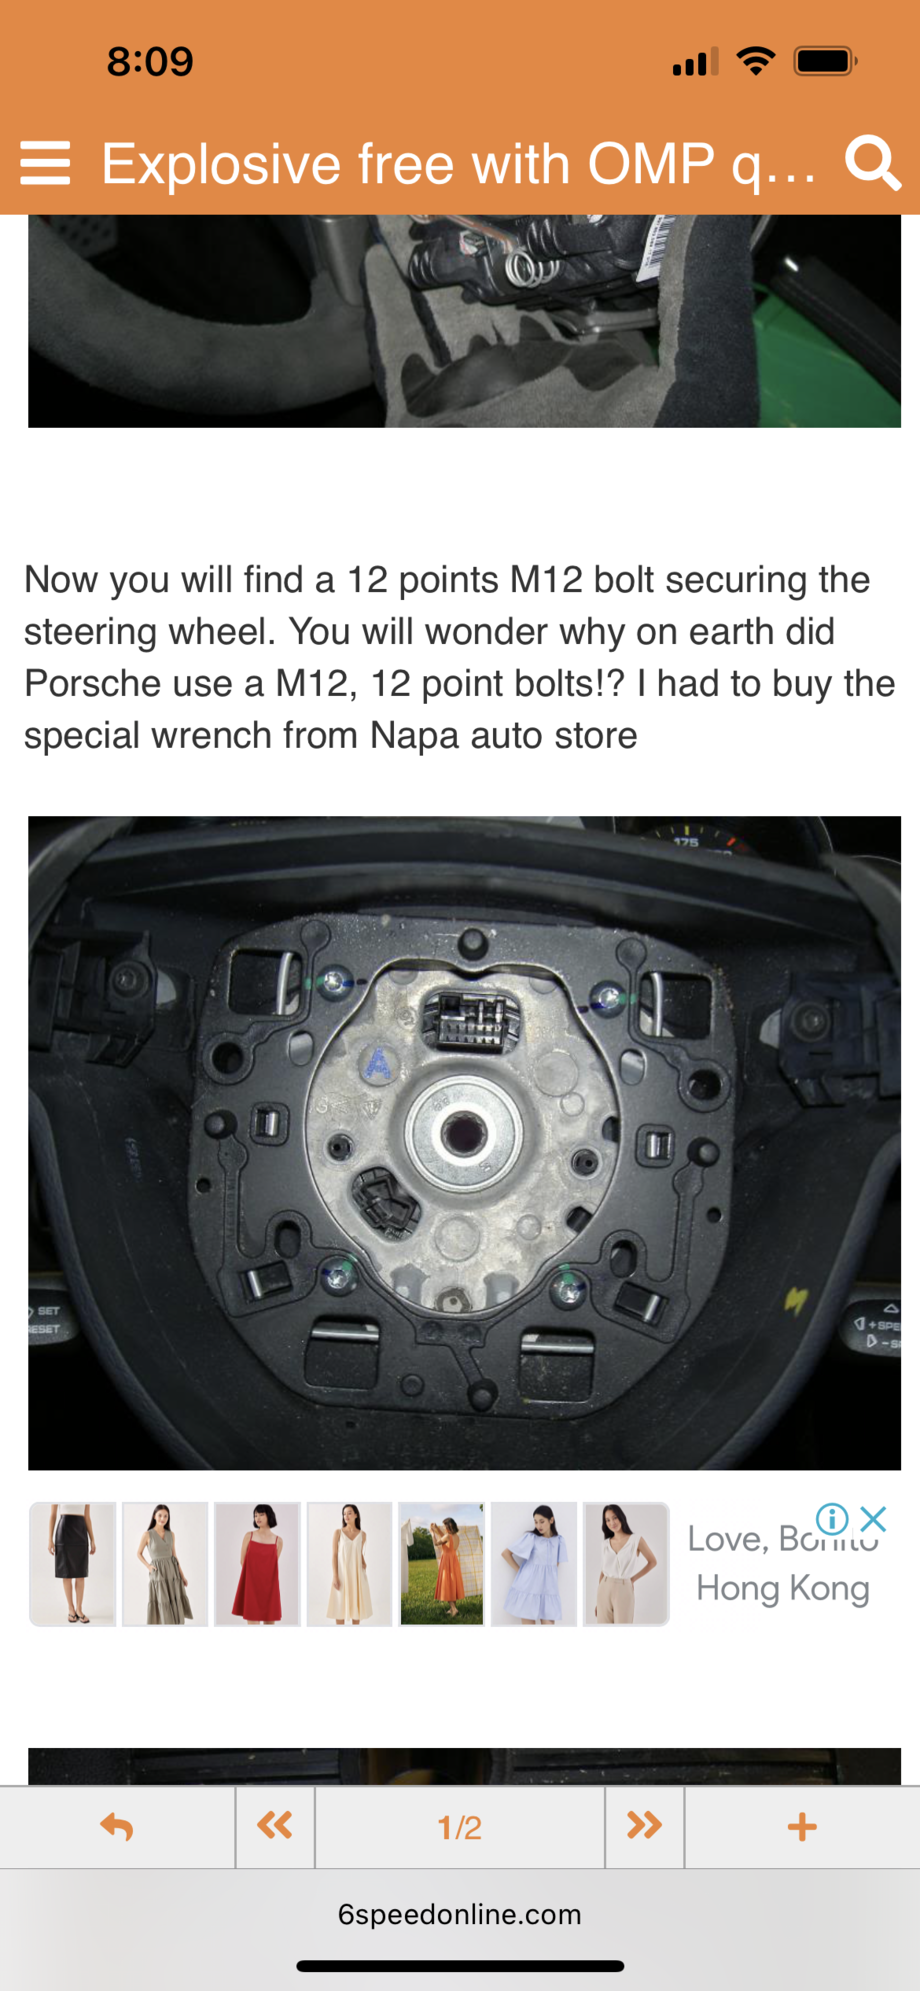
13) now going back to the car. You need to remove the steering wheel itself. To do that, make sure the wheel is straight and use a triple square m12 bit to remove the only bolt holding the wheel to the car. Take note, triple square strips easily so make sure it�s really in there straight before you remove. I used an impact and it came off with very little work. Make sure you use your knees to hold the wheel and don�t let it move too much. After the nut comes off, place it on the side since you will need it again. Here, use a marker and mark the top dead Center so you can realign the wheel better later.
14) to get the Momo hub to sit squarely, you need to dremel off a plastic dummy plug positioned in the 7 o�clock position. Then, remove two rubber sleeves on the two spokes that poke out. Now, you can slide the Momo hub on with no issue. Remember to use the marked position to align the top hole. You�ll need to realign the wheel probably several times later and even possibly an alignment as the splines don�t 100% match up to factory wheel spec. So expect a trip to alignment shop if you want 100% dead Center. See pic below for that dummy plastic plug that needs to be removed.
15) Now put the nut back on. 37 ft lbs. You can�t torque it down now since you�ll need the wheel on there to physically exert that much force. But just need that in mind.
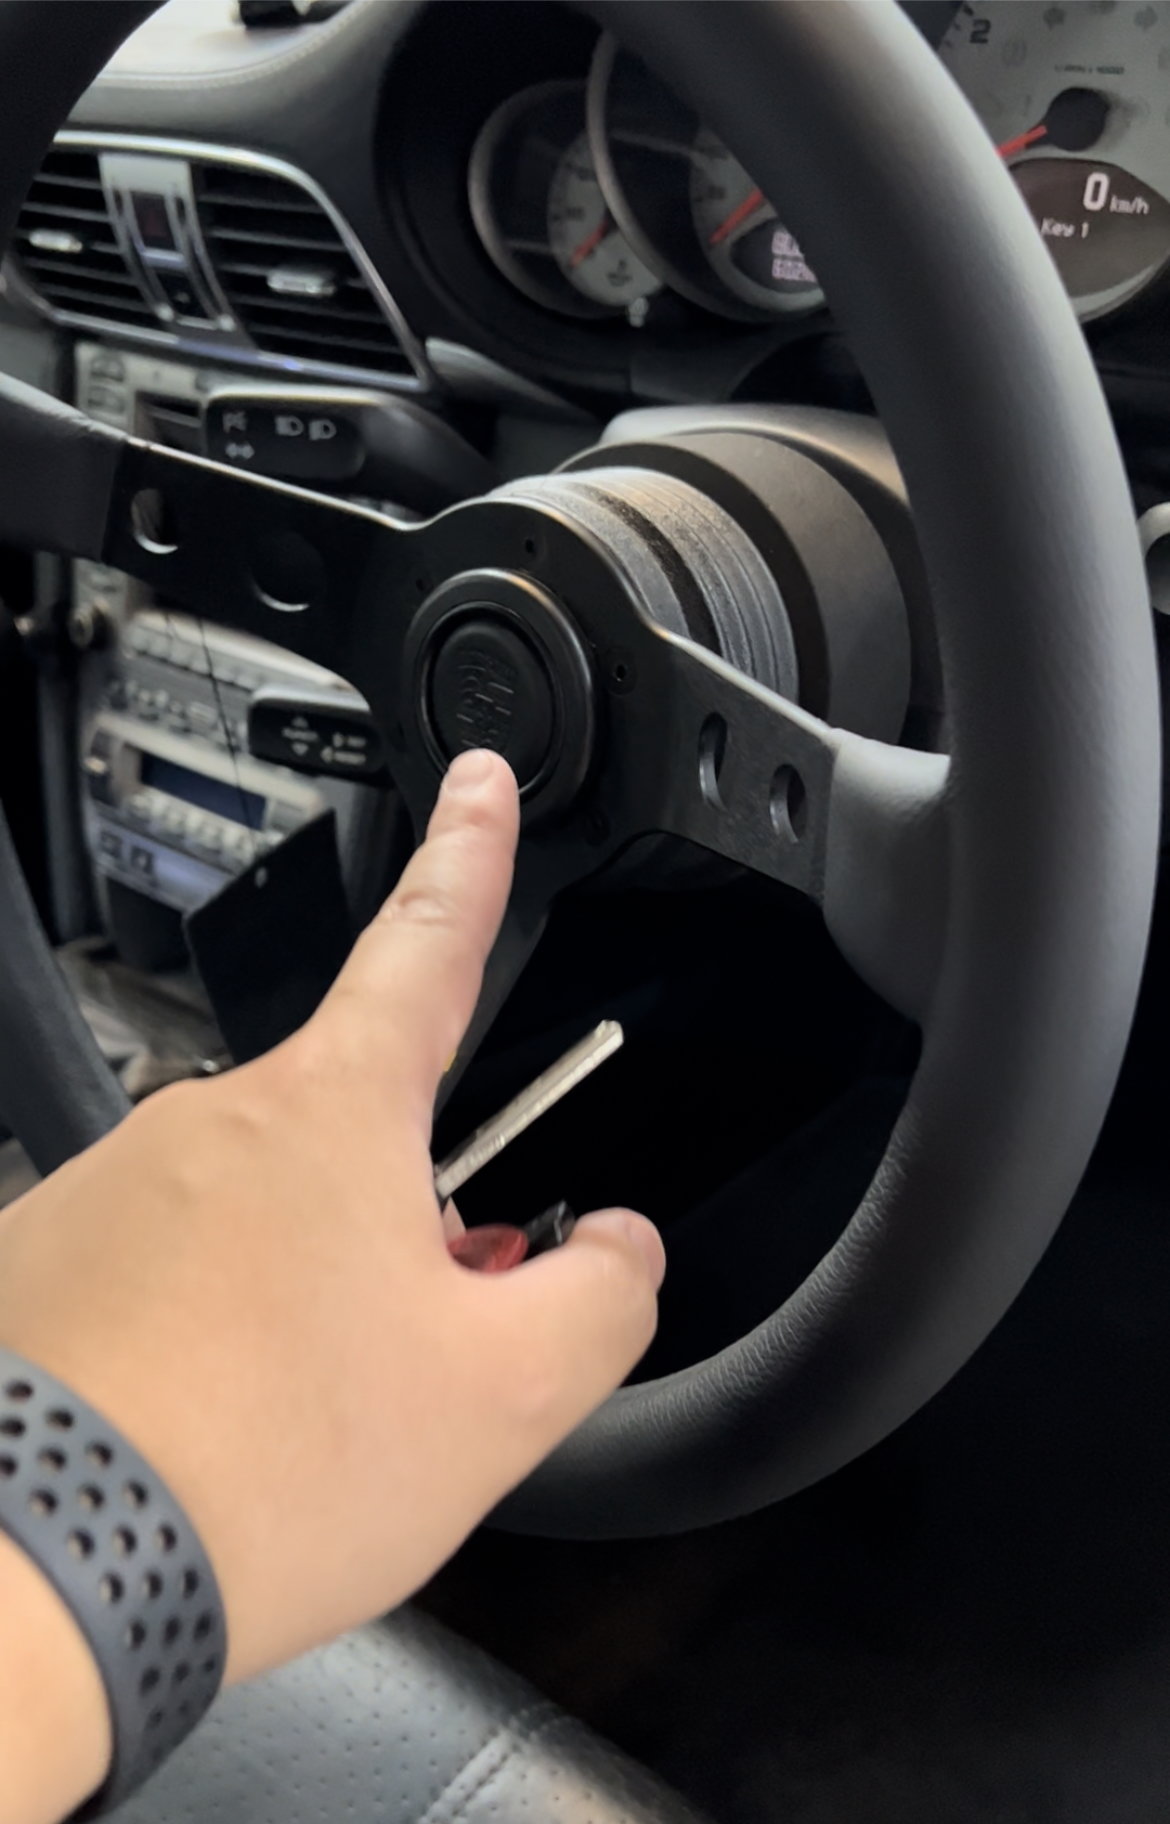
16) put your Momo wheel on. It comes with a thin metal ring to snap the horn in, don�t forget this! 7 nm on each of the 6 screws. Don�t over tighten or you�ll strip and deform the hex screws that it came with and it�s ugly. Now you can torque the m12 nut. However, I�d suggest you go test drive first and make sure the car drives as Straight as possible. Just have the m12 nut as tight as you can for now. No point torquing a few times. Don�t drive yet though!
17) put the harness in and the horn button. Now, you should be nearly done. Put the battery terminal back on. Your PSM and PASM light will come on, just drive and it�ll go away. Test the horn. I don�t suggest you to snap the horn in yet because then you can access the m12 nut for realignment.
18) Turn on the car and test the horn and see if your airbag light comes on! If it�s all good, go drive and test for alignment. Remove the m12 nut and carefully move your hub one spline at a time for accuracy.
And you�re done! Hope you enjoyed this article!
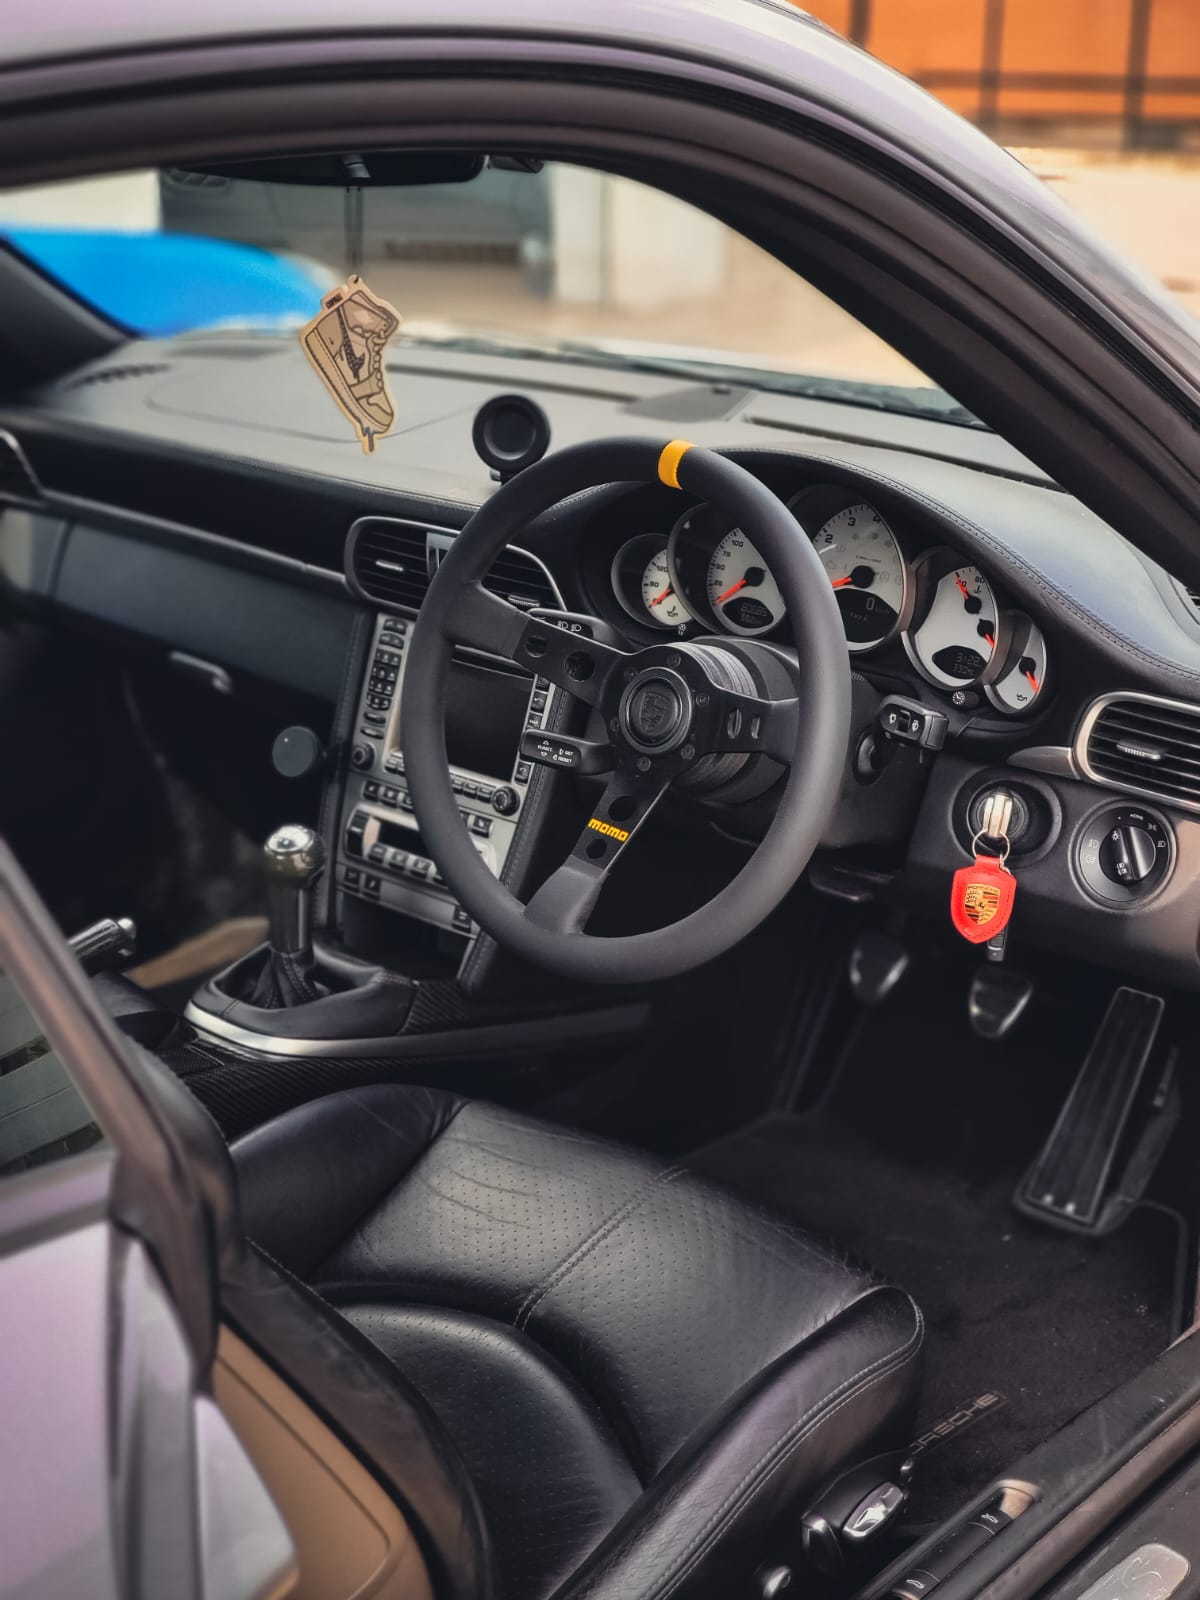
Final Outcome for me!
follow me or message me on IG if you have any questions.
Nice write up! Curious as to why you chose to use resistors versus coding the airbag out? Not trying to be critical, just seems like a lot if unnecessary splicing of wires. This was a simple plug and play for me.
Great article! I�m considering the same thing. Want to mix classy vintage racing with modern.
Originally Posted by 997.one
Nice write up! Curious as to why you chose to use resistors versus coding the airbag out? Not trying to be critical, just seems like a lot if unnecessary splicing of wires. This was a simple plug and play for me.
For someone like me that knows very little, can you explain what you mean by this? �Coding the airbag out� and how was yours just plug and play, thanks.
Planning to do this myself in the coming days. I'll be using a Momo Mod 07, Flashpower short hub and later an NRG Quick Release. I considered going with an OEM Porsche wheel, but those wheels used with airbags are easily over $1000. This setup gives the cockpit a really classic look and you still get the nice thicker wheel with Momo vs my factory thin rimmed steering wheel at nearly 1/3 the price new. Plus, this is an easily reversible mod.
For VB_CarreraS - I think it is definitely plug and play if you have something like PIWIS or Durametric Professional which are dealer level software so you can program out the airbag, but for most of us that either don't want to pay a dealer to program this or find it easier to do some 'splicing of wires', I think it's a reasonable option.
My factory wheel doesn't have any controls other than the horn, so hopefully the install should go easier for me. Write up on this was done more than a year ago. Any update? How's the wheel held up? I've heard nothing but good things about the Mod 07, but also hear the prototipo is a good option too if you don't want the wheel too close?
I'm still debating on what would pair well with this wheel in terms of shift *****, BFI, Rennline, Momo, etc.
Just finished doing this upgrade and wanted to share my notes/frustration.
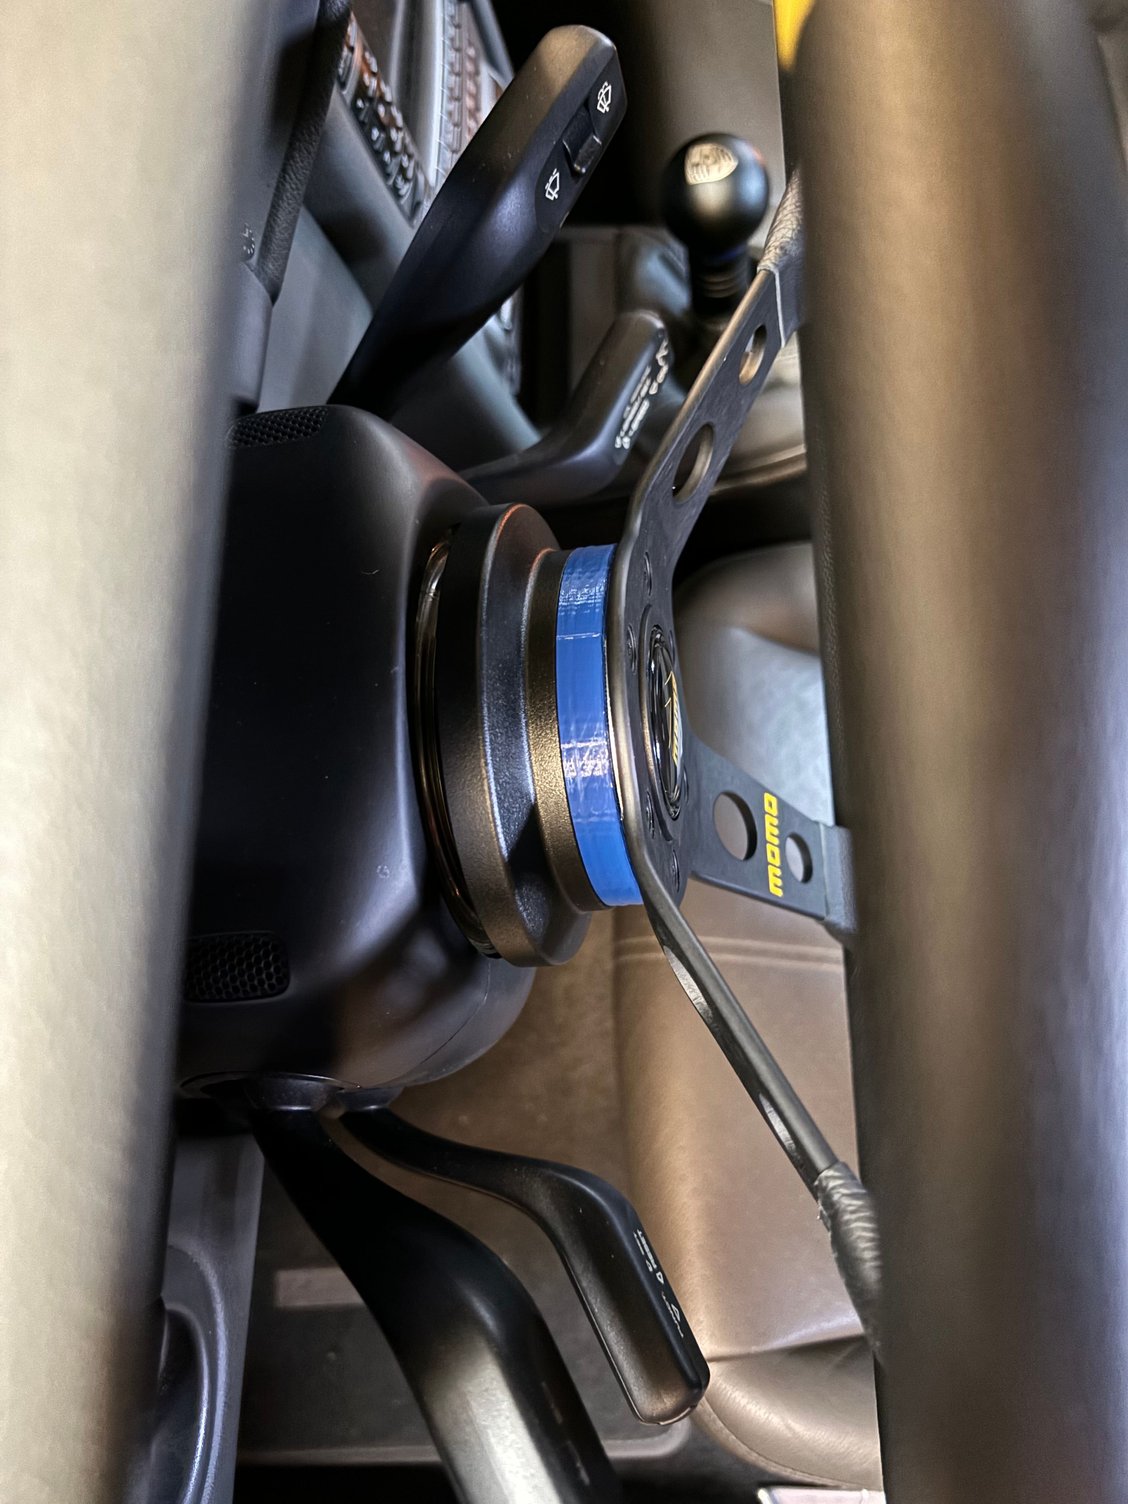
I also went with the Momo Mod 07 wheel. The dish on the wheel really gives the interior of the 997 a nice retro vibe, plus it just looks a little more updated than the prototipo. I've seen other Mod 07's as well as referenced the OP's pictures and what I didn't like is how the factory Momo hub plus the dished Mod 07 wheel really brings the wheel out too far from the control stalks.
I don't plan to track my 997 and I really prefer my arms to be stretched out when driving. So some digging around led me to this aftermarket adapter by Flashpower Performance.
This hub adapter, plus the Mod 07 puts the Momo wheel even closer to the control stalks, but by only about 1/4" essentially nearly a factory fit. If down the road, I decide to get a quick release adapter, this combination would still keep the wheel at good distance from me. I can only imagine how close the wheel would be with a factory momo hub adapter, Mod 07 wheel, and quick release adapter.
The issue with using this hub adapter comes in the placement of your wiring harness. I was unable to use the setup by the OP which included the airbag connectors and factory plug. When I tried to use this harness, the plug basically prevented me from fully seating the adapter's splines to the steering column. Plus the airbag connectors were too big to safely place in the tiny space of a short hub adapter.
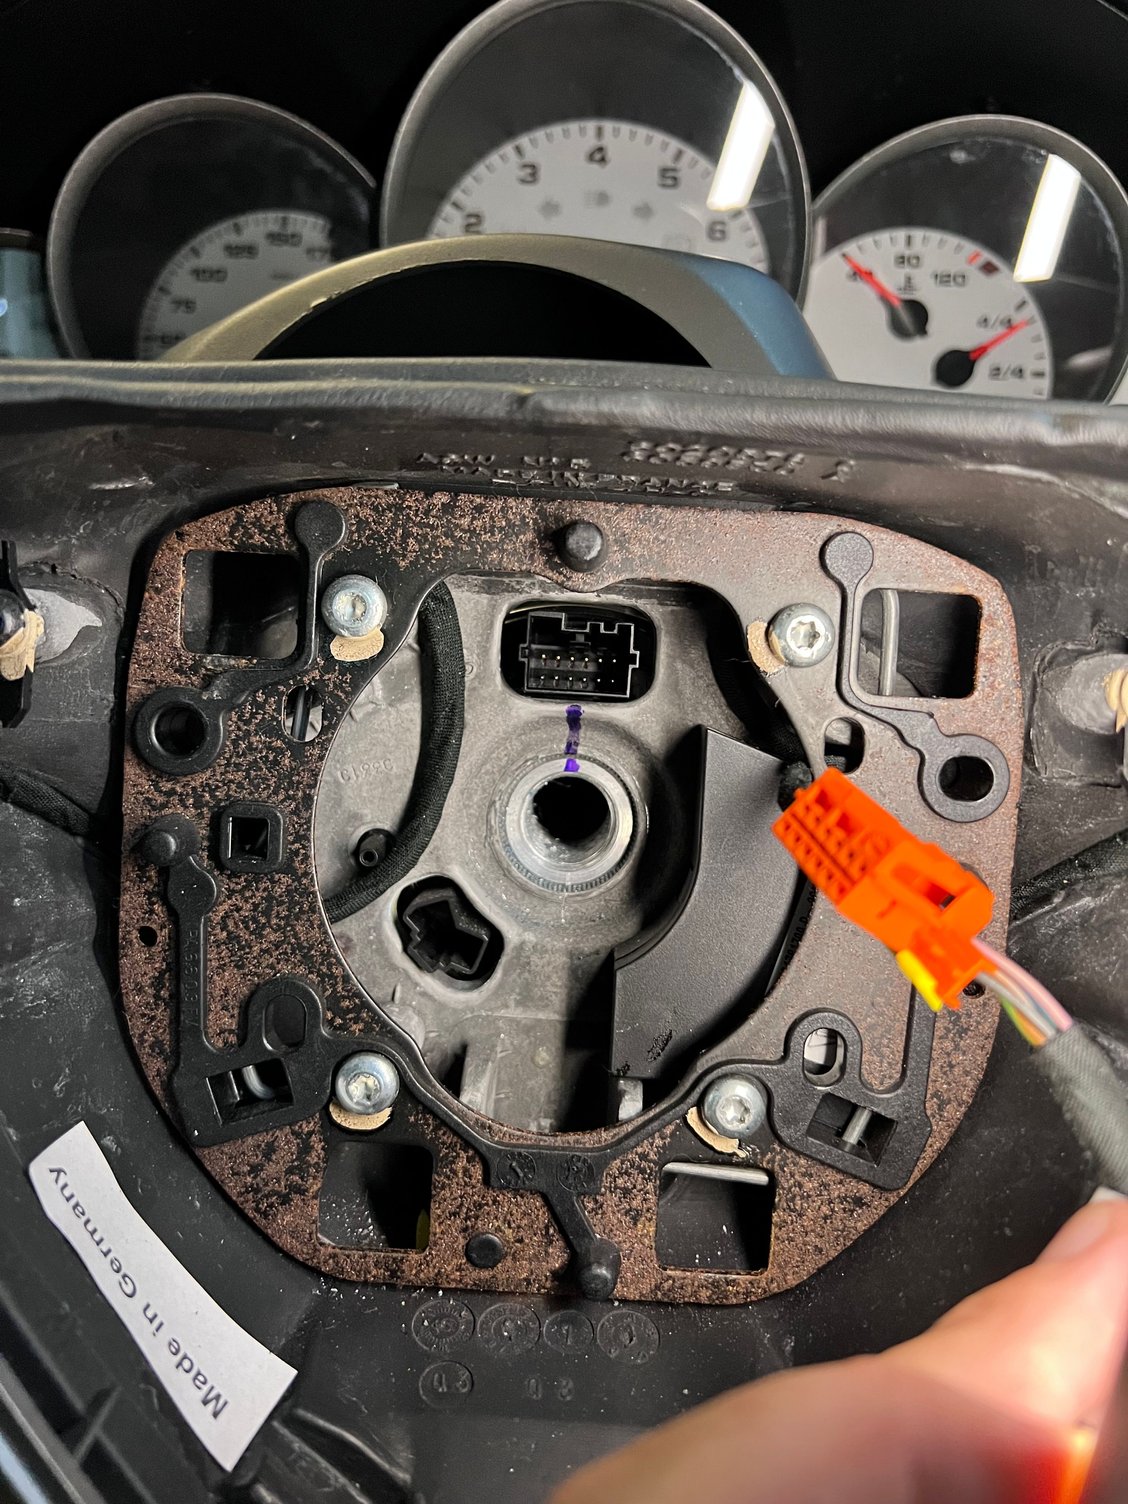
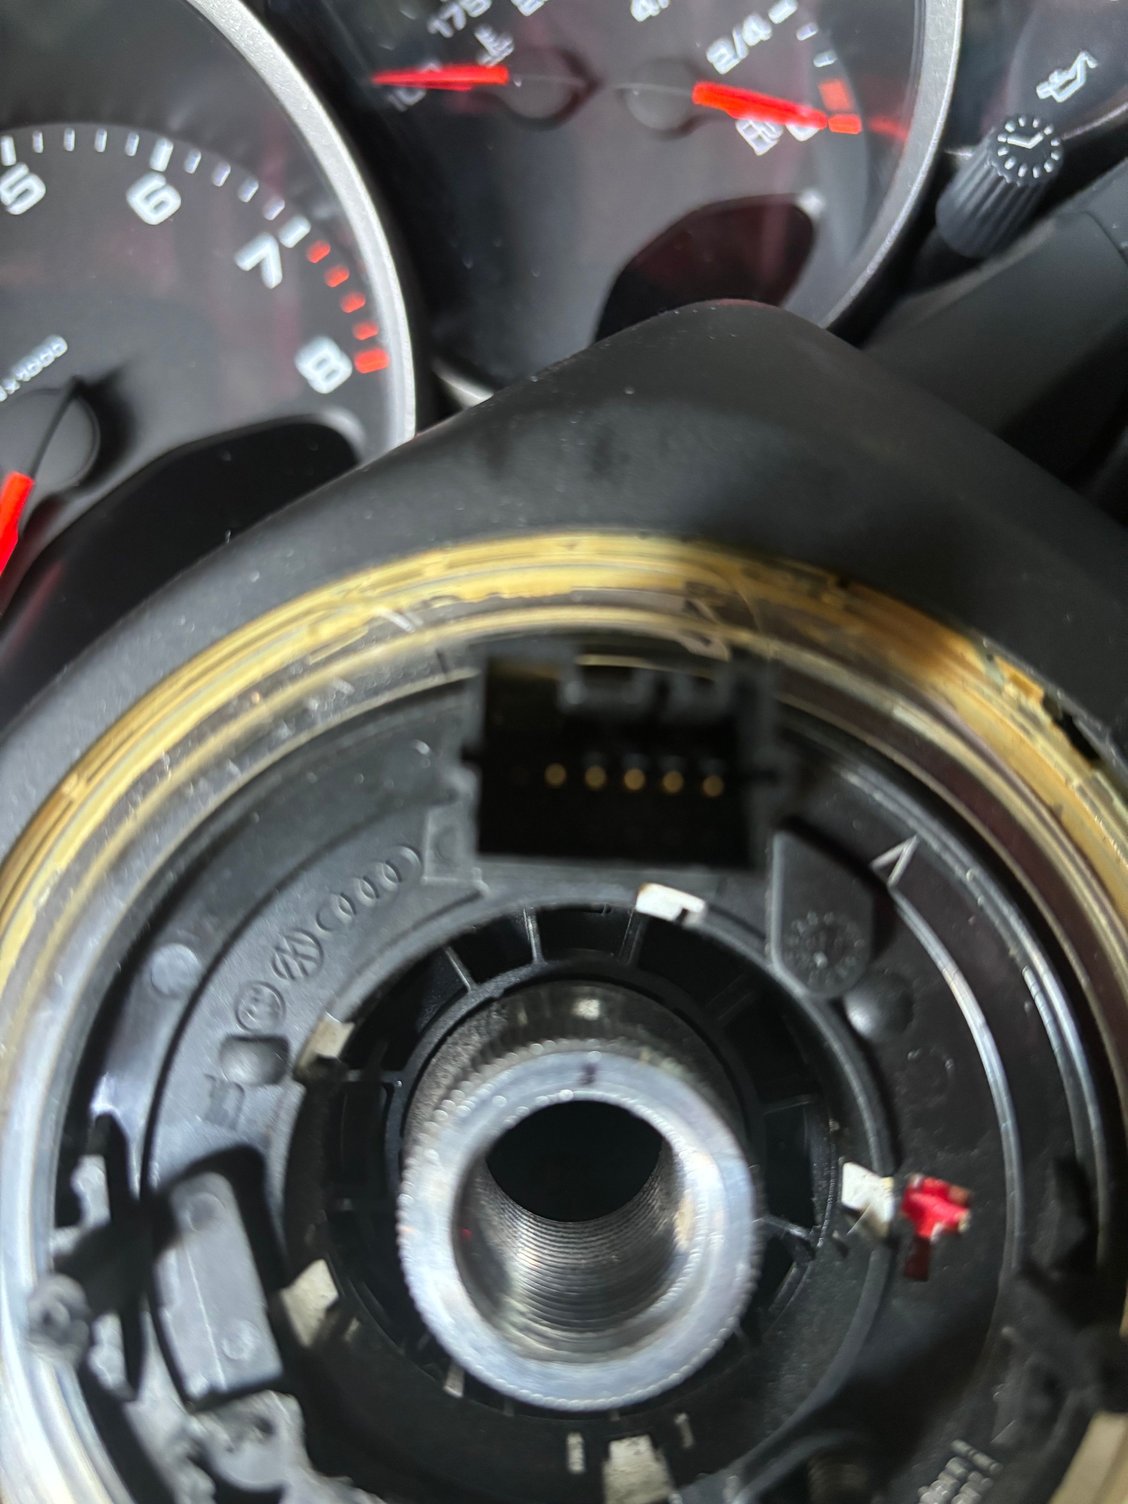
I should also note (something that is not emphasized enough in fact) that you will have to modify the clock spring mechanism to use an aftermarket steering wheel. As the OP did point out, there's large plastic dummy plug at 7 o'clock as well as two plugs at 9 and 3 o'clock that need to be shaved off.
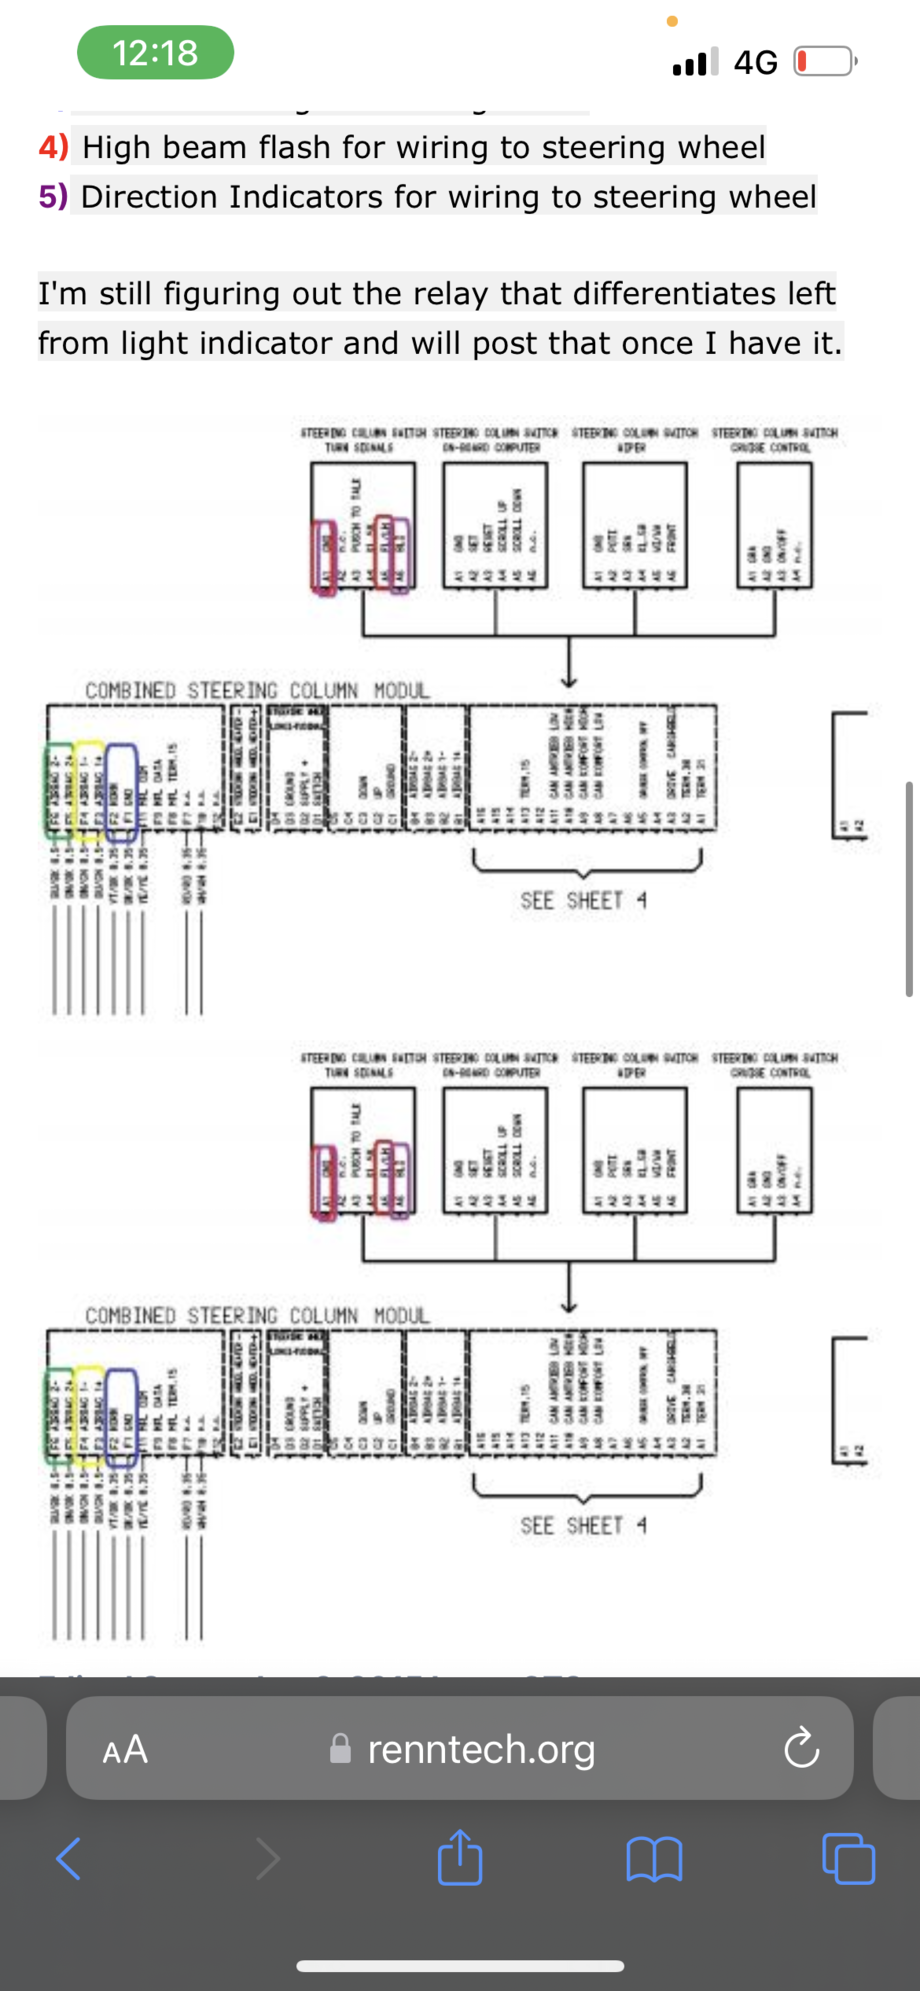
So back to the adapter. The method I used for wiring was to use female crimp on pins and wire directly into the steering column plug, no harness at all. There was some trial and error when I did this, however. I referenced the diagram marked, 'Steering Column Combined Modul' and assumed I could use the top six pins of the steering column plug. I then wired up 2 3ohm resistors to some female crimp on pins, heat shrinked them up and plugged them in from left to right, 3 ohm resistor, pin 1 and 2, 3 ohm resistor, pin 3 and 4. Pin 5 and 6 I ran a ground and power lead for the horn.
Went to put the negative terminal back on the battery to check my work and.... beep beep beep beep. I knew immediately that the order should have been reversed. So to summarize if you're planning to use the Flashpower Performance Short Hub adapter, the order for the pins should be
Viewing pins from left to right, Power and Ground to pin 1 and 2, 3 ohm resistor to pin 3 and 4, 3 ohm resistor to pin 5 and 6.
Also, even though I did make a mistake wiring, I did not trigger any airbag lights.
You can pickup female crimp on pins online, but if you like going to pick a part stores/junkyards, just grab some wiring harnesses. They're everywhere!
If using a flashpower performance hub adapter or similar short hub adapter, do not use the factory wiring harness, it won't work. Instead, use female crimp on pins and pin directly to this plug in this order left to right upper pins only power and ground to pin 1 and 2 3 ohm resistor to pin 3 and 4 3 ohm resistor to pin 5 and 6
Here's my setup. I'm also using a 3d printed 10mm spacer (PETG, 100% infil) until an aluminum one is shipped out to me. This gives me a perfect 1:1 in terms of wheel placement vs OEM.
Here's my setup. I'm also using a 3d printed 10mm spacer (PETG, 100% infil) until an aluminum one is shipped out to me. This gives me a perfect 1:1 in terms of wheel placement vs OEM.
Hi mate,
currently doing this job myself and have chosen to follow your lead with the female crimp pins, however they seem too loose and won�t stay on the pins in the clock spring. Which particular type did you use?


 04-30-2022, 01:12 AM