When you click on links to various merchants on this site and make a purchase, this can result in this site earning a commission. Affiliate programs and affiliations include, but are not limited to, the eBay Partner Network.
I need some help. I started to tackle the water pump DIY as my bearing had failed and the pulley was wobbling.
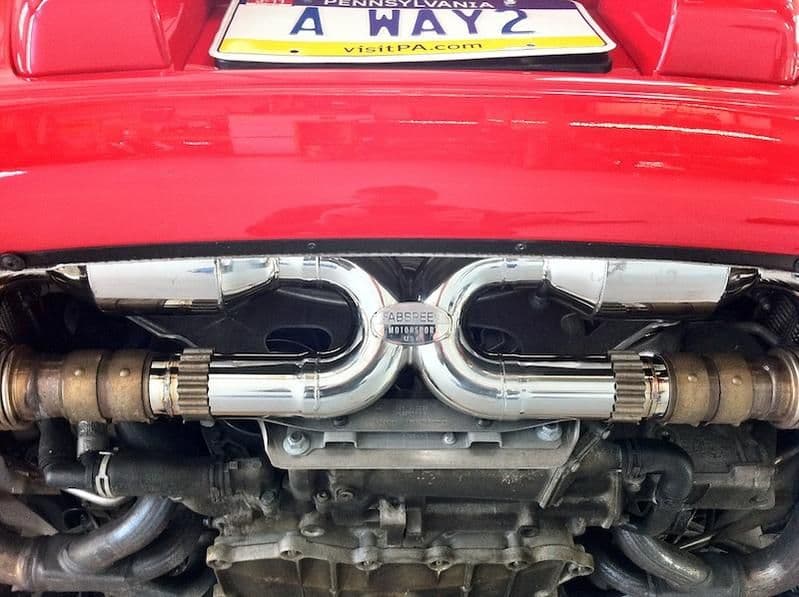
The picture at the bottom is not my car, but you can see the idea of what is going on.
Here is my problem: I have a full fabspeed setup, headers, cat x-pipe, and mufflers. It has different geometry than the stock set up. All of the tutorials and videos are with stock exhaust systems where there is plenty of space to access the exhaust bracket torx bolts. The fabspeed cat x-pipe blocks access to the T-10 torx bolts that secure the exhaust bracket to the engine mount bracket carrier, which, in turn, prevents me from moving the whole thing out of the way.
Not only that, the fabspeed exhaust system is absolutely immovable, no play at all. I though maybe i could get cute and put the jack on the x-pipe to push it up slightly and get to the bolts...it lifted the whole dang car with no change in geometry. (curse fabspeed and their fantastic build quality)
I was able to loosen the bolts connecting the engine to the bracket carrier using box wrenches on the lower ones, and the upper ones with some angle drive extensions, so the engine is "loose" from the bracket carrier. Never the less, the x-pipe prevents the bottom of the bracket carrier from moving at all. And the top of the bracket carrier won't move because it is connected to the engine mounts.
So...here is my question: If I pull the engine mounts (with engine properly supported of course) would my engine mount bracket carrier be free to move forward at the top so I could pull the water pump up out of the engine?
Or do I bite the bullet, pull off the most of the exhaust system, so I can pull the brackets properly? I only wanted to avoid this route because it will require gasket and bolt replacement, not to mention be more of a PITA.
With the engine pinned to the exhaust, removing the motor mounts will just move the exhaust too, no?
Removing the X should be relatively easy. Probably easiest to pull the bumper off, doable with it on, but it's not a big job to take it off and it makes working back there SO much easier.
I don't so much want the engine to move. I want the bracket carrier to be loose at the top. In any event I started removing the exhaust because it will have to come off if I want to reassemble properly.
I have a full Fabspeed setup and I think when I did mine I only pulled the driver's side header. I keep a few spares of the Fabspeed exhaust gaskets in the parts cabinet so I'm ready to tackle projects like this as they come up
1. Position jack underneath engine.
2. Using a wood block or similar, Place the block between the jack and the engine oil sump and jack up enough pressure to support weight of the engine.
3. Remove (2 ea.) Engine Mount nuts.
4. Slowly lower the jack. Should lower the engine about 6 inches or so.
5. Remove Engine Mount Carrier. If the exhaust is in the way, remove the exhaust as necessary.
1. Position jack underneath engine. 2. Using a wood block or similar, Place the block between the jack and the engine oil sump and jack up enough pressure to support weight of the engine.
3. Remove (2 ea.) Engine Mount nuts.
4. Slowly lower the jack. Should lower the engine about 6 inches or so.
5. Remove Engine Mount Carrier. If the exhaust is in the way, remove the exhaust as necessary.
For installation, accomplish the same in reverse.
I would not recommend jacking up the weight of the motor from the oil sump plate - it's fairly thin aluminum and you could crack it or flex it enough to create a leak somewhere around the perimeter - that's just not a proper place to support the weight of the motor.
(curse fabspeed and their fantastic build quality)
Apologize for our incredible build quality?? NEVER! I'll have to tell marketing to add "can be used to jack up entire car" on the Sport Cat X-Pipe webpage**...
Originally Posted by Petza914
I have a full Fabspeed setup and I think when I did mine I only pulled the driver's side header. I keep a few spares of the Fabspeed exhaust gaskets in the parts cabinet so I'm ready to tackle projects like this as they come up
Torq5teer--I would definitely recommend removing at least one header as Pete has indicated (and as you have already begun). This is the best way to ensure the system does not get damaged during the maintenance and that you are able to access everything appropriately and while its extra time to pull it off, makes everything easier in the end. Let me know if you need additional gaskets or any other parts as you work. Best of luck!
Thanks for the responses. Removing at least some of the exhaust appears to be the right way to do things here. Besides, it is due for its 80k service and I might as well do the plugs while I'm in ther. Gotta love mission creep.
hi... removing the exhaust is the right thing - easy to do
tip on the spark plugs: get a set of coils as well... sometimes they develop cracks and you should replace them... if they are good, you can always return the new ones
Another tip on the spark plugs, it's easier to use multiple short extensions than a long one to reach the plug through the tube. You put the socket and first short one together and put it in the tube, then before it's fully inserted, you hold the end with your fingers adding the next short one, etc. As you remove the plug, you take them back apart on the way out. This means you don't need a lot of clearance at the entrance/exit of the spark plug tube.
Another tip on the spark plugs, it's easier to use multiple short extensions than a long one to reach the plug through the tube. You put the socket and first short one together and put it in the tube, then before it's fully inserted, you hold the end with your fingers adding the next short one, etc. As you remove the plug, you take them back apart on the way out. This means you don't need a lot of clearance at the entrance/exit of the spark plug tube.
1. Position jack underneath engine.
2. Using a wood block or similar, Place the block between the jack and the engine oil sump and jack up enough pressure to support weight of the engine.
3. Remove (2 ea.) Engine Mount nuts.
4. Slowly lower the jack. Should lower the engine about 6 inches or so.
5. Remove Engine Mount Carrier. If the exhaust is in the way, remove the exhaust as necessary.
For installation, accomplish the same in reverse.
I did exactly that. If my memory serves, even if you remove the exhaust, the motor mount bracket is still in the way.
I did exactly that. If my memory serves, even if you remove the exhaust, the motor mount bracket is still in the way.
That is correct. If he had the stock exhaust, he could accomplish the replacement without removing the stock exhaust but, he would still be required to remove the engine carrier bracket. Unfortunately, because he has an aftermarket exhaust, he is not able to even remove the carrier.
That is correct. If he had the stock exhaust, he could accomplish the replacement without removing the stock exhaust but, he would still be required to remove the engine carrier bracket. Unfortunately, because he has an aftermarket exhaust, he is not able to even remove the carrier.
Pete, great advice on the taped extensions. New pump in. New plugs and coils. Fired it up without mufflers and cats to check for leaks and misfires before full reassembly. Sounded like a biker rally. Neighbors came out of their homes to check out the window shaking ruckus. All good to go. Pipes go back on tonight.

 10-01-2017, 01:21 PM


 I'll have to tell marketing to add "can be used to jack up entire car" on the Sport Cat X-Pipe webpage**...

