When you click on links to various merchants on this site and make a purchase, this can result in this site earning a commission. Affiliate programs and affiliations include, but are not limited to, the eBay Partner Network.
Hi everyone, I'm new to this forum so its a pleasure to be here.
My 996 Turbo centre Radiator had a considerable leak and dumped the entire coolant, car is dry.
Rad was replaced last night and I have the coolant ready, all is good to here. I have read so many articles on this forum so far about a DIY procedure for an entire coolant refill, and to be honest there are so may contradictory answers I'm more unsure now than before I started to look.
I have a 996 Turbo workshop manual but it doesn't cover a full coolant replacement/refill
I would be very grateful if anyone could list the steps I should follow to refill the system and then remove any air.
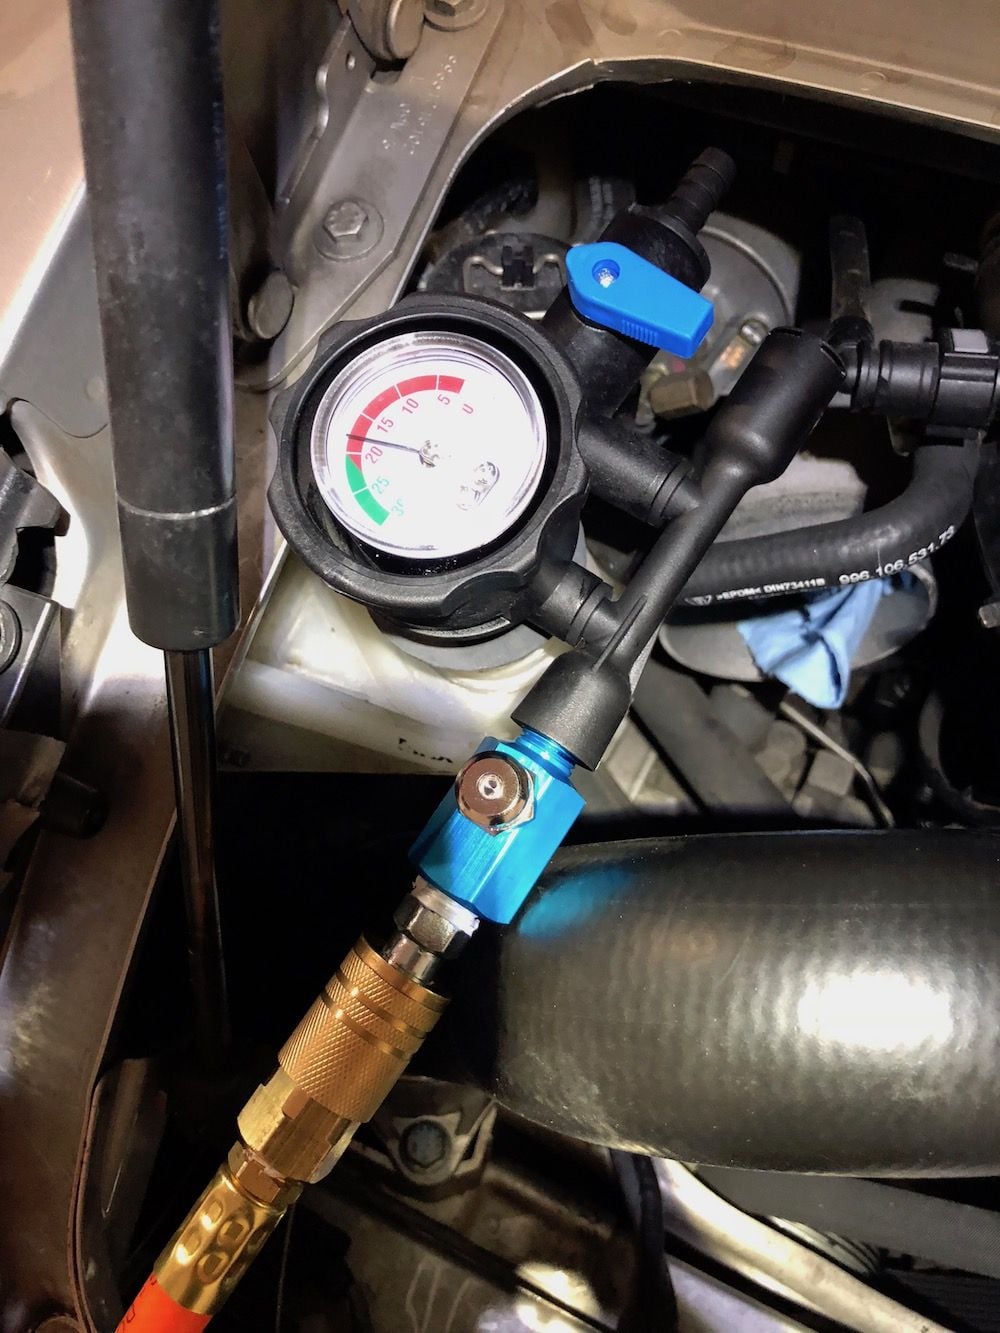
The most efficient way is to use a vacuum system.
Or you can position the rear so the engine is higher than the front, jack or steep driveway, and fill it. Then start the engine and keep topping up the reservoir as the engine comes up to temperature. Rev the engine to 2k rpm a few times to push the air out.
When the level stabilizes you can put the cap back on, open the bleeder bail and let the engine cool off for a couple of hours.
The bleeder is actually a vacuum break that lets the coolant flow out of the tank into any air locked nooks n crannies in the system. Pressure relief is in the cap.
Refill the tank and take a ride with the bail still up. (Carry coolant in case you need it while you are out)
Leave the bail up for the next few outings top up as needed.
Typically the level will stabilize slightly below midway between Max and Min. Snap the bail down and monitor level for the couple of weeks.
I think the easiest way to fill would be with an Airlift type system. Although I have one of those systems I recently filled a buddies 997.1tt after an issue with a lower radiator hose that popped off. I followed a similar procedure as shown at Pelican. Went without issues. Here is link, scroll down about half way down page where refill procedure starts:
only thing i would add to fpb's suggestions would be to maintain the 2/3k revs while filling with the rear raised ( i had mine on j'stands ) as the system will pressurize more easily if continually revved. then i run with the breather cap unsnapped for a bit ( add as needed or even a bit may overflow out the breather ) and only close it once i am certain the levels are correct.
Hi everyone, I'm new to this forum so its a pleasure to be here.
My 996 Turbo centre Radiator had a considerable leak and dumped the entire coolant, car is dry.
Rad was replaced last night and I have the coolant ready, all is good to here. I have read so many articles on this forum so far about a DIY procedure for an entire coolant refill, and to be honest there are so may contradictory answers I'm more unsure now than before I started to look.
I have a 996 Turbo workshop manual but it doesn't cover a full coolant replacement/refill
I would be very grateful if anyone could list the steps I should follow to refill the system and then remove any air.
Thank you for your help and guidance
Nick
My recommendation is to either get a vacuum lift system or take the car to a shop that has one.
I know there is a refill procedure that doesn't require this system be used but my frank opinion of the procedure is it sucks.
To run an engine at elevated RPMs to get it hot with the very likely possibility there are air pockets in the heads which would be subjected to localized overheating during this procedure is just mind boggling.
To run an engine at elevated RPMs to get it hot with the very likely possibility there are air pockets in the heads which would be subjected to localized overheating during this procedure is just mind boggling.
from pelican parts tutorial:
With your Carrera cold, elevate it on jack stands (see Pelican Technical Article: Jacking Up Your Porsche 911 Carrera) and remove the plastic protective panels that cover the radiator hoses on the underside of the car. Place the heater temp controls all the way to high, turn the ignition to the on position, and turn on the passenger compartment fan to its lowest setting. Do not start the car. By turning the heater on, you are opening the valves to the heater core, which will allow you to drain the coolant located in the core. Move to the rear trunk and slowly remove the radiator/reservoir cap inside the trunk to allow any coolant system pressure to vent out.
Now it's time to empty the coolantâ�"refer to Figure 2 for the location of the hoses that need to be disconnected. At the bottom of the engine, open the drain plug located in the oil pump housing and let the coolant empty into your large bucket (photo3). When the flow has stopped, replace the plug using a new O-ring and torque to 7â�"11 ft-lbs (10â�"15 Nm). Next disconnect the two large radiator hoses that feed the supply and return coolant lines to the front of the car. I also like to disconnect the front lower hoses from the radiators as well, but this requires removing the front bumper cover (see Project 68 and Pelican Technical Article: Porsche 911 Carrera Radiator and Fan Replacement).
Reconnect the hoses when all of the coolant has drained using new hose clamps. I used to only recommend the use of good quality German screw-type clamps, but I'm slowly coming around to the annoying spring-clip type that were used in the initial assembly of the car. These clips have an advantage over the clamp type in that they apply constant pressure when the hose expands or contracts as the car heats and cools.
Next, disconnect and empty the coolant from the two heater hoses. Reattach with new hose clamps. Now it's time to refill the coolant and bleed the system. In the rear trunk, on the left side of the engine bay is the coolant tank (red arrow), remove the filler cap (blue arrow) and fill the tank up to the top of the fill level, then flip up the metal clip that opens the bleeder valve (green arrow) (Figure 4). Start the car and run it at idle, topping off the coolant to the maximum level, until no more coolant can be added (Figure 5). Rev the engine, let it settle down, and top it off again if the level decreases. Be sure during the whole process that the car does not exceed 176 degrees Fahrenheit (80 degrees Celsius) while bleeding the systemâ�"if the car gets too hot it will interfere with your ability to fill and bleed the system to the proper level.
Now, reinstall the reservoir cap and let the car continue to warm up at about 2,500 rpm for 10 minutes or until the thermostat for the front radiators opens up. When the thermostat opens and coolant starts flowing forward, the electrical radiator fans should turn on. Now allow the car to continue to warm up a bit more, revving the car to about 5,000 rpm every 30 seconds or so. Remove the reservoir cap slowly, letting any built up pressure dissipate. There should not be any tremendous pressure built up because the bleeder valve is still open at this time. Top off the coolant in the tank to the maximum level, reinstall the cap, and repeat the process of revving the engine to about 5,000 rpm for another five minutes. Now, allow the engine to idle for a few minutes until you hear the radiator fans cycle on and off at least once. Turn off the engine, and slowly remove the reservoir cap again, relieving any pressure that might have built up there. Top off the coolant until it reaches the MAX level indicated on the coolant tank gauge, located on the side of the tank. Flip down the metal clip to close the bleeder valve. If you have an automatic transmission car, then replace fuse B1 in the driver's side door kick panel.
That is good as long as you don't get scalded by the pressurized coolant escaping as you open the blue expansion tank cap to top up.
There is a popular misconception that the Pelican instructions reinforce. Snapping the bail up DOES NOT bleed off the pressure.
If you believe the pressure is relieved by snapping the bail up try this:
Go for a drive and get the engine up to temp.
Park the car, preferably near a hospital so that you can get first aid for burns, shut it off and open the engine cover.
Is the square peg that the metal bail mounts on up or down? If it is up without the bail snapped up has it vented the pressure?
Think so?? Then open the blue cap on your vented system and see if you get scalded by any escaping pressurized coolant.
That is good as long as you don't get scalded by the pressurized coolant escaping as you open the blue expansion tank cap to top up.
There is a popular misconception that the Pelican instructions reinforce. Snapping the bail up DOES NOT bleed off the pressure.
it's recommended to leave the breather UNsnapped as you refill, leaving far less pressure than would be extant if you had snapped the breather shut while filling. as noted, i waited to snap the breather cap tight until the coolant level normalized.
here again, is the quote from their tutorial which is virtually the same procedure i followed. or i should say i worked the pedals and keep the revs at 2500 while my bud adds the coolant
remove the filler cap (blue arrow) and fill the tank up to the top of the fill level, then flip up the metal clip that opens the bleeder valve (green arrow) (Figure 4). Start the car and run it at idle, topping off the coolant to the maximum level, until no more coolant can be added (Figure 5). Rev the engine, let it settle down, and top it off again if the level decreases. Be sure during the whole process that the car does not exceed 176 degrees Fahrenheit (80 degrees Celsius) while bleeding the systemâ�"if the car gets too hot it will interfere with your ability to fill and bleed the system to the proper level.
Now, reinstall the reservoir cap and let the car continue to warm up at about 2,500 rpm for 10 minutes or until the thermostat for the front radiators opens up. When the thermostat opens and coolant starts flowing forward, the electrical radiator fans should turn on. Now allow the car to continue to warm up a bit more, revving the car to about 5,000 rpm every 30 seconds or so. Remove the reservoir cap slowly, letting any built up pressure dissipate.There should not be any tremendous pressure built up because the bleeder valve is still open at this time.
again, i only close the cap once the levels are adequate and any overflow out the breather has occurred. if you do it "right"? then presumably none will overflow. i didn't and it did lol.
but yeah, i agree. danger danger. i usually wear a hazmat suit when opening that blue cap!
Interestingly, my wrench replaced the rear (right) coolant tube (near the engine mount) and said he was only able to vacuum in 3 - 4 liters of mix. I took the car back to my office, operating under the assumption that I did not dump all the previous coolant, looked at the reservoir and it was still full, bail was in the upright position.
I am going to put the car on my ramp after a couple hours and see if it will take anymore after cooling. I suppose my question is, if the wrench used the vacuum system and only got 3-4 litres in, how likely is it that I lost less coolant than I thought?
The only way I'd do it now having done it other ways on other cars is using the Airlift II. With that, it is super easy, and I was able to fill it the right amount with total confidence the first time. It does require compressed air access, and a good steady flow, but the added benefit is confidence you don't have any leaks and you've gotten most if not all of the air pockets out of the system.
The only way I'd do it now having done it other ways on other cars is using the Airlift II. With that, it is super easy, and I was able to fill it the right amount with total confidence the first time. It does require compressed air access, and a good steady flow, but the added benefit is confidence you don't have any leaks and you've gotten most if not all of the air pockets out of the system.
Yes, that's what the wrench did - I have let it sit for almost two hours, took the cap off, pulled the bail up, had the GF note the level, ran it between 2500 and 5000rpm, and the level did not go down, but it did pulse a bit with rpm range. Temp gauge, with AC on was ever so slightly over 80c.
Sooooo, I have put the bail back to its original position, and will drive it home, about 8kms, park it and let it completely cool overnight, check the level again in the AM. Appreciated Nerdtalker.
 02-21-2017, 08:19 AM


")