When you click on links to various merchants on this site and make a purchase, this can result in this site earning a commission. Affiliate programs and affiliations include, but are not limited to, the eBay Partner Network.
Helpful to see even if I'm using the stock equipment. I think when this slave goes, I'll have a GT2 setup waiting for the occasion.
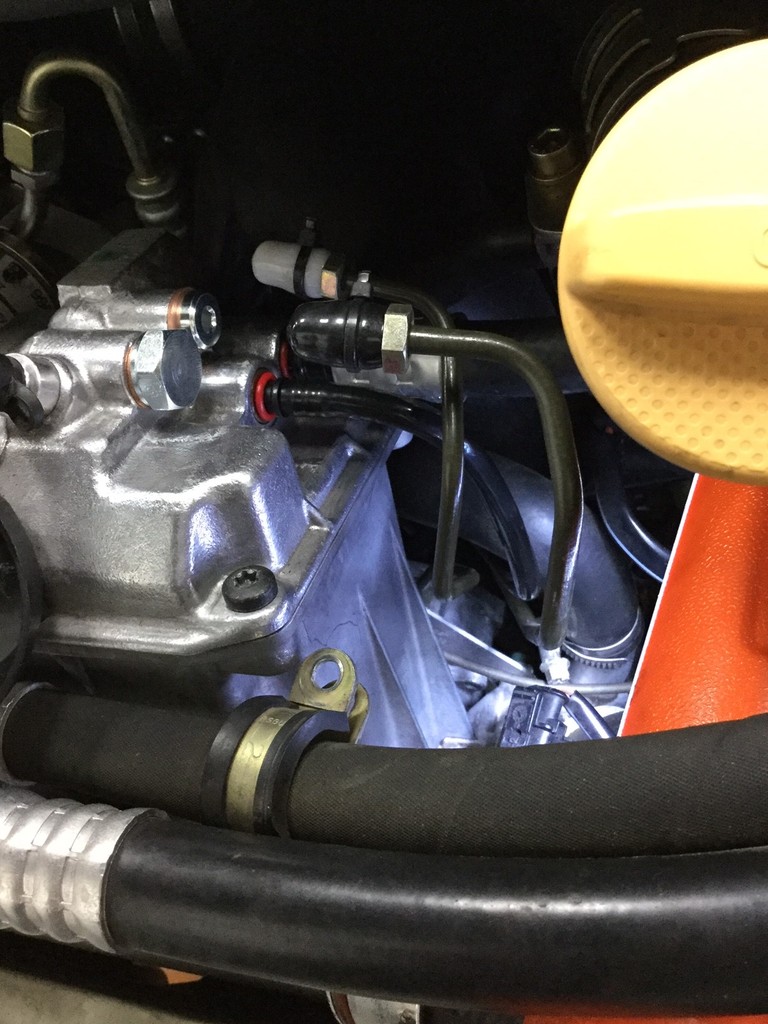
Now I need to figure out how to get to the hard line that goes from the res to the pump out of the pump and I should be good to go....looks like some disassembly required.
Tried to wiggle my left hand up over the starter before taking out the old slave to see if I'd be able to do it without taking out the starter. Not likely.
When are you taking yours apart?
Dave,
Likely tackling it perhaps next week. Just got the new motor in one of the Audi's that I am shaking down this week, have a couple other small fluid/tire changes to do on the rest of the fleet then all focus can begin on the slave and new strut mounts on the 911.
Sounds like pulling the starter might just be easier to get some extra space, always sucks having to pull out some bigger things to get to a connection, but it does save the skin on the knuckles.
Last edited by TheDeckMan; 04-28-2017 at 02:17 PM.
The old slave is out and the new slave in. Still need to bleed it but a few notes.
The Porsche procedure recommends taking the starter out on the passenger side as a way to get a clear path for one arm to push the slave into the trans while you thread the bolts with the other. Others say they had thin enough arms to do it without removing the starter at all. I'm 6'3" and 230....okay, 240lbs and I was able to get by going "halfway".
I took the leads off the starter and that afforded me the room to get my arm up there. I also learned after trying for 20 minutes - unsuccessfully - and then walking away to have a good swear and a think - that if I made a fist and used it to push the tail of the slave, I could hold it there a lot easier (no finger fatigue).
DISCO.
You also do have enough room to use your finger to get a really idea of where the hole is in the clutch fork that you're aiming for...
Also make sure that the vertical bracket that makes an "L" comes down and points toward the FRONT of the car....not the rear. I had mine attached to the slave loosely at the top bolt as a way to gauge the proper height of the slave. That approach isn't as helpful when the bracket is facing the wrong way.
hah....if it were a concerted effort with no kids, home repairs or yard work in between then it'd have taken a lot less but I do fall into the "multi-tasker" category. It's also my first time doing anything on this car beyond an oil change so it's been a solid learning experience and I'd always prefer to try and do it right the first time which tends to include a good chunk of research. Thanks to all who answered questions and offered their experience.
Received a Schwaben brake bleed bottle from ECS yesterday. I'm probably a little more excited than I should be but after years of using a stiff plastic hose jammed into a Poland Spring bottle, this thing is really nice. It has a 90-degree nipple on it which makes it a ton easier to attach to the bleed screw on the slave along with a really flexible hose which will well, flex when you move the nipple and not knock over your bottle of spent fluid. Comes with a metal hanger as well. Nice design and well built.
Received a Schwaben brake bleed bottle from ECS yesterday. I'm probably a little more excited than I should be but after years of using a stiff plastic hose jammed into a Poland Spring bottle, this thing is really nice. It has a 90-degree nipple on it which makes it a ton easier to attach to the bleed screw on the slave along with a really flexible hose which will well, flex when you move the nipple and not knock over your bottle of spent fluid. Comes with a metal hanger as well. Nice design and well built.
water bottle at the dollar store coat hanger and 6 ft of clear line from lowes. maybe 5$ total and as things get old and hard to use easy to replace
hah....if it were a concerted effort with no kids, home repairs or yard work in between then it'd have taken a lot less but I do fall into the "multi-tasker" category. It's also my first time doing anything on this car beyond an oil change so it's been a solid learning experience and I'd always prefer to try and do it right the first time which tends to include a good chunk of research. Thanks to all who answered questions and offered their experience.
Kodos for undertaking this having only done oil previously.
Lots of other stuff will seem relatively easy after monkeyig around with slave, lines, and pentosin in cramped quarters.
hah....if it were a concerted effort with no kids, home repairs or yard work in between then it'd have taken a lot less but I do fall into the "multi-tasker" category. It's also my first time doing anything on this car beyond an oil change so it's been a solid learning experience and I'd always prefer to try and do it right the first time which tends to include a good chunk of research. Thanks to all who answered questions and offered their experience.
Received a Schwaben brake bleed bottle from ECS yesterday. I'm probably a little more excited than I should be but after years of using a stiff plastic hose jammed into a Poland Spring bottle, this thing is really nice. It has a 90-degree nipple on it which makes it a ton easier to attach to the bleed screw on the slave along with a really flexible hose which will well, flex when you move the nipple and not knock over your bottle of spent fluid. Comes with a metal hanger as well. Nice design and well built.
Great to hear of the progress Dave! Those bleeder bottles are nice, I have a Motive one and it makes things so much nicer when bleeding clutch slaves/brakes by ones self.
Thanks Noah! Gonna bleed and test tonight. I also bought the 11mm (brake bleed) offset wrench and it hadn't really occurred to me that it'd be perfect for bleeding the slave until I remembered the're both 11mm. I was using an ignition wrench on the bleeder because it's tiny but they have such a thin profile. This should work really well. The offset is pretty extreme and should - if not clear the transmission - at least make it easier to move around in there.
Kodos for undertaking this having only done oil previously.
Lots of other stuff will seem relatively easy after monkeyig around with slave, lines, and pentosin in cramped quarters.
Thank you, sir. I will be happy to be done with the Pentosin. Lotta shop towels.
Agreed. It certainly helps realign your perception of "tight spaces".
"Nah, it looks pretty straight-forward in the write-up", he said to his wife casually.
Also helped me reacquaint myself with some of my less-frequently used tools. I actually had a set of stubby wrenches that went all the way up to 22mm for the accumulator. Gold.
Bled the slave, tripled-checked for any leaks on the slave or at the reservoir in the frunk. Looked good. That was a win.
Started the car to check my connections at the hydraulic pump in the engine bay and I have a leak from the plug for the high pressure line going to the slave.
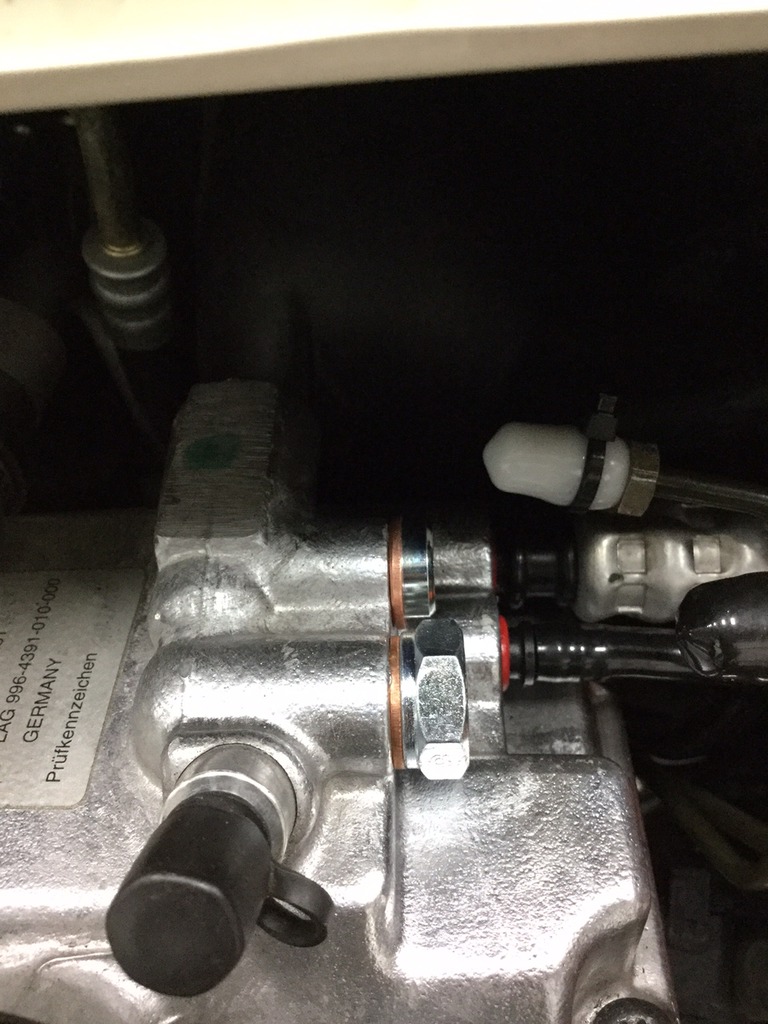
I was using a copper sealing ring. Guessing I need to find another solution. Should I be looking for a different material for the sealing ring or is my plug the problem?
When you seal a hydraulic port, are you looking to replicate the line and have it seat and seal on the flare like the fitting itself or are you looking for the threads and the sealing ring to do the job? Can I use the plug, copper ring and some Loctite hydraulic thread sealer or would you change any of those?
This is what I have in place now. (The larger one closer to you....I am not plugging the smaller one - goes from the pump to the res - and reinstalled that line)
I have the same style setup on the slave where the accumulator used to be (plug with copper ring) and that isn't leaking. It's only under the pressure generated by my foot and the master so guess that's the difference.
I know this may sound a little off, pull the leaking plug use the copper sealing ring but use some rtv/silicone make a gasket around the the sealing surface of the both sides of the ring, tighten it down and clean off the excess.
I know this may sound a little off, pull the leaking plug use the copper sealing ring but use some rtv/silicone make a gasket around the the sealing surface of the both sides of the ring, tighten it down and clean off the excess.
Just wanted to update the post.
Figured out why it was leaking.
Took out the plug and copper sealing ring for a look.
�Hmmm, why would I have put one in that looked like that? That won�t seal. Let�s try another.�
Same thing.
�Okay, let�s take a closer look. Ahhhh, yeah�..that certainly isn�t helping.�
�okay, I�ll grab my flat needle file and file it off.�
��.and try it again.�
�Come on!!!....�
Then��.
Compliments to �TheDeckMan� for the absolutely impeccable craftsmanship of this piece.
I installed it tonight and it worked flawlessly to seal that port. Thank you again DeckMan!
Soo...Progress. I thought.
Then I started it and gave it a poke and got what you here in this video.
Checked the fluid level in the reservoir using the procedure in the manual. Reads correctly.
Pushed the clutch pedal a few times. Didn't go away. (If I've effectively removed the power assist for the clutch then pushing the clutch shouldn't have an effect on the pump).
I'll check the fluid level again tomorrow but will be doing some more research as well.
Last edited by danspach; 05-18-2017 at 12:44 AM.
Reason: pic wasn't working
 04-24-2017, 04:16 PM