When you click on links to various merchants on this site and make a purchase, this can result in this site earning a commission. Affiliate programs and affiliations include, but are not limited to, the eBay Partner Network.
AOS replacement - any clips-doo-dads I should order ahead of time?
Going to do the AOS on my 99 when I get back from holidays in a couple weeks. Any clips or anything I should be ordering so I have them when I rip into it? I have the AOS itself and 999-512-630-00 35x12 lower hose clamp. anything else I should be ordering so I'm not trying to finish the job and not be able to do it because of a silly .50 clip I forgot to order?
Also plan on doing the alternator Y-cable and the 4-6 timing chain tensioner at the same time.
I recommend a fresh container of Band-Aids. Otherwise, I don't think you will need additional parts. It would be tempting to replace all the AOS hoses, but I don't think this is really possible with the engine in the car. I did mine from the flywheel side with the transmission out and it was still a bitch.
That clip is the main thing. And mostly because it comes in the handy dandy open position.
Drain the coolant then get all of the hoses out of the way, drop the engine down almost to the cross member to get more room, remove the manifold bolts before the plenums, then pay attention to the routing of the throttle cable. I used needle nose vise grips for all of the spring loaded hose clamps but I'm sure there are specific tools for that. The pelican guide provides everything else you need to know.
Oh ya, and if the AOS won't seat properly, it's catching on one of the wires or hoses at the bottom.
On top of the band aids add your favorite beverage to the mix. It's a frustrating job because of the lack of clearance in the engine bay.
The most difficult was the hidden bolt on the top of the engine. But when all is said and done you can pat yourself on the back for a job well done.
Oh also take pictures of the vacuum lines as that's where I screwed up when putting things back together again. If you get them wrong you car will run badly when it's all put together again.
Glad to see you have a positive attitude about this to begin with. There have been many write-ups about replacing the AOS. Like said, it is a PITA job with the engine in the car, and after doing it I told myself I would never do that again! I would gladly pay someone $1200 to do it to save myself from the pain and agony. That being said, wrap left arm in ace bandages because almost all of the work is down the left side (removing the air intake bolts) and you will cut your arm many many times. Besides the AOS and bellows and clamps, I replaced the intake manifold gaskets and TB O-ring. Also, you will break the coolant hose connector just to the right of the alternator. Have another one or plan on doing the forever repair with a brass fitting and hose clamps. And more than likely you will break the oil filler tube if you have a lot of miles on your car. Smart to color code your vacuum lines with different colored electrical tape. Might consider getting some new vacuum tubing because the plastic becomes very brittle with age/heat. And also like said, plenty of your favorite beverage(s) because you will need it. Alcohol is highly recommended for the pain you will experience. And remember, stepping away and taking a nap solves a lot of problems. Like how in the hell do you remove that last intake bolt, and more importantly, how in the hell do you get it back in? I used painters tape to tape the bolt to a socket and more to tape together swivel sockets and extensions to reach over the intake and down and back there.
You will need coolant to refill. Get 3 LED shop lights and put them in there so you can see. And get one of those extended spring hose clamp removal tools. Invaluable for removing the various spring clamps you will encounter. Might consider a good time to replace serpentine belt and air filter.
I was in process of doing mine while I was doing coolant tank, water pump, etc. On my C4S 2004 I could not get to it. It was a while I'm in there, preventative project anyway. I'll drop the motor this winter and do it along with some other things. When I did my coolant tank, water pump, thermostat I replaced about 3 gallons total. Porsche coolant and distilled water 50/50 for me.
So you guys talking about manifold gaskets, are they really intake gaskets or the plenum rings you're talking about? You don't need to actually take the intake manifold off, do you?
So you guys talking about manifold gaskets, are they really intake gaskets or the plenum rings you're talking about? You don't need to actually take the intake manifold off, do you?
Yes, driver side manifold comes off if going through the front.
If you want to have the coolant hose on hand, PM me. I have an extra one for a 996.1.
For the coolant, expect a couple of gallons to come out. If it's relatively fresh, you can get a .55 micron filter for a 5 gallon bucket (my favorite Ahsai recommendation) to filter and reuse the existing.
Moving the coolant lines and lowering the engine should make you need less ace bandages.
Lowering the engine just as easy as loosening the 2 back motor mounts a bit? Is a brand of coolant in particular compatible/play nice with Porsche stuff?
Thanks for the offer of the hose. I'll order that gasket I guess!
Lowering the engine just as easy as loosening the 2 back motor mounts a bit? Is a brand of coolant in particular compatible/play nice with Porsche stuff?
Thanks for the offer of the hose. I'll order that gasket I guess!
Yes, loosening the 2 motor mount bolts is okay, but you will need to go more than that. Remove rear bumper and the back heat shields so you can drop the engine down to the cross-member. This will provide clearance for your mufflers and let you drop the engine down as far as you can. Get the rear of the car up on jack stands. You will need access under the car to remove the AOS bolts. Continue to support the engine with a jack underneath. At times doing this job you will need to raise the engine, lower the engine, raise the engine and so on.
If you are certain that Porsche coolant is already in there, use only Porsche coolant for refill. A mix of coolant might turn your coolant into jello and that is not good. That is a fact.
You can get the engine down quite as ways without taking off the bumper. I'd say 3" which should be plenty. But as Joe said, you will want to continue to support it with a jack.
My procedure does work and almost makes the job bearable...almost. You need as much room in there to work as possible and you don't want to have to backtrack in the middle. Once you know how to do it, removing the rear bumper is a 15 minute job. I found that I could not lower the engine enough because the mufflers would hit the heat shields and bumper. I wanted it down as far as I could drop it. You can drop the engine down probably a good 6-7" and that is massive for this tight job.
1) Remove rear bumper and outer heat shields for clearance
2) Loosen rear wheel lugnuts
3) Jack up rear and put jack stands under the car high enough you'll be able to work underneath
4) Remove rear wheels
5) Now place jack under motor with a piece of wood to support it and slightly raise the engine
6) Remove lower motor mount nuts
7) Lower engine until it stops at the cross-member and then raise it ever so slightly. That will place the weight of the engine on the jack at the lowest you can get it. Watch for straining the coolant hoses and O2 connectors.
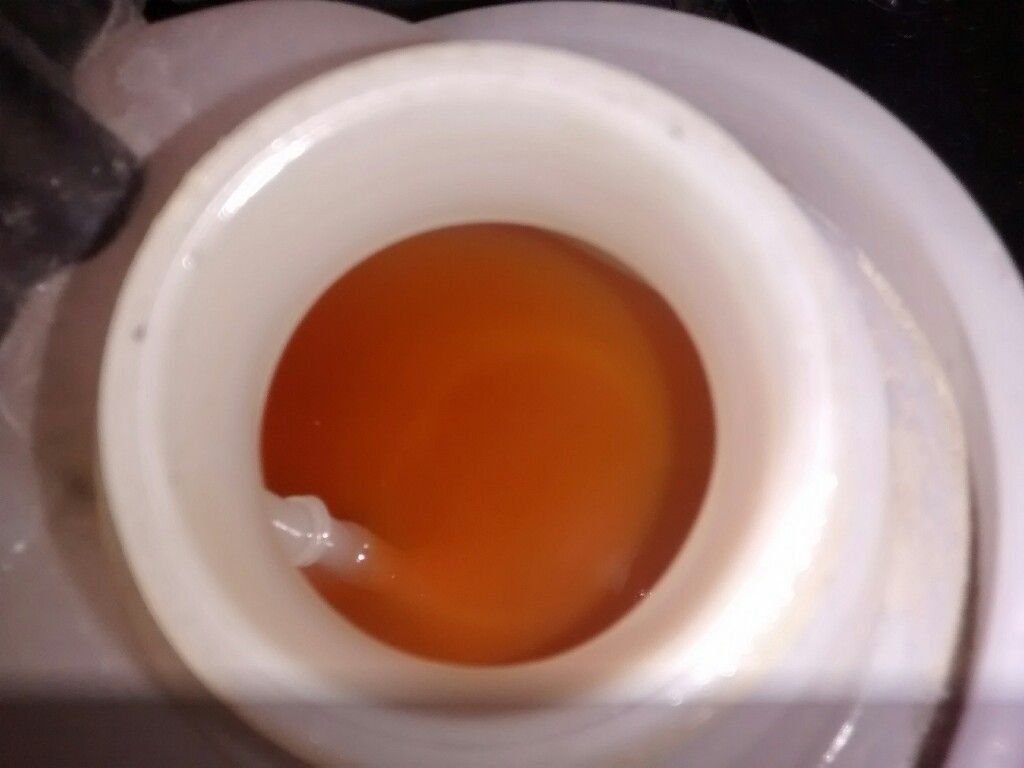
Re: Coolant. Supposedly the PO only had it serviced at Porsche so I expect it to be Porsche unicorn blood err coolant. It's sort of a orangy-pinky color. Does this look like OEM coolant?
e: I did the motor mounts already so it'll be a snap for me to loosed them and drop it a couple inches or so. Thanks for the advise for that or I might not have done it. I can see that being very helpful.

 08-23-2016, 09:33 PM