Very broken 2002 3.6 996 C4S
 08-02-2016, 06:21 PM
#46
I was in the same situation, I was forced to go with a replacement engine as my crank had been damaged and they are hard to get hold of, I ended up buying a used engine and stripping it to refresh it, Hartech honed my cylinders and fitted strengthening rings to prevent d chunking in future , I would say with that level of debris your going to have a fair bit of damage , I have some parts left over if you need anything, I know loads of places to get bits also in uk if you need anything message me ok
You just need to get the heads off and possibly pull off the 456 side of the engine casing, if you have the engine in an engine stand swivel it so 123 side is facing down , undo all casing bolts and you can lift it off by hand , you will then see right inside, don't worry nothing will fall out it all sits in the other casing half, you will just expose the bearing carrier and rods and Pistons for 456 but you will see the damage that's been done I would imagine, you mentioned a thin metal piece before, that sounds like the timing chain baffle , if that's been chewed I'm wondering if you have had a timing chain failure??
You just need to get the heads off and possibly pull off the 456 side of the engine casing, if you have the engine in an engine stand swivel it so 123 side is facing down , undo all casing bolts and you can lift it off by hand , you will then see right inside, don't worry nothing will fall out it all sits in the other casing half, you will just expose the bearing carrier and rods and Pistons for 456 but you will see the damage that's been done I would imagine, you mentioned a thin metal piece before, that sounds like the timing chain baffle , if that's been chewed I'm wondering if you have had a timing chain failure??
 08-04-2016, 11:13 AM
#47
Intermediate
Thread Starter

Join Date: Jul 2016
Location: Hertfordshire
Posts: 34
Likes: 0
Received 0 Likes
on
0 Posts
Thanks thats very kind of you - I expect I will certainly be in touch with you. I've made a good start on getting the engine out but I only get a few spare hours here and there. I hope to have it all out by Sunday and then I'll start pulling it apart.
Most of that material in the sump is the weird thin stuff - its a fraction of a mm thick and its painted/coated so its nothing load bearing hence me thinking its a shield or something. The baffle suggestion sounds about right.
Most of that material in the sump is the weird thin stuff - its a fraction of a mm thick and its painted/coated so its nothing load bearing hence me thinking its a shield or something. The baffle suggestion sounds about right.
08-04-2016, 12:23 PM
#48
Intermediate
Thread Starter
Join Date: Jul 2016
Location: Hertfordshire
Posts: 34
Likes: 0
Received 0 Likes
on
0 Posts
Couple of quick questions. I'm using the Pelican guide to make sure I dont miss anything and it seems pretty good but I have 2 queries. Firstly the diagonal braces underneath - I've undone the bolts at either end and the one visible nut on one of the 2 middle mounts but how do I remove it? It seems very happy on those 2 central mounts - do they just pull out? I didnt want to lever it just in case im missing something.
Secondly and im sure im being really dumb here but I cant seem to see the 17mm and 19mm fuel line connections that it mentions in the guide. I'm looking everywhere on the left hand side of the engine (standing looking from the back) and I just cant see them - am I missing something silly here?
Many thanks
08-04-2016, 12:29 PM
#49
Those braces just pull out. The only fuel connection you need to disconnect is a quick connect left of the left intake manfold. Top left of the engine bay. No tools needed unless the c4s is different than c2.
Couple of quick questions. I'm using the Pelican guide to make sure I dont miss anything and it seems pretty good but I have 2 queries. Firstly the diagonal braces underneath - I've undone the bolts at either end and the one visible nut on one of the 2 middle mounts but how do I remove it? It seems very happy on those 2 central mounts - do they just pull out? I didnt want to lever it just in case im missing something.
Secondly and im sure im being really dumb here but I cant seem to see the 17mm and 19mm fuel line connections that it mentions in the guide. I'm looking everywhere on the left hand side of the engine (standing looking from the back) and I just cant see them - am I missing something silly here?
Many thanks
Secondly and im sure im being really dumb here but I cant seem to see the 17mm and 19mm fuel line connections that it mentions in the guide. I'm looking everywhere on the left hand side of the engine (standing looking from the back) and I just cant see them - am I missing something silly here?
Many thanks
08-04-2016, 12:45 PM
#50
Intermediate
Thread Starter
Join Date: Jul 2016
Location: Hertfordshire
Posts: 34
Likes: 0
Received 0 Likes
on
0 Posts
Ahhhh - I thought the quick release version was for the 997. That makes more sense as I cant see how I could have missed these. I'll have a look tonight as I should get another hour or so on it.
08-04-2016, 10:07 PM
#51
I believe Porsche has now designated the 996 as a "Classic" meaning that prices at your OPC's are at a lower rate than for more modern models. I am not completely sure if that only applies to labor rates or also parts. It might be worth a general inquiry, I remember reading about it in Total911 or one of the other British Porsche rags a year or so ago.
08-05-2016, 03:57 AM
#52
Intermediate
Thread Starter
Join Date: Jul 2016
Location: Hertfordshire
Posts: 34
Likes: 0
Received 0 Likes
on
0 Posts
Almost ready to drop now. Gold star for Ahsai - fuel line was lovely and easy - different to the Pelican guide. Couple of gearbox bits to unbolt and the power steering hoses still and then I'm ready to lower on Sunday.
Will send the ARB and diagonal braces in for blasting and powdercoating I think along with some new droplinks whilst im at it.
Will send the ARB and diagonal braces in for blasting and powdercoating I think along with some new droplinks whilst im at it.
08-08-2016, 04:10 AM
#53
Intermediate
Thread Starter
Join Date: Jul 2016
Location: Hertfordshire
Posts: 34
Likes: 0
Received 0 Likes
on
0 Posts
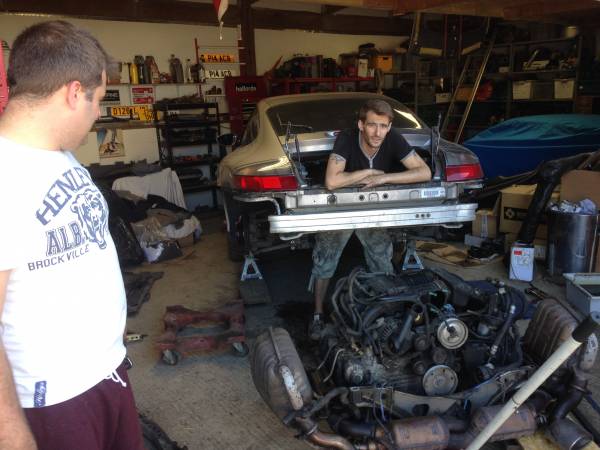
OK so a bit more progress - apologies but still no diagnosis of whats actually happened but I have now got the engine out of the car and thanks to all of the help on here it was pretty straight forward considering it wasnt done with a lift. Four stands, one trolley jack, one transmission jack and an engine hoist. This is me after finally getting it out.

 08-08-2016, 11:58 PM
#55
Rennlist Member
good luck finding replacement or rebuilding
Last edited by groovzilla; 08-11-2016 at 11:44 AM.
08-15-2016, 05:58 AM
#56
Intermediate
Thread Starter
Join Date: Jul 2016
Location: Hertfordshire
Posts: 34
Likes: 0
Received 0 Likes
on
0 Posts
Had a wedding at the weekend so only got an hour or so. I've pulled almost everything off the engine now and labelled it all up on some shelves so that it should be easy to put back together. Gearbox is also off and the clutch is pretty worn so definitely worth putting a new one on.
Looking down into the intake side of both heads, no sign of anything untoward on the valves so it doesnt look like there has been piston to valve contact but further investigation needed obviously.
Saturday I have most of the day so this will be when the heads finally get pulled off and we should have an answer.
08-15-2016, 10:18 AM
#57

I have seen a number of members from here very satisfied with the engine and price they got back from them.
sorry off topic.
08-18-2016, 04:22 AM
#58
Intermediate
Thread Starter
Join Date: Jul 2016
Location: Hertfordshire
Posts: 34
Likes: 0
Received 0 Likes
on
0 Posts
Right - I got another hour last night and pulled off the flywheel and the IMS cover and something doesnt look right here. The bearing itself spins fine and there is no sign of any fresh oil leaks however the bearing is not sitting evenly in the hole - its completely off centre which presumably means the IMS must have broken in order to shift like that?
Apologies the pics arent great but it wasnt easy to get a shot straight on. Let me know your thoughts.


Apologies the pics arent great but it wasnt easy to get a shot straight on. Let me know your thoughts.

 08-18-2016, 08:10 AM
#59
Former Vendor

Right - I got another hour last night and pulled off the flywheel and the IMS cover and something doesnt look right here. The bearing itself spins fine and there is no sign of any fresh oil leaks however the bearing is not sitting evenly in the hole - its completely off centre which presumably means the IMS must have broken in order to shift like that?
Apologies the pics arent great but it wasnt easy to get a shot straight on. Let me know your thoughts.
Apologies the pics arent great but it wasnt easy to get a shot straight on. Let me know your thoughts.
- lock the engine at TDC 1
- remove the IMS tensioner
- remove bank 1 tensioner
These 3 things are what should be done before even attempting to remove the IMS Bearing flange.
08-18-2016, 08:16 AM
#60